
Meetings Strategies
Qualified Meetings instantly books meetings with qualified buyers right on your website. Here are seven plays that will help you increase pipeline and accelerate the sales process.
- The ABM Target Account
- The 1-2 Punch for Sales
- The Ideal Customer Profile
- The In-Market Account
- The Deal Accelerator
- The Existing Customer Upsell
- The Unqualified Visitor
<span id="abm"></span>
The ABM Target Account
You already know that target accounts are high-quality pipeline, so let them book a meeting effortlessly. Offer a sales rep’s calendar when a target account arrives on your site after clicking through a paid ABM advertisement campaign.
How to Build the ABM Target Account
Harness Qualified for Advertising and Button Experiences to fast-track visitors from your targeted ABM ad campaigns.
1. Target & Track Paid Ads
Work with your demand gen manager to create a tailored ad campaign. There are different options to track your ads:
- Qualified can automatically track certain ads from Google Ads and LinkedIn.
- Manually add UTM parameters to Facebook ads and unsupported ads types in Google Ads or LinkedIn.
- Include URL parameters within ads for other platforms.
Target accounts with high Signals Engagement and Research data.
2. Configure Meeting Types & Meeting Routing
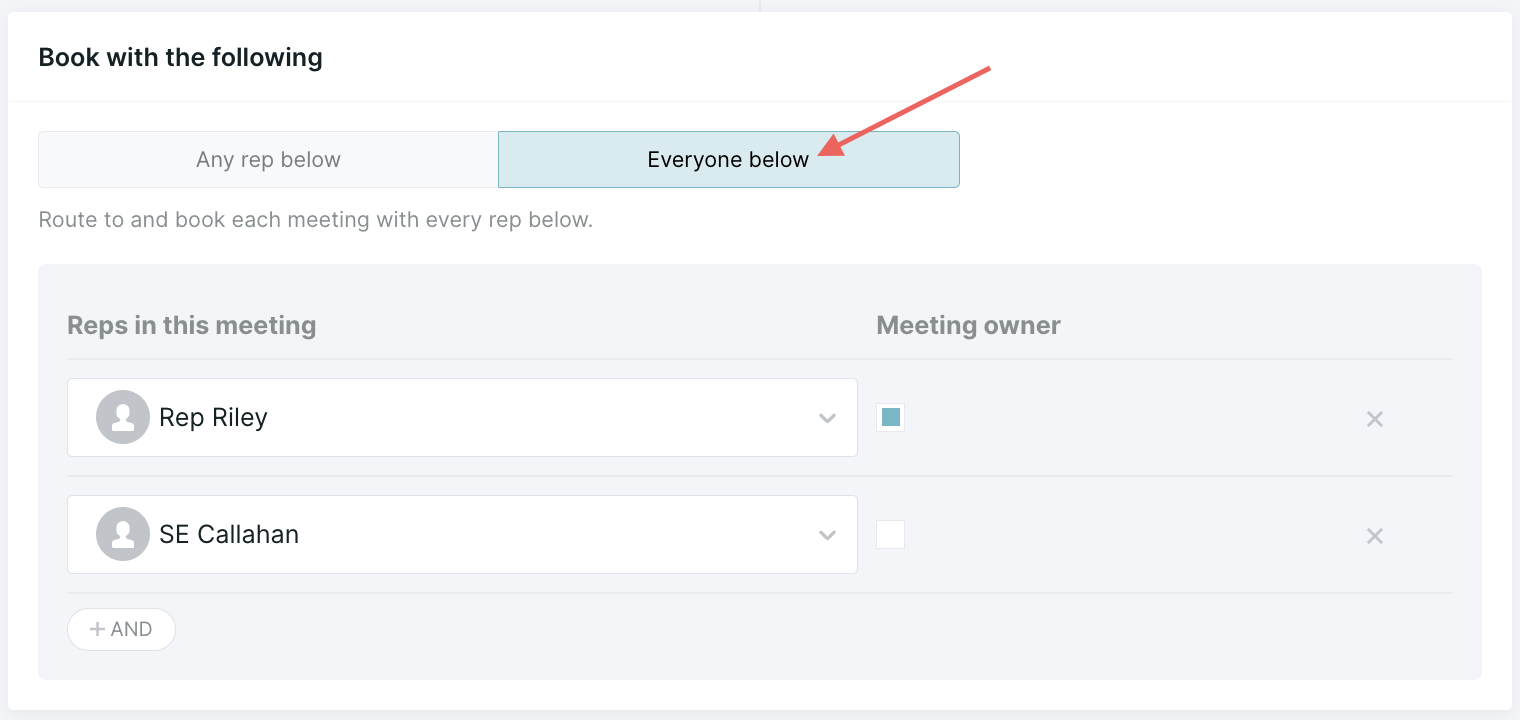
Create or verify that you have the appropriate meeting type and meeting routing for these target accounts. If your campaign focuses on accounts early in the sales process, for example, create a “Demo” meeting type with routing that includes your solutions engineer. Click Everyone below and add every rep who should attend:
3. Create a Button Experience
Next, create a new Button Experience. After selecting which button will trigger the Experience:
1. Insert a Branch action.
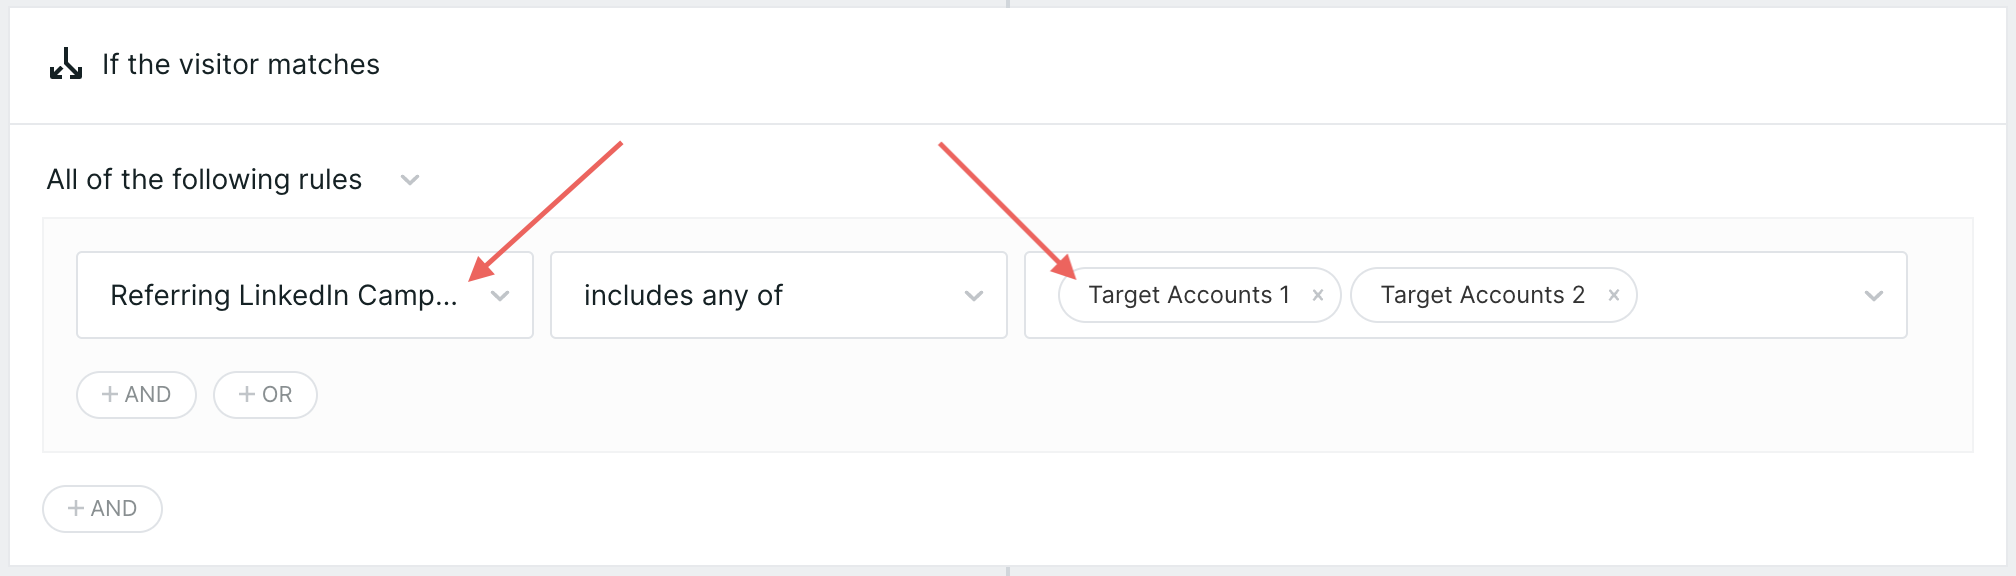
2. Build the branching based on clickthroughs from your ad campaign. For example, select Referring LinkedIn Campaign and includes any of. Choose the campaign(s) you want to include:
3. Below the Match branch:
- Insert an Offer a meeting (fullscreen) action.
- Click the Route for Meeting step and then click Select Meeting type from the right panel. Choose a relevant meeting type.
4. Below the No Match branch, add Start a conversation and Navigate steps to a different, relevant page on your site. (Stay tuned for new options later this spring.)
5. When you finish building your Experience, click Save in the top-right corner.
Use Case
A demand gen manager launched a new ABM campaign for their target accounts. Wanting to get the highest ROI on their ad spend, they ask Admin Anna to create a bespoke Experience for visitors that interact with the hyper-personalized ABM ad campaign.
A prospect is browsing LinkedIn when they see a personalized ad from TroveRobotics. They click on the advertisement and eventually their website’s Talk with Sales button. Immediately presented with an AE’s calendar, the prospect schedules a meeting with their specific rep and meeting type associated with them as a target account.
<span id="1-2-punch"></span>
The 1-2 Punch for Sales
Customize a visitor’s Experience based on what brought them to your website. When they click a link inside a personalized outbound email and arrive on your site, allow them to schedule a meeting with the same rep who reached out.
How to Build the 1-2 Punch for Sales
Seize the opportune moment when visitors are engaged on your site to book a sales meeting.
1. Track Outbound Emails
There are a few ways to track clickthroughs from outbound emails that can also be used to trigger Experiences:
- If your team uses Salesloft, connect it with Qualified. Then run a Salesloft cadence email step.
- If you instead use Outreach, connect with Qualified. Add prospects to a sequence or send a one-off email from Outreach. When you’re drafting the sequence or one-off email in Outreach, click Add Link for Qualified to alter and track the links within your email.
- Append UTMs to the links in your outbound email.
2. Configure Meeting Types & Meeting Routing
Create or verify that you have the appropriate meeting type and meeting routing for these accounts. When setting up the meeting type, edit the confirmation email to be relevant to your prospect. If your outbound campaign focuses on accounts in the cybersecurity industry, for example, include links to your organization’s own security policies in the confirmation email.
3. Create a Form or Button Experience
To build a Form Experience:
- Click Show this experience to visitors that fill out.
- From the right panel, pick which form to connect from Select form.
To build a Button Experience, first select which button will trigger the Experience.
Next, add the meetings scheduler for only your existing customers:
1. Insert a Branch action.
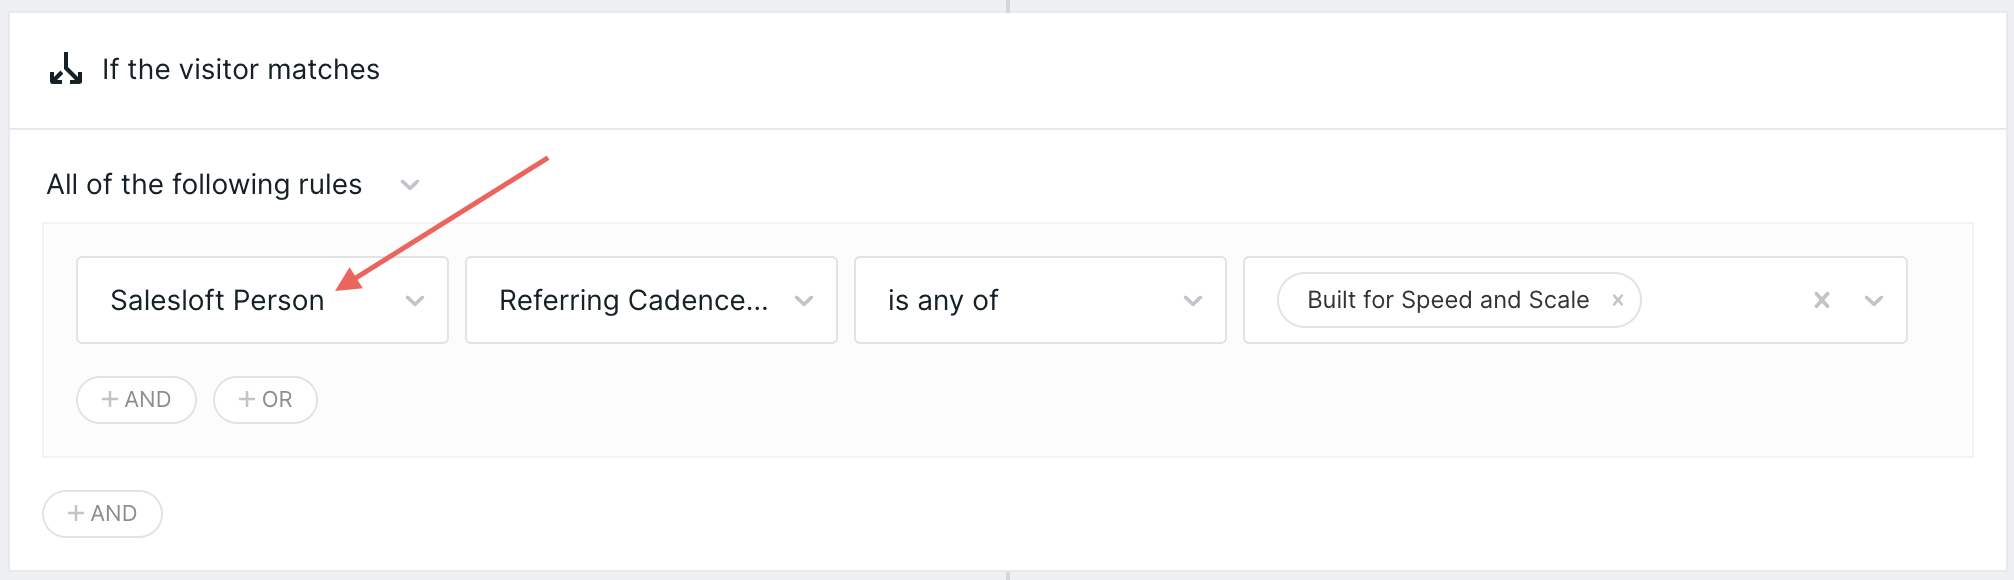
2. Build the branching based on clickthroughs from your outbound emails. For example, select Salesloft Person, Referring Cadence this session, and is any of. Choose the cadence(s) you want to include:
3. Below the Match branch:
- Insert an Offer a meeting (fullscreen) action.
- Click the Route for Meeting step and then click Select Meeting type from the right panel. Choose the new, relevant meeting type for this type of visitor.
4. Below the No Match branch:
- If this is a Form Experience, end the Experience or add a Start a conversation action to direct them to live chat with an available sales rep.
- If this is a Button Experience, add Start a conversation and Navigate steps to a different, relevant page on your site. (Stay tuned for new options later this spring.)
5. When you finish building your Experience, click Save in the top-right corner.
Use Case
The sales team at TroveRobotics wants to book more meetings, but only with compelling prospects. After narrowing down which business segment is their ideal customer, Rep Riley crafts and sends a new email campaign in Outreach.
Later that evening, the prospect reads the email and clicks a link to learn more. Shortly after they land on the TroveRobotics website, they click a Book a Demo button. The Button Experience is launched. Rather than asking the prospect to fill out a form or wait for live chat after business hours, they’re presented with the Qualified meeting scheduler. Immediately the prospect is able to book a meeting on Rep Riley’s calendar.
<span id="icp"></span>
The Ideal Customer Profile
Guide the right prospects to schedule meetings with your sales team to increase the quality of your pipeline and, in turn, shorten deal cycles. When a visitor completes a form on your site, dynamically offer a sales rep’s calendar to only the visitors in their ideal customer profile.
How to Build the Ideal Customer Profile
Build a Form Experience so your reps speak with the most promising visitors.
1. Connect Qualified to your Marketing Automation Platform
Form Experiences are triggered when a Marketo, Pardot, or HubSpot form is submitted. Once your form is built, verify that the MAP is connected with Qualified.
2. Configure Meeting Types & Meeting Routing
Create or verify that you have the right meeting types and meeting routing for these accounts. We recommend customizing meeting types for two similar types of visitors.
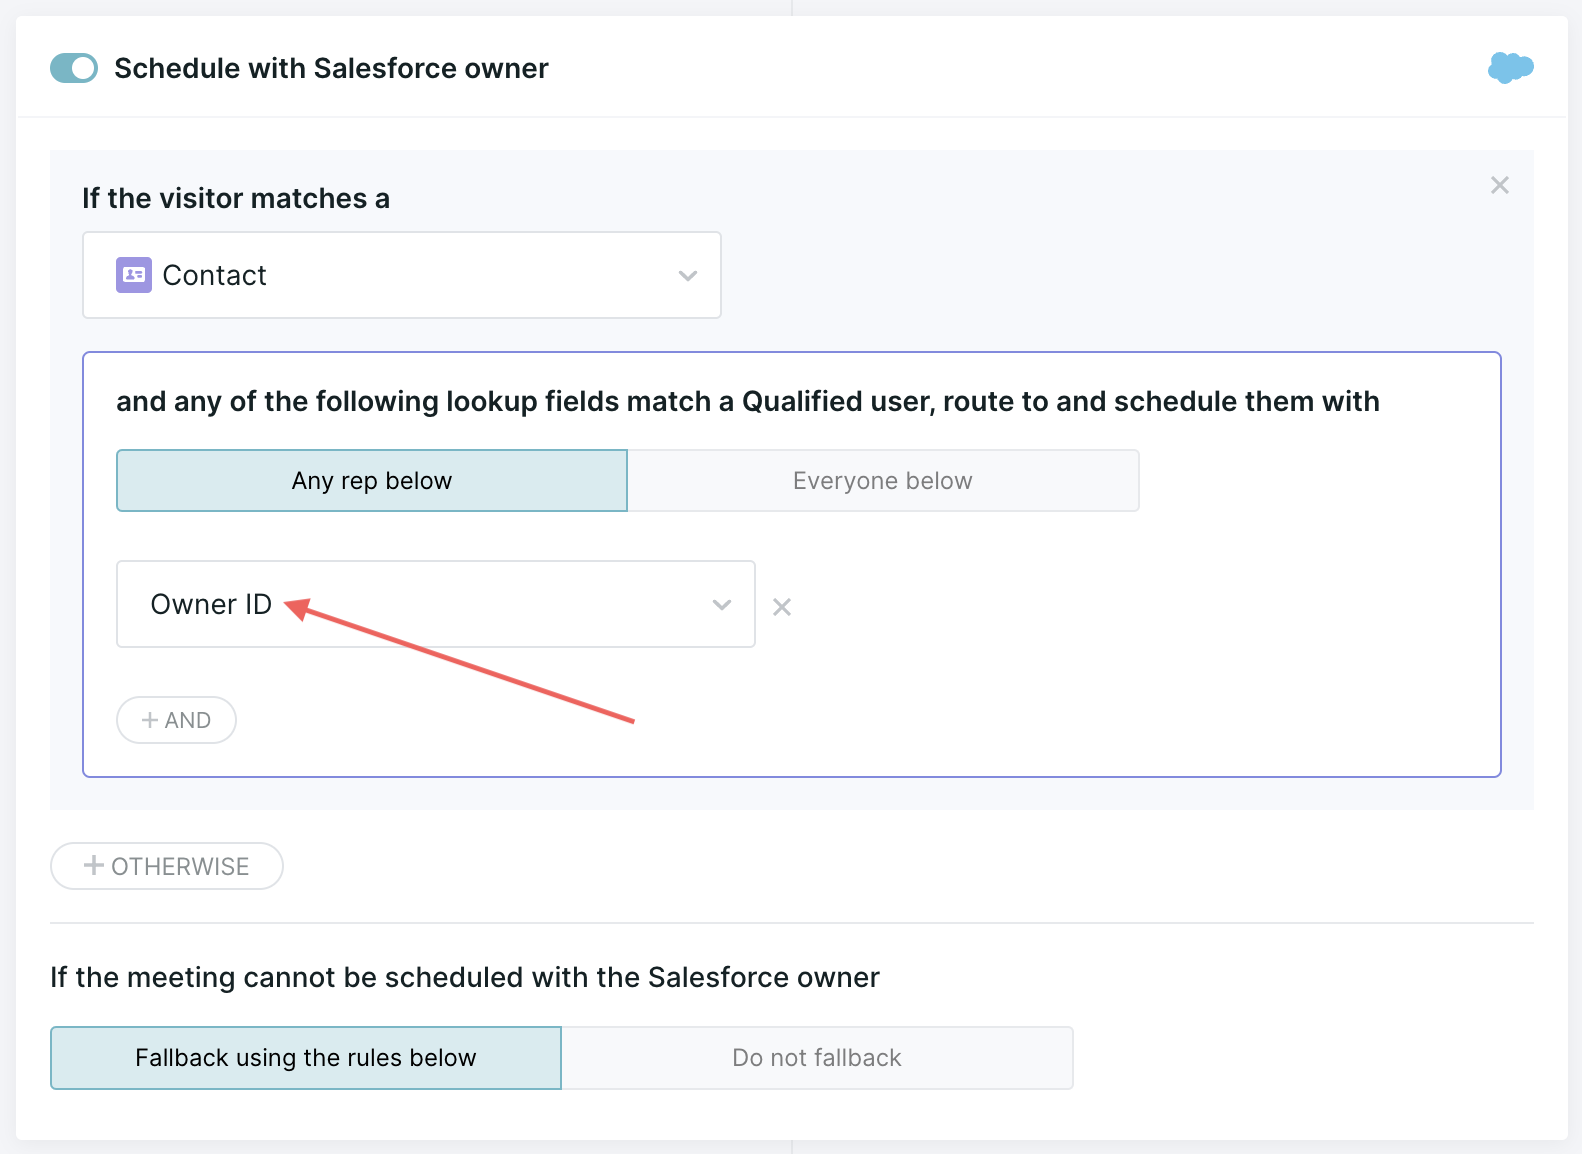
- Route visitors from target accounts to the Salesforce contact owner ID:
- Route visitors from accounts in your ICP to your BDR group:

3. Create a Form Experience
Next, design a new Form Experience:
1. Click Show this experience to visitors that fill out.
2.From the right panel, pick which form to connect from Select form.
3. Insert a Branch action and set the criteria to your Salesforce Target Accounts list.
4. Below the Match branch:
- Insert an Offer a meeting (fullscreen) action.
- Click the Route for Meeting step and then click Select Meeting type from the right panel. Choose the meeting type designed for your target accounts.
5. Below the No Match branch, insert another Branch action.
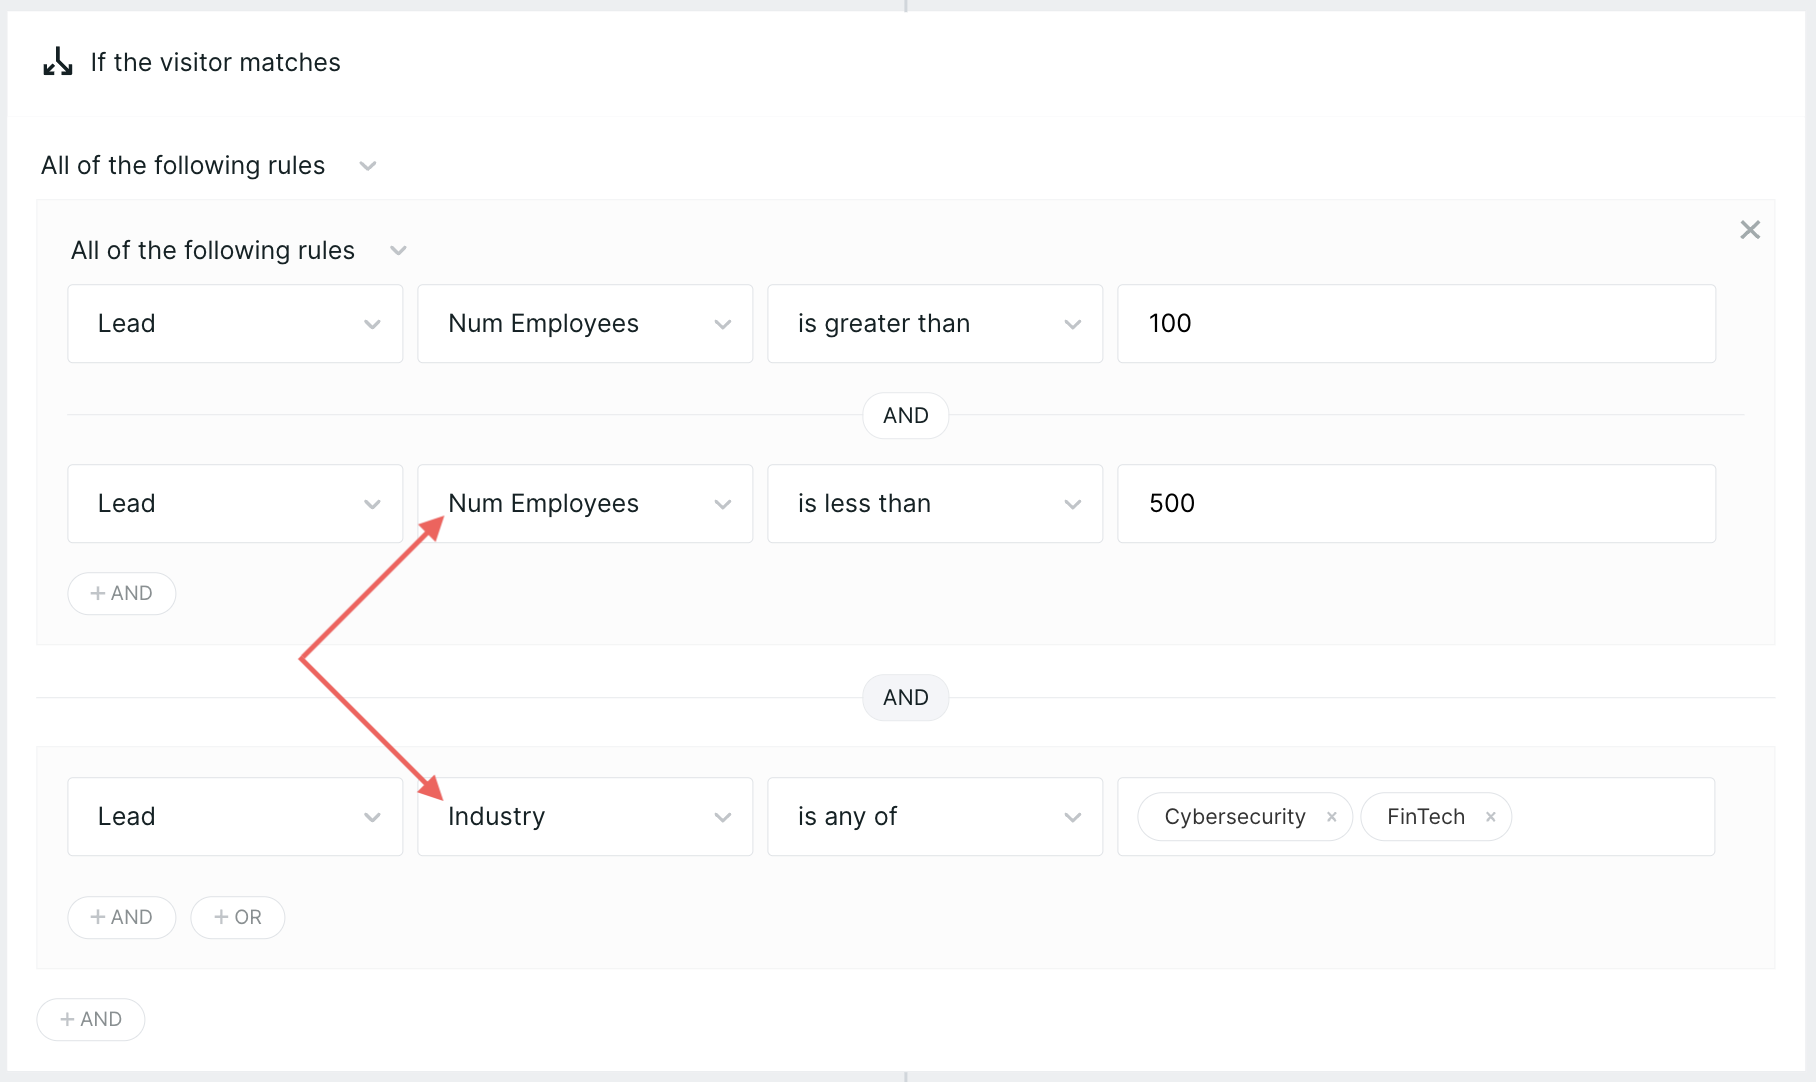
6. Within your second branch’s criteria, check the visitor’s form answers to learn if they’re in your ICP. If your form includes Number of Employees and Industry fields, for example, choose your MAP, like Marketo Lead, and then those form fields:
7. Below the Match branch:
- Insert an Offer a meeting (fullscreen) action.
- Click the Route for Meeting step and then click Select Meeting type from the right panel. Choose the meeting type designed for your target accounts.
8. Below the No Match branch, end the Experience or add a Start a conversation action to direct them to live chat with an available sales rep.
9. When you finish building your Experience, click Save in the top-right corner.
You can also reference fields from Clearbit, Salesforce, or your other marketing automation platforms to learn if they’re in your ICP.
Use Case
TroveRobotics is laser-focused on growing pipeline from their ideal customer profile (ICP). To make sure visitors in their ICP are given VIP treatment, Admin Anna creates a new Experience that checks submitted forms for fields that indicate an ICP account. When identified, visitors can immediately schedule a meeting without emailing back and forth.
After the Form Experience is created, every submission on their pricing page is reviewed for ICP criteria. A visitor happens to be in their ICP, so they’re offered Rep Raquel’s calendar right away. With minimal effort, they schedule a meeting and Rep Raquel starts researching her new high-priority account.
<span id="in-market"></span>
The In-Market Account
Prospects research options, like your competitors, early in the sales cycle. Harness the insight of Signals Research Intent to pinpoint which visitors are actively researching topics relevant to you and connect them with your sales team at the most optimal time in their buying journey.
How to Build the In-Market Account
First, configure a meeting types and meeting routing, tailored for accounts learning about the topics you selected for Signals Research Intent.
Next, create a new Button Experience. After selecting which button will trigger the Experience:
1. Insert a Branch action.
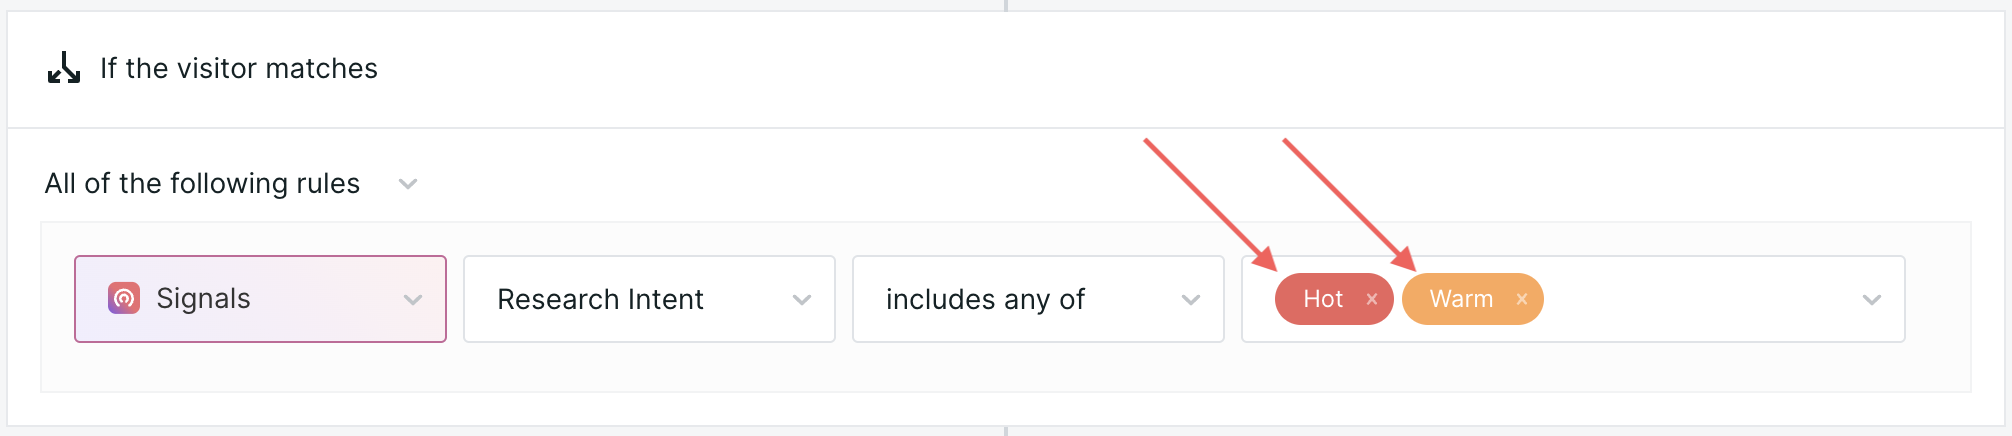
2. To specify what level of Signals Research Intent makes a visitor worth prioritizing:
- From the next drop-down menus, select Signals, Research Intent, and includes any of.
- Select Hot and Warm:
3. Below the Match branch:
- Insert an Offer a meeting (fullscreen) action.
- Click the Route for Meeting step and then click Select Meeting type from the right panel. Choose a relevant meeting type for this type of visitor.
4. Below the No Match branch, add Start a conversation and Navigate steps to a different, relevant page on your site. (Stay tuned for new options later this spring.)
5. When you finish building your Experience, click Save in the top-right corner.
Use Case
To uncover hidden pipeline, TroveRobotics starts focusing on accounts actively researching their industry and main competitor. Admin Anna builds a new Experience that allows those accounts to book meetings immediately, rather than wait in a queue.
When a visitor later clicks Book a Demo, Qualified knows that they’re from an account with high Research Intent. As such, the visitor is considered a high-priority prospect and can schedule a meeting without further delay.
<span id="deal-accelerator"></span>
The Deal Accelerator
With limited time, your Account Executives need to focus on the opportunities most likely to close. Enable visitors from open opportunities to schedule meetings with the same AE through the sales cycle.
How to Build the Deal Accelerator
Follow these steps to reconnect visitors with their assigned sales rep.
1. Configure Meeting Types & Meeting Routing
Create or verify that you have the appropriate meeting types and meeting routing for accounts with open opportunities. Set the meeting routing to display the prospect’s current AE’s calendar. Depending on your Salesforce set-up, you may route to the matched Salesforce contact’s Owner ID:
2. Build a Segment
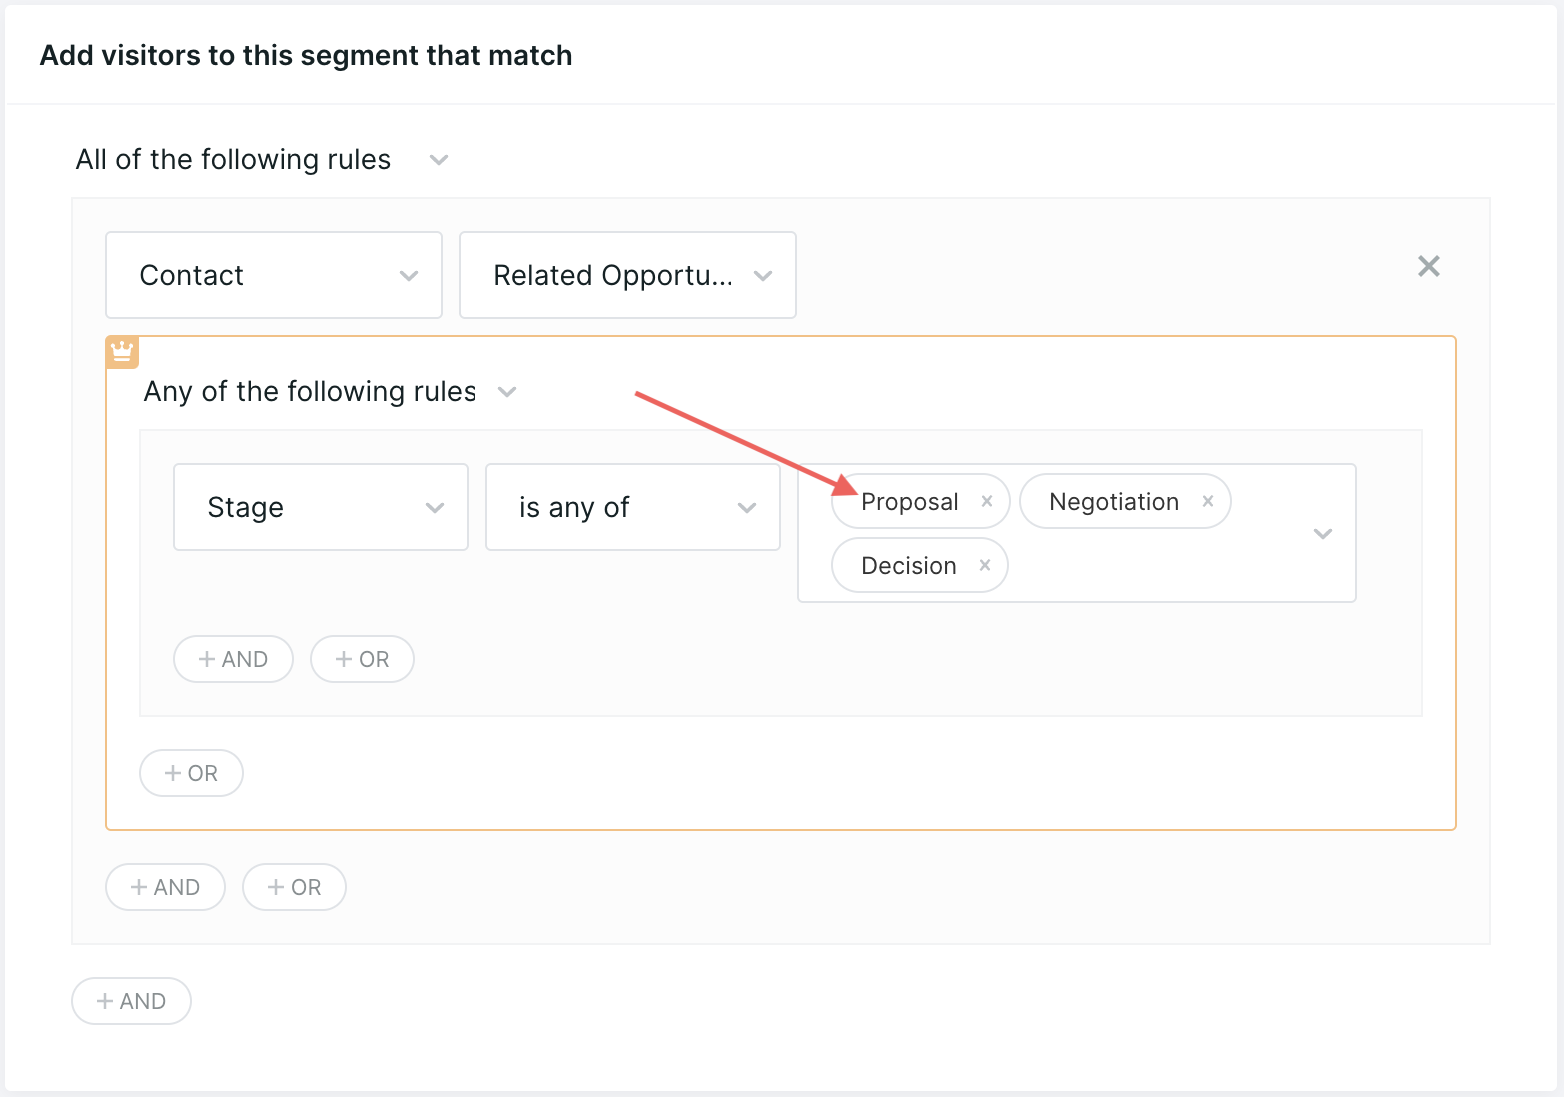
Create a new segment for open Salesforce opportunity stages, like Proposal, Negotiation, and Decision. Based on your Salesforce configuration, the segment may be designed like this:
- Select the Contact object and then Related Opportunity via Account.
- From the next drop-down menus, select Stage and is any of.
- Then choose all stages that represent open opportunities, such as Proposal, Negotiation, and Decision.
If you want to further focus who can book appointments, make the segment more specific. For example, include only accounts with high Signals Engagement Intent.
3. Create a Form or Button Experience
To build a Form Experience:
- Click Show this experience to visitors that fill out.
- From the right panel, pick which form to connect from Select form.
To build a Button Experience, first select which button will trigger the Experience.
Next, add the meetings scheduler for only your existing customers:
1. Insert a Branch action.
2. To set up the qualifying criteria, select Segments, include any of, and your new segment.
3. Below the Match branch:
- Insert an Offer a meeting (fullscreen) action.
- Click the Route for Meeting step and then click Select Meeting type from the right panel. Choose the new meeting type that routes to the visitor’s account manager.
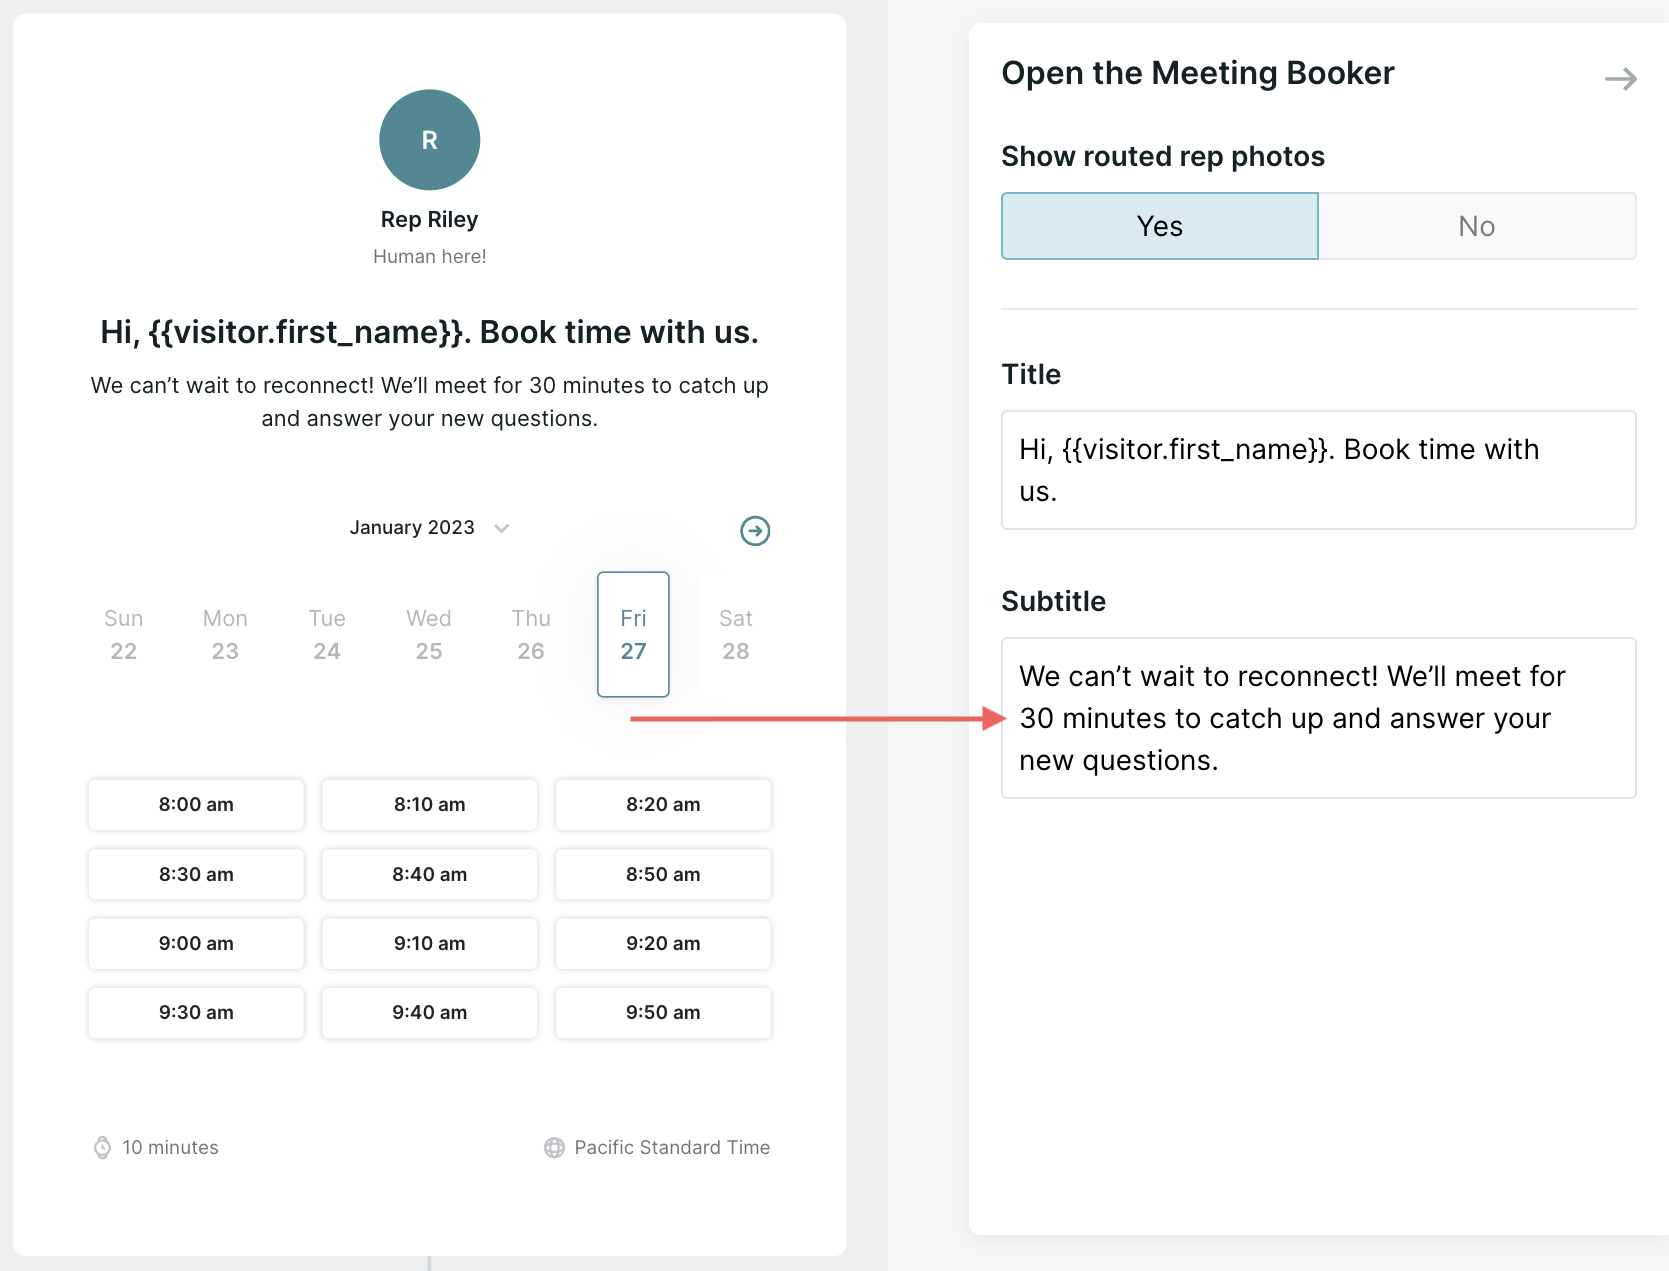
- (Optional) Edit the Subtitle in the meetings scheduler to inform the visitor that they’re booking with the same sales rep they’ve been working with:
4. Below the No Match branch:
- If this is a Form Experience, end the Experience or add a Start a conversation action to direct them to live chat with an available sales rep.
- If this is a Button Experience, add Start a conversation and Navigate steps to a different, relevant page on your site. (Stay tuned for new options later this spring.)
5. When you finish building your Experience, click Save in the top-right corner.
Use Case
The sales managers at TroveRobotics understand that deals are more likely to close when the same AE manages the deal from start to finish. Knowing that website visitors related to open opportunities should receive a personalized Experience, Admin Anna builds a new Qualified segment for open Salesforce opportunities and a Button Experience unique to that segment.
When a contact from an opportunity in the Negotiation stage lands on their website, they click Talk to Sales. Rather than filling out yet another form, the known prospect schedules a follow-up meeting with their established AE.
<span id="existing-customer"></span>
The Existing Customer Upsell
Grow pipeline by tapping into your current customers. When your clients explore specific pages on your site, like new product offerings or pricing, invite them to a meeting with their trusted account manager.
How to Build the Existing Customer Upsell
Follow these steps to identify which accounts are most likely to increase spend.
1. Configure Meeting Types & Meeting Routing
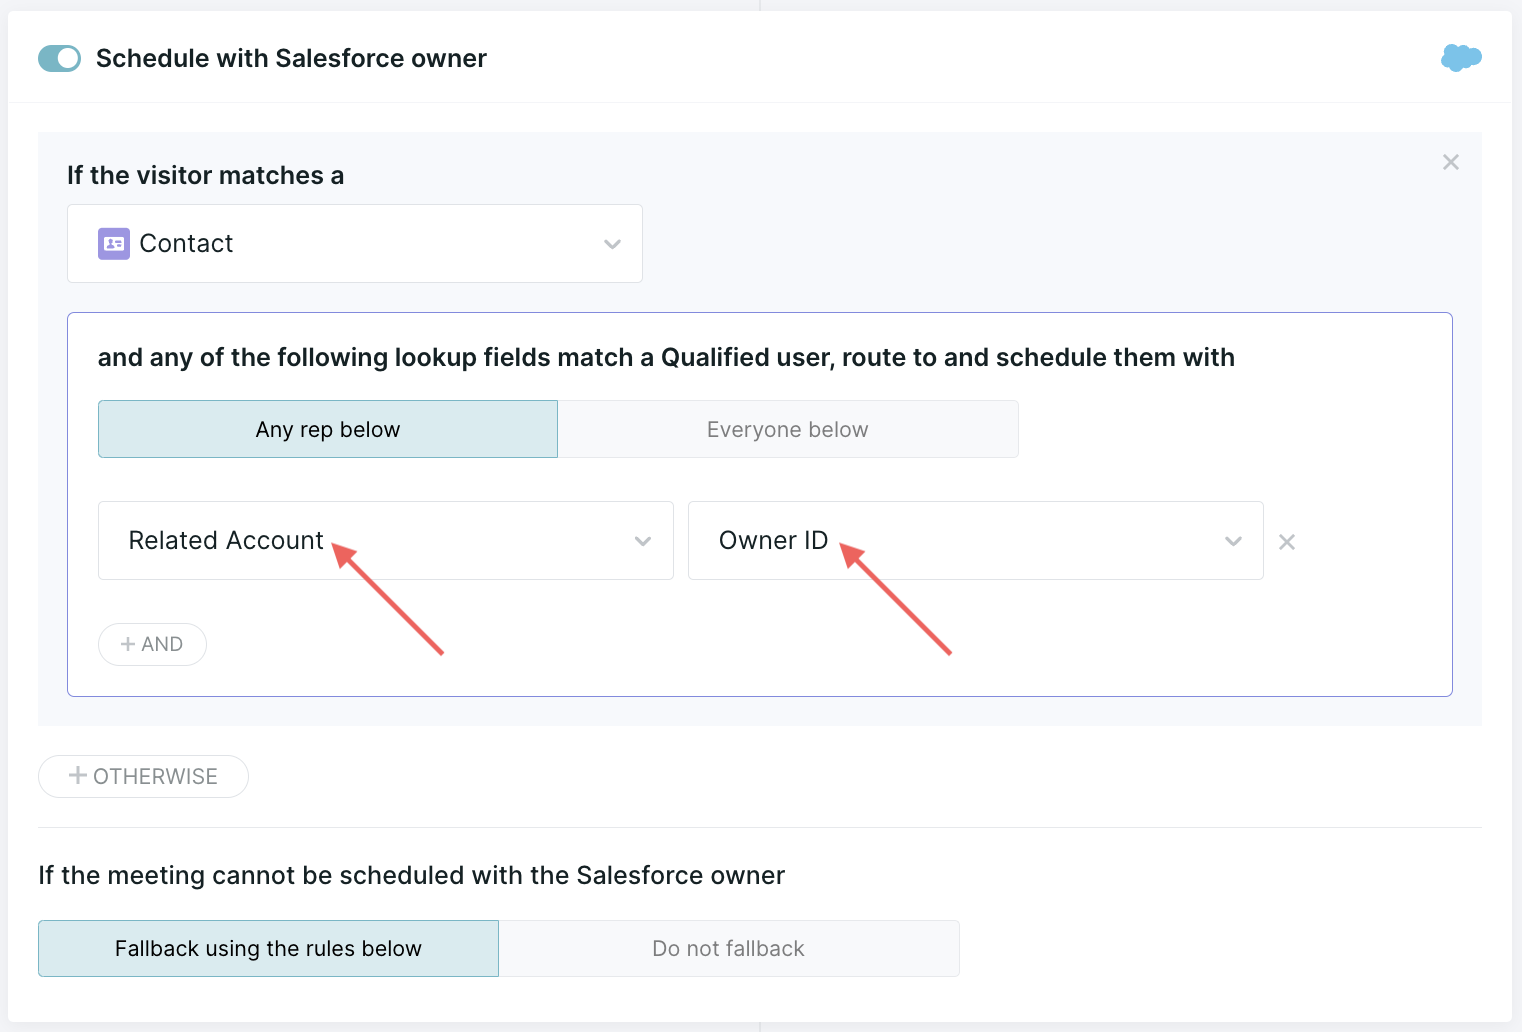
Create or verify that you have the appropriatemeeting types and meeting routing for your current customers. Set the meeting routing to display their account manager’s calendar.
Depending on your Salesforce set-up, you may route to the matched Salesforce Contact. Then, select Related Account and Owner ID from the next drop-down menus:
2. Build a Segment
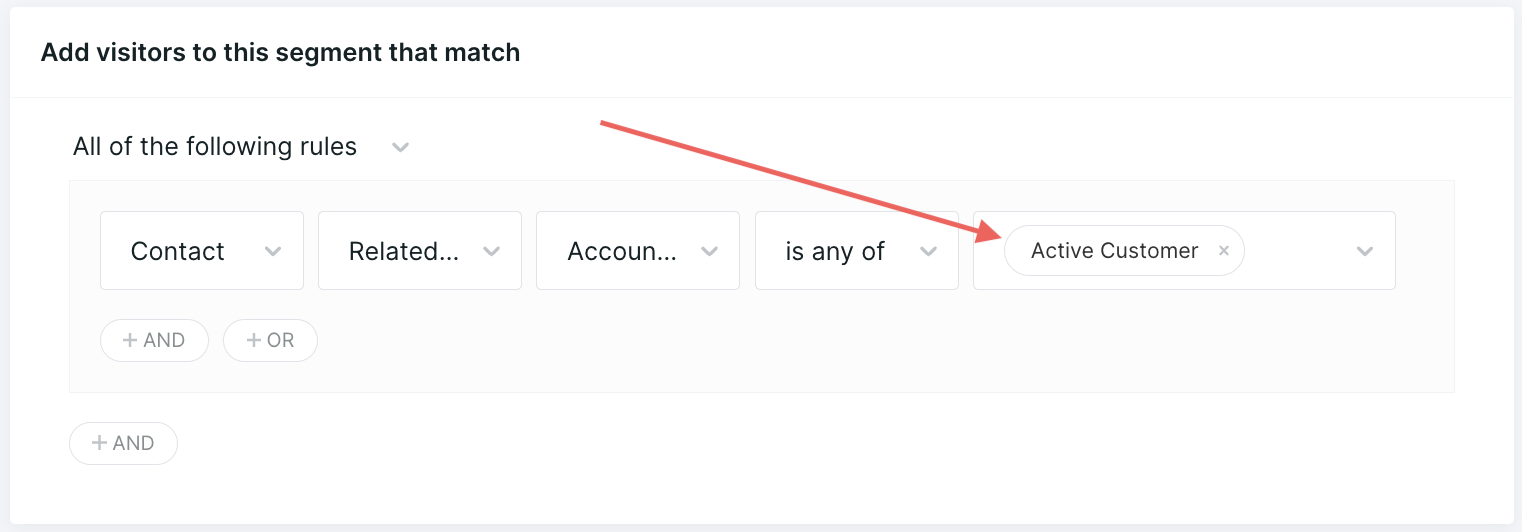
Create a new segment for your existing customers. Depending on your Salesforce configuration, the segment may be designed like this:
- Select the Contact object and then Related Account.
- From the next drop-down menus, select Account Type and is any of.
- Then choose all stages that represent your current customers, such as Active Customer:
3. Create a Form or Button Experience
To build a Form Experience:
- Click Show this experience to visitors that fill out.
- From the right panel, pick which form to connect from Select form.
To build a Button Experience, first select which button will trigger the Experience.
Next, add the meetings scheduler for only your existing customers:
1. Insert a Branch action.
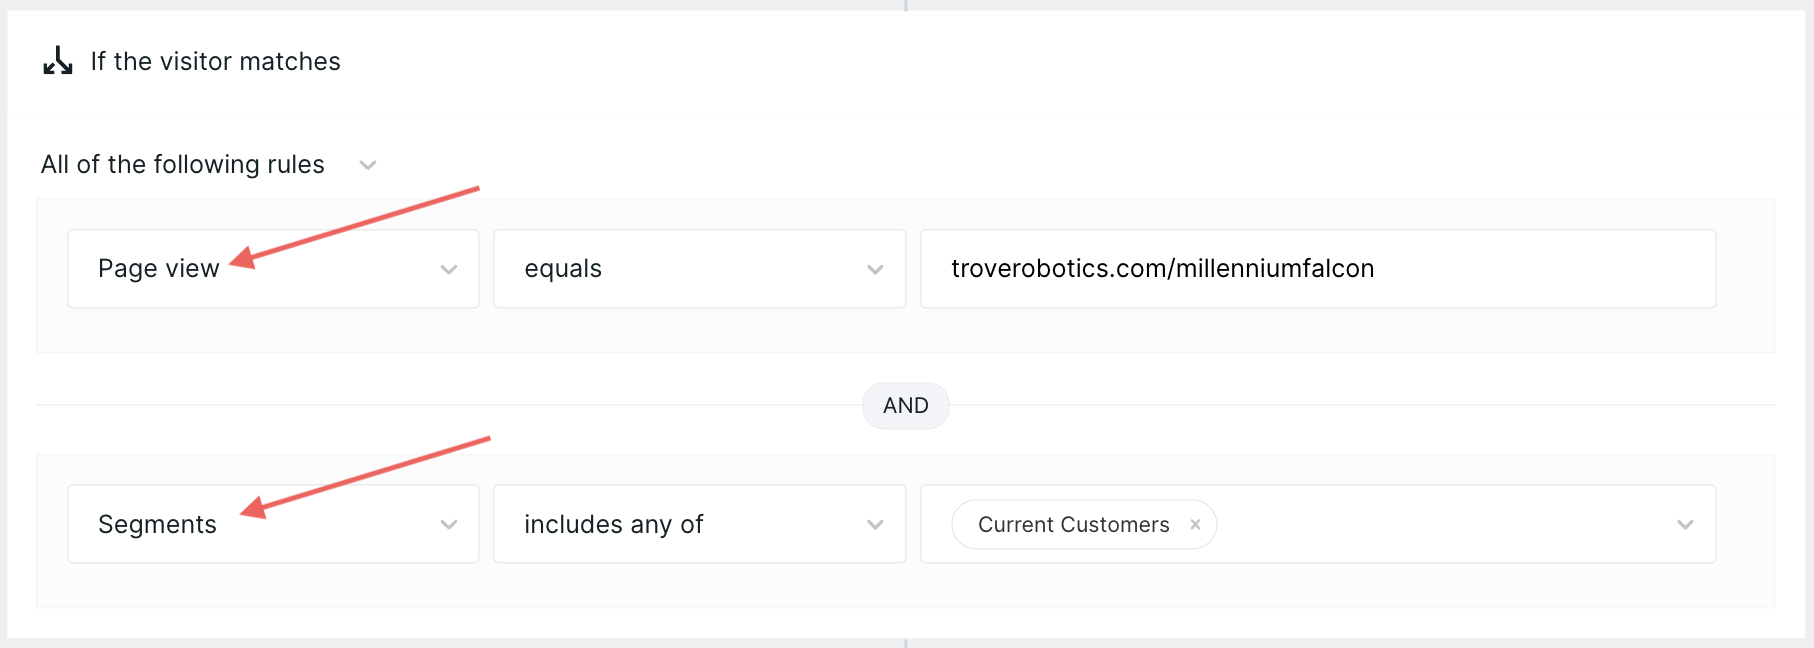
2. To set up the qualifying criteria:
- From the next drop-down menus, select Page View and equals. Enter links to your cross-sell products or services.
- Within your second branch’s criteria, select Segments, include any of, and your new segment:
3. Below the Match branch:
- Insert an Offer a meeting (fullscreen) action.
- Click the Route for Meeting step and then click Select Meeting type from the right panel. Choose the new meeting type that routes to the visitor’s account manager.
4. Below the No Match branch:
- If this is a Form Experience, end the Experience or add a Start a conversation action to direct them to live chat with an available sales rep.
- If this is a Button Experience, add Start a conversation and Navigate steps to a different, relevant page on your site. (Stay tuned for new options later this spring.)
5. When you finish building your Experience, click Save in the top-right corner.
Use Case
Focused on growing renewal deals, Admin Anna builds a new Qualified segment for their existing paid customers and a Button Experience that’s only offered to the new segment.
One of Rep Raquel’s accounts visits TroveRobotics’ website. They reach the newest product’s page and click the Book a Demo button. When the meeting scheduler appears, the visitor books a meeting with their account manager, rather than someone new who lacks their unique context on the account.
<span id="unqualified"></span>
The Unqualified Visitor
Protect your sales reps’ time by preventing unwanted meetings. Only offer the Qualified meeting scheduler to identified visitors that haven’t already been disqualified.
How to Build the Unqualified Visitor
Better support your sales reps by deprioritizing anonymous visitors and disqualified leads.
1. Connect Qualified to your Marketing Automation Platform
Form Experiences are triggered when a Marketo, Pardot, or HubSpot form is submitted. Once your form is built, verify that the MAP is connected with Qualified.
2. Build Segments
Create two new segments for lower-priority visitors. Your configurations may vary depending on your Salesforce setup.
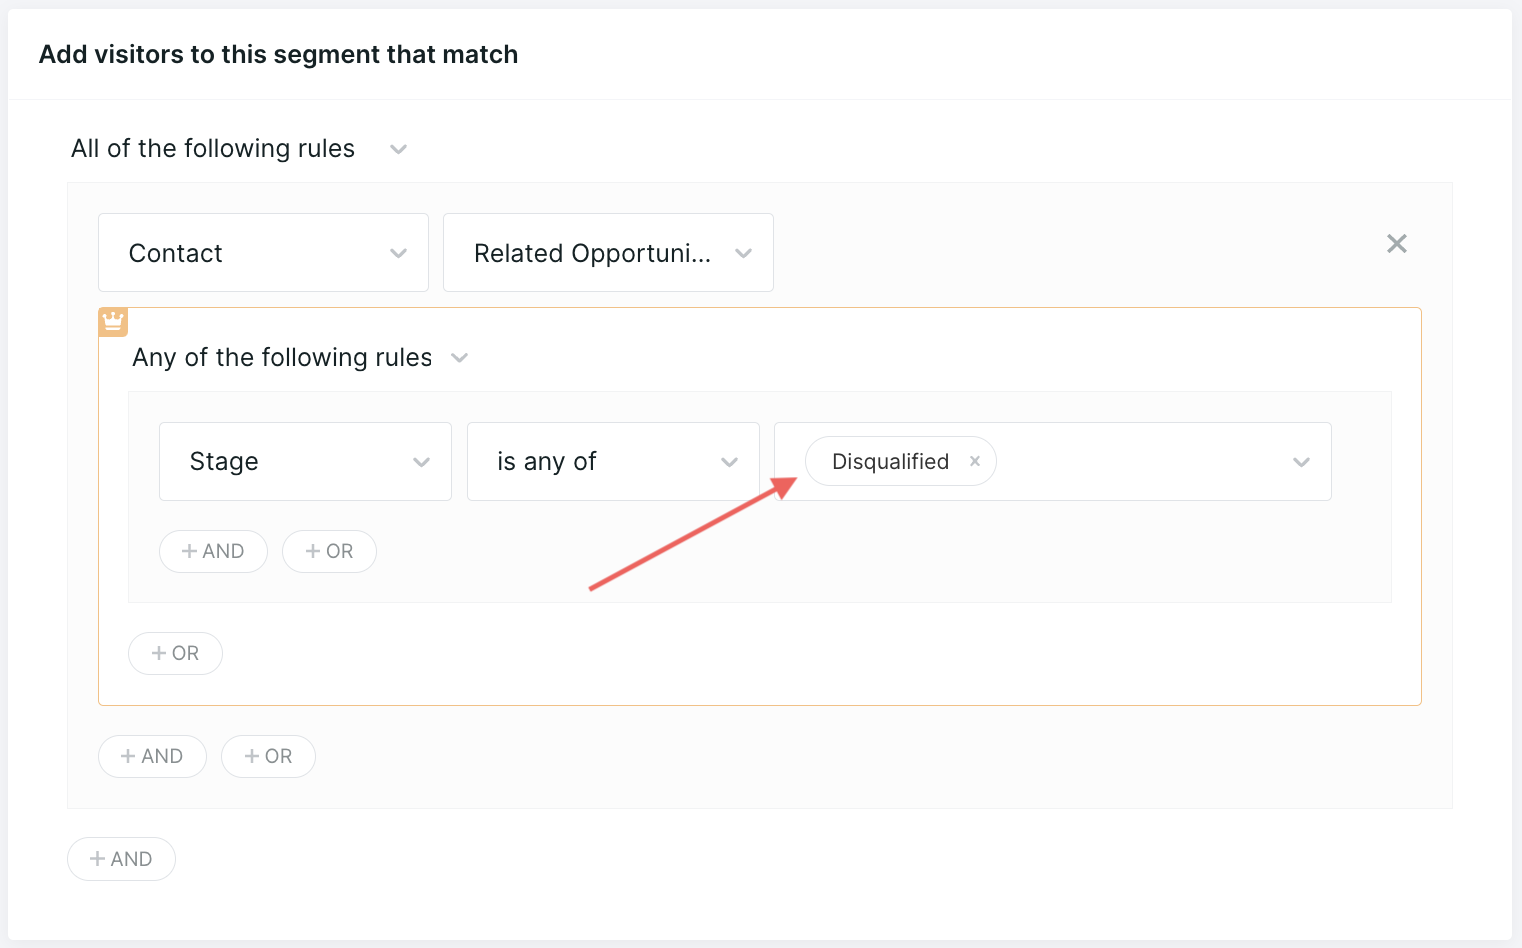
To build a segment with visitors connected to previously disqualified opportunities:
- Select the Contact object and then Related Opportunity via Account.
- From the next drop-down menus, select Stage and is any of.
- Then choose all stages that represent disqualified opportunities:
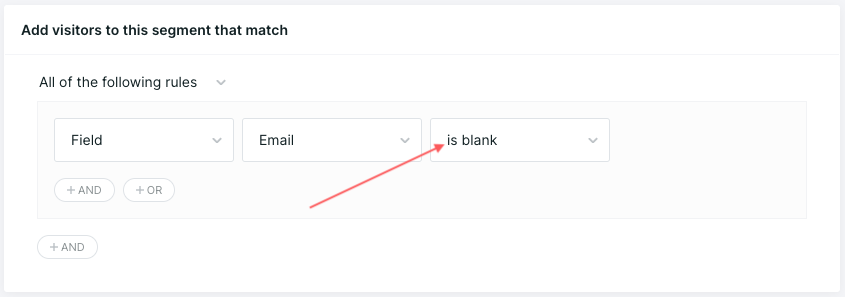
To assemble a second segment with anonymous visitors, select Field, Email, and is blank:
3. Create a Form Experience
Next, create a new Form Experience:
1. Click Show this experience to visitors that fill out.
2. From the right panel, pick which form to connect from Select form.
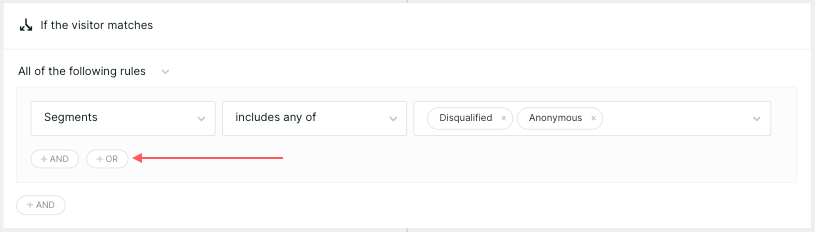
3. Insert a Branch action and set the criteria to your new Disqualified and Anonymous segments.
4. Click + OR:
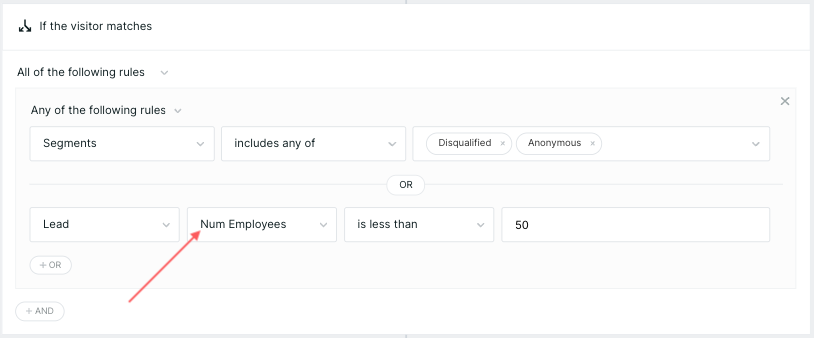
5. Check the visitor’s form answers to learn if they’re disqualified. If your form includes a Number of Employees field, for example, choose your MAP, like Marketo Lead, and then that form field:
6. Below the Match branch, end the Experience or add a Start a conversation action to direct them to live chat with an available sales rep.
7. Below the No Match branch:
- Insert an Offer a meeting (fullscreen) action.
- Click the Route for Meeting step and then click Select Meeting type from the right panel. Choose a relevant meeting type.
8. When you finish building your Experience, click Save in the top-right corner.
Use Case
Looking to optimize their reps’ calendars, sales managers want to avoid meetings with unqualified buyers. Admin Anna creates an Experience that displays the Qualified meetings scheduler to only recognized visitors in the sales funnel.
When a disqualified lead arrives on TroveRobotics’ website, they can’t immediately book a meeting. Instead, the visitor fills out a form to request a sales meeting. Their request is handled at a lower priority, helping sales reps and AEs better manage their time.
Heading 1
Heading 2
Heading 3
Heading 4
Heading 5
Heading 6
Lorem ipsum dolor sit amet, consectetur adipiscing elit, sed do eiusmod tempor incididunt ut labore et dolore magna aliqua. Ut enim ad minim veniam, quis nostrud exercitation ullamco laboris nisi ut aliquip ex ea commodo consequat. Duis aute irure dolor in reprehenderit in voluptate velit esse cillum dolore eu fugiat nulla pariatur.
Lorem ipsum dolor sit amet, consectetur adipiscing elit, sed do eiusmod tempor incididunt ut labore et dolore magna aliqua. Ut enim ad minim veniam, quis nostrud exercitation ullamco laboris nisi ut aliquip ex ea commodo consequat. Duis aute irure dolor in reprehenderit in voluptate velit esse cillum dolore eu fugiat nulla pariatur.
Lorem ipsum dolor sit amet, consectetur adipiscing elit, sed do eiusmod tempor incididunt ut labore et dolore magna aliqua. Ut enim ad minim veniam, quis nostrud exercitation ullamco laboris nisi ut aliquip ex ea commodo consequat. Duis aute irure dolor in reprehenderit in voluptate velit esse cillum dolore eu fugiat nulla pariatur.

Block quote
Ordered list
- Item 1
- asdfasdf
- asdfasdf
- asdfasdf
- Item 2
- Item 3
Unordered list
- Item A
- Item B
- Item C
Bold text
Emphasis
Superscript
Subscript
|
|---|
|


.svg)


