
Building Smart Form Experiences
Smart Form Experiences are a way to give a direct path to sales rep calendars. Buyers can avoid inconvenient scheduling cycles and sales reps can focus on what matters: preparing for productive meetings with worthwhile buyers. Qualified Smart Form Experiences can trigger on Pardot, Marketo and Hubspot forms natively, as well as custom forms
- Creating New Form Experience
- Form Experience Builder Actions
- Syncing Smart Form Experiences
- Custom Forms
- Test your Form Experience
<span id="new-form-experiences"></span>
Creating New Form Experiences
First, determine which form(s) on your website you want to trigger an experience when a visitor submits it. This can be a Marketing Automation Platform (MAP) form or a Custom Form.
Before you build the experience, ensure that the correct visitor fields are mapped from your form.
To create a new Form Experience as a Qualified Admin:
1. Go to Settings → Experiences → Forms.
If you don't have Form Experiences in Settings, reach out to your Qualified Success Architect for more information.
2. Click the + Create form experience button at the top.
3. Add a descriptive name in the Name this experience… field.
4. Click the Save Experience button in the top right corner.
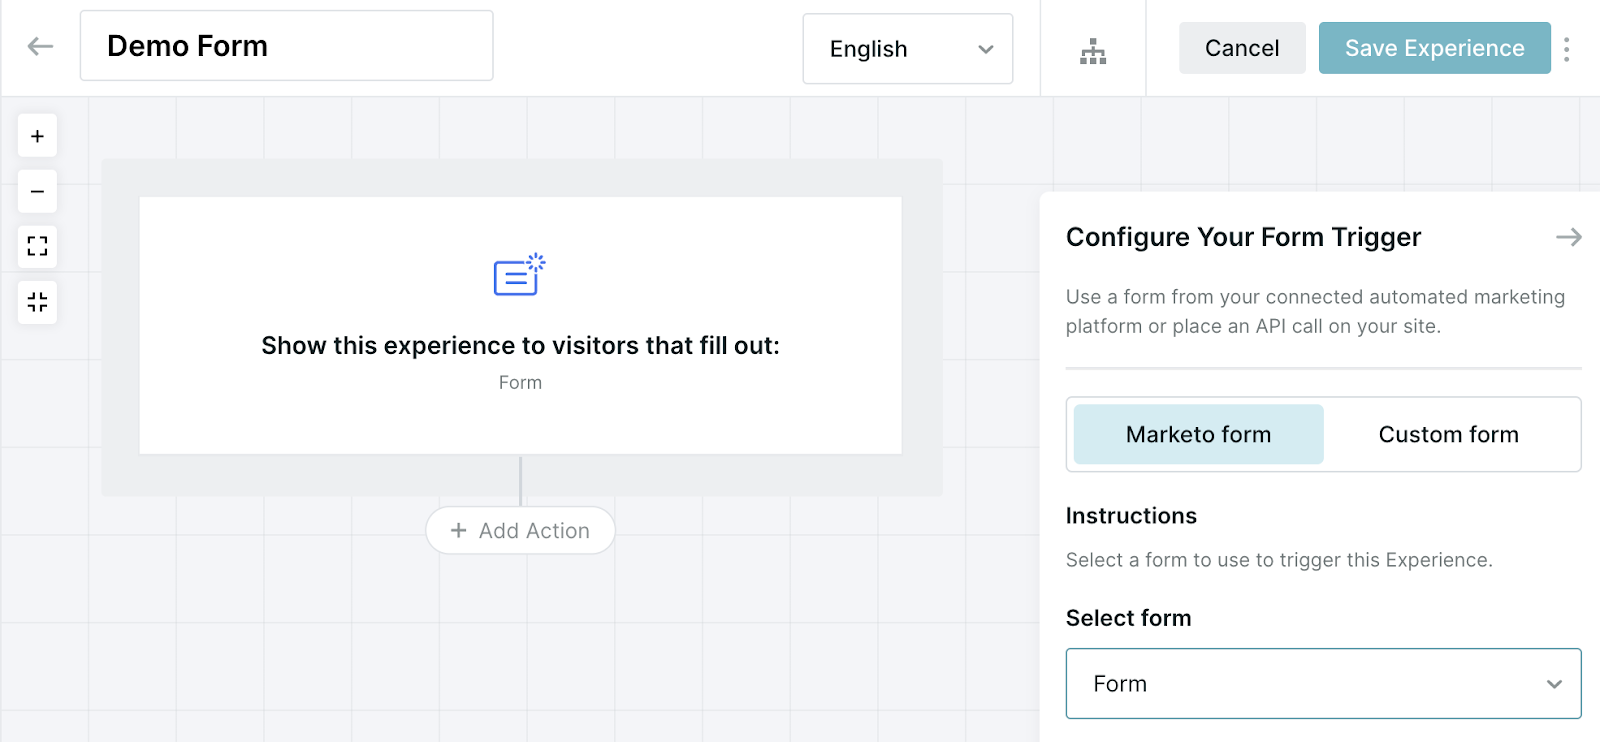
5. Click the Show this Experience to visitor that fill out: node at the top of the experience to configure the form.
6. You can directly select an existing Marketo/Pardot/Hubspot Form or, if your form is hosted through another form provider, including Eloqua, use a Custom Form.
7. If you select an MAP form, define your lead configuration:
- Don't wait for MAP lead creation - recommended and fastest option! With this selected, any visitor field mapped to a form field (as visually identified in the Form fields section) will be filled upon form submission and can be used immediately within Qualified.
- For orgs using Custom Forms, this is the expected behavior.
- Wait for MAP lead creation - With this selected, Qualified will wait up to 3 seconds for prospect creation before continuing. You may want to use this option when routing or qualifying based on information not included in the form
- Also wait for Salesforce lead creation - Wait for Salesforce to create a lead. Use this when routing based on information only available in Salesforce.
8. Build your Form Experience - Once the form is submitted, the experience will flow through the actions defined within that experience. Form experiences can branch to qualify specific users, offer meeting times, push to connected systems, and much more.
<span id="form-builder-actions"></span>
Form Experience Builder Actions
Start visitor engagement
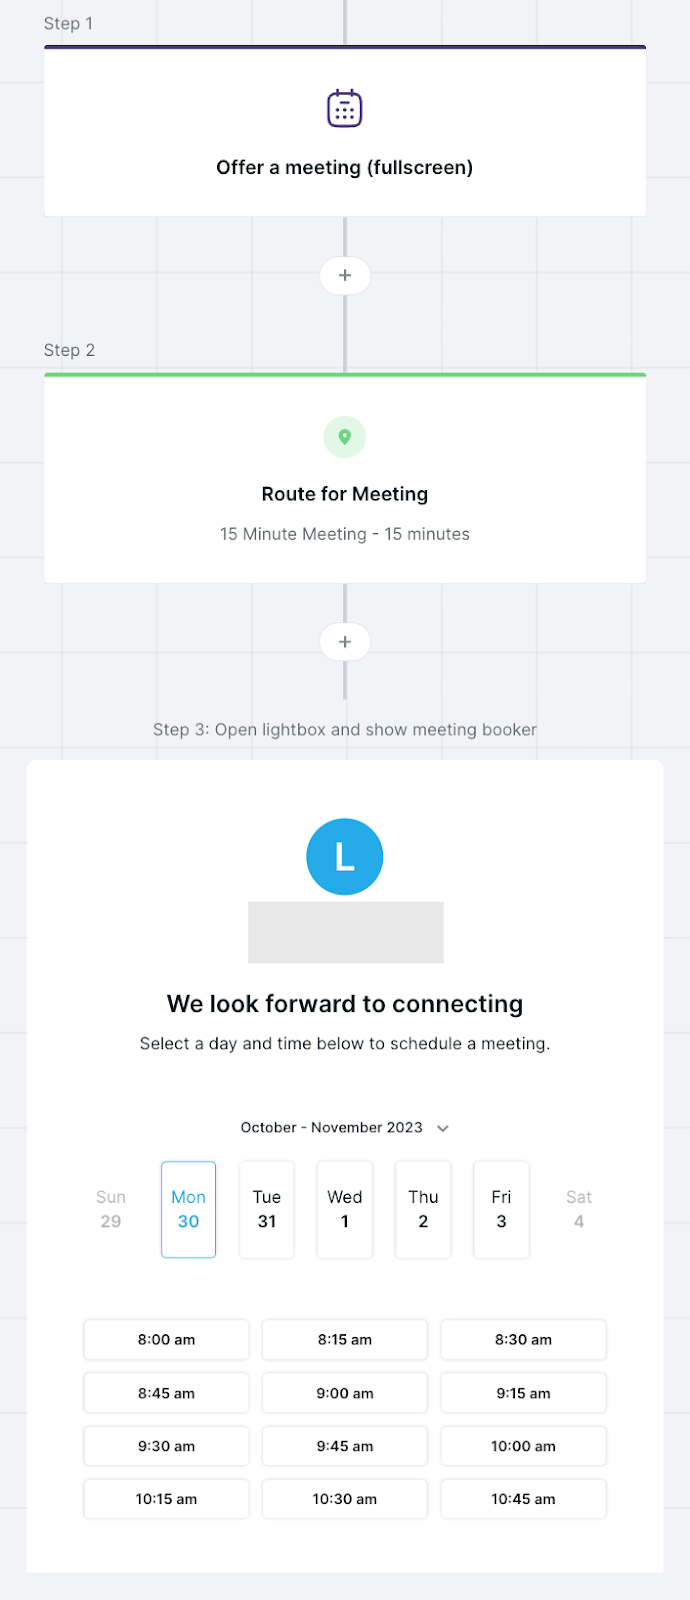
Offer a Meeting
Prompt visitors to schedule a meeting using the full-screen meeting booker on your site after submitting a form. You have the flexibility to collect their email and route the meeting request to a specific representative based on their identity. Alternatively, you can utilize general routing rules to ensure efficient scheduling.
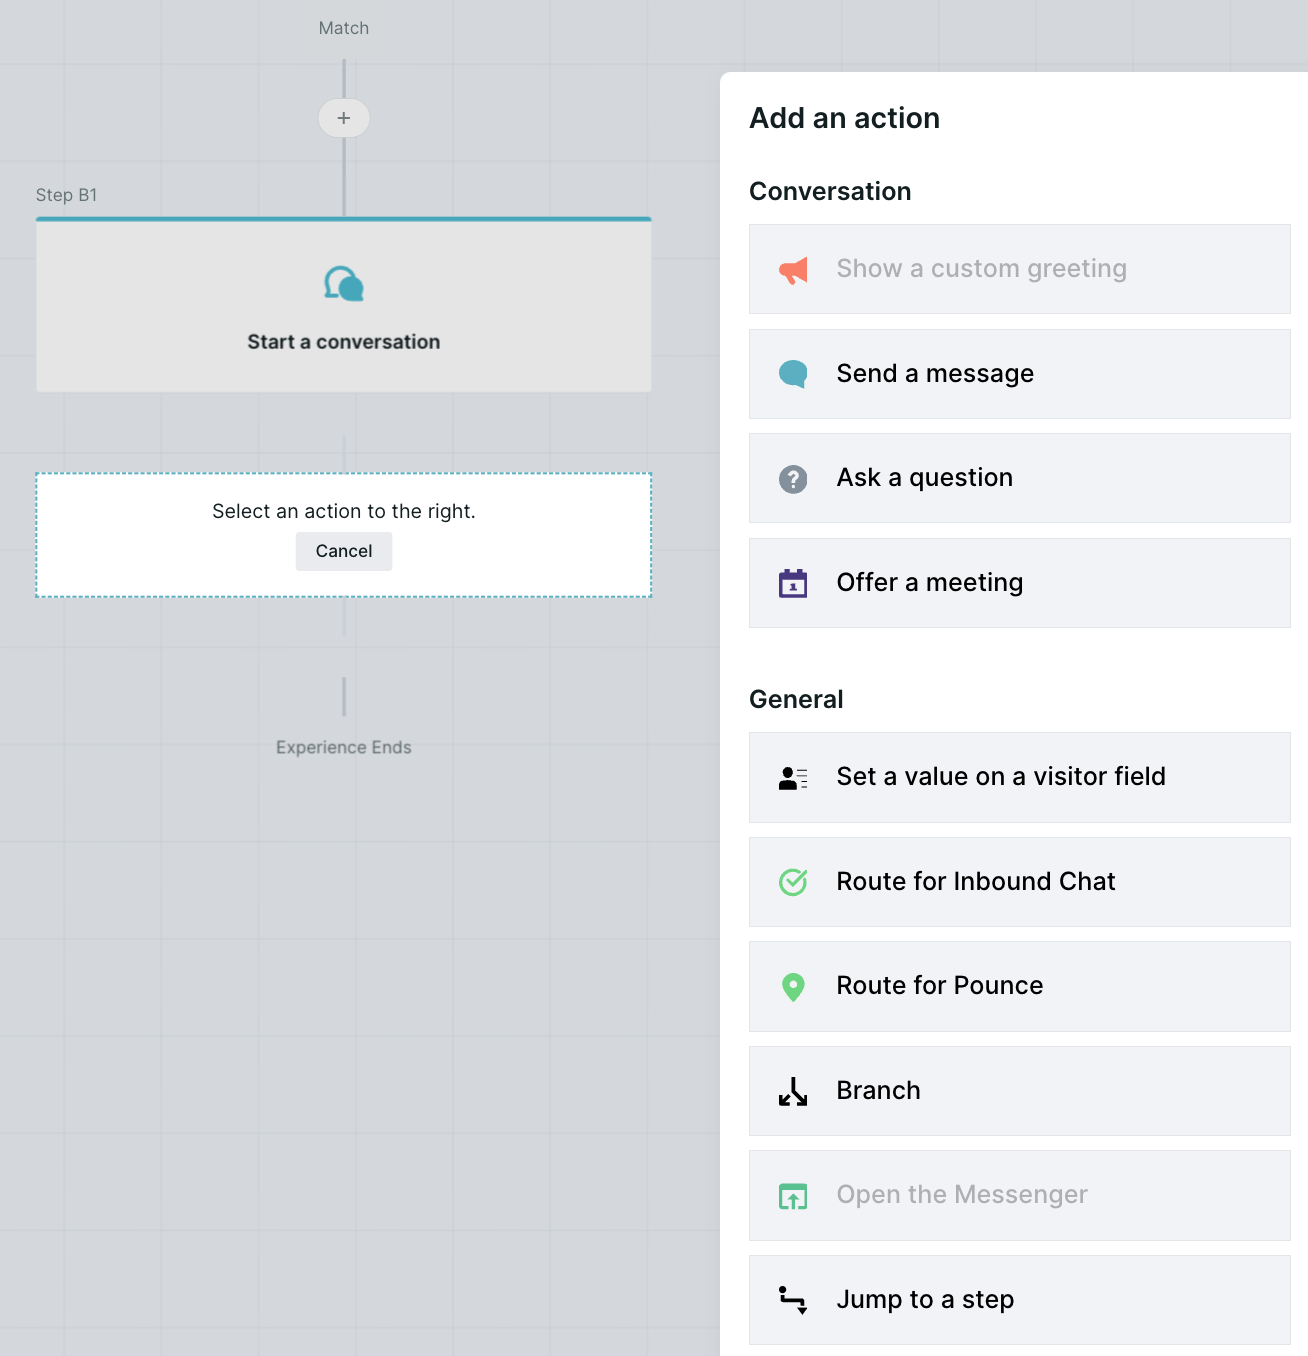
Start a Conversation
Empower your sales representatives to initiate a conversation within a smart form experience, particularly when interacting with VIP visitors. By selecting the "Start a Conversation" option, you can leverage the available experience step options to create a personalized touch, fostering stronger connections and building trust.
General
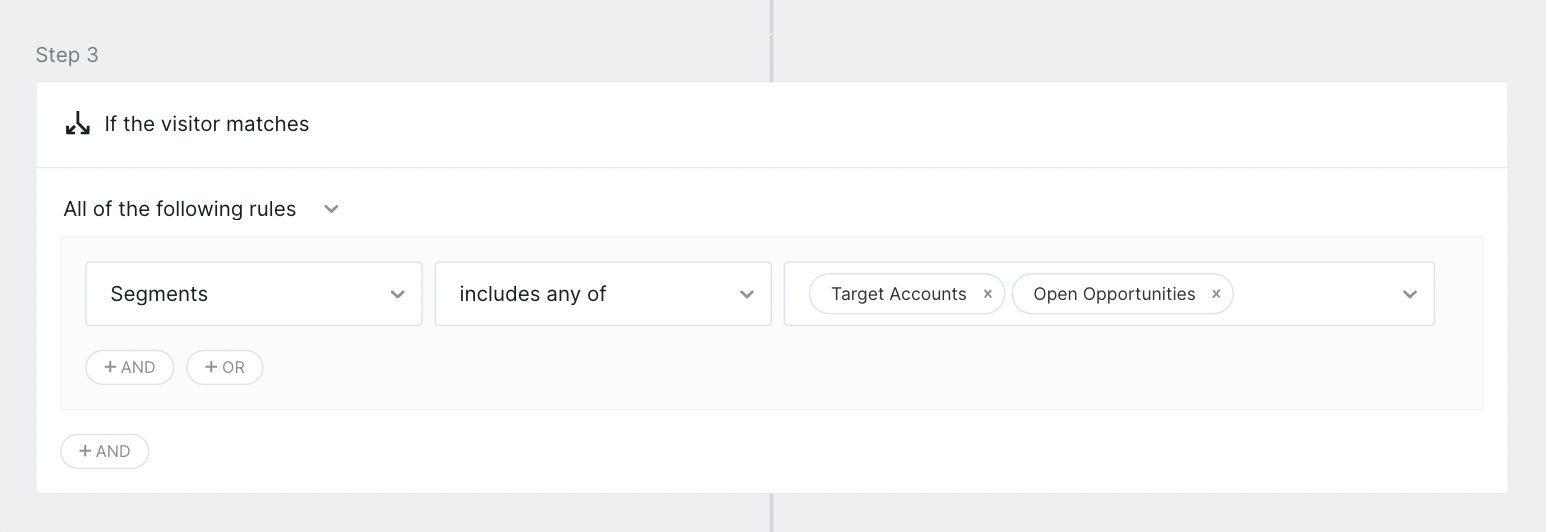
Branch
Leverage the branch step to create logical pathways based on visitor information. Guide them through different branches of the experience, such as booking a meeting or initiating a live chat, to ensure their journey aligns with their specific needs and interests.
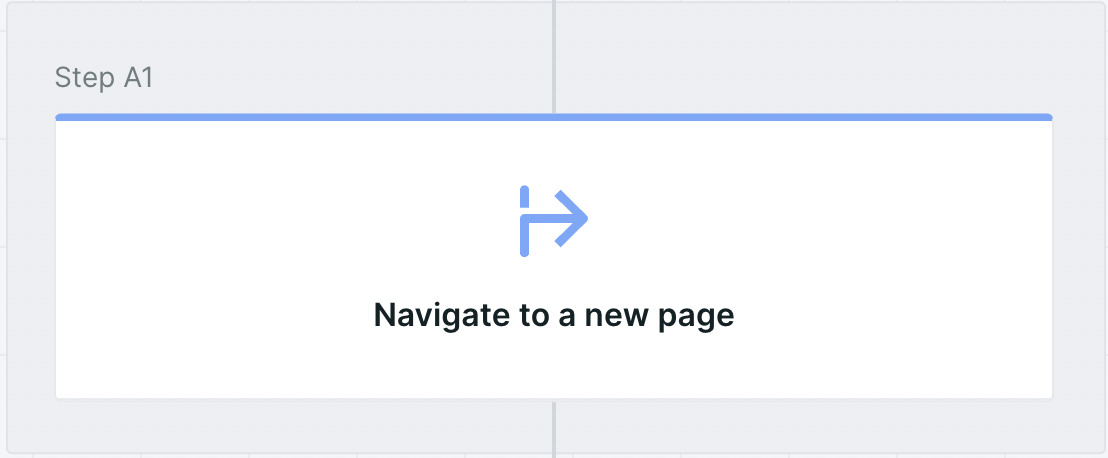
Navigate
Utilize the navigate step to seamlessly direct users to another page within your website. This feature enables you to provide additional information or guide them to relevant resources, enhancing their understanding of your offerings and reinforcing their engagement.
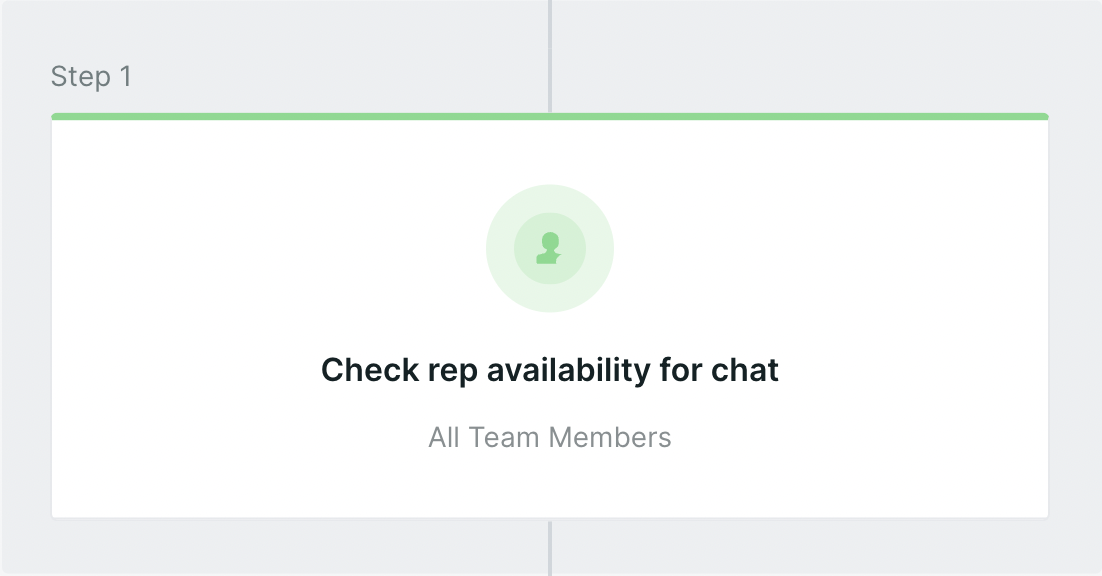
Rep Availability
Maximize the opportunity to engage with VIP buyers by utilizing the rep availability step. By checking if a representative is available for a chat, you can ensure that valuable leads are promptly connected with a sales professional, maximizing the potential for conversions and nurturing strong customer relationships.
<span id="syncing"></span>
Syncing Smart Form Experiences
Qualified Meetings offers seamless integration with popular marketing automation platforms such as Pardot, Marketo, and HubSpot. This integration enables efficient lead management and ensures a smooth transition of leads between Qualified and your chosen Marketing Automation Platform (MAP).
We will explore three different options to synchronize leads, while considering data workflows, preventing duplicate leads, and accurately assigning lead ownership.
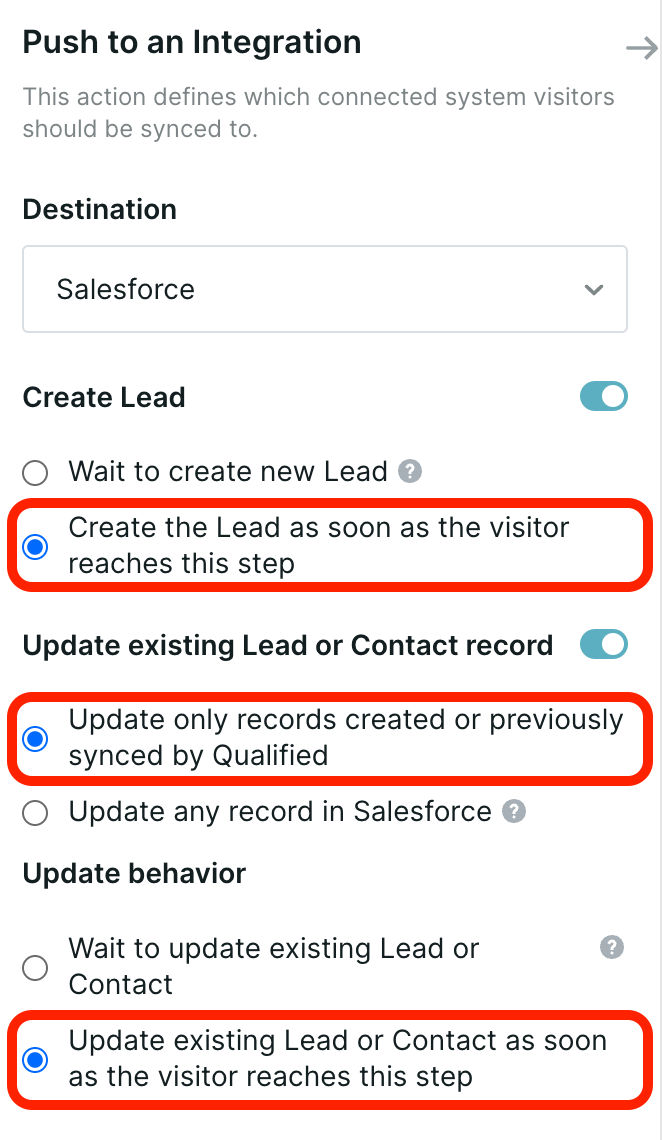
Option 1: Qualified Creates qualified Leads in SFDC
One option for optimizing lead management with Qualified Meetings involves MAP creating unqualified prospects within the MAP while the form handles lead creation. Simultaneously, Qualified takes charge of lead creation in Salesforce (SFDC) and will assign the lead to the meeting owner.
However, to implement this option, MAP Admin needs to pause lead creation on the form from the MAP to SFDC. Additionally, the Qualified Form Experience must either replicate the form MQL process or pass data to the MAP for future replication. It's worth noting that some customers may find this option infeasible if they wish to retain their existing form automation process.
Configuration Steps:
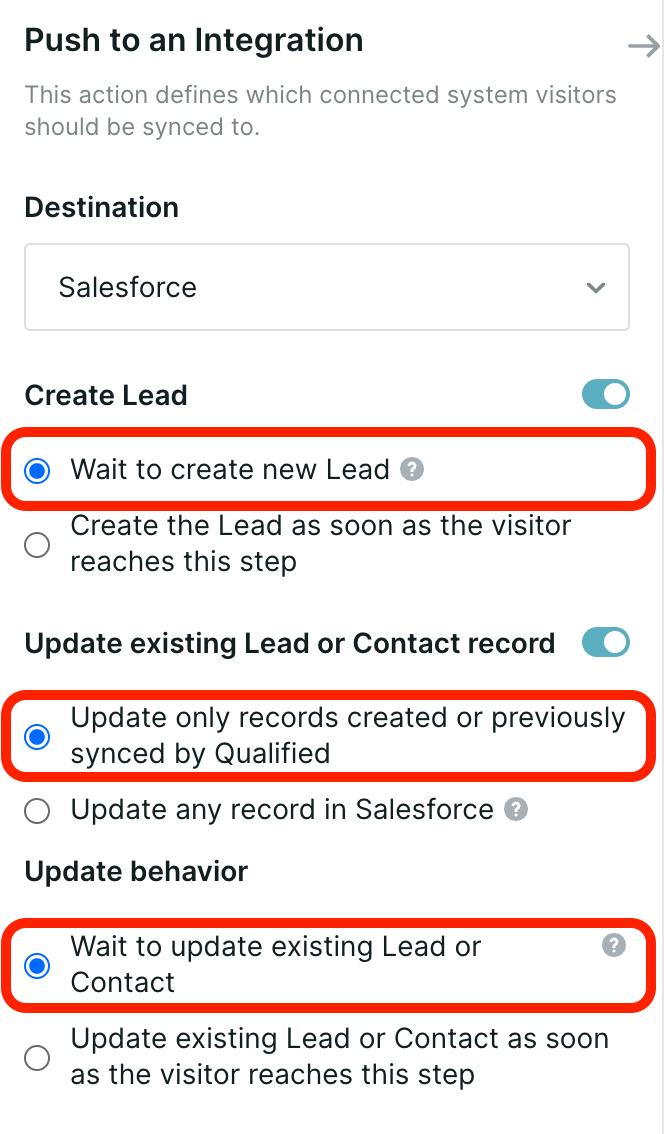
- Add a Salesforce push step right after the "Route for Meeting" step.
- Enable the "Create Lead" with the “Wait to create new Lead” option selected, and "Update existing Lead or Contact Record" with the “Wait to update existing Lead or Contact” option selected.
Option 2: MAP or Qualified Create SFDC Leads and Manage Lead Assignment Based on Sync Speed
Another approach to optimizing lead sync and ownership in Qualified Meetings is to have the MAP Admin maintain their existing automations. While this option may result in potential lead reassignments in Salesforce (SFDC), it offers flexibility and relies on the sync speed between the MAP and Salesforce.
When a visitor interacts with the Salesforce push step in the Experience, two scenarios may occur. If the MAP has already created the lead in SFDC, Qualified will reassign the lead to the meeting owner.
On the other hand, if the MAP hasn't created the lead yet, Qualified will create and assign the lead to the meeting owner. To mitigate the possibility of reassignment, the admin can choose to delay lead creation on the MAP side for up to 5 minutes, providing a smoother lead ownership experience.
Configuration Steps:
- Add a Salesforce push step at the end of meeting booking branches.
- Enable the "Reassign new Leads to meeting owner" setting.
Option 3: MAP Creates SFDC Leads and Manages Lead Assignment
To optimize lead sync and ownership in Qualified Meetings, another option is to have the MAP Admin maintain their existing automations. In this configuration, the MAP Admin is responsible for configuring lead assignment based on the meeting owner data passed by Qualified.
To ensure accurate lead creation that aligns with the collected meeting owner information, the admin can choose to delay lead creation from MAP to SFDC for up to 5 minutes. This delay allows for the proper collection of meeting owner details before creating the lead in the MAP, enhancing lead management and ownership accuracy.
Configuration Steps:
- Set the Qualified visitor owner in a field within the Form experience after the meeting is booked, OR set the Qualified visitor owner as a fixed field mapped to MAP.
- This field will be used in MAP → SFDC automation to assign the lead to the meeting owner.
- This field will be used in MAP → SFDC automation to assign the lead to the meeting owner.
- Add MAP push step at the end of meeting booking branches. No SFDC push steps are required.
<span id="custom-forms"></span>
Custom Forms
Qualified Meetings can trigger on Pardot, Marketo and Hubspot forms natively, but additional guidance is required to trigger forms that are not natively supported. This includes: Eloqua forms, custom-built forms, forms from a 3rd-party provider such as Gravity and forms that leverage Pardot form handlers. This guidance requires use of the Qualified JavaScript API.
Configuration
Before a form experience can be added to your website, some basic configuration needs to be done by a Qualified admin.
First, navigate to your form experience and click the Form Trigger experience step (pictured below).
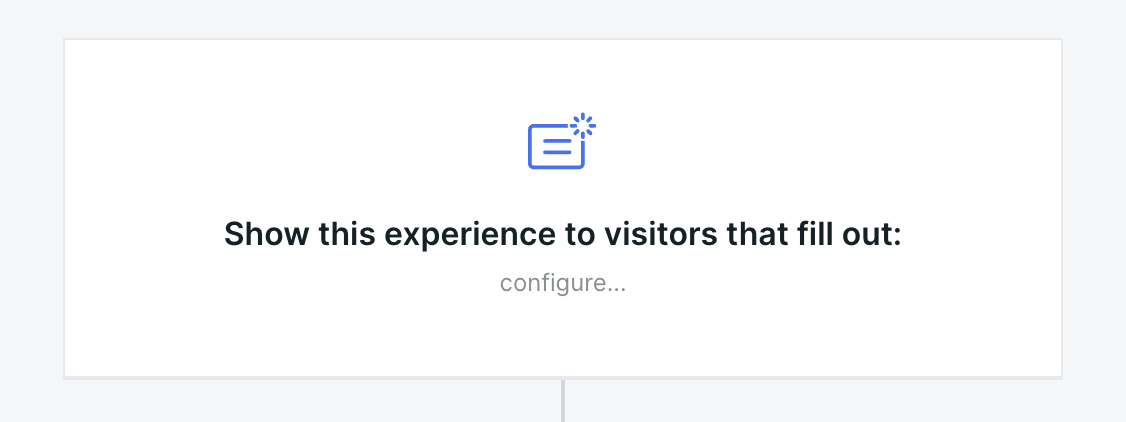
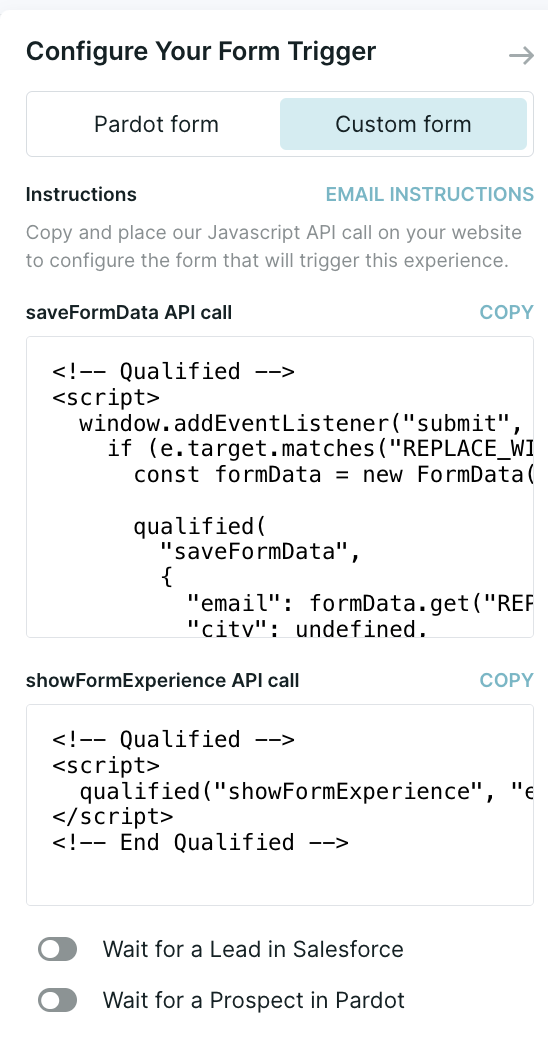
If you are not using a supported Marketing Automation form (Pardot, Marketo, or Hubspot), click the Custom Form tab to reveal setup instructions and configuration options.
For your experience to function properly, you must indicate the connected systems that your form submits to. For example, if you are using a custom-built form that submits data to Pardot, enable the “Wait for a Prospect in Pardot” option.
This area in the Qualified UI also includes sample JavaScript code for your web developer.
To send detailed installation instructions to your web developer, we recommend clicking the Email Instructions link or following the guidance below.
Installation Instructions
There are two API calls that will need to be implemented in JavaScript by a web developer on your team, saveFormData and showFormExperience. As a reminder, please ensure that both the page containing the form and the page that the form redirects to, if applicable, have the main Qualified JavaScript snippet installed.
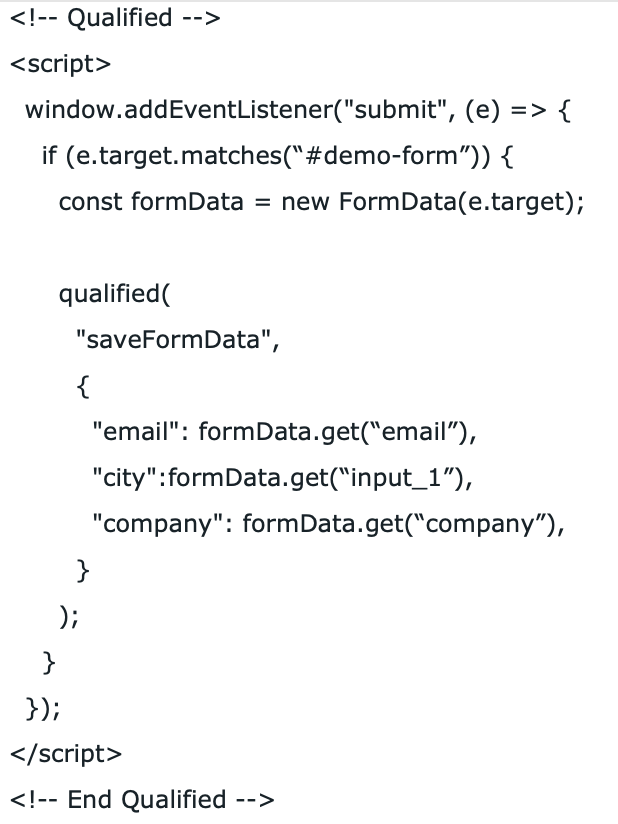
1. Capturing form data using saveFormData
Capturing data from the form submission allows the form experience to qualify the visitor based on form data. Form data captured via this API call is sent to Qualified when the form experience is triggered as described in step 2 below. The saveFormData script can be copied from Qualified and edited to reflect the CSS selector and field names on the form you wish to collect data from.
Note that prior versions of custom form javascript may have included saveSmartFormData. While this is still supported, it is recommended to use saveFormData for all custom forms going forward.
API call
qualified('saveFormData', fieldValues);
This call should be made upon form submission. It’s useful to note that the data captured via this API call will not be sent to Qualified until showFormExperience , described below, is subsequently invoked. This means that it can be made any number of times without any side-effects; it can be invoked optimistically for a form that relies on server-side validation, for example.
If the form submits data to Salesforce or one of the marketing automation platforms that are integrated with Qualified– Pardot, Marketo, Hubspot, Eloqua– it’s not strictly necessary to provide a full set of field mappings as the form submission data will be automatically ingested from those systems by Qualified.
Arguments
fieldValues ****- an object where the attributes are Qualified Visitor Field API Names (found in the Visitor Fields settings section) and respective values are form field values. You must capture email address. All other field values are optional. Field values must be mapped to the field's name.
Example
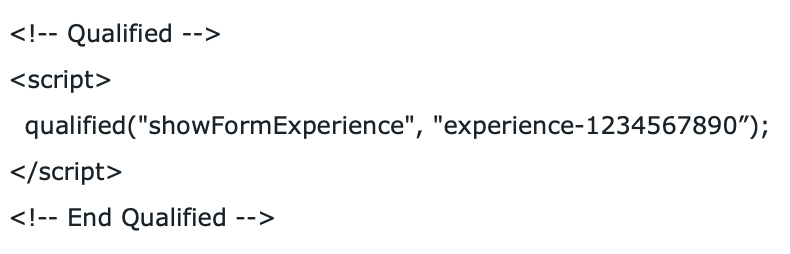
2. Triggering form data using showFormExperience
After a successful form submission, showFormExperience sends the data captured by saveFormData and triggers a specific form experience. The showFormExperience script can be copied from Qualified and should not require any adjustments, unlike the edits required in the first script.
This call should be made only after a successful form submission. For forms that redirect to another page after successful submission, the call should be embedded in the page that’s redirected to (for example a 'Thank You' page), and placed after the main Qualified JavaScript snippet. For forms that don’t redirect– e.g. those that send data via XMLHttpRequest– this call should be made after detecting a successful form submission.
API Call
qualified('showFormExperience');
Arguments
No arguments are required.
Example
<span id="test-form-experience"></span>
Test your Form Experience
Finally, you can test the configured qualification rules to fire in real-time based on any of the values submitted in your form. This will be specific to your company of course, but for the sake of simplicity, let's say that we want to qualify a lead if the company size is greater than 100 employees.
Now, when someone fills out your MAP lead form and states that their company size is 100+ employees, Qualified will immediately offer a Meeting Booker, or alert your reps and present the qualified lead with an open door to chat with or talk to your sales team...instantly.
The visitor information in your form will still be submitted to MAP and if they met your Qualification rules they will be presented with your Qualified experience. If they don't quite match your rules, they'll be given your default message after form submission.
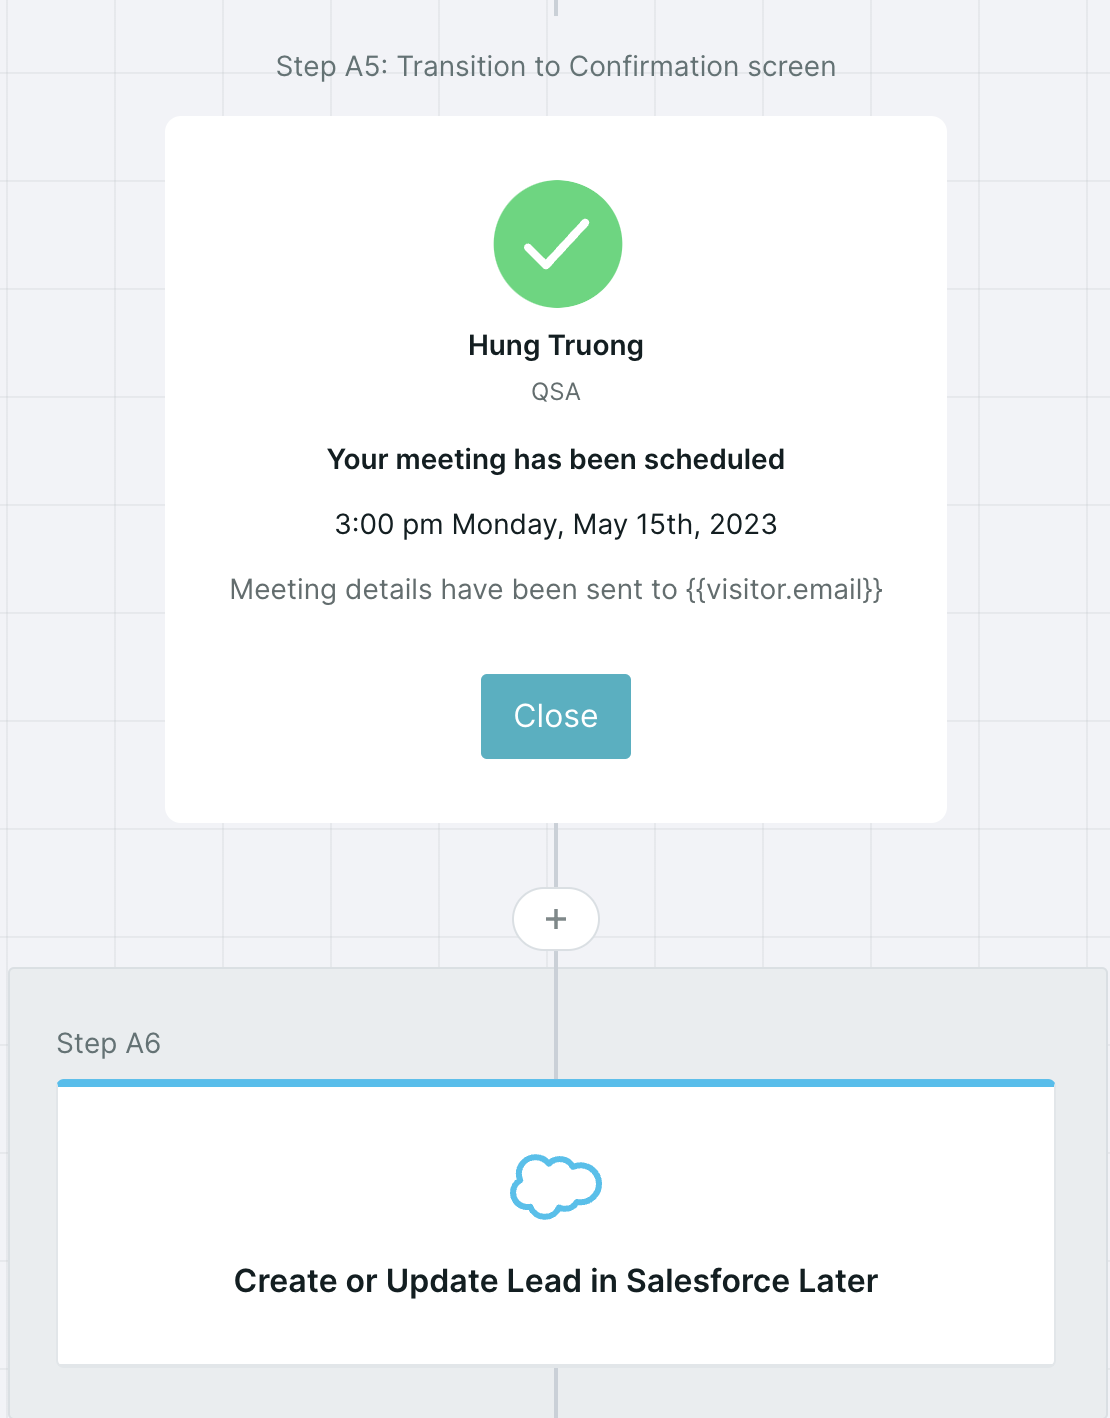
If you have a Salesforce push step within the experience, the visitor will be created as a lead in Salesforce and as a lead in MAP. Because of the sync between Salesforce and MAP, you won't have to worry about duplicates as MAP will merge any leads in Salesforce that have the same email address as your leads in MAP. It's recommended to include a Salesforce push step in order to create Event records for Meetings Booked via Qualified and attach to any relevant Campaigns.
Heading 1
Heading 2
Heading 3
Heading 4
Heading 5
Heading 6
Lorem ipsum dolor sit amet, consectetur adipiscing elit, sed do eiusmod tempor incididunt ut labore et dolore magna aliqua. Ut enim ad minim veniam, quis nostrud exercitation ullamco laboris nisi ut aliquip ex ea commodo consequat. Duis aute irure dolor in reprehenderit in voluptate velit esse cillum dolore eu fugiat nulla pariatur.
Lorem ipsum dolor sit amet, consectetur adipiscing elit, sed do eiusmod tempor incididunt ut labore et dolore magna aliqua. Ut enim ad minim veniam, quis nostrud exercitation ullamco laboris nisi ut aliquip ex ea commodo consequat. Duis aute irure dolor in reprehenderit in voluptate velit esse cillum dolore eu fugiat nulla pariatur.
Lorem ipsum dolor sit amet, consectetur adipiscing elit, sed do eiusmod tempor incididunt ut labore et dolore magna aliqua. Ut enim ad minim veniam, quis nostrud exercitation ullamco laboris nisi ut aliquip ex ea commodo consequat. Duis aute irure dolor in reprehenderit in voluptate velit esse cillum dolore eu fugiat nulla pariatur.

Block quote
Ordered list
- Item 1
- asdfasdf
- asdfasdf
- asdfasdf
- Item 2
- Item 3
Unordered list
- Item A
- Item B
- Item C
Bold text
Emphasis
Superscript
Subscript
|
|---|
|


.svg)


