
<span id="top"></span>
Adding the Qualified Live Booker to Salesforce
Integrate the Qualified Live Booker into Salesforce to streamline meeting scheduling. This guide covers two methods: adding it as a custom button on Lead and Contact records or embedding it as a Lightning Component/iframe. Choose the approach that fits your workflow and enable seamless scheduling directly within Salesforce.
<span id="adding-button"></span>
Adding the Live Booker as a Button
Learn how to create and configure a custom Live Booker button for Lead and Contact records in Salesforce. This method allows quick access to meeting scheduling directly from Salesforce.
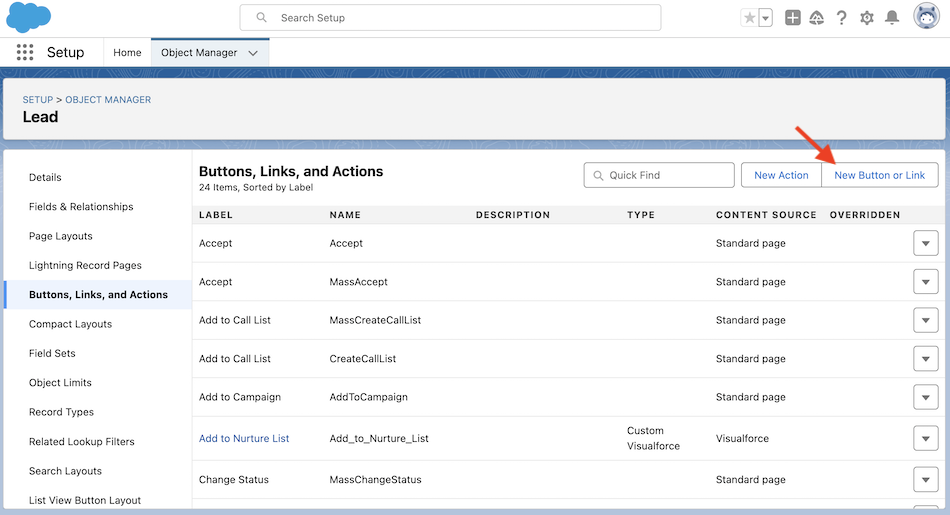
Step 1: Create Buttons in Salesforce
- In Salesforce, navigate to Setup → Object Manager → Lead/Contact → Buttons, Links, and Actions.
- Select the “New Button or Link" button.
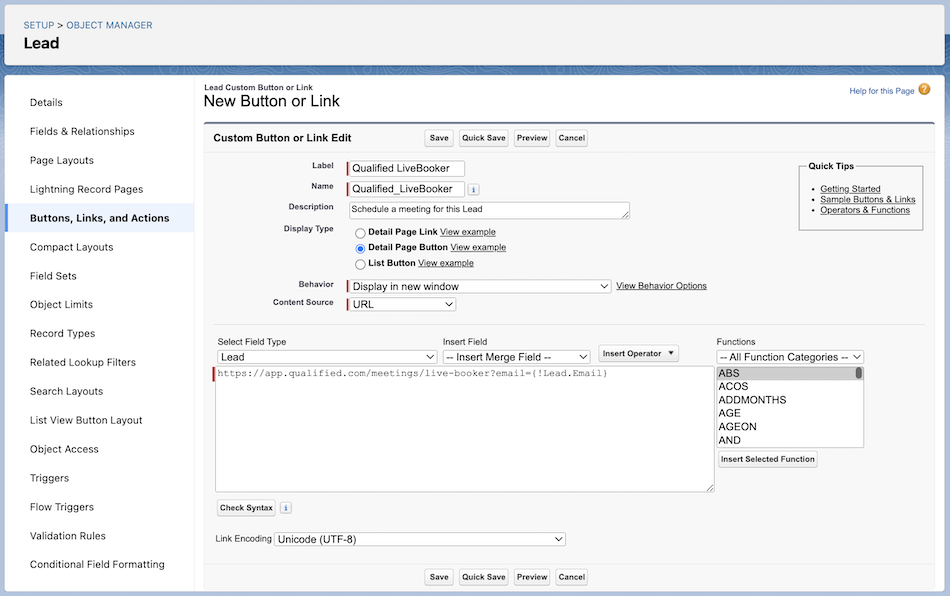
- Create a button with these details:
- Label: Qualified Live Booker
- Display Type: Detail Page Button
- Behavior: Display in a new window
- Content Source: URL
- URLs:
- Lead Object:
https://app.qualified.com/meetings/live-booker?email={!Lead.Email} - Contact Object:
https://app.qualified.com/meetings/live-booker?email={!Contact.Email}
- Lead Object:
- Link Encoding: Unicode (UTF-8)
Step 2: Add Button to Lead/Contact Page Layouts
- Navigate to Setup → Object Manager → Lead/Contact → Page Layouts.
- Drag and drop the Live Booker button to the desired page layout.

- For Lightning users:
- Edit the Action Button Panel in the Lightning App Builder to include the buttons.
<span id="embedding-iframe"></span>
Embedding the Live Booker as an Iframe
Discover how to embed the Live Booker in Salesforce using a Lightning Component. This approach streamlines workflows by integrating scheduling functionality directly into your Salesforce pages.
Step 1: Install the Salesforce Package
- Start in the Qualified Application:
- Navigate to Settings → Meetings → Salesforce in your Qualified account.
- Copy the installation key provided in this section.
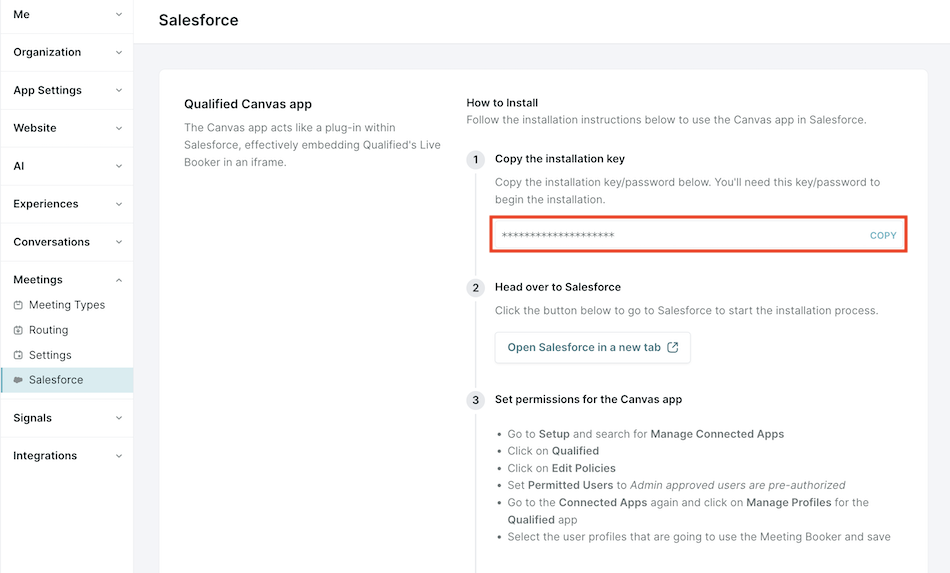
- Proceed to Salesforce:
- Click the button in your Qualified app to access the Salesforce installation page, or use this installation link.
- Enter the installation key/password when prompted.
- Install for All Users or Install for Specific Profiles
- Complete the installation process.
Step 2: Enable the Qualified Canvas App
- In Salesforce, go to Setup → Manage Connected Apps → Qualified.
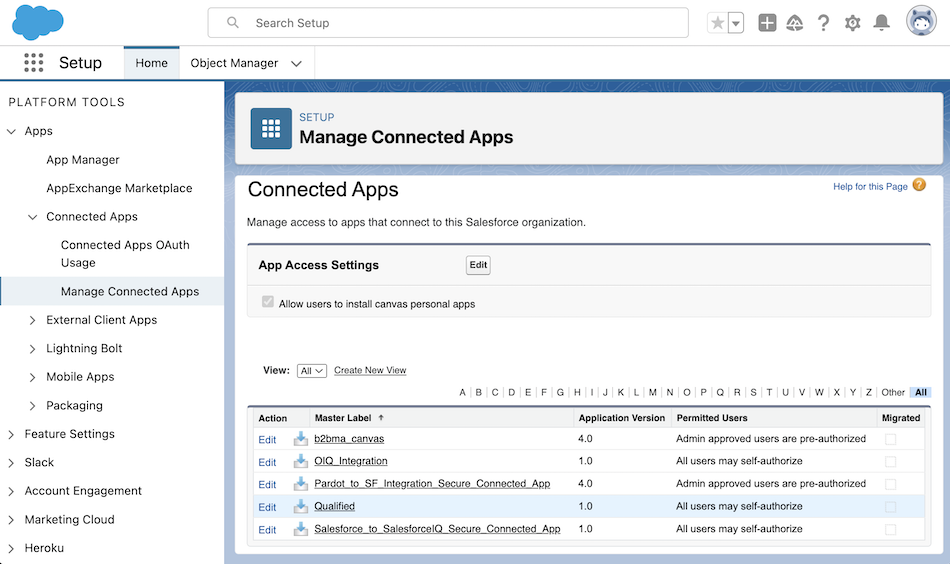
- Select Edit Policies, then:
- Set Permitted Users to "Admin approved users are pre-authorized” and Save.
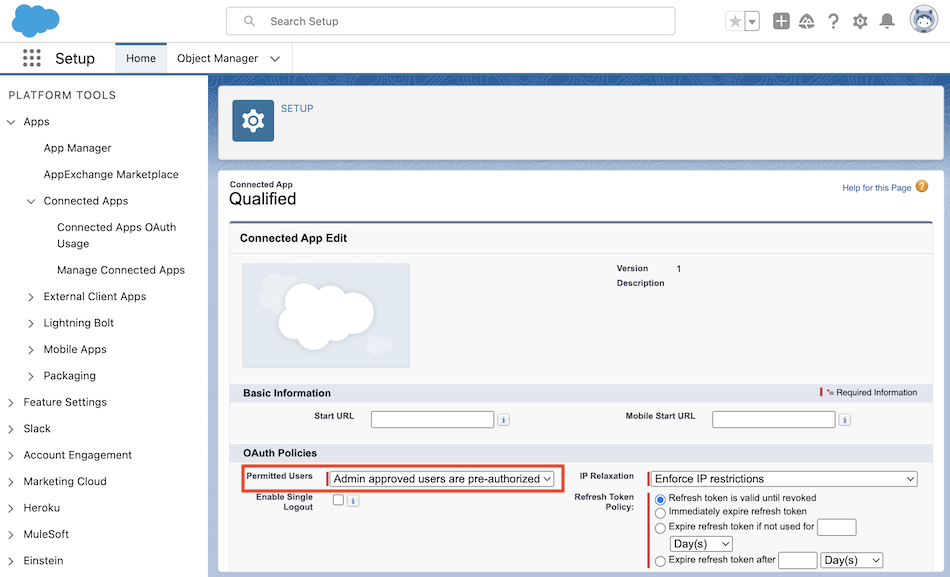
- Return to Manage Connected Apps → Qualified → Manage Profiles:
- Assign the app to the Profiles that will use the Live Booker, and Save.
Note: These users will need to also be a user in Qualified.
Step 3: Users to Connect Salesforce in Qualified
- Each Salesforce user that will be using the Live Booker must have their Salesforce account connected to their Qualified user account.
- If the user has not completed this step yet, they can do so by:
- Log into your Qualified account and navigate to Settings → Salesforce → Connection, and connect Your personal Salesforce connection.
- Ensure the Salesforce account matches the account intended for use with the Qualified Canvas App.
Qualified Admin can verify whether a user has connected their personal Salesforce account in Qualified by going to Settings → Organization → Users and referencing the “Salesforce Connection” column in the user table.
- Once connected, the Qualified Canvas App will automatically authenticate when accessed in Salesforce.
Step 4: Configure the Lightning Component
After obtaining the Lightning Component snippet from Qualified, you’ll need to integrate it into Salesforce. Follow these steps to access the snippet and implement it using the approach that best suits your needs:
- Access the Lightning Component Snippet:
- In your Qualified account, copy the Lightning Component snippet from Settings → Meetings → Salesforce.
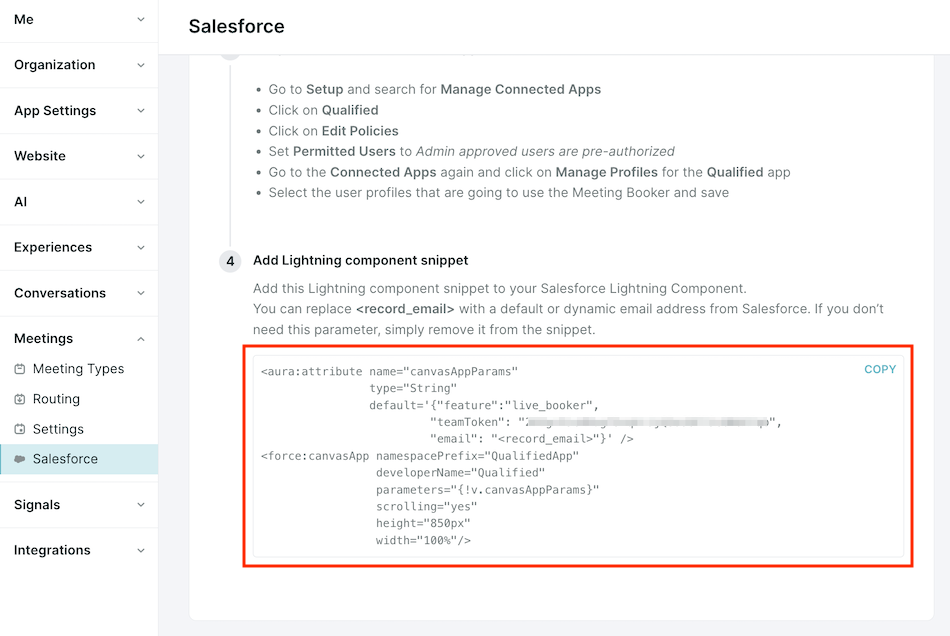
The snippet includes a parameter <record_email>. Replace this placeholder with a dynamic email address sourced from Salesforce. If the email parameter is not needed for your implementation, simply remove it from the snippet.
- Add the Lightning Component to Salesforce
Depending on your organization's needs, you can implement the Lightning Component using one of these methods- Using a Canvas App in a Visualforce Page
Learn how to integrate the Lightning Component within a Visualforce page using a canvas app. Refer to this Salesforce Developer documentation: Canvas App in a Visualforce Page - Using a Canvas App with a Lightning Component
For implementations involving a canvas app in conjunction with a Lightning Component, follow this example: Canvas App in a Lightning Component - Adding a Lightning Component to a Record Page
Customize your record pages in Salesforce via the Lightning App Builder to include and configure Lightning Components: - Explore Salesforce Trailhead Modules
For a detailed walkthrough, explore the Lightning App Builder Trailhead module: Lightning App Builder Module
- Using a Canvas App in a Visualforce Page
- Save and Test Your Changes
Once the Lightning Component is added to your Salesforce environment, ensure the configuration is saved. Test the integration to verify that the Live Booker is functioning as intended.
Need more control over your meetings? Learn how to set up Reschedule, Reassign, and Cancel buttons in Salesforce in our guide on Configuring Buttons to Manage Meetings.
Heading 1
Heading 2
Heading 3
Heading 4
Heading 5
Heading 6
Lorem ipsum dolor sit amet, consectetur adipiscing elit, sed do eiusmod tempor incididunt ut labore et dolore magna aliqua. Ut enim ad minim veniam, quis nostrud exercitation ullamco laboris nisi ut aliquip ex ea commodo consequat. Duis aute irure dolor in reprehenderit in voluptate velit esse cillum dolore eu fugiat nulla pariatur.
Lorem ipsum dolor sit amet, consectetur adipiscing elit, sed do eiusmod tempor incididunt ut labore et dolore magna aliqua. Ut enim ad minim veniam, quis nostrud exercitation ullamco laboris nisi ut aliquip ex ea commodo consequat. Duis aute irure dolor in reprehenderit in voluptate velit esse cillum dolore eu fugiat nulla pariatur.
Lorem ipsum dolor sit amet, consectetur adipiscing elit, sed do eiusmod tempor incididunt ut labore et dolore magna aliqua. Ut enim ad minim veniam, quis nostrud exercitation ullamco laboris nisi ut aliquip ex ea commodo consequat. Duis aute irure dolor in reprehenderit in voluptate velit esse cillum dolore eu fugiat nulla pariatur.

Block quote
Ordered list
- Item 1
- asdfasdf
- asdfasdf
- asdfasdf
- Item 2
- Item 3
Unordered list
- Item A
- Item B
- Item C
Bold text
Emphasis
Superscript
Subscript
|
|---|
|


.svg)


