
<span id="top"></span>
Configuring Buttons to Manage Meetings in Salesforce
Easily manage meetings in Salesforce with Qualified Reschedule, Cancel, and Reassign buttons. This guide shows you how to configure these buttons, add them to your Salesforce layout, and use them to keep your meeting schedules organized and up-to-date.
- Video Walkthrough: Configuring Buttons in Salesforce
- Steps to Configure Buttons in Salesforce
- Using the Reschedule, Cancel, and Reassign Buttons in Salesforce
<span id="video-walkthrough"></span>
Video Walkthrough: Configuring Buttons in Salesforce
Follow along with this quick video guide to set up Reschedule, Cancel, and Reassign buttons in Salesforce.
<span id="steps-to-add-buttons"></span>
Steps to Configure Buttons in Salesforce
Follow step-by-step instructions below to set up Reschedule, Cancel, and Reassign buttons in Salesforce.
- Reschedule: Update meeting times quickly and notify participants.
- Cancel: Cancel meetings with clear tracking and notification updates.
- Reassign: Assign meetings to a new owner, either manually or using automated routing rules.
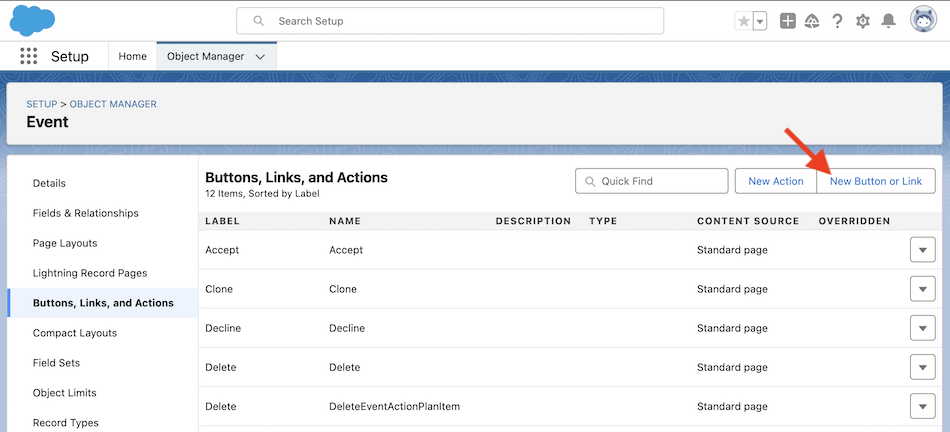
Step 1: Create Buttons in Salesforce
- In Salesforce, navigate to Setup → Object Manager → Event → Buttons, Links, and Actions.
- Select the "New Button or Link" button.
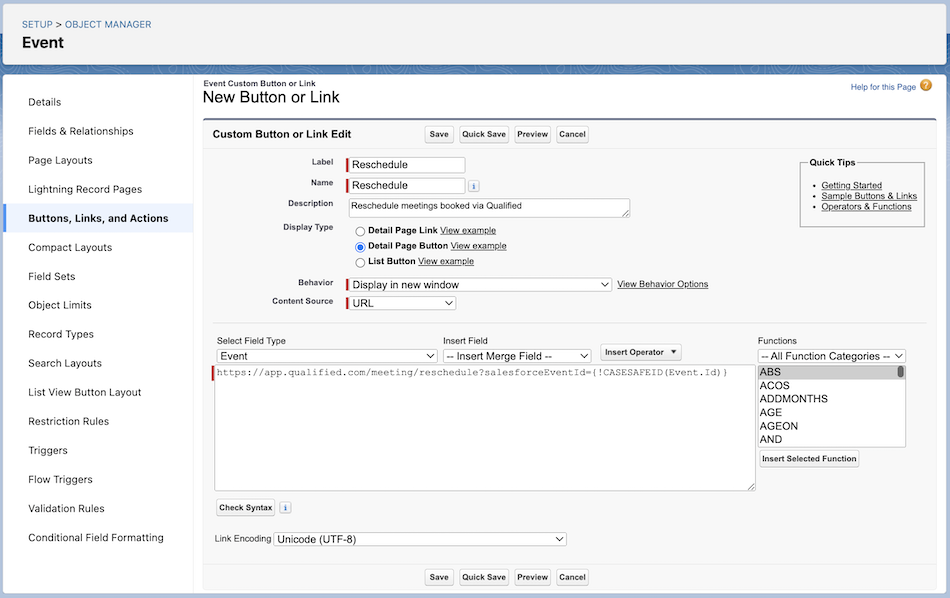
- Create a button for each action (Reschedule, Cancel, Reassign) with these details:
- Label: "Reschedule", "Cancel, and “Reassign”
- Display Type: Detail Page Button
- Behavior: Display in a new window
- Content Source: URL
- Select Field Type: Event
- URLs (Note the URLs below are case sensitive):
- Reschedule:
https://app.qualified.com/meeting/reschedule?salesforceEventId={!CASESAFEID(Event.Id)} - Cancel:
https://app.qualified.com/meeting/cancel?salesforceEventId={!CASESAFEID(Event.Id)} - Reassign:
https://app.qualified.com/meeting/reassign?salesforceEventId={!CASESAFEID(Event.Id)}
- Reschedule:
- Link Encoding: Unicode (UTF-8)
Some users have reported issues with copy/pasting the URLs above. If you experience issues, try typing the URL manually into the field.
Step 2: Add Buttons to Event Page Layout
- Navigate to Setup → Object Manager → Event → Page Layouts.
- Select Buttons, then drag and drop the new buttons to the desired layout.

- For Lightning users
- Edit the Action Button Panel in the Lightning App Builder to include the buttons.
Want to make scheduling even easier? Check out our guide on Adding the Live Booker to Salesforce to integrate a button or iframe for seamless meeting scheduling directly within Salesforce.
<span id="using-the-buttons"></span>
Using the Reschedule, Cancel, and Reassign Buttons in Salesforce
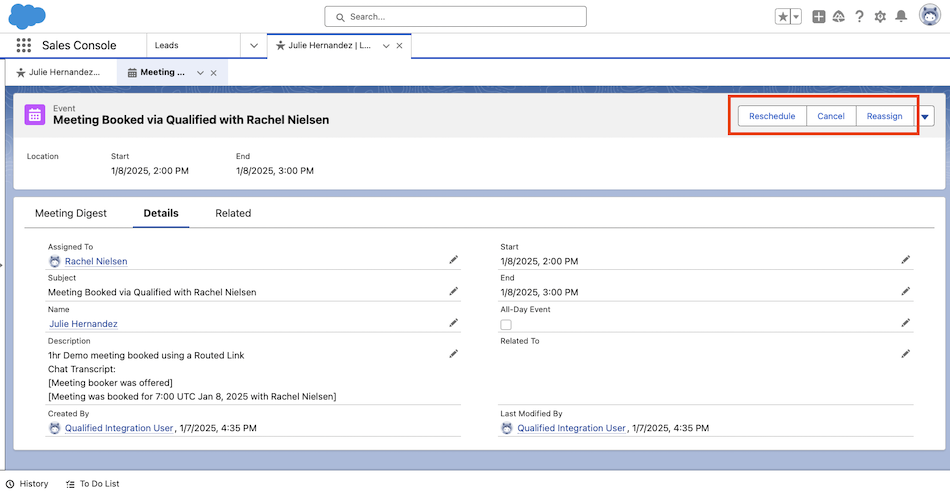
Once the Reschedule, Cancel, and Reassign buttons are configured in Salesforce, users can manage their meetings seamlessly. This section demonstrates how these buttons work in action and highlights the changes made to the event records in Salesforce after each action.
Rescheduling a Meeting
- Clicking the Reschedule button on an event record, the Qualified app opens in a new tab where the user can then select a new date and time for the meeting.
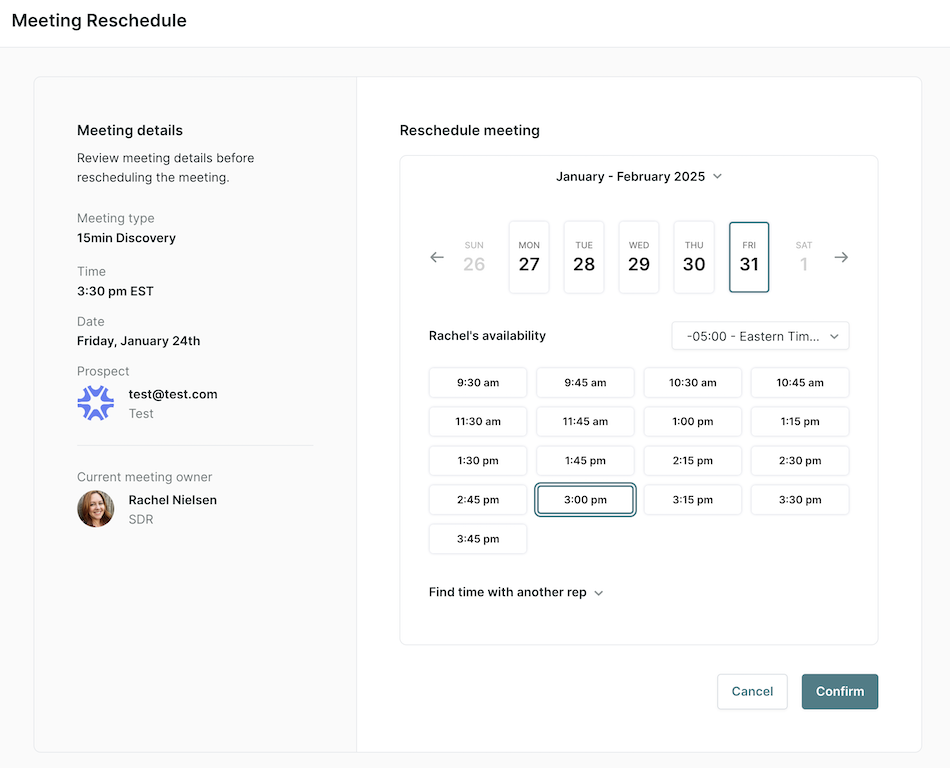
- If the rep does not have the desired date and time available, the user can select Find time with another rep to reschedule the meeting with another rep.
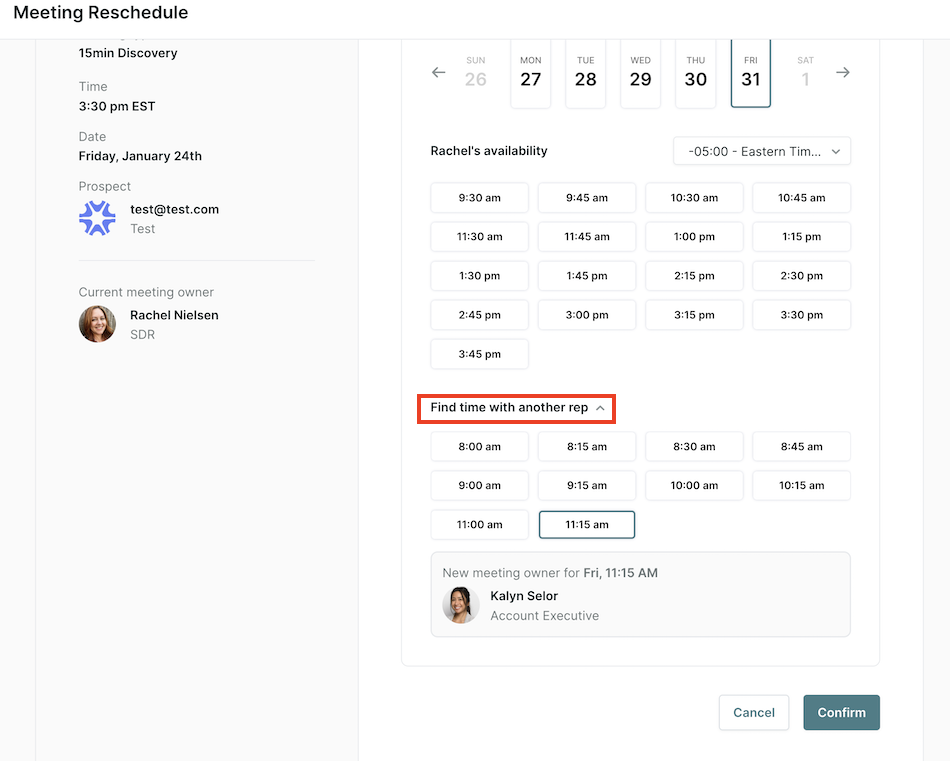
- After confirming the changes, the meeting is rescheduled, and notifications are sent to all participants.
- Changes to Event Records in Salesforce
- If the meeting is rescheduled with the same rep: the event record will be updated to reflect the new Start and End date/time.
- If the meeting is rescheduled with a different rep:
- The event record’s Description will be updated to include “Reassigned from [original rep] to [new rep]. Final meeting booked using [method]"
- Additionally, the Subject and Assigned To fields will be updated to reflect the reassignment.
.png)
Canceling a Meeting
- Clicking the Cancel button on an event record opens the Qualified app in a new tab where the user is prompted to confirm the cancellation. The user also has the option to “Reschedule the meeting” or select “Never mind” to exit without changes.
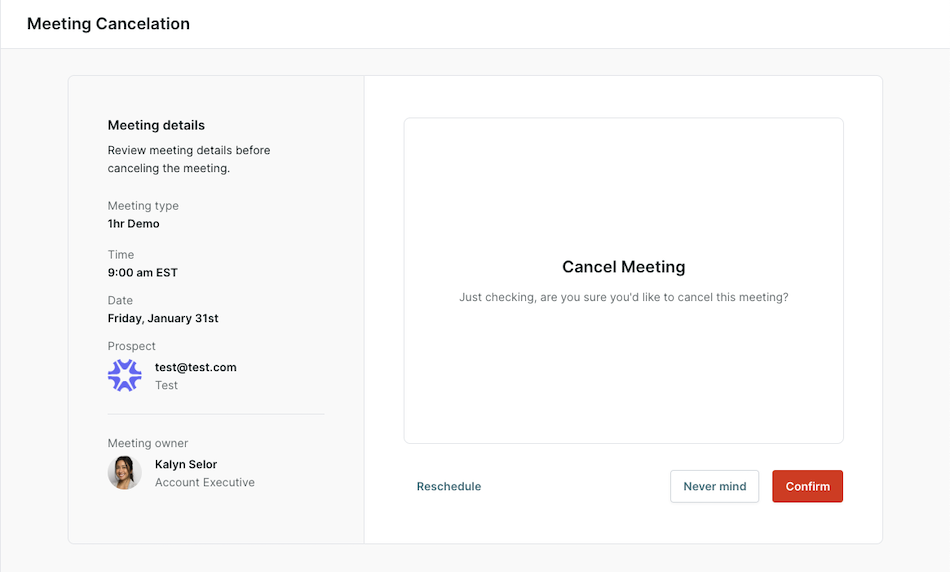
- Once confirmed, the meeting is canceled, and notifications are sent to participants.
- Changes to Event Records in Salesforce: The event record’s Subject will be updated to include “Canceled”

Reassigning a Meeting
- Clicking the Reassign button on an event record opens the Qualified app in a new tab where the user can choose between automatic reassignment (based on routing rules) or manual reassignment (selecting a specific rep).
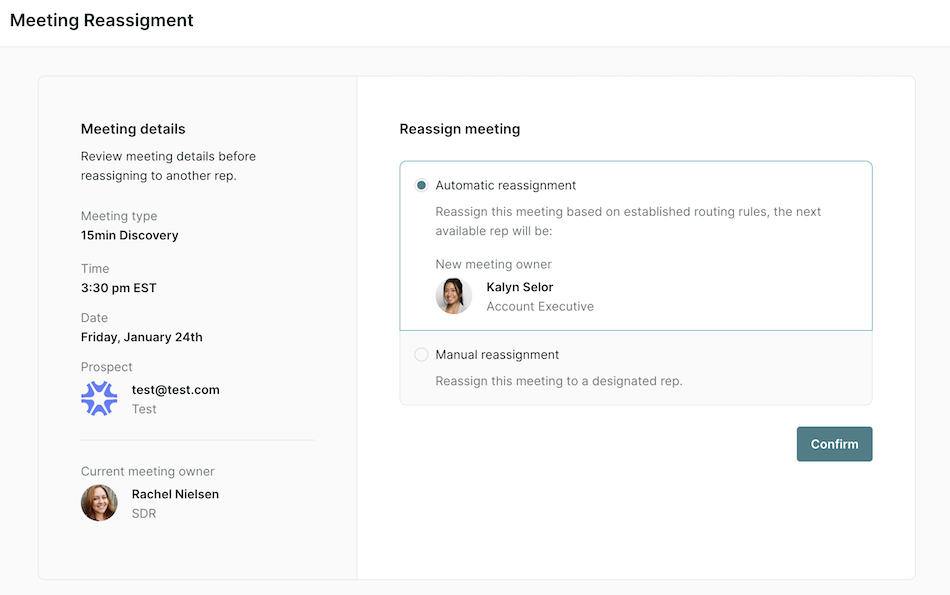
Users will only be able to reassign meetings to reps who have availability at the same date and time as the existing meeting. If they want to reassign and reschedule the meeting to a different time, the user should click the Reschedule button instead.
- After confirming the reassignment, the meeting is reassigned, and notifications are sent to the new assignee and participants.
- Changes to Event Records in Salesforce
- The event record’s Description will be updated to include “Reassigned from [original rep] to [new rep]. Final meeting booked using [method]"
- Additionally, the Subject and Assigned To fields will be updated to reflect the reassignment.
- Back to Top
Heading 1
Heading 2
Heading 3
Heading 4
Heading 5
Heading 6
Lorem ipsum dolor sit amet, consectetur adipiscing elit, sed do eiusmod tempor incididunt ut labore et dolore magna aliqua. Ut enim ad minim veniam, quis nostrud exercitation ullamco laboris nisi ut aliquip ex ea commodo consequat. Duis aute irure dolor in reprehenderit in voluptate velit esse cillum dolore eu fugiat nulla pariatur.
Lorem ipsum dolor sit amet, consectetur adipiscing elit, sed do eiusmod tempor incididunt ut labore et dolore magna aliqua. Ut enim ad minim veniam, quis nostrud exercitation ullamco laboris nisi ut aliquip ex ea commodo consequat. Duis aute irure dolor in reprehenderit in voluptate velit esse cillum dolore eu fugiat nulla pariatur.
Lorem ipsum dolor sit amet, consectetur adipiscing elit, sed do eiusmod tempor incididunt ut labore et dolore magna aliqua. Ut enim ad minim veniam, quis nostrud exercitation ullamco laboris nisi ut aliquip ex ea commodo consequat. Duis aute irure dolor in reprehenderit in voluptate velit esse cillum dolore eu fugiat nulla pariatur.

Block quote
Ordered list
- Item 1
- asdfasdf
- asdfasdf
- asdfasdf
- Item 2
- Item 3
Unordered list
- Item A
- Item B
- Item C
Bold text
Emphasis
Superscript
Subscript
|
|---|
|


.svg)


