
Configuring Qualified Visitor Fields
Qualified Visitor Fields store everything you track and know about your website visitors within Qualified. They contain information your reps may gather by chatting with a Lead directly, information the visitor may have given you explicitly through a Lead form or chatbot, or other info that might be pulled from an external system, like Salesforce, Pardot, or Clearbit.
<span id="creating-visitor-fields"></span>
Creating Visitor Fields
Before you start creating a bunch of Visitor Fields, we recommend getting started by connecting the Salesforce org-level account and configure the Salesforce Lead Mapping first. It will ensure your new visitor fields are aligned with what is required to create a net new Lead.
If you need to create additional visitor fields after completing Lead Mapping, follow the steps below to do so.
1. As a Qualified admin, go to Settings → App Settings → Visitor Fields.
- The first time you navigate here, you'll notice that there are a few default lead fields for name, email, and company, which tend to be defaults for every company.
2. Click the “+” icon to add additional fields
3. Add a Field Name and set the corresponding field Type. Note: you cannot update the Type once you save the new visitor field.
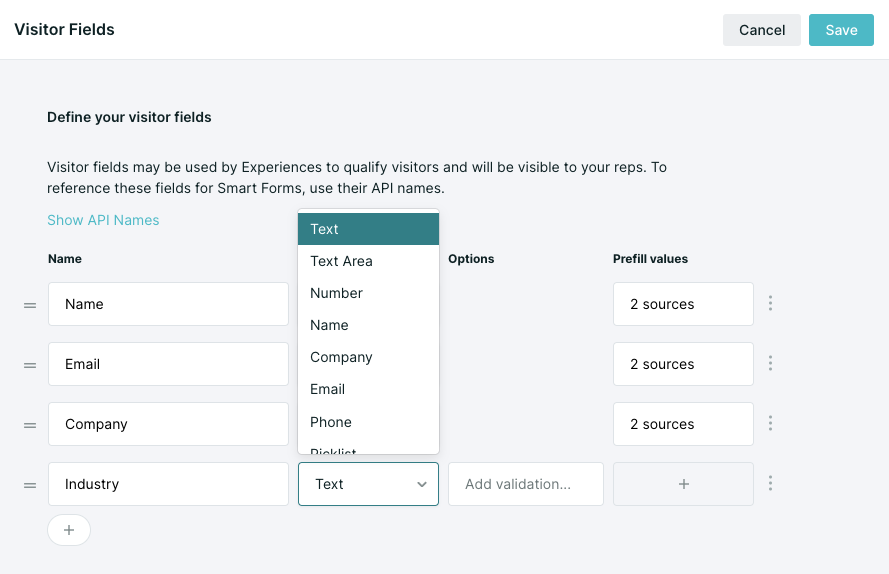
4. If necessary, click to Add validation… (learn more about visitor field validation)
5. If applicable, click the “+” icon in the right column to add prefill sources (Learn more about populating visitor fields)
6. Optionally, click the three dots on the far right to adjust display settings.
- Live Stream - Show the visitor field to reps in the Live Streams view.
- Hidden - Hide the visitor field from reps in the Visitor 360, making it not editable by reps.
- Delete - Delete the field and all associated data.
7. To save your changes, click “Save” in the top right corner of the screen.

<span id="visitor-field-validation"></span>
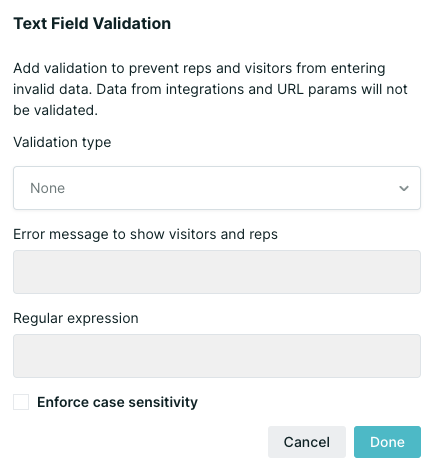
Visitor Field Validation
Learn how to add validation rules on your visitor fields to ensure that the data you collect from visitors is accurate and formatted correctly.
Before getting started, note the following:
- You can only add validation for Text field types.
- We already have pre-built validation fields for Phone and Email.
To get started, click on the Add validation option in the row of the text visitor field you want to add validation to.
Qualified has identified some common validation criteria and we offer these out-of-the-box while others you can create custom on your own.
Out-of-the-Box Validations
Qualified has some out-of-the-box validations already set up for you, including postal code and URL. When you select one of these validation rules, you’ll see the syntax we use behind the scenes to make sure the validation works correctly. This is called a regular expression and it’s used as an industry standard.
Select your out-of-the-box validation rule by selecting it from the drop-down box in the pop-up modal.
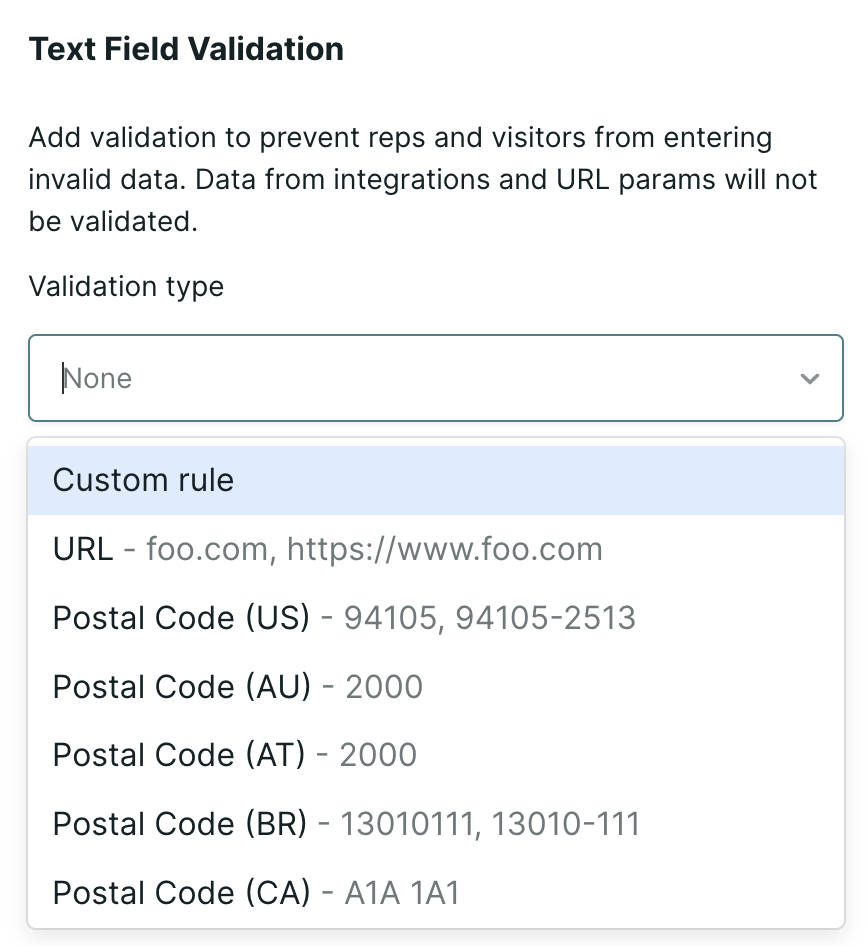
Once you’ve finished your selection, click Done and then Save on your visitor fields to ensure the validation starts taking place immediately for your visitors.
Custom Validation Rules
Qualified gives you the opportunity to create your own validation rules for your visitor fields if we don’t have your rule out-of-the-box. This could include specific username validations, product id’s, and serial numbers.
Behind the scenes, Qualified uses regular expressions to create validation rules, which is an industry-standard programming language. If you're ready to test your own custom validation rules, check out regular expression 101.
Regular expressions have a reputation for being gnarly, but that all depends on how you approach them. There is a natural progression from something as simple as this:
\d
To something as complicated as the expression below.
^(\(\d{3}\)|^\d{3}[.-]?)?\d{3}[.-]?\d{4}$
To give you some ideas on how to use regular expressions we’ve given you an example below of a custom validation rule and the regular expressions used to create them.
Example: Serial Number
In this example, we’ll use a serial number as our visitor field validation rule. As visitors come to the site, they can speak with our team and get more information about add-ons for the product they’ve recently purchased. In order for our team to know the exact product, we’ll ask the visitor to give us the product serial number and validate that against a regular expression.
All serial numbers should have the same structure in our made-up company: ABCD-1234-XYZ. To get started we’ve created a visitor field titled “Serial Number” and we’ve selected to create a custom rule to validate the data that visitors enter into this field.
You’ll notice that our regular expression looks like:
^[A-Z]{4}-\d{3}-[A-Z]{3}$
In plain English this means:
^ The start of the expression
[A-Z]{4}- The first group of characters should be any uppercase letters A-Z and only allow 4 of them followed by a dash.
\d{3}- The next group of characters should be only digits 0-9 and allow only 3 of them followed by a dash
[A-Z]{3} The last group of characters should be any uppercase letters A-Z and only allow 3 of them.
$ Do not validate any other characters that are added beyond this.
Common Expressions
Here are some common expressions used:
- Limit field to 255 Characters:
^.{0,255}$ - Time format HH:MM 12 hour:
/^(0?[1-9]|1[0-2]):[0-5][0-9]$/ - Zipcode: There is no single regex that can handle all zip codes given that zip codes around the world do not follow a common pattern.
<span id="populating-visitor-fields"></span>
Populating Visitor Fields
There are a few ways you can populate Visitor Fields with information about a visitor on your website. They can be populated by asking the visitor a question or setting a visitor field with a specific value within an Experience, reps manually updating Visitor Fields while chatting with the visitor, or automatically updating it using one or more of the methods below:
- Mapping Visitor Fields to your Salesforce or MAP
- Prefill with Additional Sources
- URL Parameters
Mapping Visitor Field to your Salesforce or MAP
Mapping Visitor Fields to your Salesforce or MAP, allows there to be a bi-directional sync between those fields. When known visitors arrive on the website, we’ll pull information into the mapped Visitor Field from Salesforce or MAP. It also allows Qualified to push data to the mapped field in your Salesforce or MAP.
Learn more about mapping fields using the resources below:
- Salesforce Lead Mapping
- Pardot Prospect Mapping
- Marketo Lead Mapping
- HubSpot Contact Mapping
- Eloqua Contact Mapping
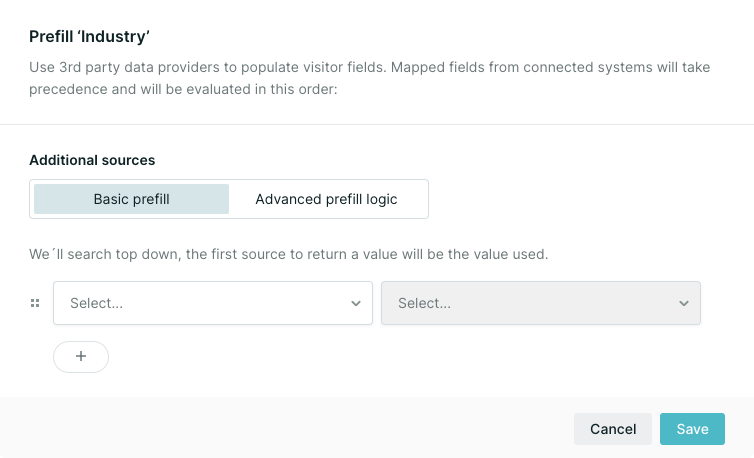
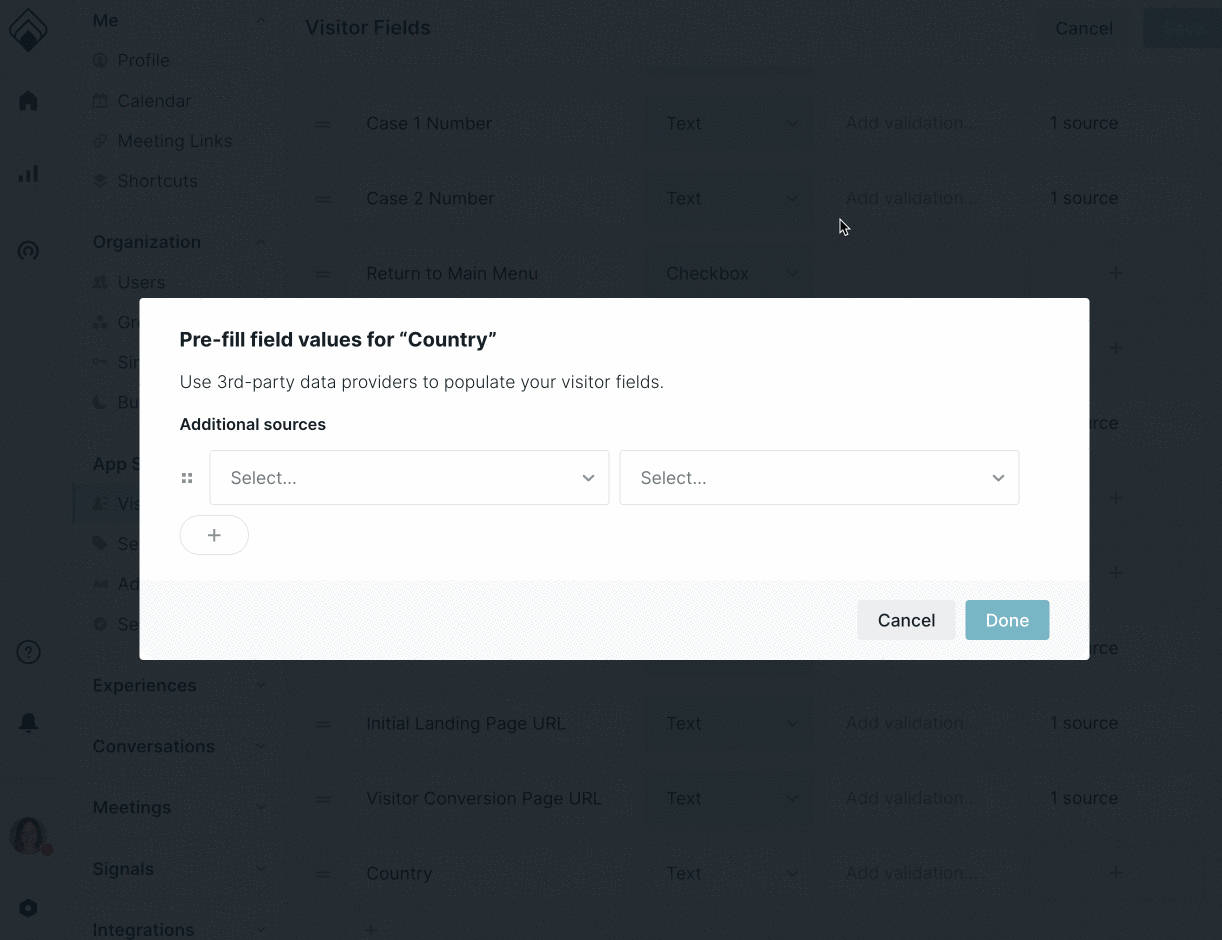
Prefill with Additional Sources
Learn how to configure the Additional Sources to prefill Visitor Fields with data from your connected 3rd party data providers. It can be used to help you prefill information in your visitor fields such as country, state, industry, etc. You can then later use this information to help route visitors for inbound chat or just simply expose this information to your reps inside Qualified, viewing a lead in Salesforce, or looking at your new prospect in Pardot.
As a Qualified Admin, go to Settings → App Settings → Visitor Fields to get started.
Once here, you can start using additional sources to prefill visitor fields that you’d like to display to your reps when using the Qualified app or that you’d like to use to later route visitors for inbound chat.
For example, while in your visitor fields layout, create a new field named "Country." Next, select the source on the right-hand side and enter the source to have Qualified pull in your visitors' country into this field automatically for you. In this case, we'll select the source to be Qualified's Demographic data.
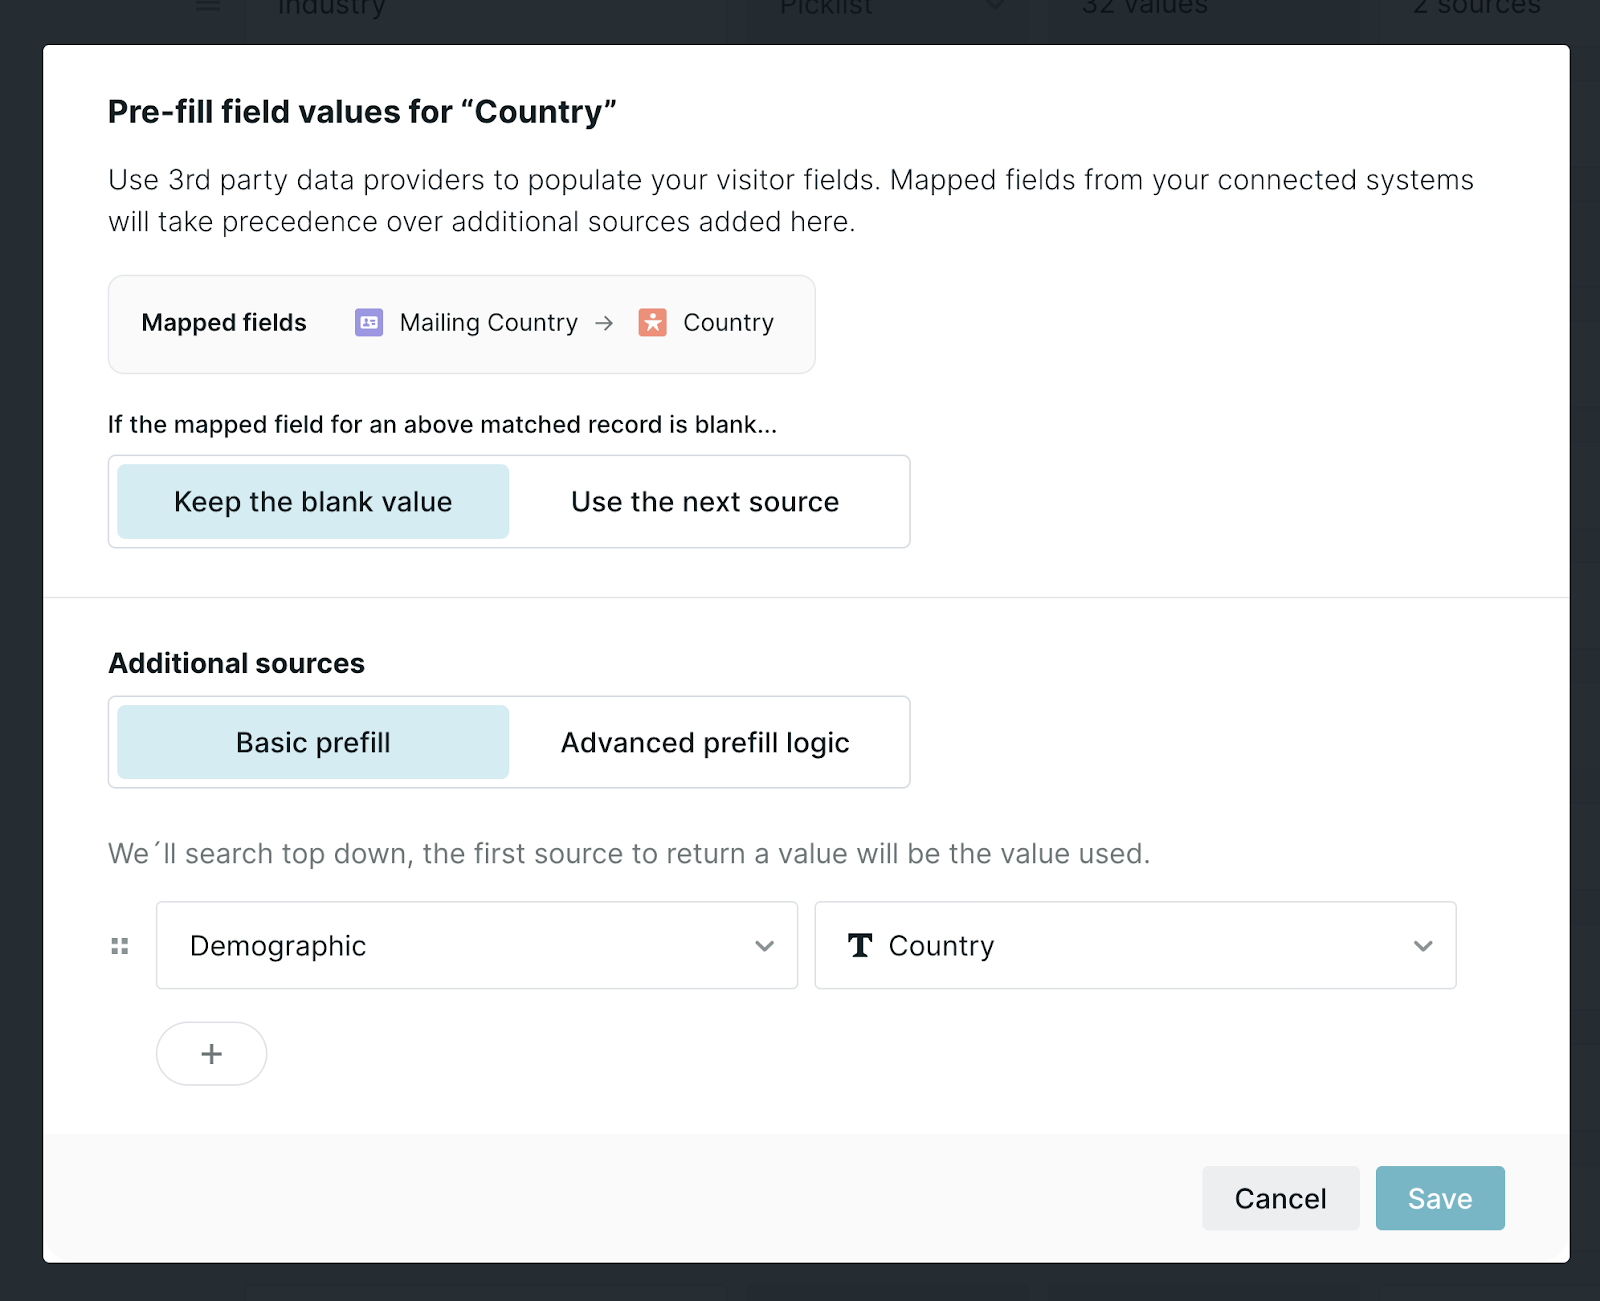
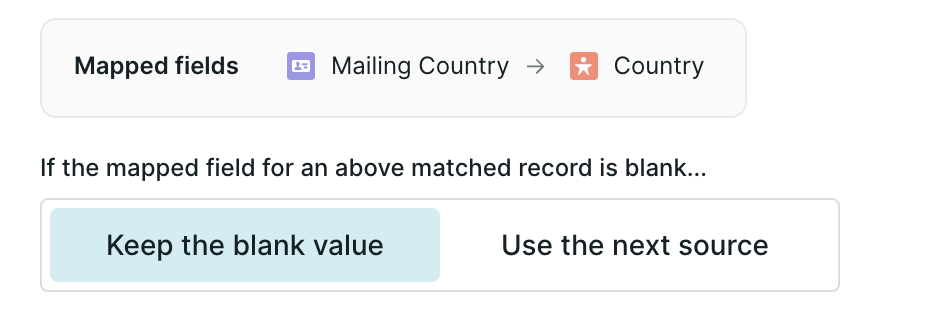
If you have mappings set up to other sources, such as Salesforce Lead or Contact (as shown below), we'll also use these two sources to pull in information as well. We'll look at all of the sources at once to gather as much information as we can about your visitor to fill into your fields. If the lead is not known in Salesforce, your Marketing Automation Platform (MAP), or other data enrichment sources, we'll then use the variable to pull in the country based on their IP address.
Additional Prefill Options
'Keep the blank value' vs. 'Use the next source'
Sometimes your 3rd party data sources, such as Salesforce or your MAP, may have a blank value for a mapped field when we match it to a record. With this setting, you can choose whether to 'Keep the blank value' in Qualified, or you can choose to 'Use the next source' to prefill the field with the Additional sources and then update the Salesforce or MAP record with the new data.
Additional sources: 'Basic prefill' vs. 'Advanced prefill logic'
When prefilling with additional sources, you can use the 'Basic prefill' to simply map the value from the source, such as Clearbit Enrichment or Qualified's Demographic data, to the mapped field, or you can use the 'Advanced prefill logic' to transform the values provided by the source to match the values accepted by the mapped field in Salesforce or MAP.
For example, you may have visitors on your website from the U.S. Virgin Islands, however, your Salesforce doesn't accept that value in the Country field and it needs to be changed to United States instead - that can be done using 'Advanced prefill logic'.
When you select the 'Advanced prefill logic', three options will appear.
1. Find a field value from an external source: select the external source(s) you would like to use to prefill the mapped visitor field. If you choose multiple, we will search top down and will use the first source to return a value. If there is no value returned, the following steps will not run.
In the example below, we selected to use Clearbit Enrichment and Qualified's Demographic fields to prefill the 'Country' field.
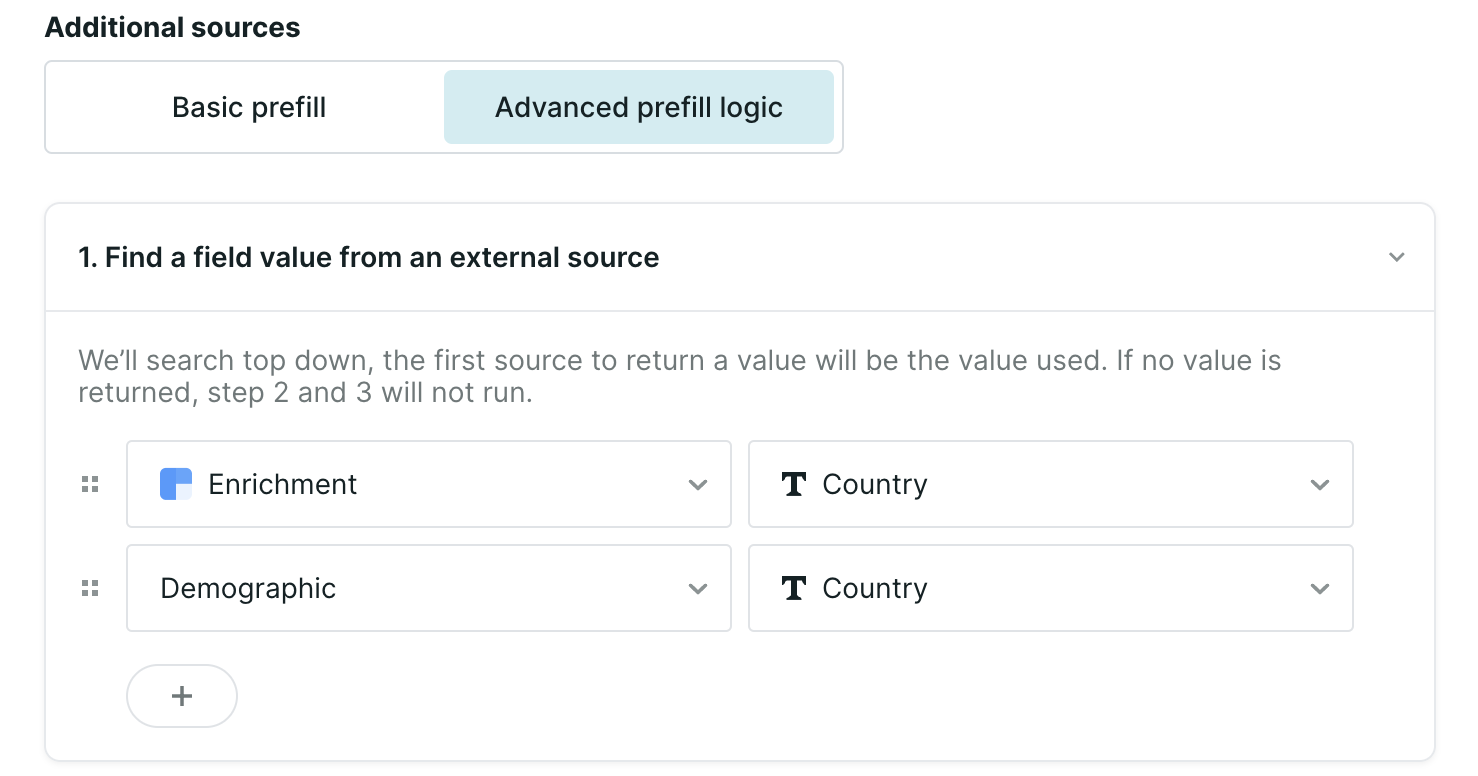
2. Map the value returned above: select the values available from the sources selected in step 1 in the first field. Then, enter the value that should be saved instead in the second field. You may add multiple rules in this section by clicking the "Add a rule" button.
Continuing the example below, we searched for the values for U.S. Virgin Islands from our external sources and found two values to transform: "Virgin Islands (U.S.)" from Enrichment and "U.S. Virgin Islands" from Qualified's Demographic data. Then, we entered "United States" as the value to save instead.
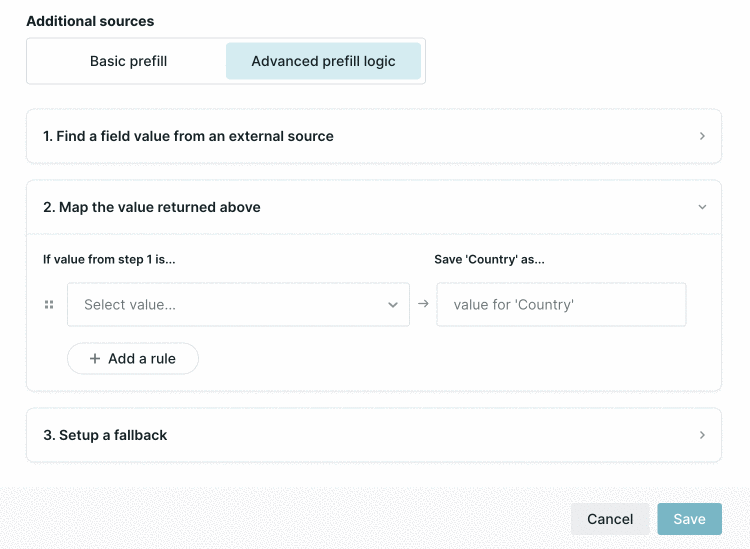
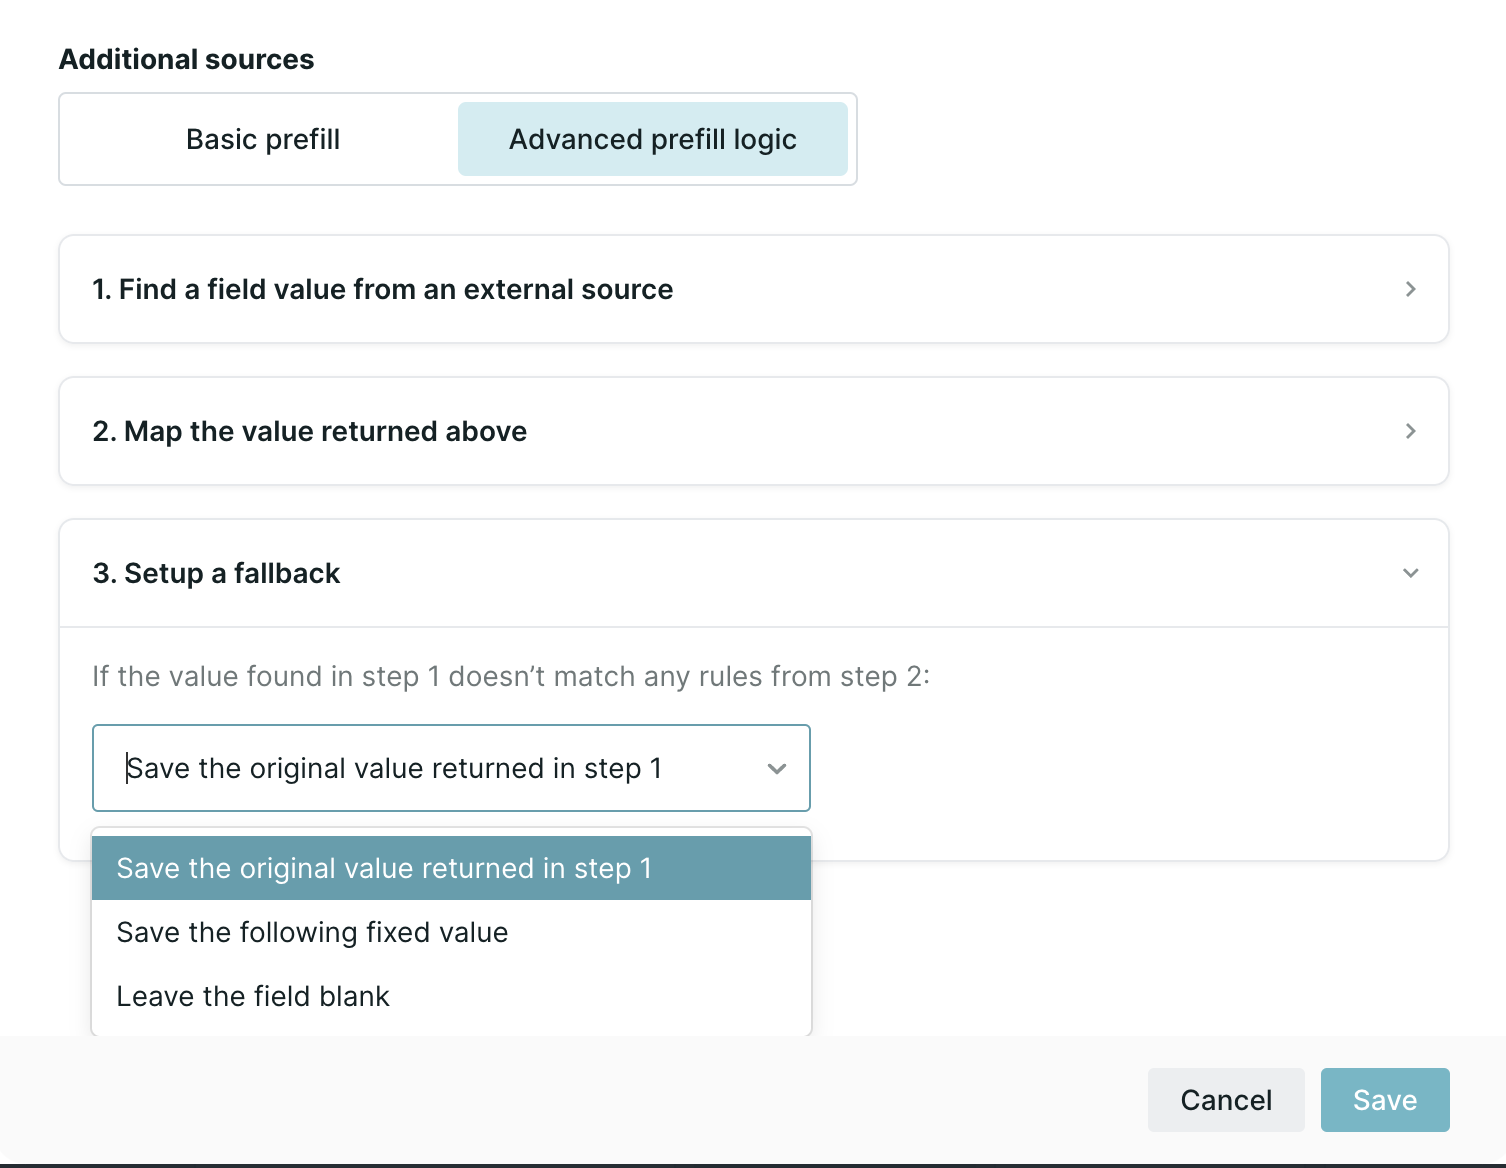
3. Setup a fallback: select what you want to happen if the value found in step 1 doesn't match any of the rules from step 2. There are three options:some text
- Save the original value returned in step 1.
- Save the following fixed value.
- Leave the field blank.
Once all three options have been configured, click the 'Save' button in the lower right-hand corner and 'Save' again on the Visitor Fields page.
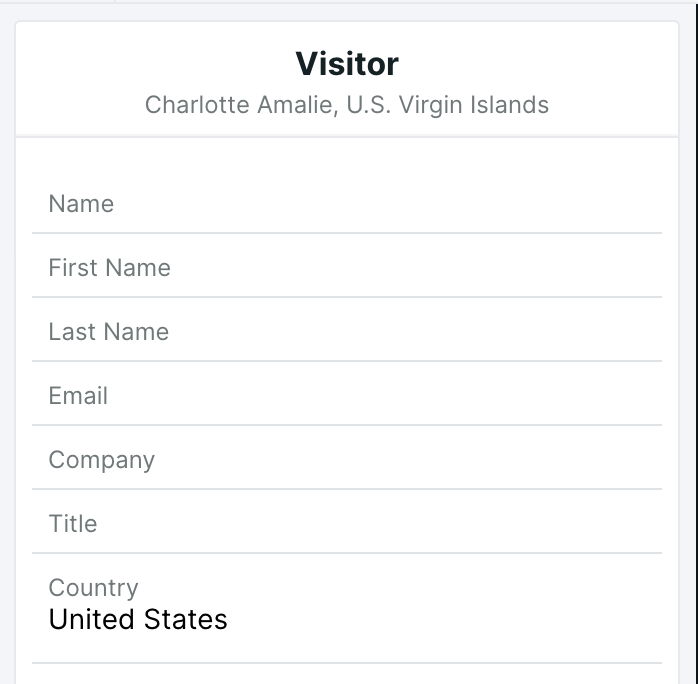
See the Source Prefill in Action
Finally, to see your prefill in action make sure your experience is live. Open an incognito window of your browser and browse to your website where your experience is now live.
While on your site as an active visitor, check out the Qualified app view where you’ll now see all of your visitor fields, including the new field where you are bringing in "country" as shown below.
URL Parameters
URL parameters is one of the most common ways that web tracking information is passed into your site when a lead arrives. Learn how to track four different types of URL parameters: UTM parameters, GCLID parameters, standard web tracking parameters, and your own custom parameters below.
Tracking UTM Parameters
UTM (Urchin Tracking Module) parameters are five variants of URL parameters used by marketers to track the effectiveness of online marketing campaigns across traffic sources and publishing media. The UTM parameters in a URL identify the campaign that refers traffic to a specific website and attributes it to the browser's website session. There are five UTM parameters:
- utm_source = which site sent the traffic (ie, utm_source=google)
- utm_medium = the campaign type (ie, utm_medium=email)
- utm_campaign = the name of the campaign (ie, utm_campaign=new_product)
- utm_term = the search term, if available (ie, utm_term=running+shoes)
- utm_content = the type of link that was clicked (ie, utm_content=banner_ad)
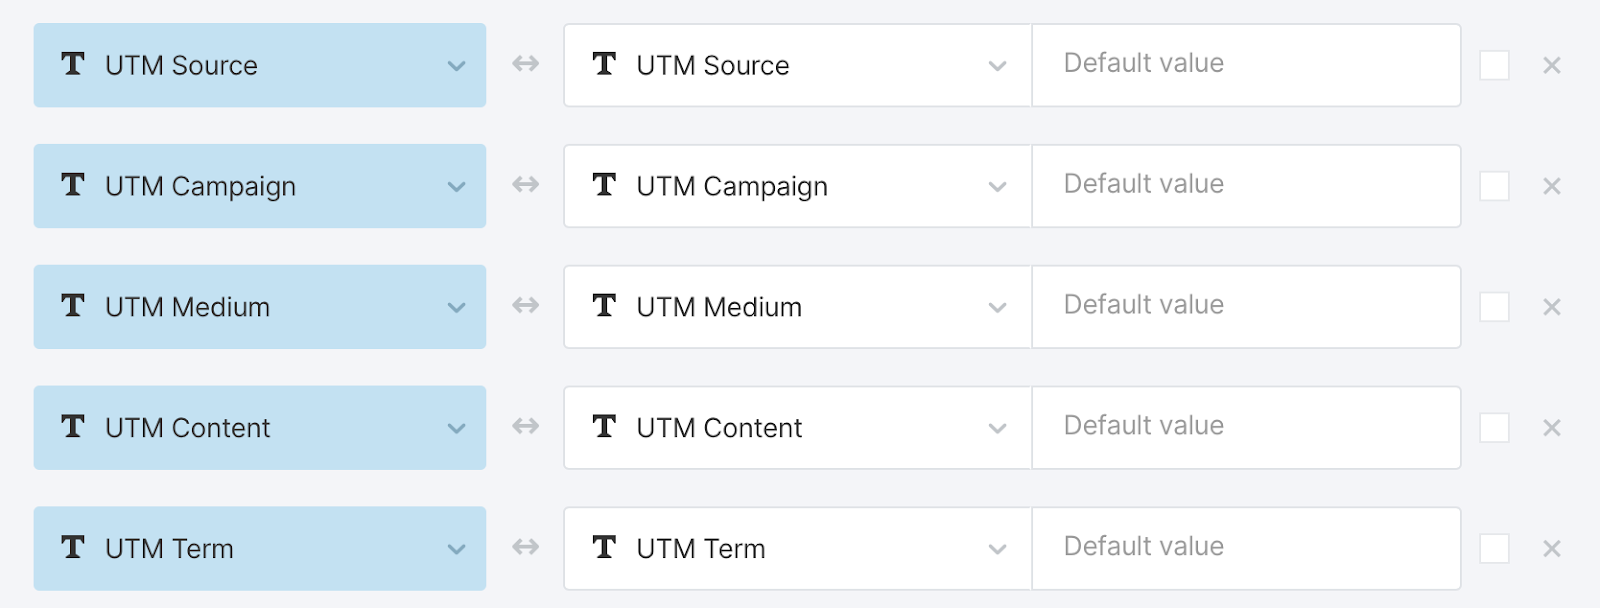
All UTM parameters are passed in the URL when someone arrives on your website, and we've made a nice convenient way to grab any of the standard UTM parameters from the URL and pass them into hidden fields, which will map into Salesforce.
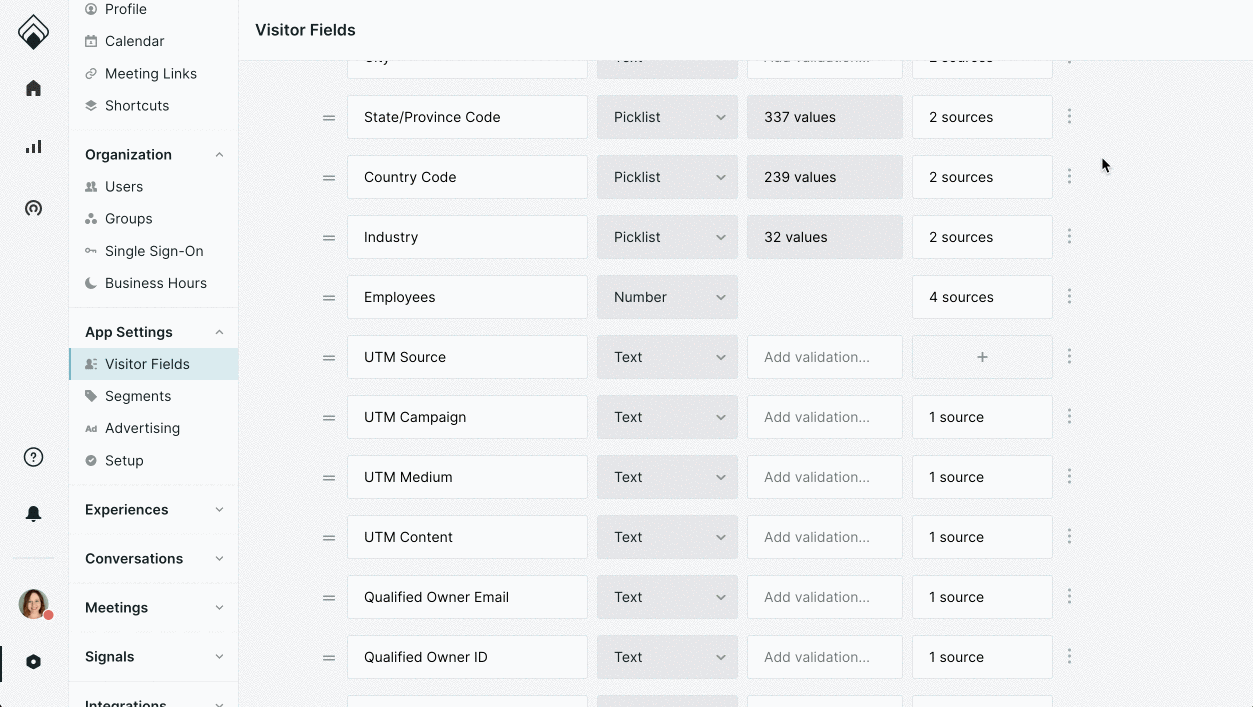
In your Visitor Fields, create a new field for each UTM parameter you'd like to track (as shown above). Click the "+" or "Source" button in the right-hand column after creating the field to use our variable tag builder.
- Under Additional sources, select 'Visit data' from the first drop down.
- Then, select the UTM parameter you'd like to track in this field.
- Click 'Save', and then 'Save' again.
Once you've created this visitor field, you'll also want to make sure it's mapped to Salesforce in your "Lead Mapping" area.
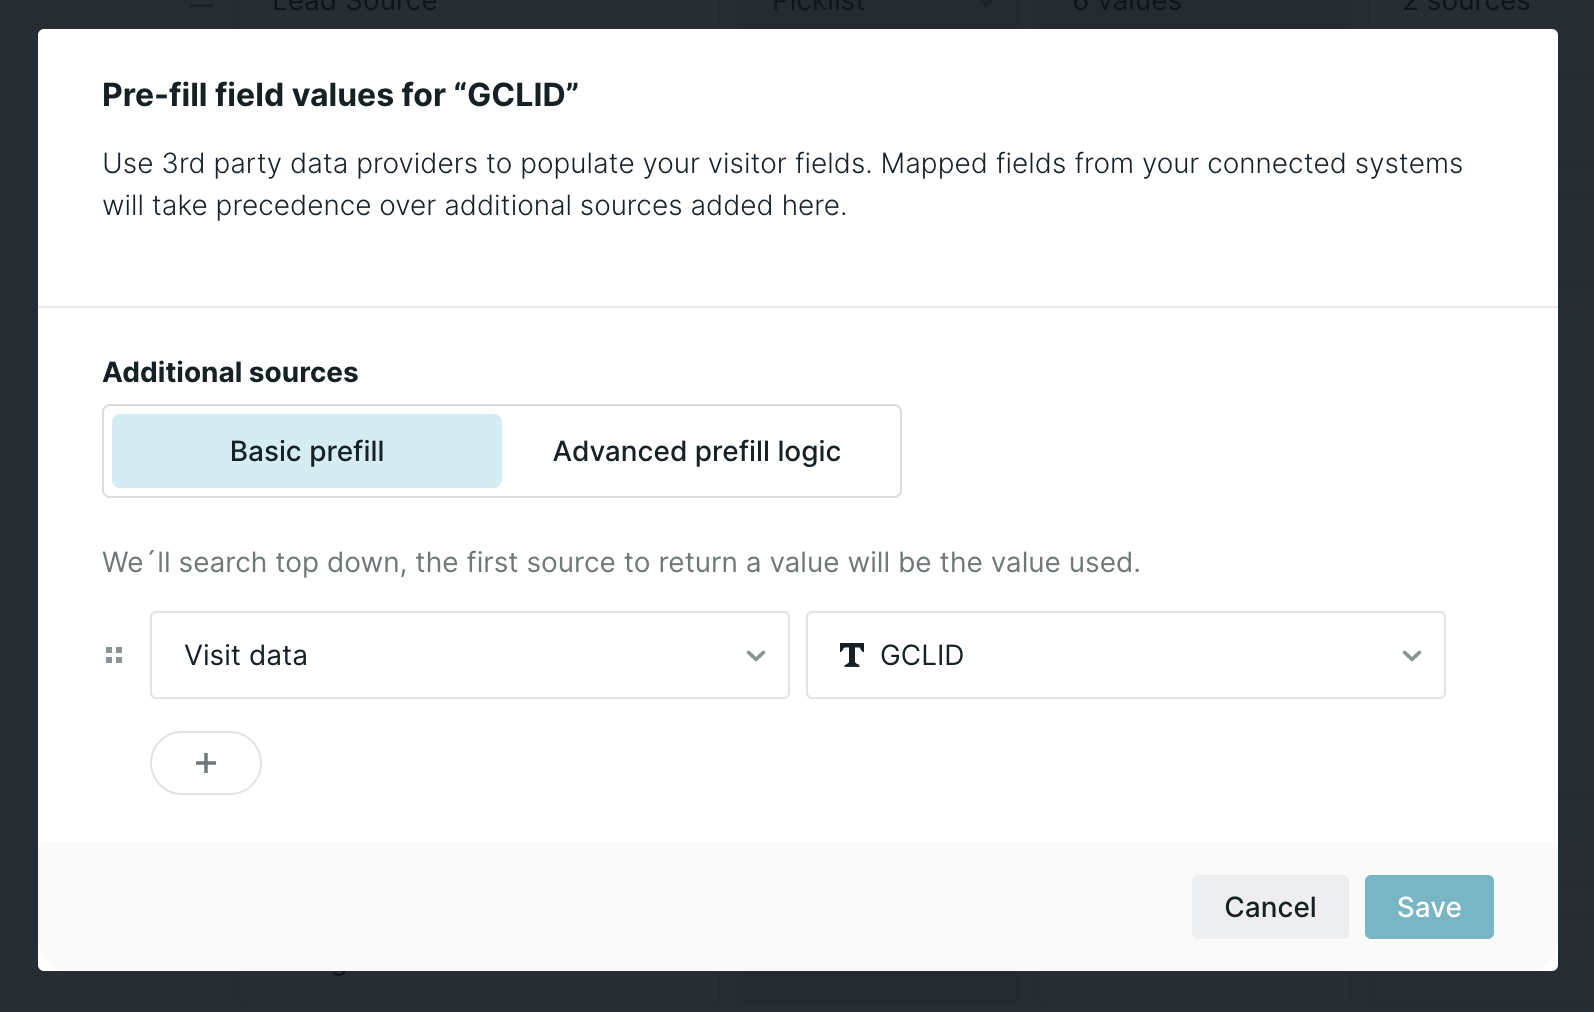
Tracking GCLID Parameters
To make things simpler for marketers using Adwords and Analytics, Google introduced the parameter called GCLID that contains all of the info that is contained in the separate UTM parameters. Even though the GCLID is only understandable by Google, many marketers want to push that GCLID parameter into the lead record in Salesforce for reporting purposes, which can be done by selecting this variable from our variable tag builder.
Referrers, Landing Pages, and Conversion Pages
There are three additional pieces of information that are readily accessible and valuable for sales reps and marketers alike. It's useful to know:
- Initial Referrer = the site that the lead was on before they landed on your site
- Initial Landing Page URL = the page on your site that the lead first entered on
- Conversion Page = the page where a conversation started on your site
All three of these parameters can be accessed through the Visitor data source and mapped into Salesforce, just like UTM Parameters and GCLID.
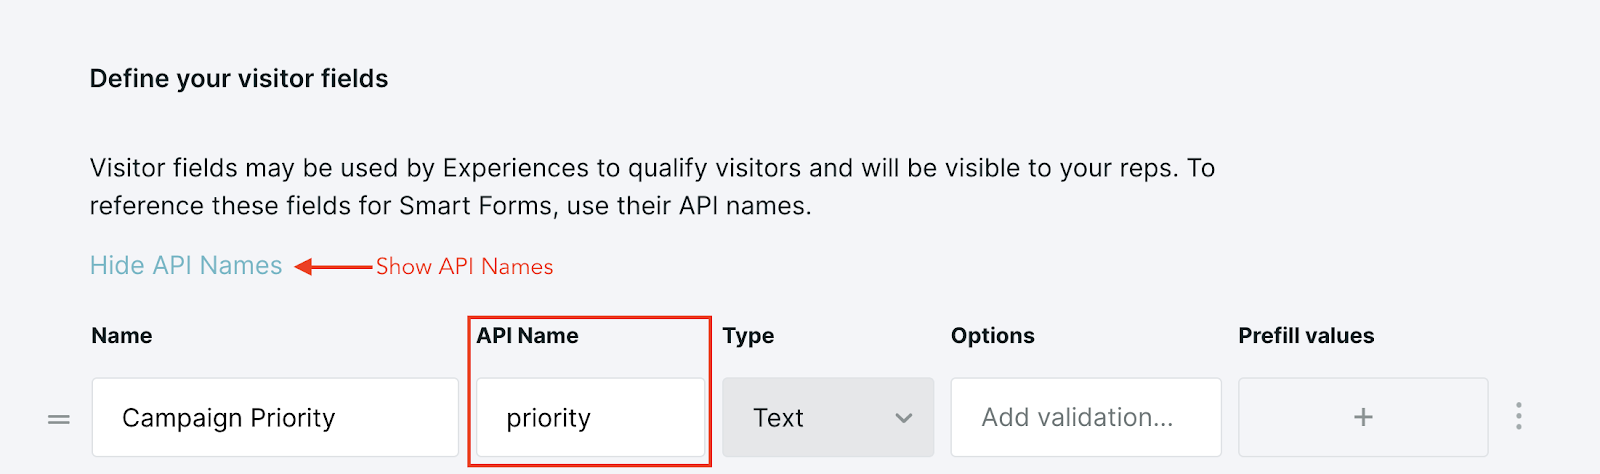
Tracking Custom URL Parameters
Finally, if you have any additional custom URL parameters that fall outside of those listed above, you can adjust the visitor field's API name to match the URL parameter to populate it with the value.
For example, let's say you have defined a campaign priority score and pass values such as ?priority=high or ?priority=low in your URLs. You can update the Visitor Field's API name to 'priority' to populate it with the URL parameter value.
<span id="variable-tag-library"></span>
Variable tag Library for Visitor Fields
Variable tags are a special Qualified syntax that allow you to use visitor field data within a chatbot or experience and populate visitor fields from data coming inbound from other systems.
Below are dynamic variables currently available in Qualified. Note the syntax you'll use to personalize your Experience or in your Experience builder will be different than what you see below which works to populate your visitor fields dynamically.
Note that all field values should be lowercase.
Standard Visitor Field Values
=visitor.first_name
=visitor.last_name
=visitor.city
=visitor.state
=visitor.state_iso_code
=visitor.country
=visitor.country_iso_code
=visitor.region
=visitor.playback_url
=visitor.initial_referrer
=visitor.initial_landing_page_url
=visitor.conversion_page_url
Date and Time
=system.current_time
=system.current_date
Note that the {{system.current_time}} variable is in ISO 8601 format and the UTC time zone. It may need to be converted to a local timezone.
Custom Visitor Field Values
=visitor.fields.<field_api_name>
URL Parameter Values
=visitor.params.<url_param_name>
UTM Parameter Values
=visitor.utm_source
=visitor.utm_campaign
=visitor.utm_medium
=visitor.utm_content
=visitor.utm_term
Qualified Owner Values
=visitor.owner.full_name
=visitor.owner.first_name
=visitor.owner.last_name
=visitor.owner.email
=visitor.owner.salesforce_user_id
Meeting Booked Values
=calendar_event.duration OR =calendar_event.duration_in_minutes
=calendar_event.meeting_type_name
=calendar_event.starts_at OR =calendar_event.starts_at_iso
=calendar_event.ends_at OR =calendar_event.ends_at_iso
=calendar_event.conference_details
=calendar_event.meeting_channel
=calendar_event.attendee_names
=calendar_event.attendee_salesforce_ids
=calendar_event.rep.name
=calendar_event.rep.email
=calendar_event.rep.phone_number
=calendar_event.rep.salesforce_id
=calendar_event.rep_who_offered.name
=calendar_event.rep_who_offered.email
=calendar_event.rep_who_offered.phone_number
=calendar_event.rep_who_offered.salesforce_id
Salesforce Lead/Contact/Account Owner Values
=visitor.external_fields.salesforce_contact.owner#name
=visitor.external_fields.salesforce_lead.owner#name
=visitor.company.external_fields.salesforce_account.owner#name
Salesforce Lead/Contact Field Values
Reference any standard or custom field using its API name.
=visitor.external_fields.salesforce_lead.<field_api_name>
=visitor.external_fields.salesforce_contact.<field_api_name>
Examples:
=visitor.external_fields.salesforce_lead.phone
=visitor.external_fields.salesforce_lead.my_custom_field__c
=visitor.external_fields.salesforce_contact.title
=visitor.external_fields.salesforce_contact.my_custom_field__c
Salesforce Account Field Values
For Salesforce Contacts with a related Account, or with any matched Salesforce Account.
=visitor.company.external_fields.salesforce_account.<field_api_name>
Examples:
=visitor.company.external_fields.salesforce_account.name
=visitor.company.external_fields.salesforce_account.employees
=visitor.company.external_fields.salesforce_account.my_custom_field__c
Salesforce Lead/Contact/Account Lookup Field Values
For referencing values in lookup fields on Leads, Contacts or Accounts:
=visitor.company.external_fields.salesforce_lead.<lookup_field_api_name>#name
=visitor.company.external_fields.salesforce_contact.<lookup_field_api_name>#name
=visitor.company.external_fields.salesforce_account.<lookup_field_api_name>#name
Examples:
=visitor.company.external_fields.salesforce_lead.abm_tier#name
=visitor.company.external_fields.salesforce_contact.ReportsToId#name
=visitor.company.external_fields.salesforce_account.SDR__r#name
Pardot, Marketo, Clearbit, & 6Sense Values
=visitor.external_fields.pardot_prospect.<field_name>
=visitor.external_fields.marketo_lead.<field_name>
=visitor.external_fields.clearbit_enrichment.person_<field_name>
=visitor.external_fields.clearbit_enrichment.company_<field_name>
=visitor.external_fields.clearbit_reveal.<field_name>
=visitor.external_fields.6sense.<field_name>
Heading 1
Heading 2
Heading 3
Heading 4
Heading 5
Heading 6
Lorem ipsum dolor sit amet, consectetur adipiscing elit, sed do eiusmod tempor incididunt ut labore et dolore magna aliqua. Ut enim ad minim veniam, quis nostrud exercitation ullamco laboris nisi ut aliquip ex ea commodo consequat. Duis aute irure dolor in reprehenderit in voluptate velit esse cillum dolore eu fugiat nulla pariatur.
Lorem ipsum dolor sit amet, consectetur adipiscing elit, sed do eiusmod tempor incididunt ut labore et dolore magna aliqua. Ut enim ad minim veniam, quis nostrud exercitation ullamco laboris nisi ut aliquip ex ea commodo consequat. Duis aute irure dolor in reprehenderit in voluptate velit esse cillum dolore eu fugiat nulla pariatur.
Lorem ipsum dolor sit amet, consectetur adipiscing elit, sed do eiusmod tempor incididunt ut labore et dolore magna aliqua. Ut enim ad minim veniam, quis nostrud exercitation ullamco laboris nisi ut aliquip ex ea commodo consequat. Duis aute irure dolor in reprehenderit in voluptate velit esse cillum dolore eu fugiat nulla pariatur.

Block quote
Ordered list
- Item 1
- asdfasdf
- asdfasdf
- asdfasdf
- Item 2
- Item 3
Unordered list
- Item A
- Item B
- Item C
Bold text
Emphasis
Superscript
Subscript
|
|---|
|


.svg)


