
Marketo Integration
Marketo helps foster customer and prospect engagement automatically across multiple digital channels. Connect Qualified to Marketo to optimize your sales and marketing teams’ efficiency.
- Connecting to Marketo
- Creating Marketo Leads & Activities
- Segments, Routing, & Experiences for Marketo Lists & Programs
- Adding Leads to Marketo Programs
- Smart Forms for Marketo
<span id="connecting-marketo"></span>
Connecting to Marketo
Why Connect Qualified to Marketo
By pulling Marketo information into Qualified, your reps learn more about website visitors. In turn, this helps them better target and engage visitors. Pull information from Marketo to:
- Present visitor fields within the Qualified Visitor 360.
- Create segments from static lists, smart lists, and programs.
In addition, automatically update Marketo with new leads and activities when people visit your website. This keeps your marketing and sales teams apprised of new prospects in your pipeline.
Configure the Marketo API
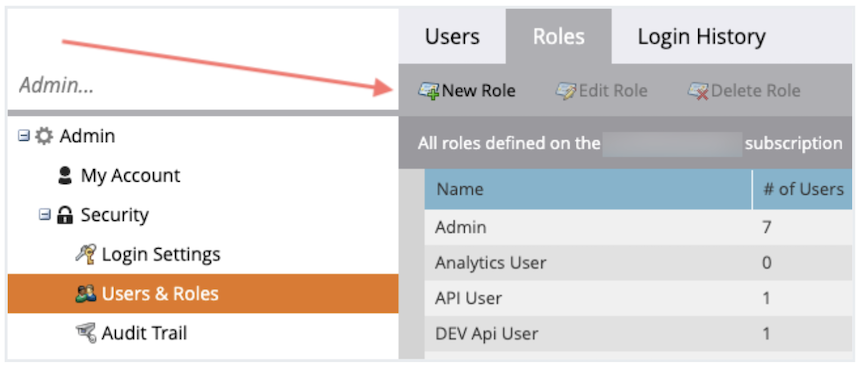
1. Create a API Role
To create a new API role, log in as the Marketo admin and:
- Click Admin.
- Click Users & Roles.
- Click the Roles tab.
- Click New Role:
- Enter a Role Name like “Qualified API Role” and Description (optional).
- Check these Access API permissions
- Read-Only Assets
- Read-Write Activity
- Read-Write Activity Metadata
- Read-Write Person
- Click Create.
2. Assign the API Role to a New User
To create a new API only user:
- Click Admin.
- Click Users & Roles.
- Click the Users tab.
- Click Invite New User.
- Enter the following details:
- Email: a valid email (While invitations are not emailed to API only users, we recommend using a valid address should Marketo send system messages.)
- First Name: Qualified
- Last Name: API User
- Reason: Qualified API User
- Click Next.
- Select the name of the new role you created, like “Qualified API Role,” and check API Only:
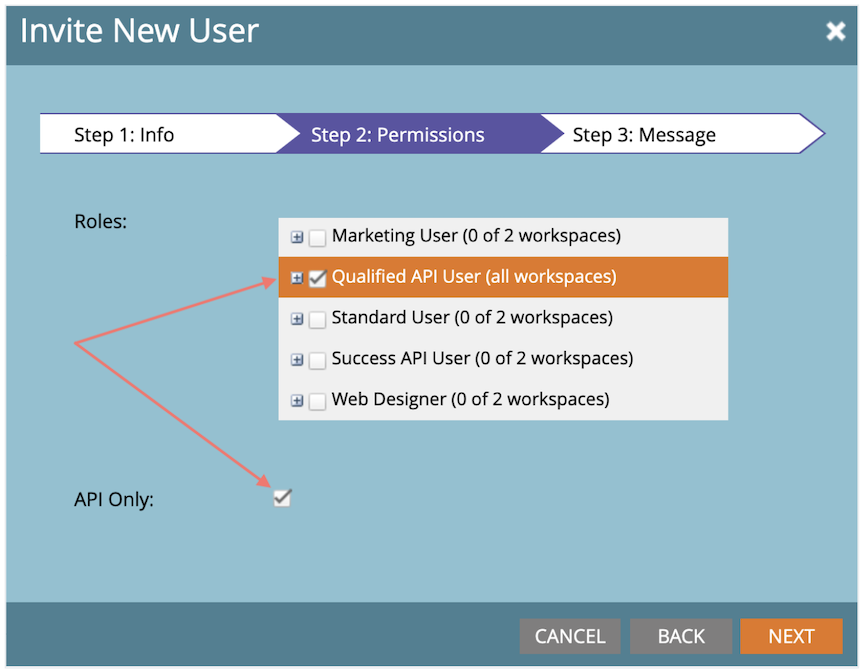
- Click Next.
- Click Send.
3. Create a Marketo Custom Service
A service allows your Marketo instance to accept API calls from Qualified. To create a custom service:
- Click Admin.
- Below Integration, click LaunchPoint.
- Under the Installed Services tab, click New.
- Click New Service:
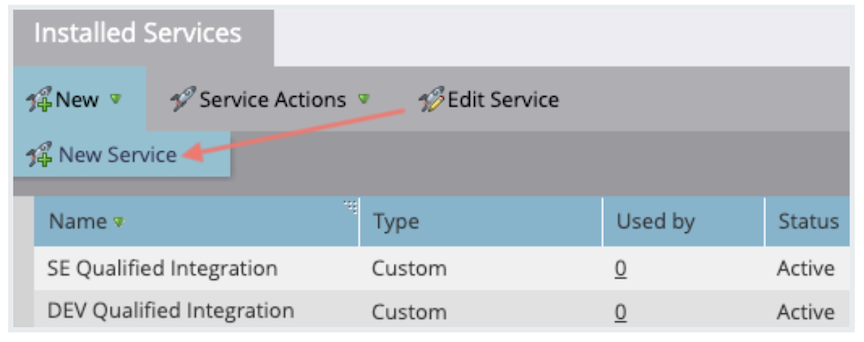
- Enter or select the following details:
- Display Name: Qualified API
- Service: Custom
- Description: Qualified API
- API Only User: The new API only user you created
- Click Create.
We understand that daily API calls are important and often costly. If you would like to limit the number of calls from Qualified to your Marketo API, reach out to your Qualified Success Architect. They can add a daily API call limit (that resets at 12:00 am CT) and/or disable API calls to Marketo when the visitor’s email address is unknown, should it fit your needs.
Connect Marketo to Qualified
Locate Marketo API Details
Some information from Marketo needs to be entered into Qualified when connecting accounts. While still logged in to Marketo, find all of the following:
- Click Admin.
- Below Integration, click Munchkin.
- Find the Munchkin Account ID
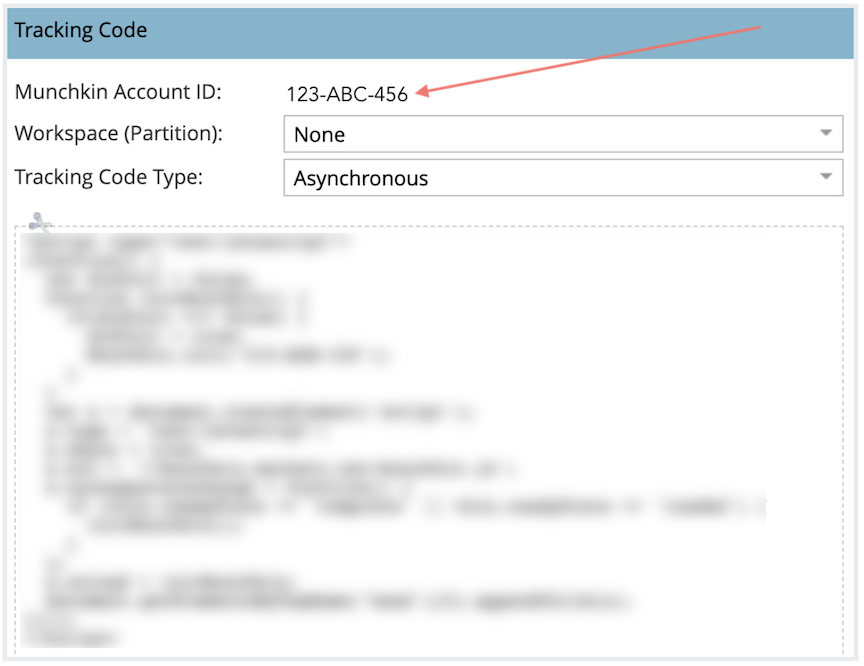
Munchkin is Marketo's custom JavaScript tracking code that tracks your website visitors, identified and anonymous. Qualified uses Munchkin to identify your Marketo leads when they arrive on your site.
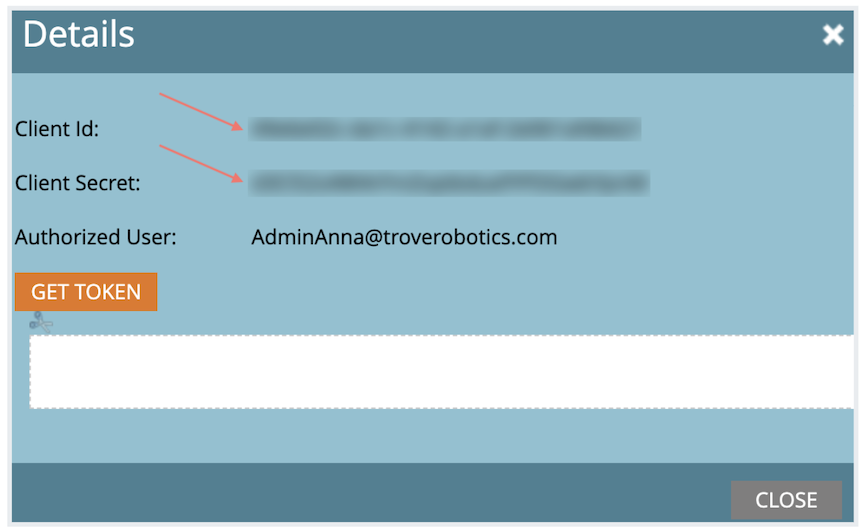
- Open the Marketo admin in a new browser tab and click LaunchPoint.
- Click View Details towards the right of your custom service’s name, like “Qualified API.”
- Find the Client Id and Client Secret:
Connect Accounts
To connect Marketo, log in to your Qualified admin account and:
- Click the Settings icon.
- In the left panel and below Marketo, click Connection.
- Click Connect to Marketo.
- Enter the Marketo API details you found: Munchkin Account ID, Client ID, and Client Secret. (Make sure there are no spaces inserted before the Munchkin Account ID.)
- Click Connect.
Map Fields in Qualified
You can present Marketo fields within the Qualified Visitor 360 and push information collected in the Qualified messenger to Marketo. If a visitor is unknown in Marketo and Qualified creates a new lead, the new lead will be based on your mapped visitor fields.
We recommend mapping at least these fields:
- Email Address
- Full Name
- Company Name
At a minimum, you must collect an email and map the Email Address field for Qualified to create a new Marketo lead. (Marketo requires an email for all new leads.)
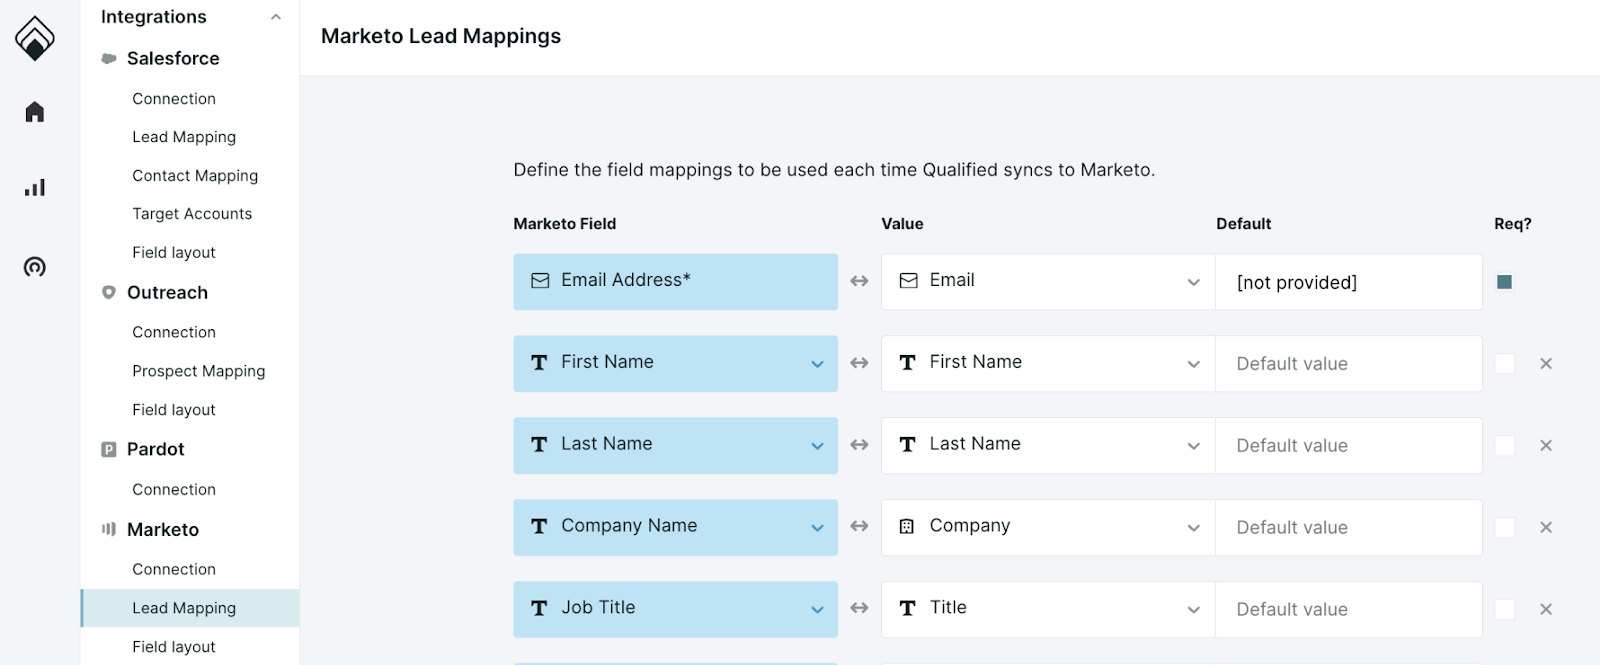
How to Map Fields
Finish creating or updating your fields in Marketo first. Then log in as a Qualified admin to map Marketo fields to Qualified:
- Click the Settings icon.
- In the left panel, click Lead Mapping below Marketo.
- Click + icon to add a new field.
- From the first drop-down menu, select a Marketo Field you want to display within Qualified.
- From the Value drop-down menu, select which Qualified field will display the Marketo information. There are a few options:
- Create field: If a visitor field hasn’t been created in Qualified yet, create a new one and map a Marketo value to it.
- Create hidden field: If a hidden visitor field hasn’t been created in Qualified yet, create a new one and map a Marketo value to it.
- Default value: If a visitor field is empty in Marketo, send the value you entered in the Default textbox to Marketo.
- Fixed value: Send the value you entered in the Default textbox to Marketo. If the Qualified and Marketo values differ, Qualified overwrites the Marketo field.
- Select any option below Value → Visitor Fields when you want to map the Marketo value to Qualified.
- (Optional) If you want to require the field when reps manually create a Marketo lead while chatting, select the Req? checkbox:

- Repeat steps 3-6 for any additional fields you want to map.
- Click Save in the upper-right corner.
If you change or create a lead field in Marketo, go to Settings icon → Marketo → Lead Mapping and click Update Fields. This is required for Qualified to recognize your Marketo updates.
Customize the Visitor 360
Add fields to the Visitor 360 to highlight information from Marketo. This aggregates information for your sales reps to more quickly understand a visitor and engage them in live chat.
To add information from Marketo to the Visitor 360, click the Settings icon → Field layout below Marketo. A preview of the Visitor 360 card appears. Select which Marketo fields you want to surface and drag and drop them to update their order.
<span id="creating-leads"></span>
Creating Marketo Leads & Activities
Create Leads from Qualified
When you have a website visitor that is not a lead yet, create that lead in Marketo. To create Marketo leads, connect to Marketo and finish mapping your fields. You can then create two leads two ways:
- During live chat, a rep clicks Create Lead in Marketo and all mapped fields where Req? is checked have values:
- A visitor is served an Experience and enters their email in the Qualified messenger. When they reach a Push to an external system Experience step for Marketo, Qualified automatically creates a new lead in Marketo.
Allow Qualified to Push Activities
Qualified can create new Marketo activities when your default push is set to Salesforce or Marketo. The steps below don’t rely on your default push setup.
If you want to allow Qualified to create new activities in Marketo, reach out to your Qualified Success Architect.
Assign Permissions in Marketo
First, confirm that the Marketo user that will be used in the Qualified connection has these two permissions:
- Read-Write Activity
- Read-Write Activity Metadata
These permissions are included with the Access API role. To assign the user this role in Marketo:
- Navigate to Admin.
- Click Users & Roles.
- Select the user you want to update.
- Click the Edit User tab.
- Under Roles, check Access API.
- Click Save.
Update Marketo Options in Qualified
Next, make sure your Qualified admin account is connected to Marketo. Once that’s done:
- Click the Settings icon.
- Under Marketo, click Connection.
- Click Enable pushing activities:
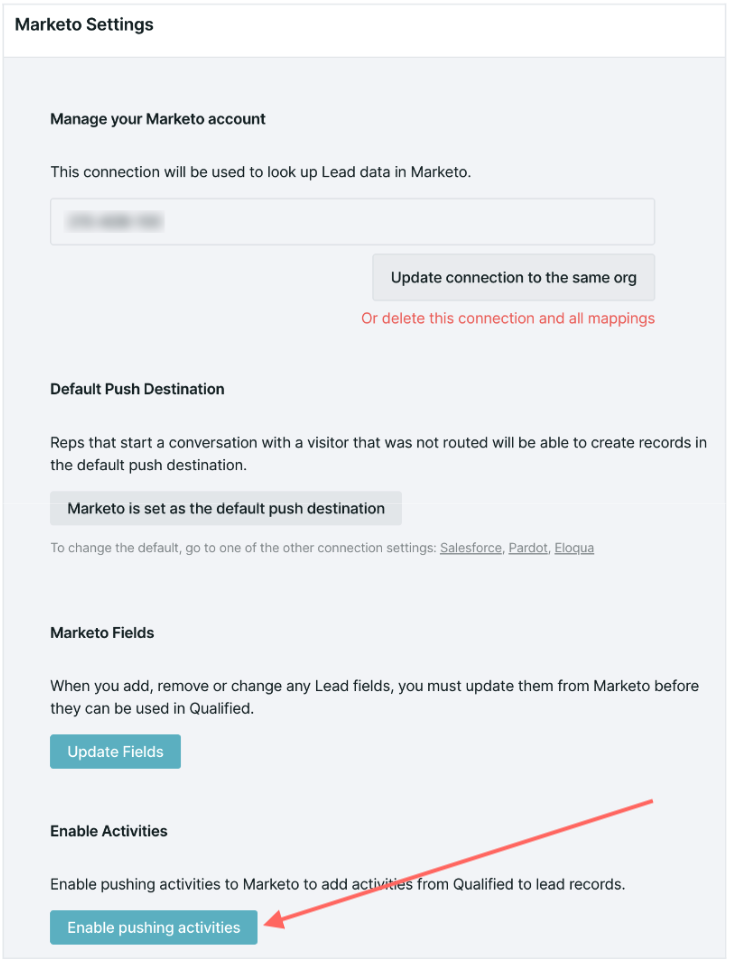
There may be a few minutes delay before Marketo recognizes the update. We highly recommend waiting five minutes and then confirming that Qualified is pushing activities in Marketo. Open the Marketo lead record to view the new activity.
Marketo Activities Created by Qualified
Qualified creates a new activity in Marketo five minutes after a visitor leaves your website or 60 minutes after no website activity is registered.
Visitor Chats with a Rep or Chatbot
When a visitor chats with a rep or chatbot in the Qualified messenger, the pushed activity includes these populated fields:
- Subject: “Conversation via Qualified” (If the visitor chats with a sales rep, it will read “Conversation via Qualified with [Rep Name].”)
- Name: Visitor’s name or email if the Name visitor field is empty
- Start Time: Date and time the chat began
- End Time: Date and time the chat finished
- Playback URL (optional); Link to view a record of the rep and visitor's interactions
- Chat Transcript (optional): A text transcript of the conversation
- Person ID: The visitor’s designated Marketo ID
- Qualified Visitor ID: The ID used by Qualified to distinguish unique visitors (When logged in to Qualified via your browser, add the Visitor ID to https://app.qualified.com/visitor/[VISITOR_ID]to open the Visitor 360.)
Visitor Books a Meeting
If a visitor books a meeting with a rep, an additional Marketo activity is created with these populated fields:
- Subject: “Meeting Booked via Qualified with [Rep Name with scheduled meeting]” (If the meeting was booked with multiple people, the Meeting Owner name is listed.)
- Name: Visitor’s name or email if the Name visitor field is empty
- Start Time: Date and time the chat began
- End Time: Date and time the chat finished
- Playback URL (optional): Link to view a record of the rep and visitor's interactions
- Person ID: The visitor’s designated Marketo ID
- Qualified Visitor ID: The ID used by Qualified to distinguish unique visitors (When logged in to Qualified via your browser, add the Visitor ID to https://app.qualified.com/visitor/[VISITOR_ID]to open the Visitor 360.)
Marketo does not allow for complex field values, so the playback URL is plain text without a hyperlink. Copy and paste the playback URL into your browser to open it. Likewise, chat transcript formatting is limited so line breaks are represented by two forward slashes (//).
If you want to include the Playback URL and Chat Transcript fields in your Marketo activities but they are not visible, reach out to your Qualified Success Architect.
Using Pushed Activity Data in Marketo
When you build smart lists in Marketo, you can create filters based on the new activities’ fields. For example, your smart list could focus on visitors that interacted with the Qualified messenger but did not book a meeting. With this level of granular detail, your marketing operations team could send automated emails acknowledging the missed chat and offer a scheduled demo.
<span id="segments-programs"></span>
Segments, Routing, & Experiences for Marketo Lists & Programs
After you connect to Marketo, create Qualified segments based on your Marketo static lists, smart lists, and programs. Then trigger and tailor Experiences for those segments.
If you’re interested in creating segments based on Marketo lists and program members, reach out to your Qualified Success Architect.
Sync List & Program Members with Qualified
Confirm that your Marketo integration user has Read-Only Assets permission. Qualified admins can then sync different list and program members. Log in to your Qualified admin account and:
- Click the Settings icon.
- In the left panel and below Marketo, click Programs & Lists.
- Click where you want to sync members from:
- Click the + icon.
- Select the list or program that you want to pull into Qualified.
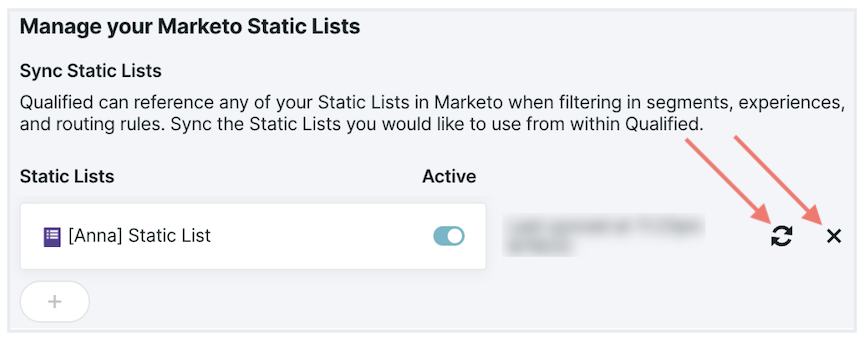
- Verify that Active is toggled on:

After Active is toggled on, your list will automatically start syncing. This can take up to a few minutes to finish. When complete, a timestamp that states when it was last synced will appear next to the list or program name.
Qualified automatically refreshes your synced Marketo member lists daily at 12:00 am CT. If you update a list or program’s criteria within Marketo, click the Refresh icon in Qualified to immediately re-sync and keep the member list accurate. You can also delete a Marketo list or program from Qualified by clicking the X icon:
Create Segments from Synced Marketo Members
After your Marketo lists are synced, build new Qualified segments. When you build a segment, select Static Lists, Smart Lists, or Programs below Marketo:
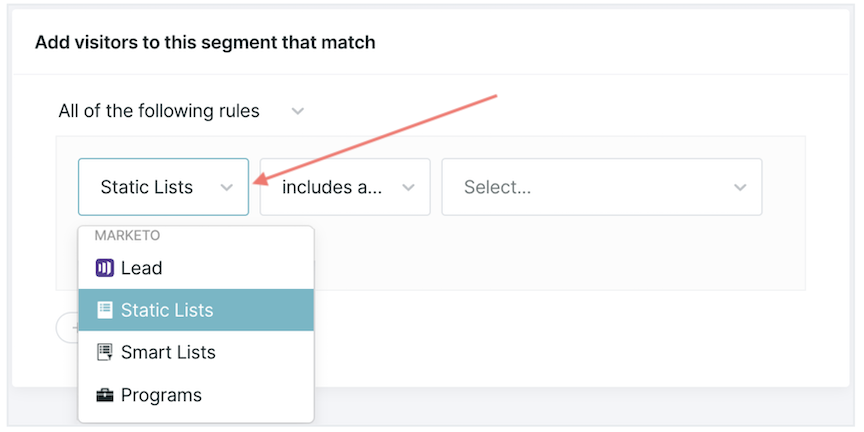
Use the drop-down menus to narrow down which list or program is included in your new segment.
You can only create segments from synced lists and programs. If you don’t see one, verify that it’s synced from Settings → Marketo → Programs & Lists.
Customize Routing & Experiences for Marketo Members
With your new segments, you can update or create a new routing rule. You can also build a new Experience or tailor an existing one a few ways:
- Alert your sales team when visitors from the segment land on your website.
- Trigger the Experience when a visitor from your new Marketo segment arrives.
- Customize the Experience based on which persona is included in that specific synced list.
<span id="leads-programs"></span>
Adding Leads to Marketo Programs
Power nurturing initiatives by automatically adding leads to your Marketo programs. Add an Experience step that defines when visitors are added to the Marketo program of your choice.
If you want Qualified to add leads to Marketo programs, reach out to your Qualified Success Architect.
Confirm Marketo Permissions
When you connect Marketo to Qualified, the integration user needs specific permissions. For Qualified to add leads to Marketo programs, confirm that your Marketo integration user has Read-Only Assets.
Customize Your Experience
Qualified can only add leads to Marketo programs when visitors already have a lead record, so two Experience steps are needed. To add leads to a Marketo program from Qualified:
- Insert a Push to an external system step to create a new or update an existing Marketo lead early in the Experience.
- Select Create the Lead as soon as the visitor reaches this step:
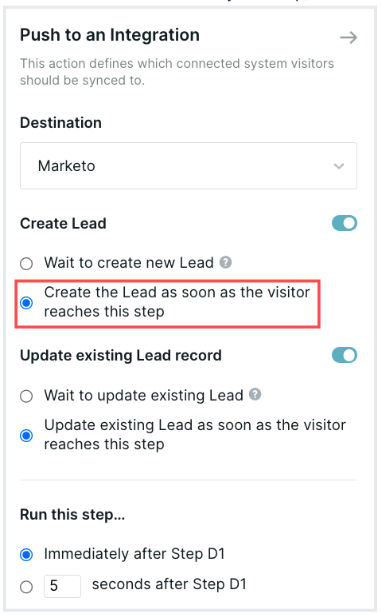
- Insert an Add to a program step after your Push to an external system one.
- From the next drop-down menu, select the program where you want to add leads. (This will display all of your Marketo programs; it’s not limited to your synced programs.) If you don’t see the program that you want, click the Refresh icon to pull an updated list from Marketo:
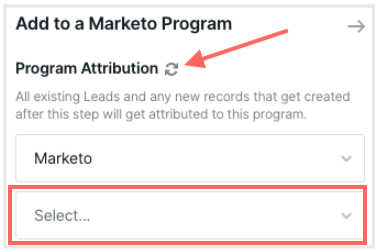
- Choose which program status is assigned from the following drop-down menu:
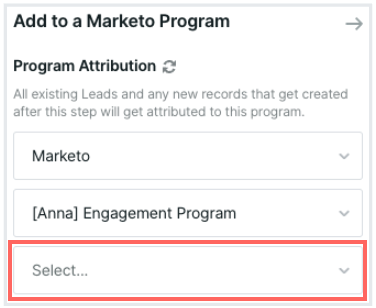
When choosing the program status, it’s important to know that you can’t send a lead backward. For example, you may have a program with status “Member” as step 10 and “Influenced” as step 20. If a lead is already in the program with status “Influenced,” you cannot change their status to “Member” from a Qualified Experience.
- When you finish building your Experience, click Save Experience.
<span id="smart-forms"></span>
Smart Forms for Marketo
Using smart forms with Qualified allows your existing lead capture form to qualify leads on-the-fly and route your most qualified visitors to your sales reps in real-time.
Traditional lead forms often come with the expectation that visitors coming to your website will have to wait hours or days to talk to your sales team. Smart forms allow you to alert your reps in real-time to those hot prospects on your site ready to talk with sales, or book a meeting with your sales team for a later time. No more back and forth scheduling required!
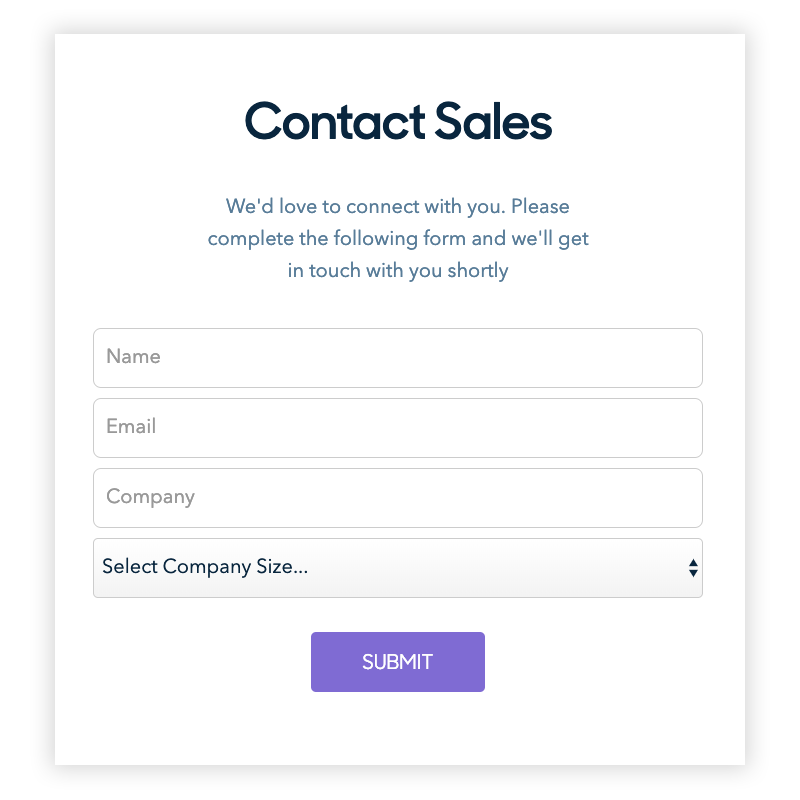
Getting Started
It all starts with understanding how your Marketo lead forms work. Let's look at a sample "contact sales" lead form that was generated by Marketo and the block of JavaScript (Marketo embed code) that is on your website which dynamically creates the form. If you use Marketo, this probably resembles a form on your website today:
The HTML (embed code) behind the Marketo lead form shown above:
<script src=“//app-sjqe.marketo.com/js/forms2/js/forms2.js”></script>
   <form id=“mktoForm_621”></form>
<script>
   MktoForms2.loadForm(“//app-sjqe.marketo.com”, “718-GIV-198”, 621);
</script>
Set Up Your Fields
Define your Visitor Fields in Qualified
First, you need to define your visitor fields in Qualified.
You can verify the Marketo field mappings by navigating to Marketo --> Lead Mapping.
Set Up Your Form Experience
A form experience will trigger when your visitor fills out your Marketo form.
To create your experience:
- Navigate to Experiences -> Forms in your Qualified account.
- Configure your Form Trigger
- Define your Marketo Lead Configuration
- Build your form experience
Heading 1
Heading 2
Heading 3
Heading 4
Heading 5
Heading 6
Lorem ipsum dolor sit amet, consectetur adipiscing elit, sed do eiusmod tempor incididunt ut labore et dolore magna aliqua. Ut enim ad minim veniam, quis nostrud exercitation ullamco laboris nisi ut aliquip ex ea commodo consequat. Duis aute irure dolor in reprehenderit in voluptate velit esse cillum dolore eu fugiat nulla pariatur.
Lorem ipsum dolor sit amet, consectetur adipiscing elit, sed do eiusmod tempor incididunt ut labore et dolore magna aliqua. Ut enim ad minim veniam, quis nostrud exercitation ullamco laboris nisi ut aliquip ex ea commodo consequat. Duis aute irure dolor in reprehenderit in voluptate velit esse cillum dolore eu fugiat nulla pariatur.
Lorem ipsum dolor sit amet, consectetur adipiscing elit, sed do eiusmod tempor incididunt ut labore et dolore magna aliqua. Ut enim ad minim veniam, quis nostrud exercitation ullamco laboris nisi ut aliquip ex ea commodo consequat. Duis aute irure dolor in reprehenderit in voluptate velit esse cillum dolore eu fugiat nulla pariatur.

Block quote
Ordered list
- Item 1
- asdfasdf
- asdfasdf
- asdfasdf
- Item 2
- Item 3
Unordered list
- Item A
- Item B
- Item C
Bold text
Emphasis
Superscript
Subscript
|
|---|
|


.svg)


