
Configuring the Pardot Integration
- Connecting to Pardot (Marketing Cloud Account Engagement)
- Pardot Prospect Tracking
- Pardot Prospect Activities
- Pardot Prospect Fields
- Pardot Landing Pages
<span id="connecting"></span>
Connecting to Pardot (Marketing Cloud Account Engagement)
By connecting your Pardot (Marketing Cloud Account Engagement) org to Qualified, you can view any of the Marketing Cloud Account Engagement (Pardot) prospect field values for a visitor on your site, such as the prospect’s:
- Demographic data, including any data gathered on their company such as industry, company size, and years in business, if you captured that data in Pardot
- Score, to measure their relative engagement
- Grade, if you are using that feature to measure how much of a demographic match they are for your goods or services
- Activity history, to see which of your emails they have opened or clicked
- And additional custom fields you’ve defined and populated for your Marketing Cloud Account Engagement (Pardot) prospects
All of which can help a sales rep have an informed conversation with the prospect – while they are on your site!
Marketing Cloud Account Engagement (Pardot) is typically managed through SSO with Salesforce, allowing Salesforce to govern access. Both systems can then share data so that you can benefit from the combination of both applications’ data and capabilities.
Create a Salesforce User with an Identity User License to Connect with Qualified
If you already have a Salesforce Integration user connected with Qualified, skip to Create a Pardot (Marketing Cloud Account Engagement) User to Connect with Qualified.
1. From Salesforce Setup, go to Users. Click New User.

2. Complete the following fields for the Salesforce ⇔ Qualified Integration User.
- First Name: Qualified Pardot
- Last Name: Integration
- Alias: Tab through to auto-populate.
- Email: Choose a valid email address to receive the email with the link to activate the user and set a password.
- Username: Select a unique username. We recommend something like qualified-integration@ourcompany.com (with your company’s name).
- Nickname: Tab through to auto-populate.
- Role: Leave as <None Selected>.
- User License: Identity
- Profile: Identity User
3. Click Save.
4. Check the email inbox for the activation email from Salesforce. Click the link in the email to set and confirm the password.
<span id="create-user"></span>
Create a Pardot (Marketing Cloud Account Engagement) User to Connect with Qualified
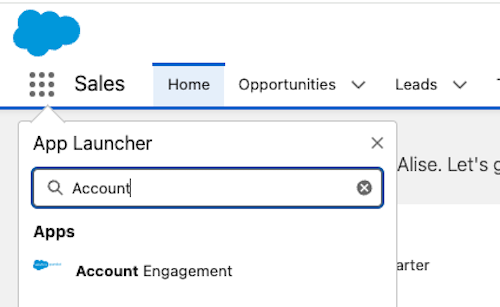
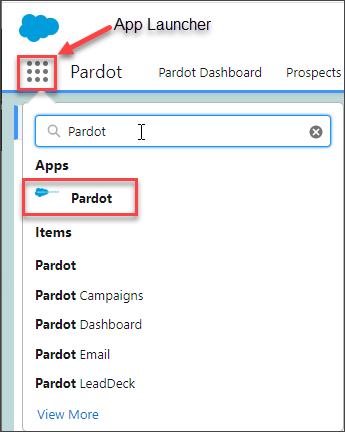
1. From the App Launcher, search for Account Engagement.
2. Select Account Engagement Settings
3. Click the "Add User" button to add a new Account Engagement User.
.png)
4. Create a new Marketing Cloud Account Engagement (Pardot) user for connection with Qualified.
- First Name: Qualified Pardot
- Last Name: Integration
- Email: admin@{yourcompanydomain} (a valid email for your admin)
- Leave the default values in the next several fields.
- CRM Username: Select the Salesforce user you created in the previous step: qualified-integration@{yourcompanydomain}.
If you do not see the Salesforce ⇔ Qualified integration username in the drop-down, click the refresh button to refresh the Salesforce user list in Pardot and try again.
- Role: Administrator
- Deselect the Email Preferences boxes.
- Click Create User to save the new Pardot ⇔ Qualified integration user.
- Scroll down past the HTML and Text signatures (not needed) and complete the timezone, locale, language.
5. Once you create the Pardot integration user, click Enable Salesforce single sign-on in the resulting screen to sync the Salesforce and Pardot integration users.
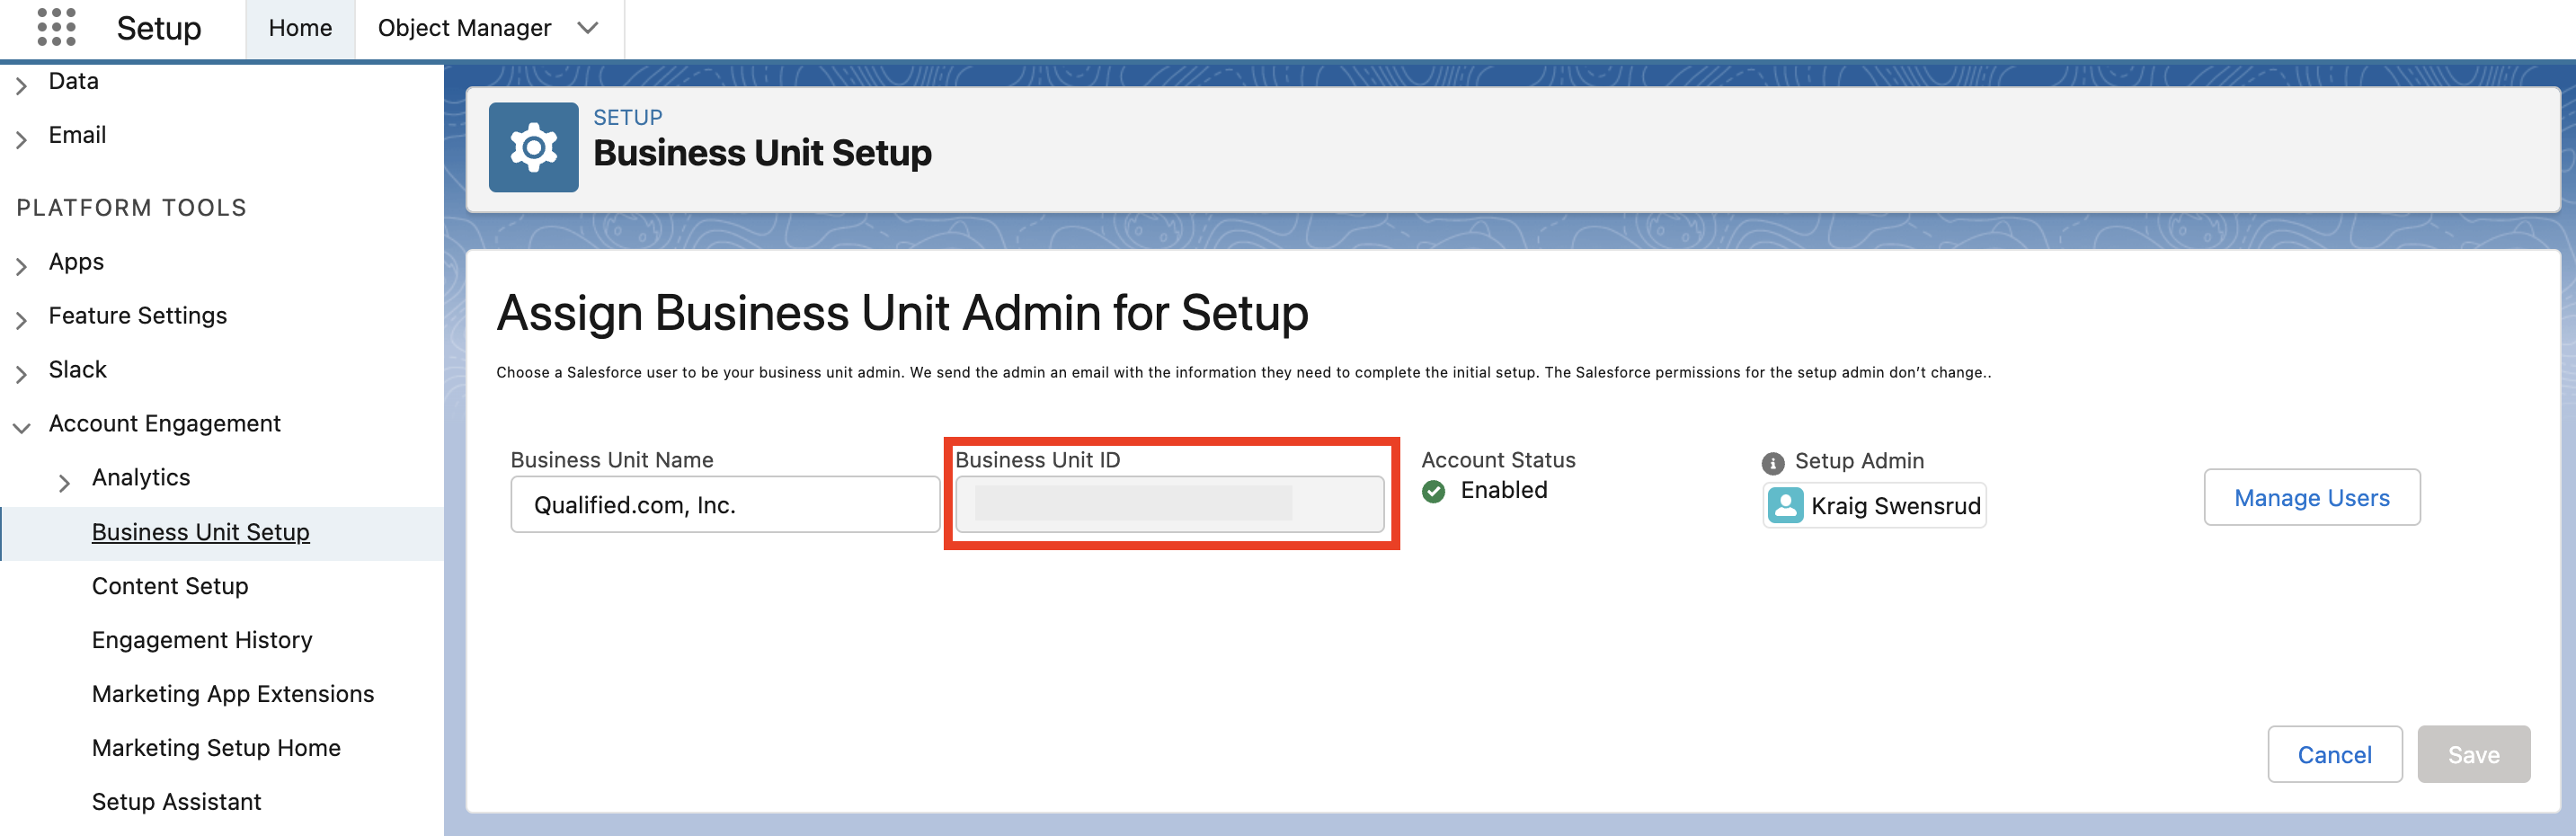
Find Your Pardot Business Unit ID
- From Salesforce Setup, go to Account Engagement on the left-hand side panel.
- Copy the 18-digit Business Unit ID. You'll need it in just a minute.
Establish Your Marketing Cloud Account Engagement (Pardot) Connection in Qualified
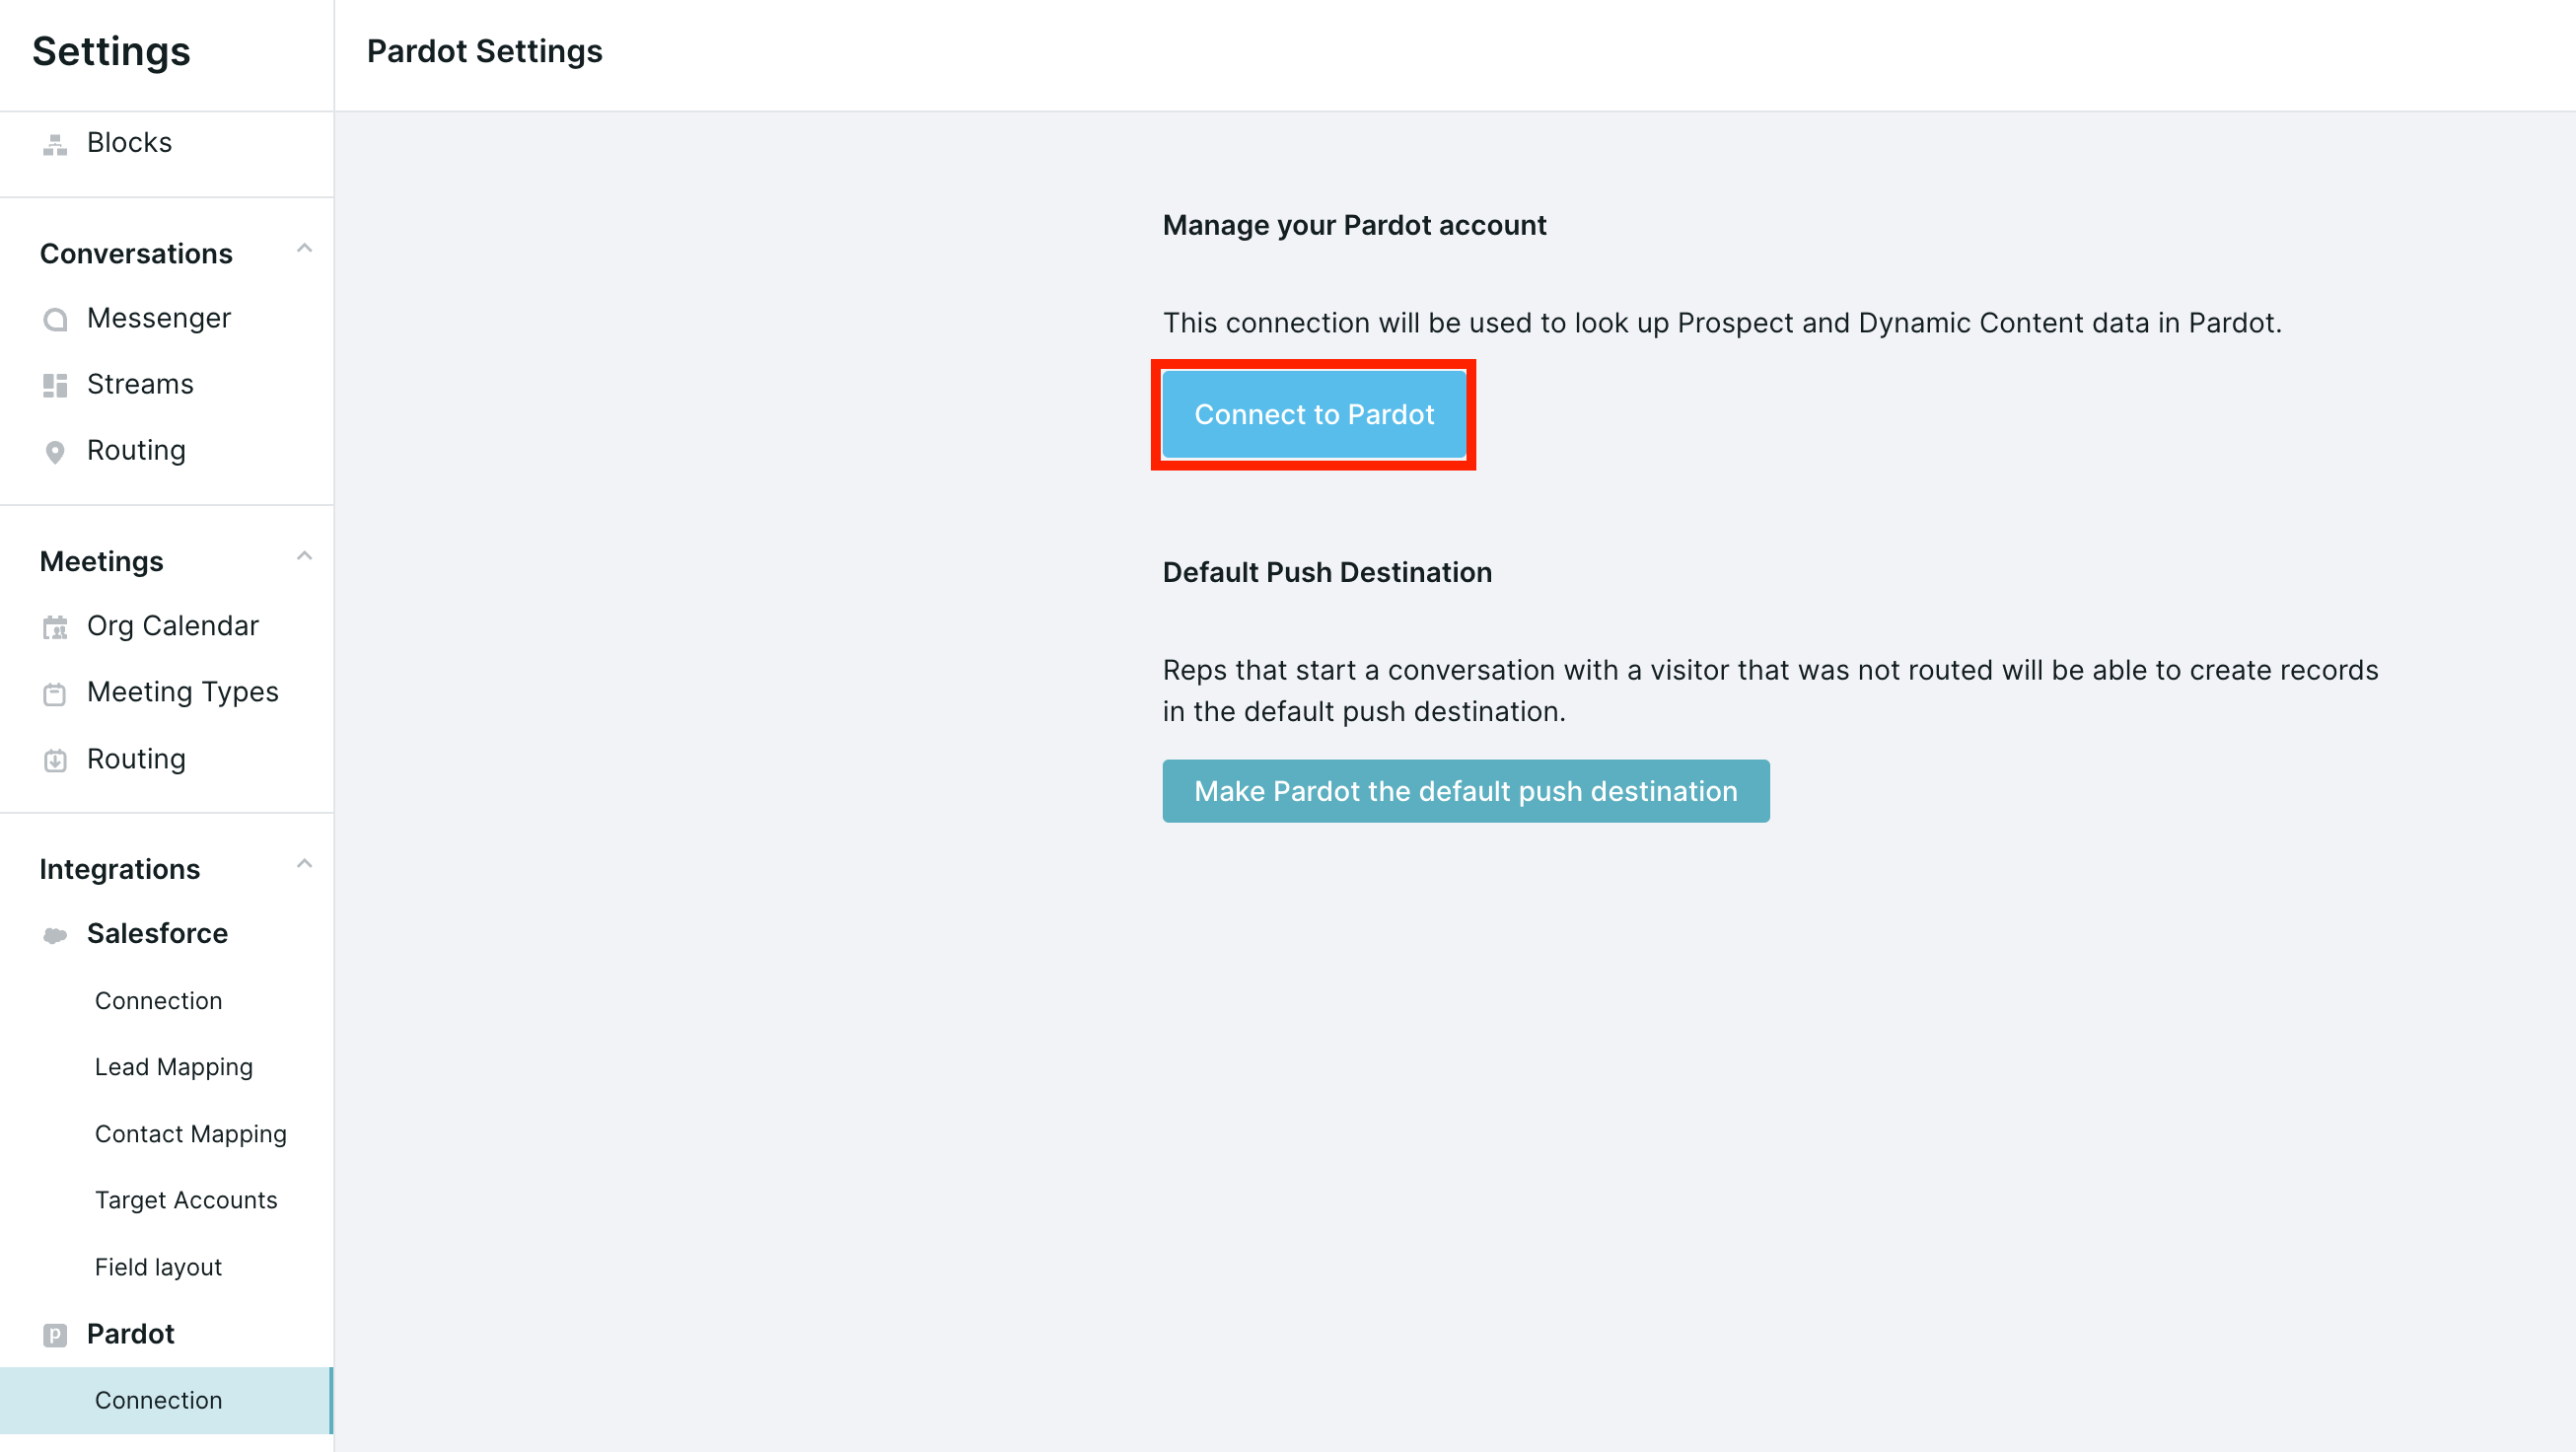
1. As an Admin in Qualified, go to Settings → Integrations → Pardot → Connection.
2. Click Connect to Pardot. Note: Qualified does not support connecting to Pardot Sandbox instances, so connection must be made to Production.
3. Enter the Marketing Cloud Account Engagement (Pardot) Business Unit ID you just copied.
For additional instructions on how to find your business unit ID, hover over the (?) tooltip.
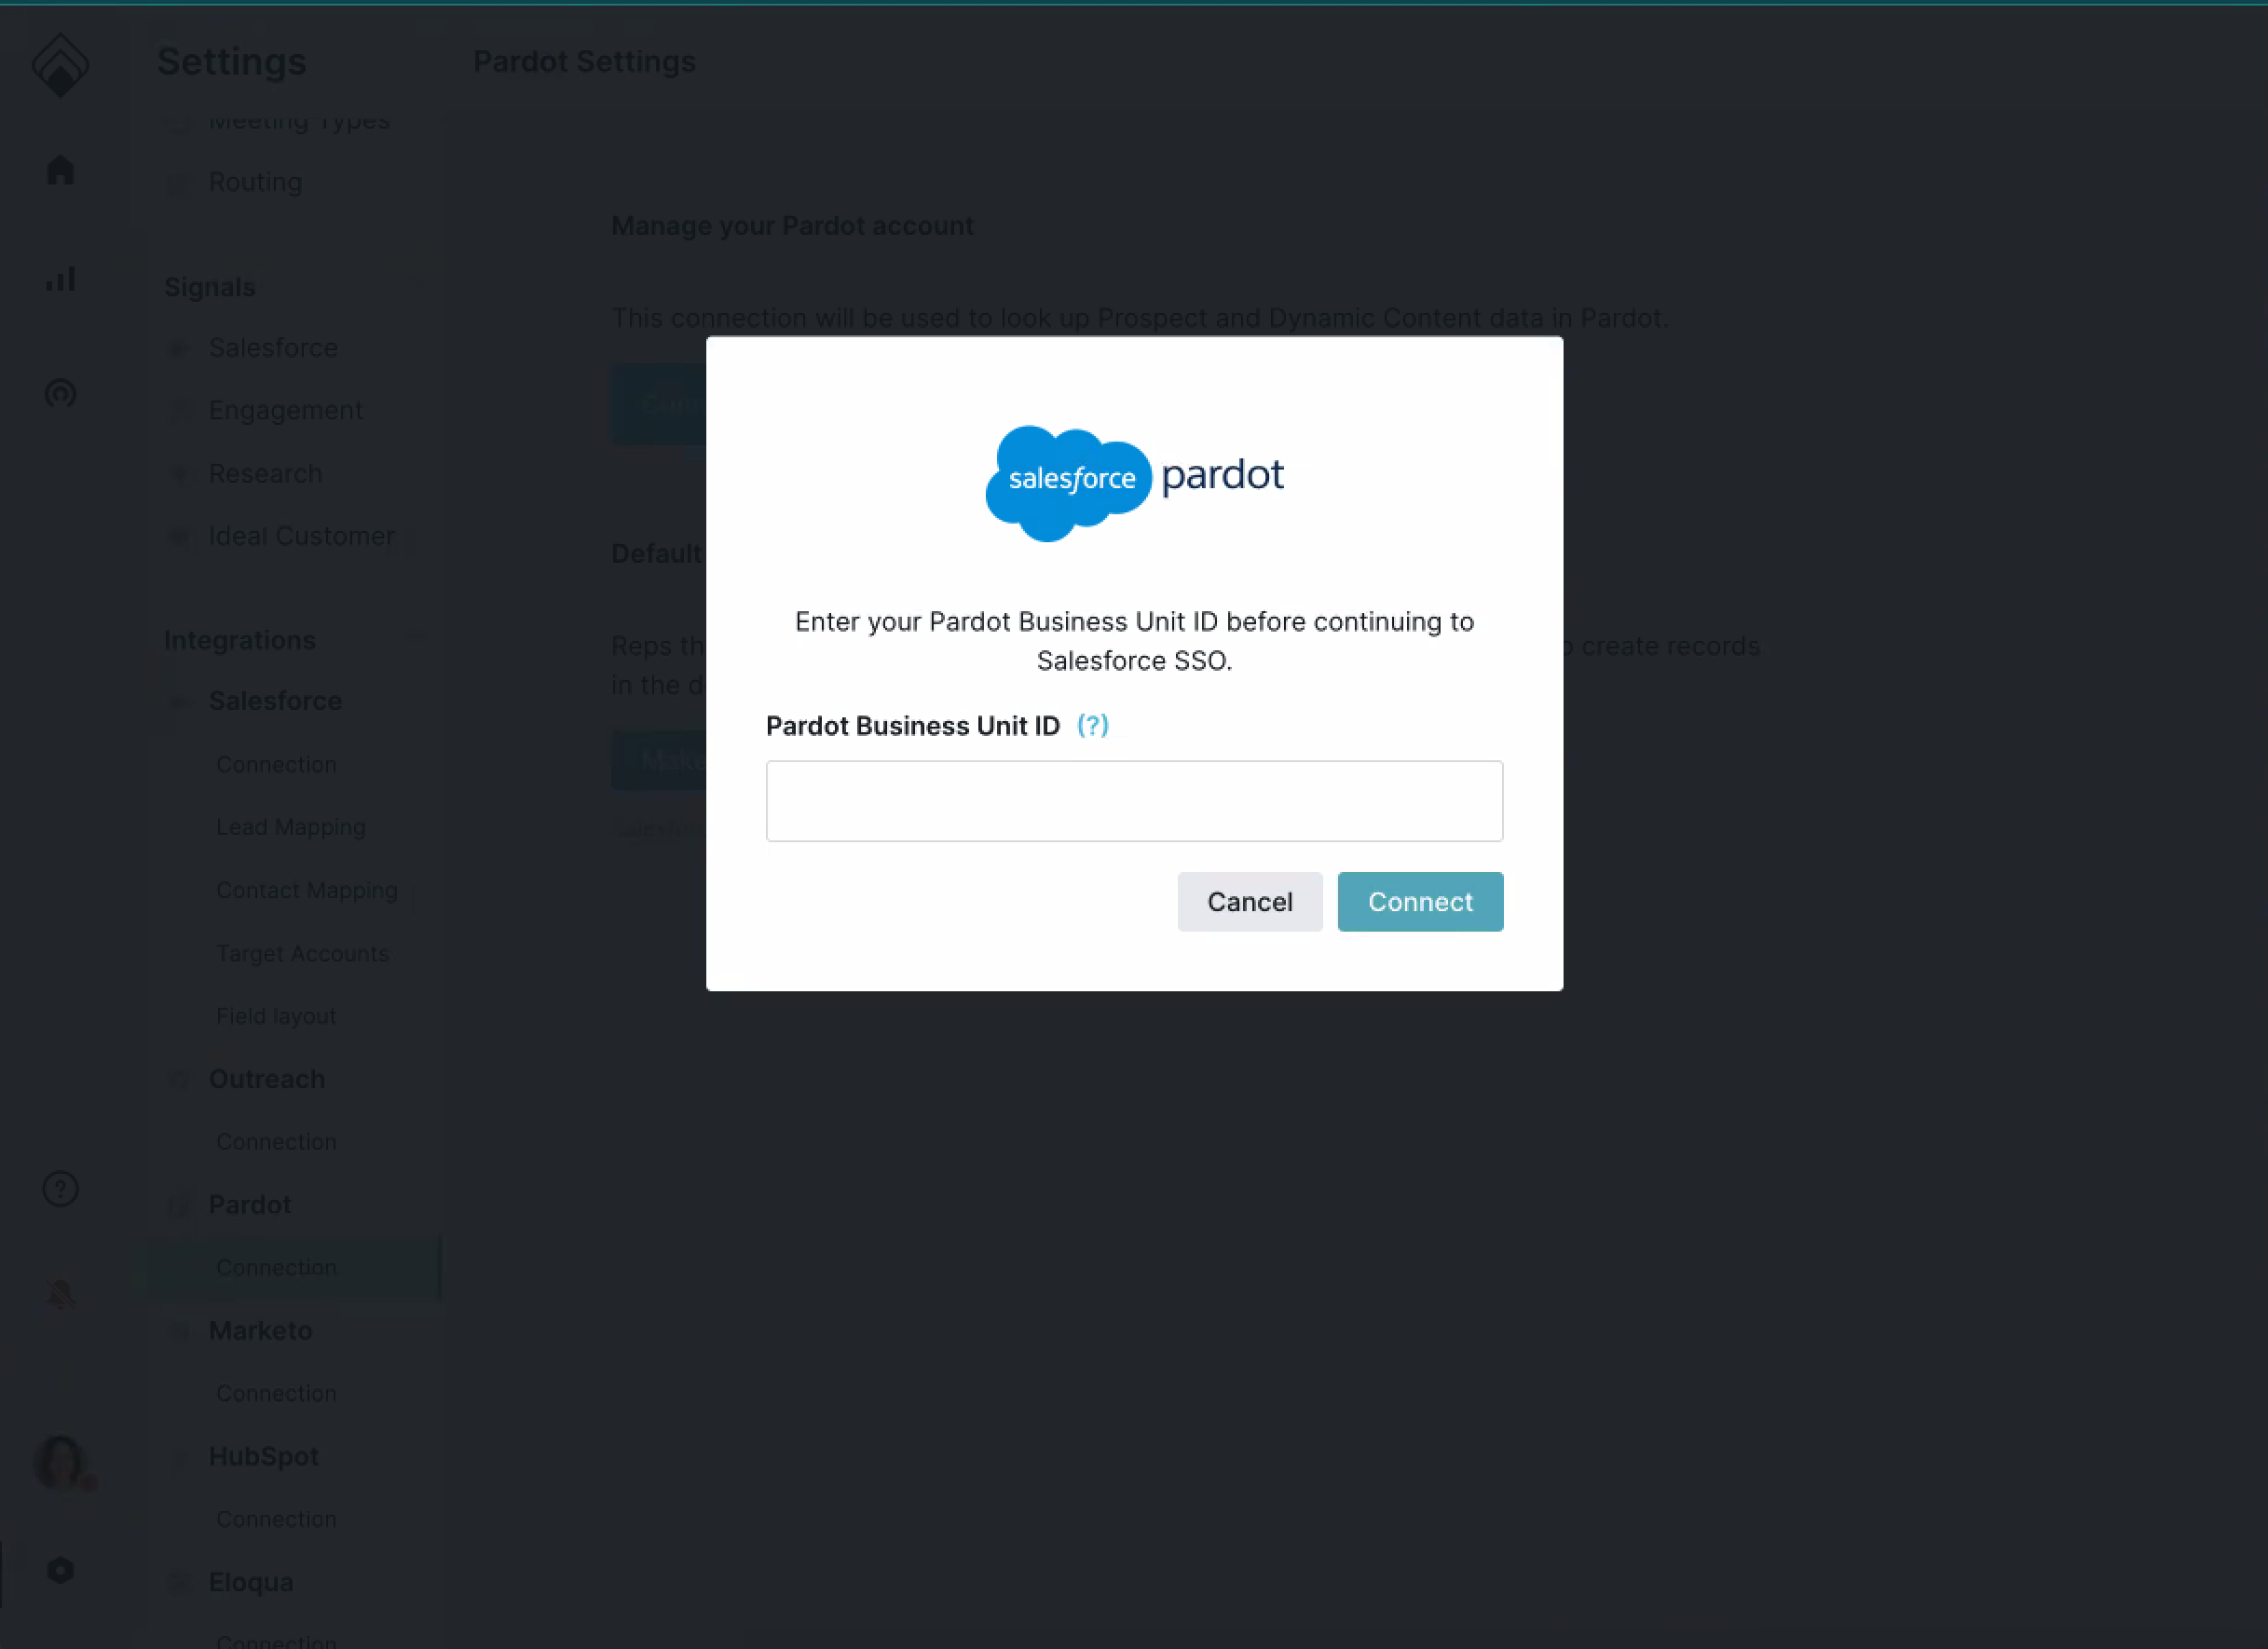
4. Click Connect.
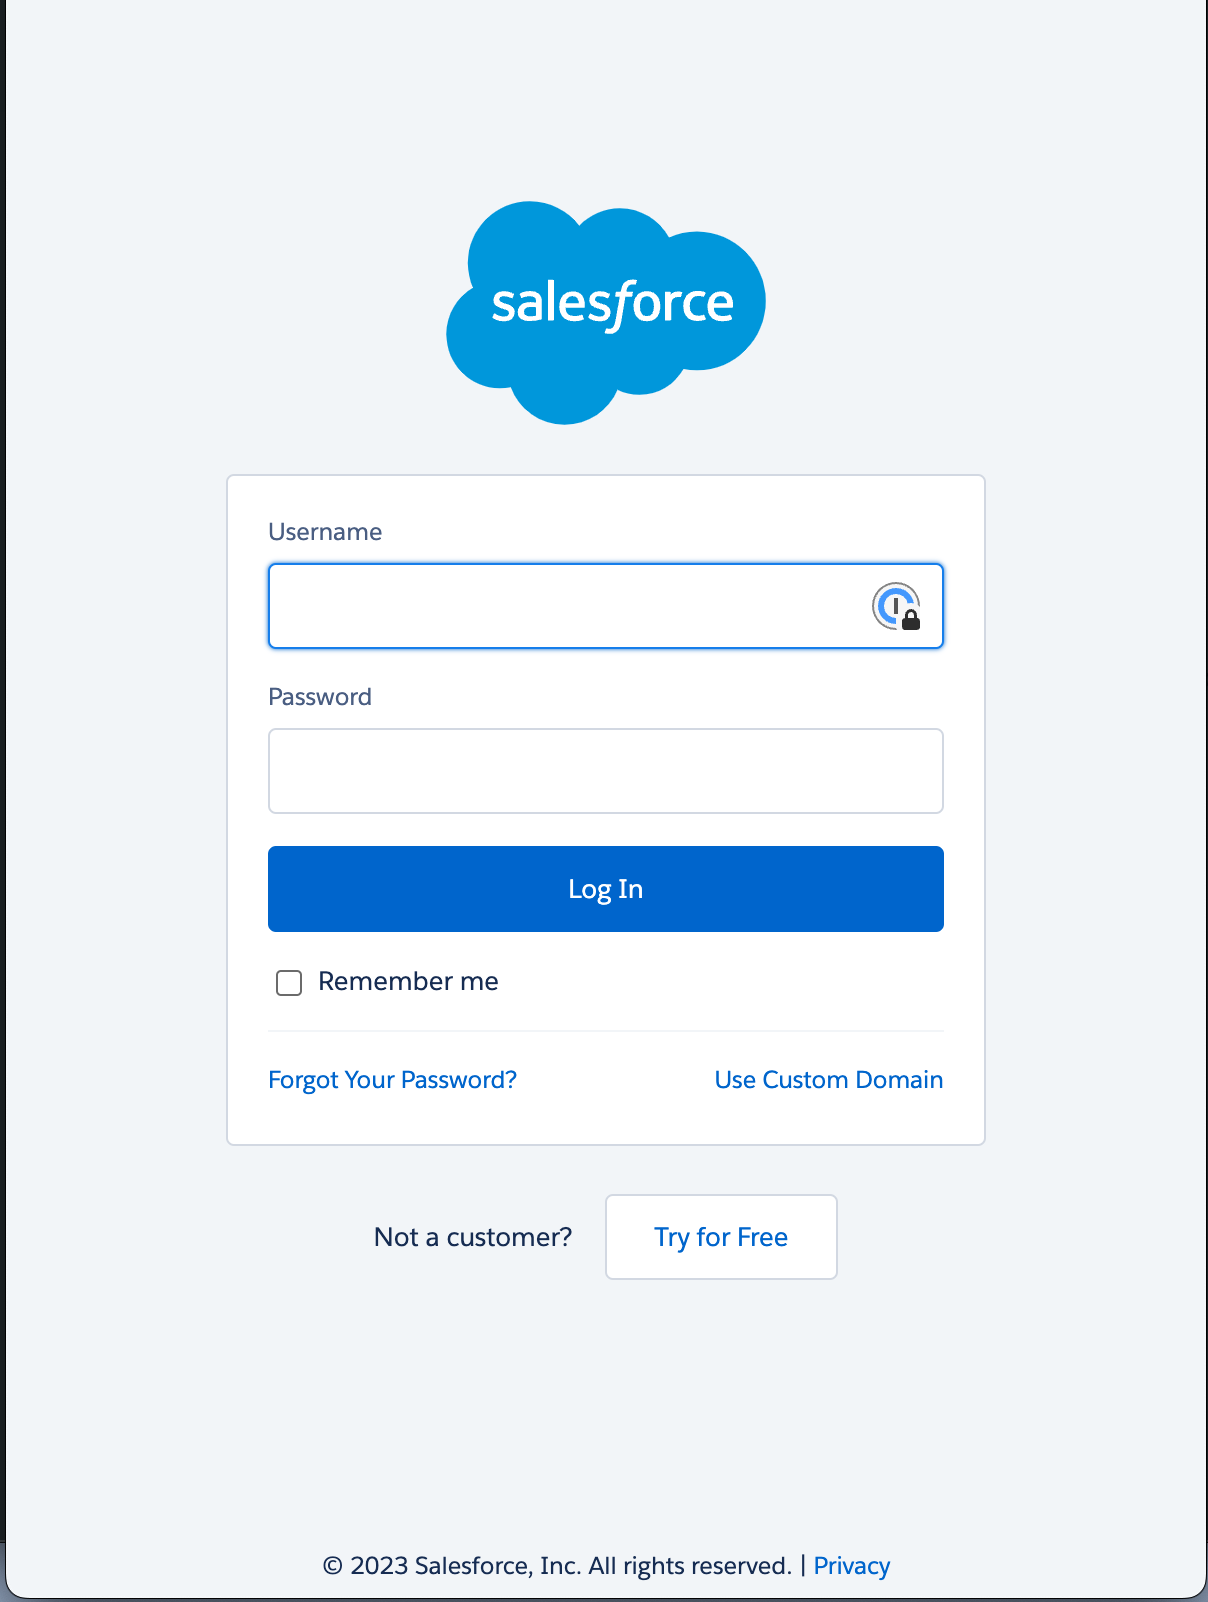
5. Enter the Salesforce username and password you created for the Salesforce ⇔ Qualified integration user. With “Remember me” selected, click Log In.
6. Click Allow to complete the connection between Qualified and Marketing Cloud Account Engagement (Pardot) (via the Salesforce SSO process).
You should now have Qualified and Marketing Cloud Account Engagement (Pardot) connected.
<span id="tracking"></span>
Pardot Prospect Tracking
Each time a Pardot prospect lands on one of your website pages that is running the Qualified JavaScript snippet, Qualified pulls in the prospect’s data so that your sales team can see the Pardot data for the prospect who is on your site within the Qualified app.
Learn how to setup Pardot Prospect Tracking using Dynamic Content, or without using Dynamic Content.
<span id="dynamic-content"></span>
With Dynamic Content
Create the Dynamic Content in Pardot
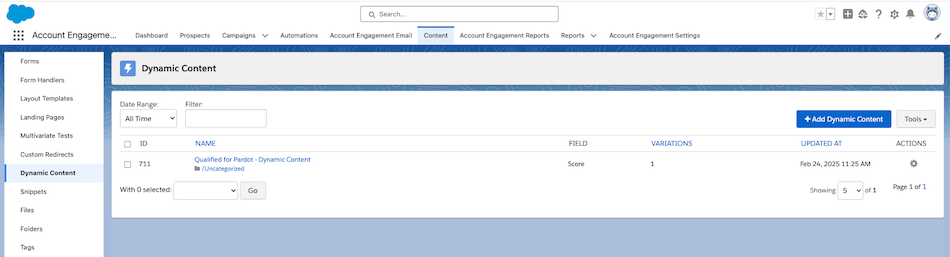
1. Navigate to the Account Engagement Console in Salesforce
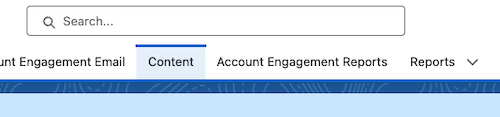
2. Select Content
3. In the left menu, select Dynamic Content and then press the blue Add Dynamic Content
4. Paste the following block into the Default Content field:
If you have upgraded your Pardot account to use Handlebars Merge Language, use {{Recipient.Email}} in place of %%email%%
5. Press Save
Verify that the Dynamic Content Is Set Up Successfully
1. As an Admin in Qualified, go to Settings → Integrations → Pardot → Connection.
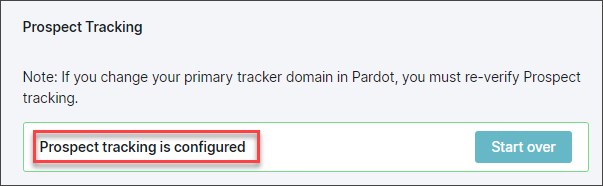
2. Scroll to the Prospect Tracking section of Pardot Settings and click Verify Prospect Tracking.
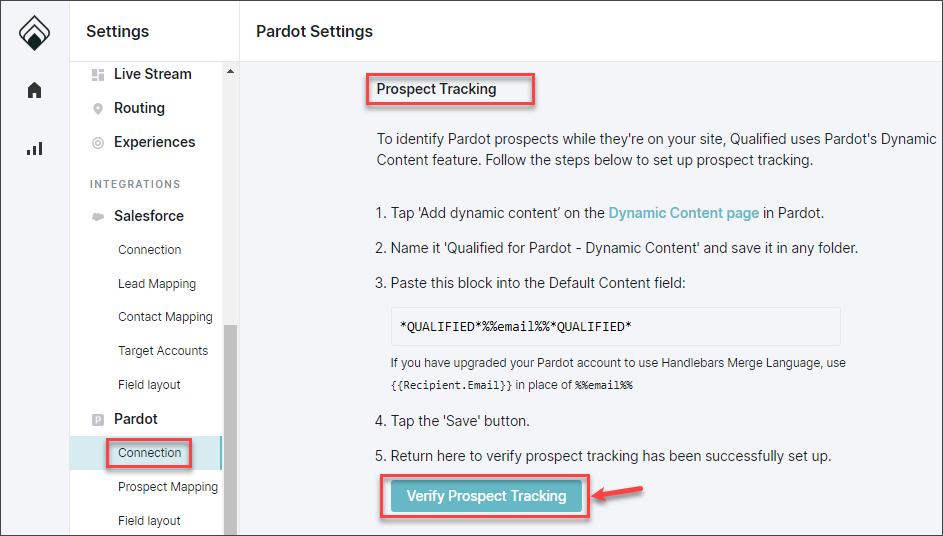
3. If your setup was successful, you'll see the message: Prospect tracking is configured.
<span id="without-dynamic-content"></span>
Without Dynamic Content
Create a Campaign for Website Tracking
Connected Campaigns between Salesforce and Pardot were introduced with the Winter 2019 Salesforce release and all Pardot orgs created since the Winter 2020 Salesforce release have them turned on by default. If you do not have Connected Campaigns enabled, consider reviewing their setup and advantages.
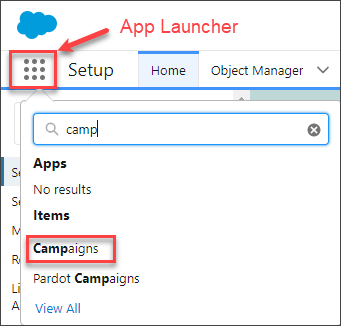
1. Access the Campaigns tab from a tab in a Salesforce app or directly from the Salesforce App Launcher.
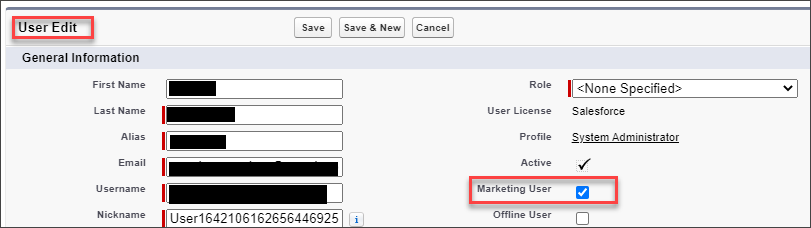
Note that to create a campaign, a user must have the Marketing User permission selected on their user record.
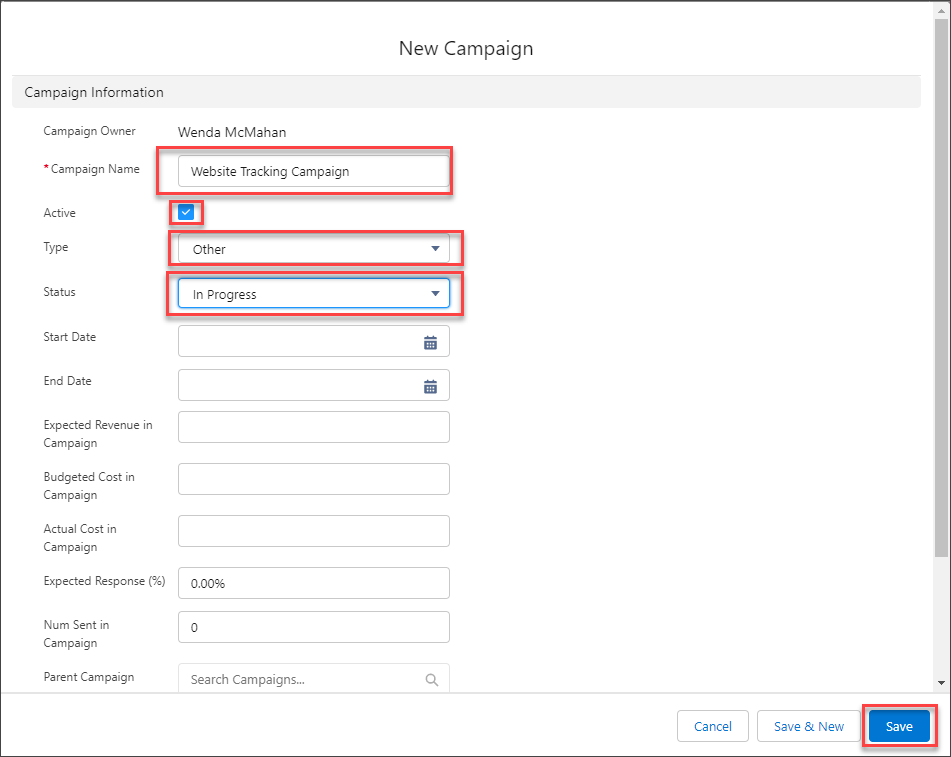
2. Click New on the Campaign page to create a Pardot campaign for tracking your website activity.
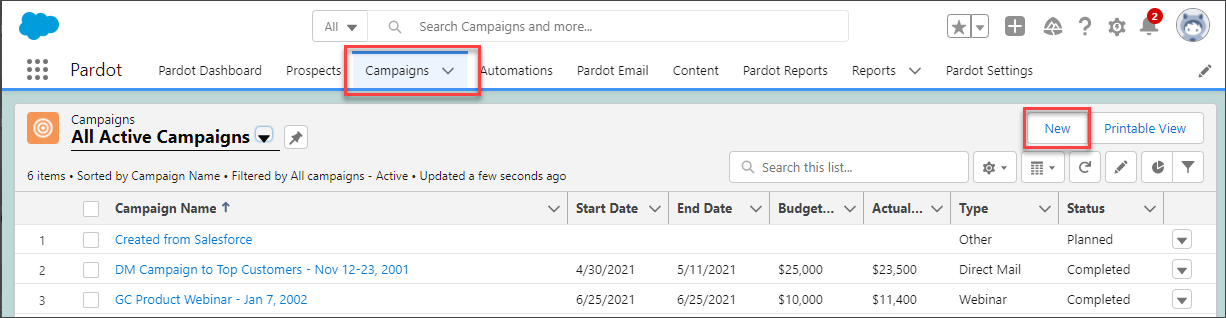
3. Enter the name of the campaign, like “Website Tracking Campaign,” mark it active, select a type, and a status. Click Save.
The campaign will automatically sync to create a Pardot Campaign if you have Connected Campaigns set up, but it can take several minutes for the sync to complete.
Copy the Campaign Tracking Code (JavaScript)
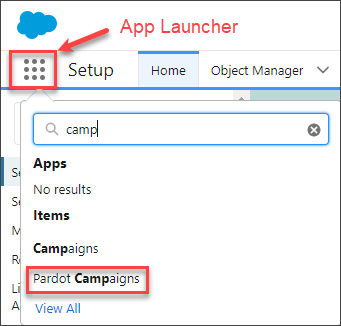
1. Access the Pardot Campaigns tab directly from the Salesforce App Launcher.
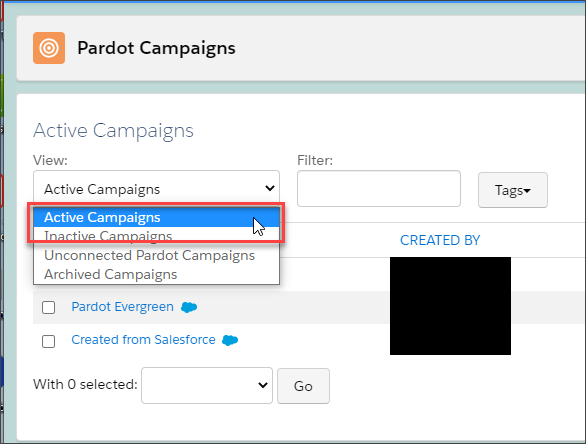
2. If necessary, select the Active Campaigns view.
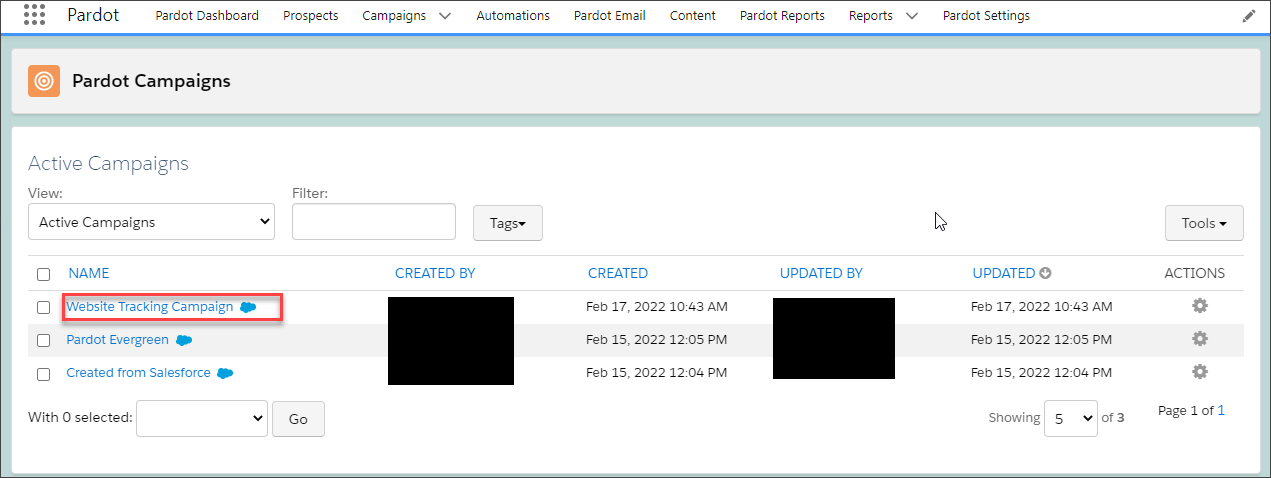
3. Click the name of the campaign you just synced from Salesforce to Pardot.
4. With the synced campaign open, click View Tracking Code at the top of the screen.
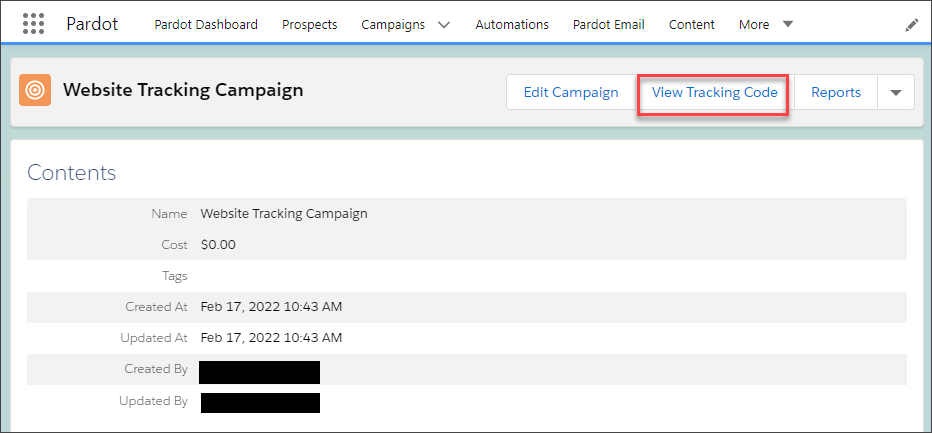
5. The tracking code is some JavaScript that you will copy for the next step.
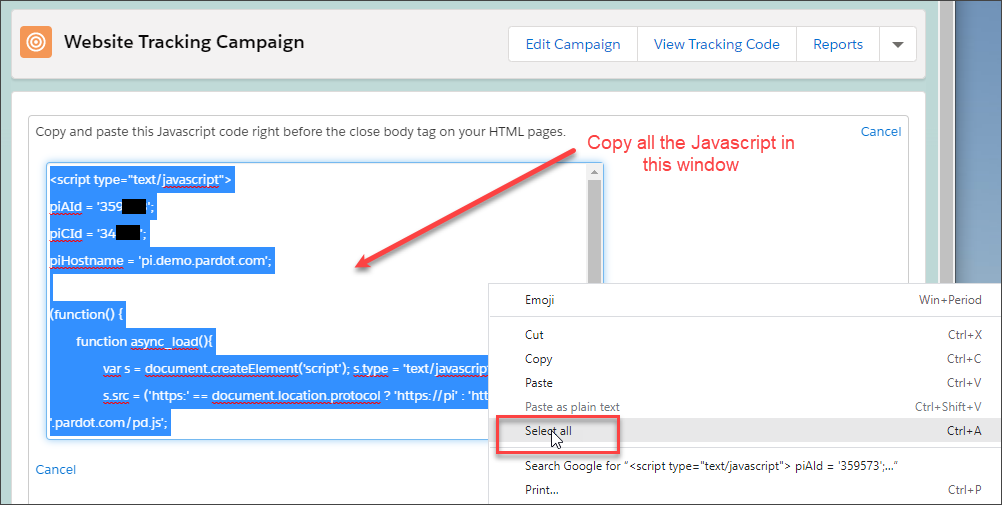
Place the Campaign Tracking Code on Your Site
The tracking code needs to be included in every page on your website where you want to track visitors with Qualified. To do this, paste the JavaScript snippet you copied into the HTML code of each page before the </body> tag.
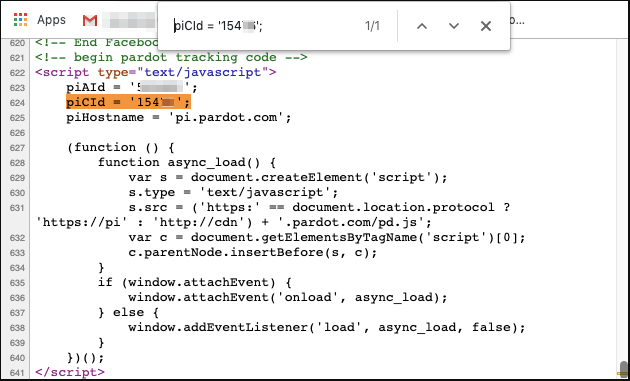
Qualified users sometimes forget to include the Pardot tracking code (JavaScript snippet) in a website page. If you are not seeing Pardot tracking results for a page, verify that the Pardot prospect tracking code has been included on that page.
<span id="activities"></span>
Pardot Prospect Activities
Both Qualified and Pardot can be set up to track activity in Pardot. You can add Qualified conversations to the Pardot prospect activity list and to the Salesforce lead or contact engagement history for prospects that are synced to Salesforce. This article includes:
- What the activity history looks like in Pardot and Salesforce
- A Pardot API exists, but might not be the simplest approach to sync activity history
- The Qualified approach: set up a form submission to create the activity in Pardot
- How to set up the form submission in less than five minutes
- Which Qualified conversations are added to Pardot
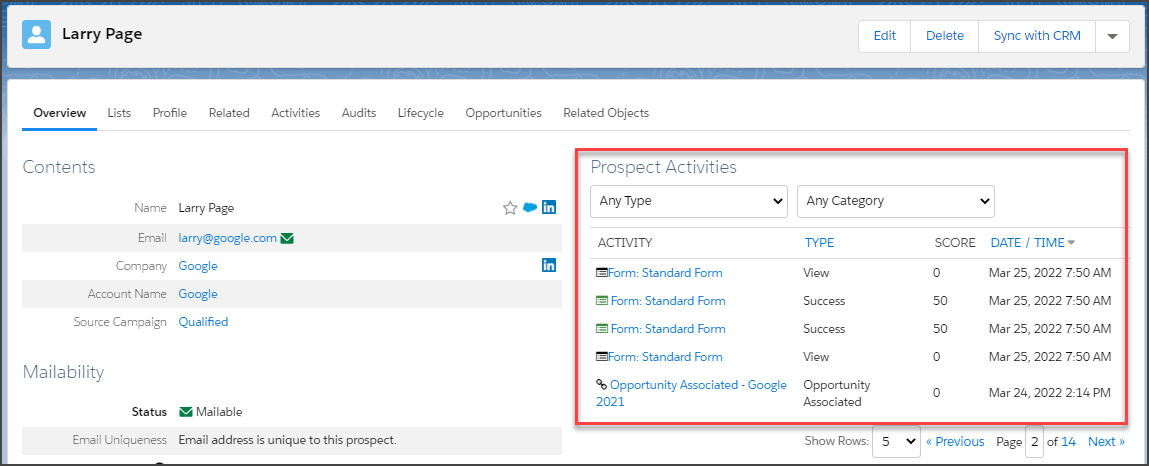
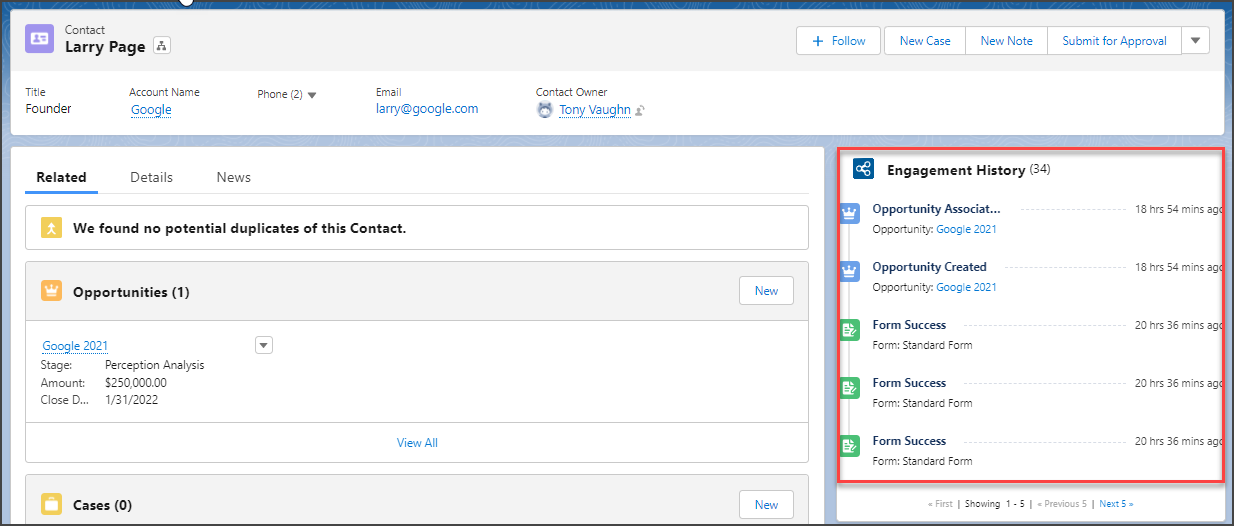
Activity History in Pardot
Pardot prospect activities are shown on the right-hand side of the Pardot prospect page. Tracked activities include:
- When a visitor chats with a sales rep or chatbot
- Form visits or submissions
- Landing page visits
- Email opens and clicks
- Website page URL clicks (if they are tracked in Pardot)
- Engagement with other assets
If connected campaigns are enabled (the default for all Pardot orgs created after the Winter 2020 Release) and the prospect is synced to Salesforce, this activity is also included in the Salesforce Engagement History. If you do not have Connected Campaigns enabled, consider reviewing their setup and advantages.
Engagement History can be placed in a component in various locations on a Salesforce lead or contact’s lightning record page or as one of the lightning page tabs.
Pardot admins can create automation based on a prospect's activities that will automatically add a prospect to a list, update the prospect's score, and more!
Qualified's standard tracking events (Conversation with a Bot, Conversation with a Rep, and Meeting Booked) will sync to Salesforce and be tracked on the Lead or Contact record as appropriate. For more information, see here.
No Official API or Connector Model
Standard Pardot actions such as web visits, form completions, and link clicks automatically create prospect activities. Although Pardot has an API available for third-party applications (such as Qualified) to connect and include their activities in Pardot, it may be simpler and faster to capture Qualified data via a form submission.
Qualified Shortcut: Set Up a Form Submission
Qualified has developed a workaround that is simpler than connecting via the API to track our conversations on a Pardot prospect record. The Pardot admin creates a Pardot form named "Conversation via Qualified" and Qualified is configured to log activity by submitting that form every time a conversation happens with a Pardot prospect in the Qualified application.
How to Set Up the Qualified ⇔ Pardot Form Submission in Under 5 Minutes
1. In the Salesforce App Launcher, select the Pardot Lightning app.

2. On the Content tab in the Pardot Lightning app, click Forms in the left side-bar if not already selected.
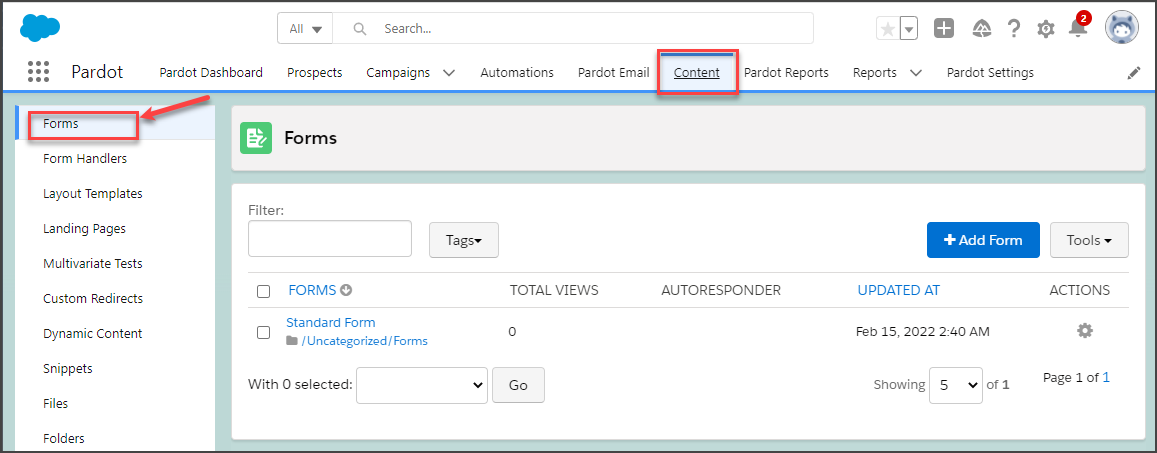
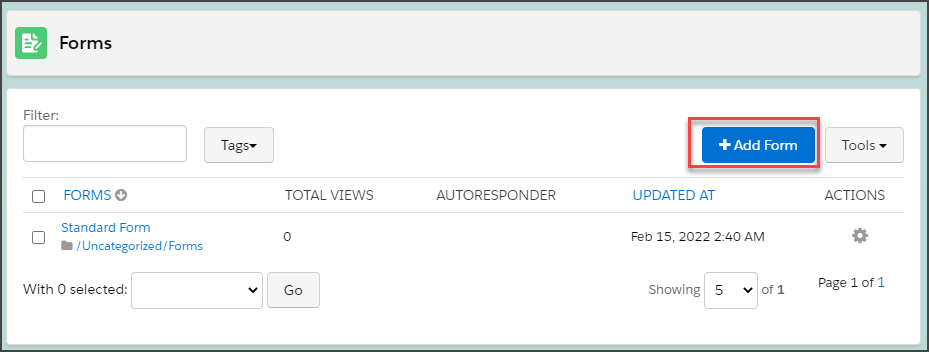
3. Click +Add Form to create a new form.
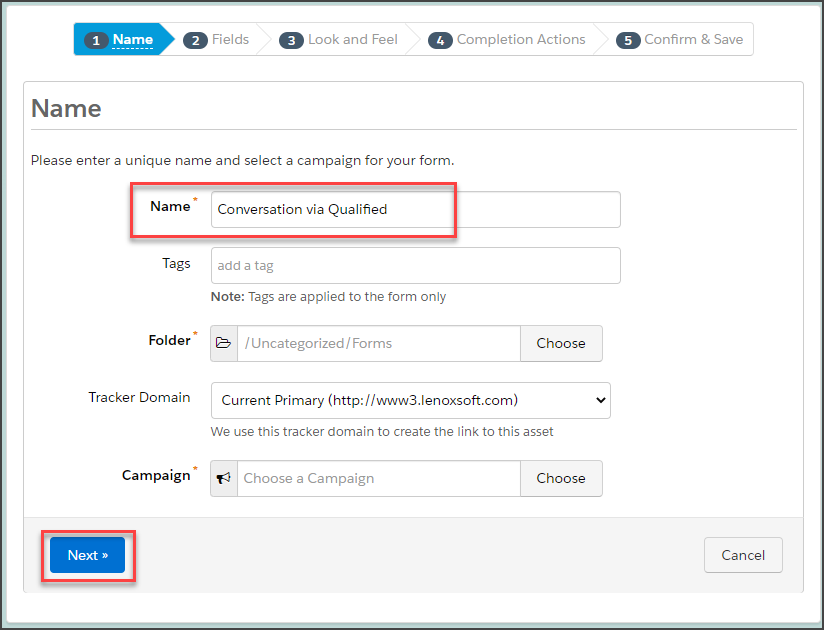
4. Give the form this name exactly: Conversation via Qualified. Select the folder, tracker code, and campaign for the form and click Next.
5. Click the trashcan icon to the right of each form field except Email to delete those fields.
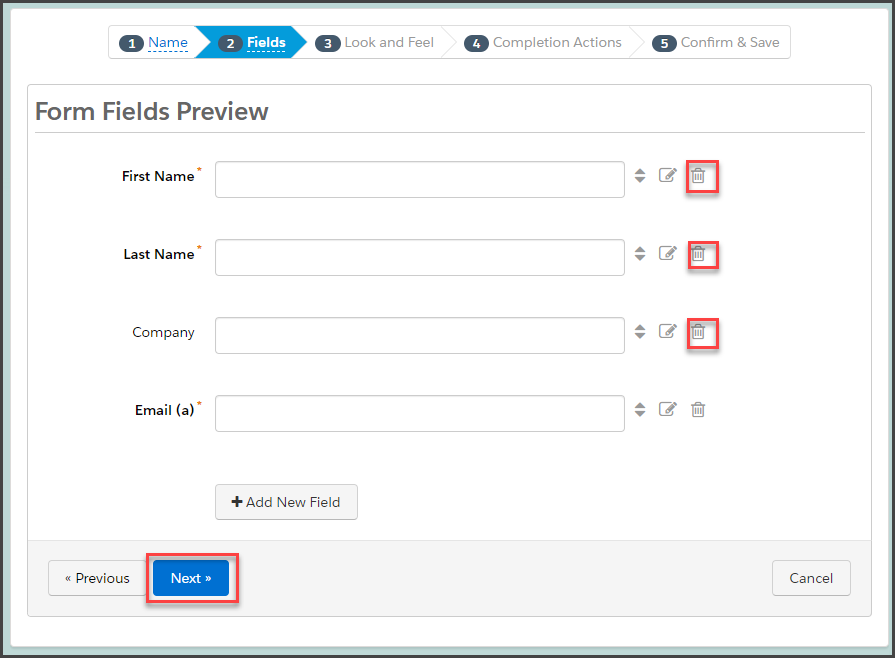
6. Click Next with only the Email field remaining on the form.

7. Choose the Standard layout template, and click Next.

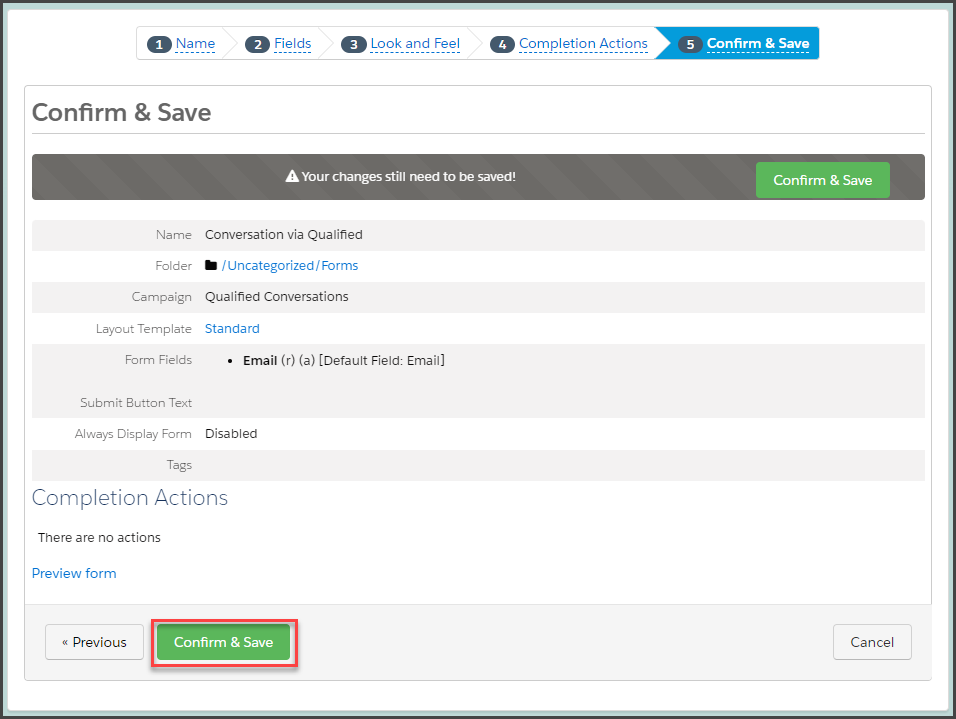
8. Click Next again and then click Confirm & Save.
Verify the Setup in Qualified
1. As an Admin in Qualified, go to Settings → Integrations → Pardot → Connection.
2. Scroll to the Prospect Tracking section of Pardot Settings and click Verify Activity/Engagement History Setup.

3. If your setup was successful, you'll see the following message: Prospect activity tracking is configured

When are Activities Added to Pardot?
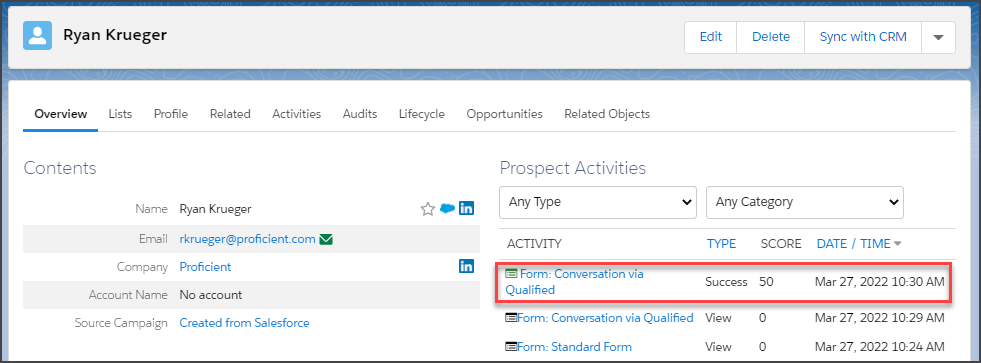
Qualified Conversations (including bot conversations, rep conversations, pouncing) will be added as a Pardot form completion activity (with the associated playback URL) once a conversation ends.
The activity is added to the prospect record in Pardot either:
- Five minutes after the prospect has closed their Qualified browser tab or window
- One hour after the prospect has been idle on the Qualified site with no mouse movement or scrolling
The activity will then appear in Pardot on the prospect record's Activity History, as shown below.
<span id="fields"></span>
Pardot Prospect Fields
After you have connected Qualified to Pardot and set up Pardot prospect tracking, choose which Pardot prospect fields to connect with Qualified. These fields will provide information about visitors that Pardot can identify who's on your site and help qualify inbound visitors for your sales team.
Pardot Prospect Fields Supported in Qualified
All standard Pardot prospect fields are supported, including:
- Demographic fields, such as name, email, company, job title, and phone.
- Company-specific data (if it exists in your Pardot org), such as industry, number of employees, website, and years in business.
- Any custom fields you have defined on prospects in Pardot.
Currently, fields on the Pardot account and opportunity objects, as well as fields from any custom Pardot objects, are not supported for mapping to Qualified.
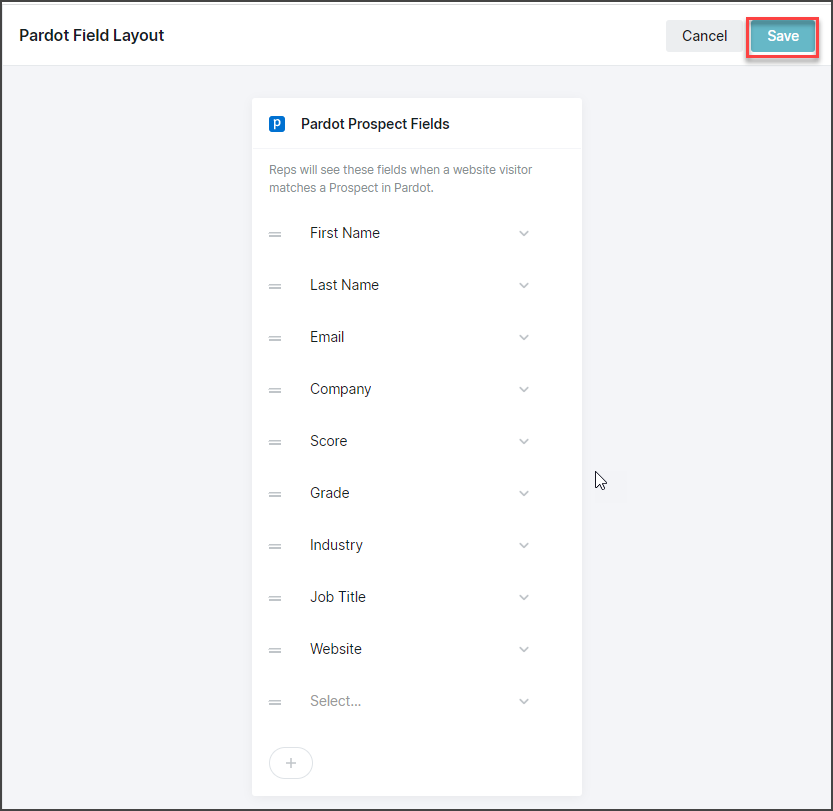
Select the Pardot Fields to Display
Selecting Pardot fields in the Pardot Field layout section of Qualified Settings (as described below) will cause them to appear in a read-only section of your sales team’s Qualified sidebar. Follow these steps to select which Pardot prospect fields will display in the Qualified sidebar.
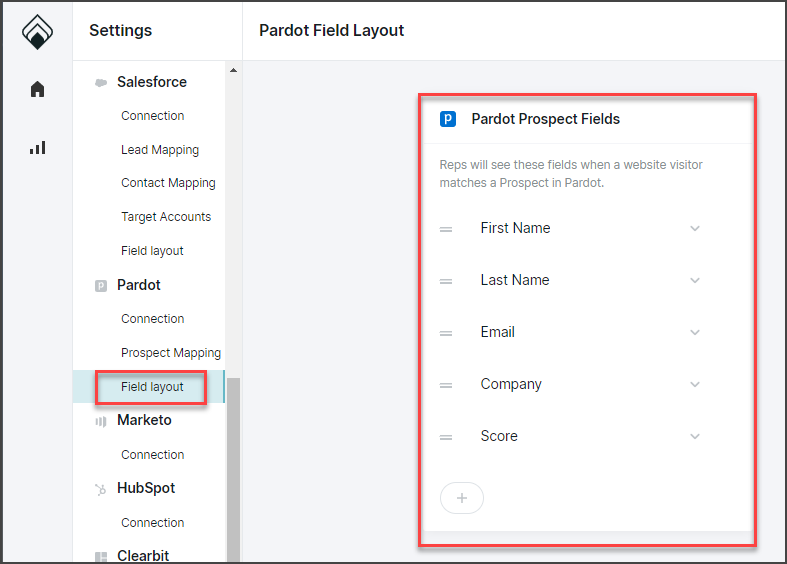
1. As an Admin in Qualified, go to Settings → Integrations → Pardot → Field Layout. The currently mapped fields will be shown.
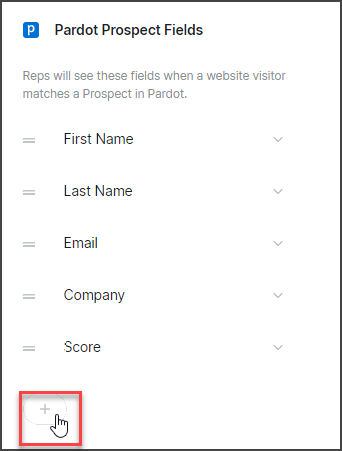
2. Click the (+) icon to add additional Pardot fields to Qualified.
3. Using the drop-down arrow and scrollbar, you can scroll to review the list of Pardot fields for a field you want to add or use the search box to locate the field.
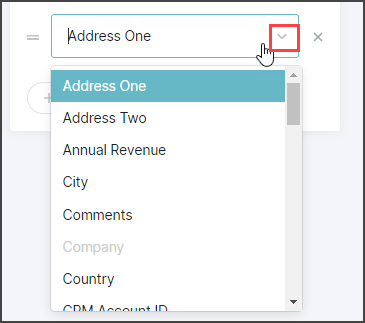
4. Click the name of each field you want to add. Repeat these steps for each field you want to add.
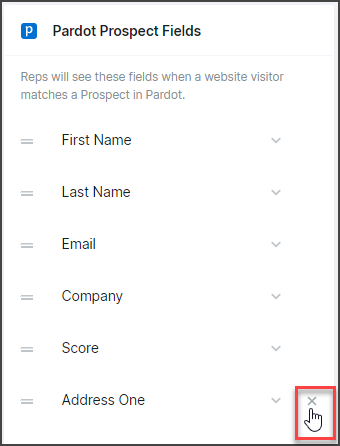
5. To remove a field from inclusion in the Qualified app, click the X to the right of that field.
6. After you have finished adding fields and deleting any you do not want, click Save.
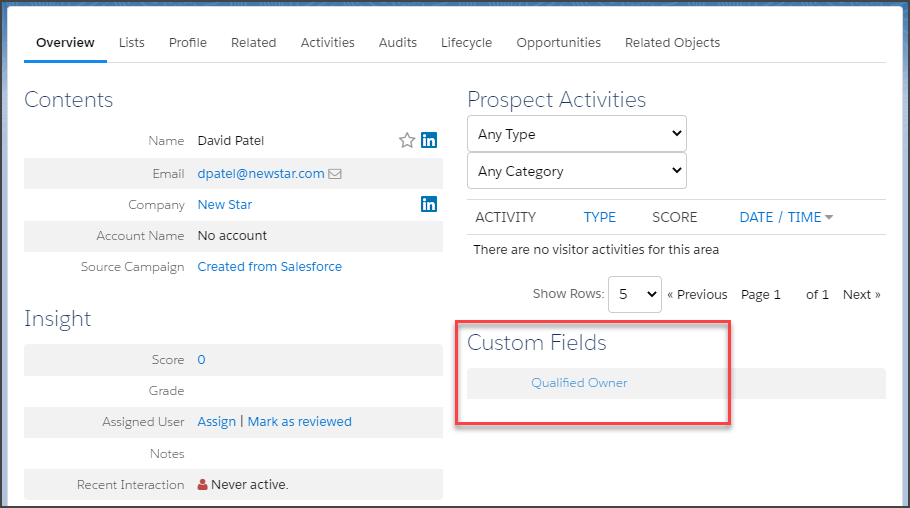
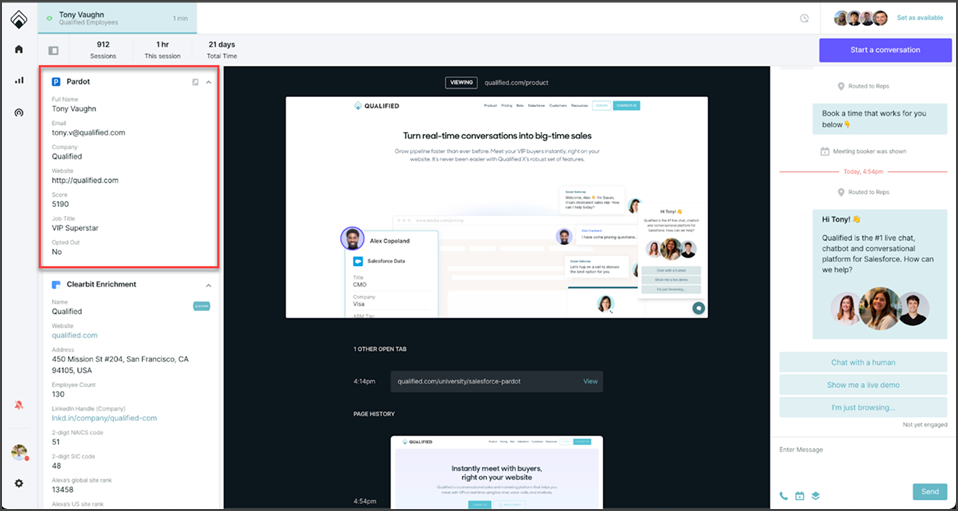
When one of your Pardot prospects visits your website, your users will see the Pardot fields that you selected to display in Qualified, as shown below:
Map Pardot Fields to Qualified Visitor Fields
Mapping Pardot field values to Qualified visitor fields allows them to be updated during a conversation with a visitor. If the Pardot data available on prospects results in their being qualified, they can be routed to speak with your sales reps, as well as pushed into Salesforce to create leads.
See the visitor fields article for more details on mapping fields from Pardot and other applications into Qualified.
To map Pardot prospect fields to Qualified visitor fields:
1. As an Admin in Qualified, go to Settings → Integrations → Pardot → Prospect Mapping
2. View and edit the existing Pardot field mapping.
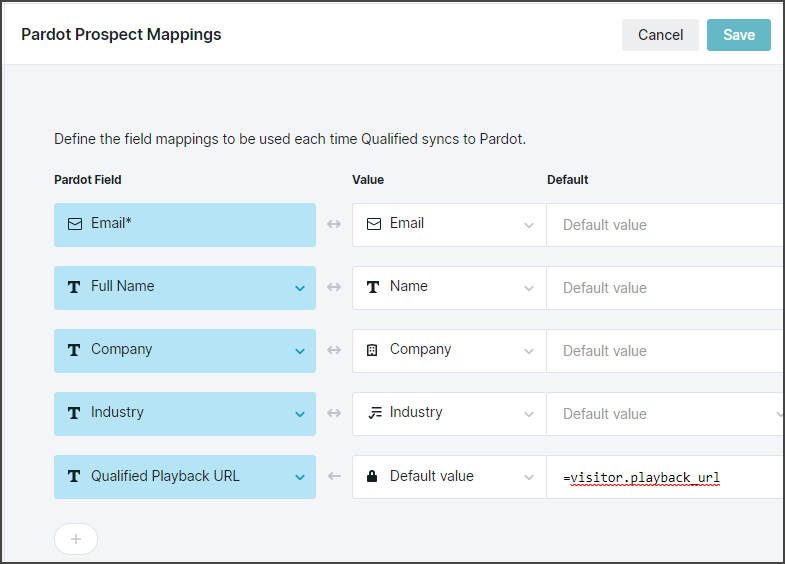
The same way that all Qualified visitor field configurations work, the data from these mapped fields will be stored in the Qualified visitor record if the visitor is synced to a Pardot prospect. The mappings will also define the prospect record’s field values when you create or update a Pardot prospect record via the sync with Qualified.
Use the Source Campaign for New Prospects drop-down to select the Pardot Campaign that will be associated with any prospects created by Qualified data for a visitor record being pushed into Pardot.
Pardot Prospect Field Mapping Notes
- For Pardot mapping, the Email field is always required in the mapping screen because an email is required to create a Pardot prospect. It is possible to mark other fields required in the Pardot Prospect Mappings screen. To do so, select the Req? box to the right of that field in the Pardot Prospect Mappings screen.
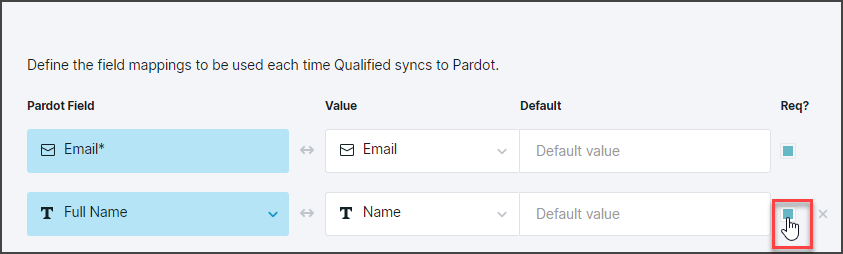
For example, you might want to make a Pardot field required if the field it maps to on your Salesforce leads is required. This would ensure that the field is populated when a Pardot prospect is synced to a Salesforce lead.
- While Qualified can read multi-picklist fields to build a segment or a target account, the mapping does not support populating multi-picklist fields in an integrated app, such as Pardot.
- Enter a default value for each field mapping for which you want to set the Pardot prospect’s value if the field is empty, such as when a new prospect is being created in Pardot. For example, you could use “Qualified” for the default value for a Lead Source mapping.
- Enter a fixed value for each field mapping for which you want to set the Pardot prospect’s value regardless of whether the field is already populated.
- Enter a hidden value for each field mapping for which you want to set a Pardot prospect’s value, but not have it visible or editable by your sales reps.
- Remember that date fields will map to text fields in Qualified.
Qualify Prospects in Real-Time with Pardot Data
Populating Qualified visitor fields with Pardot data allows your sales reps to:
- Act on the visitor data in real-time
- Edit visitor data as they learn more from each conversation
- Push the data into Salesforce to create leads
- Qualify inbound prospects to talk to specific team members
The most valuable advantage of having Pardot data in Qualified is the ability to qualify visitors within the Qualified app in real-time. You can then create Qualified experience triggers to determine when a Pardot prospect indicates that they are ready to talk to your sales team. These triggers form the basis of the Qualified conversational marketing application.
<span id="landing-pages"></span>
Pardot Landing Pages
In order to use Qualified on any of your web pages, the Qualified JavaScript snippet must be installed on each of those pages.
The Qualified JavaScript Snippet and Pardot Landing Pages
There are two main ways to create Pardot landing pages:
- Use custom HTML code that your team writes or imports.
- Use a Pardot landing page template with their WYSIWYG landing page builder.
The following sections cover how to add the Qualified JavaScript snippet to Pardot landing pages built with each method.
Adding the Snippet to Pardot Landing Pages (Custom Templates)
Pardot landing pages for which your team supplies the HTML are built inside Pardot Layout Templates. The following is a high-level overview of how to add a layout template to Pardot and add the JavaScript snippet to it.
1. In the Salesforce App Launcher, select the Pardot Lightning app.
2. On the Content tab in the Pardot Lightning app, click Dynamic Content in the left side-bar.
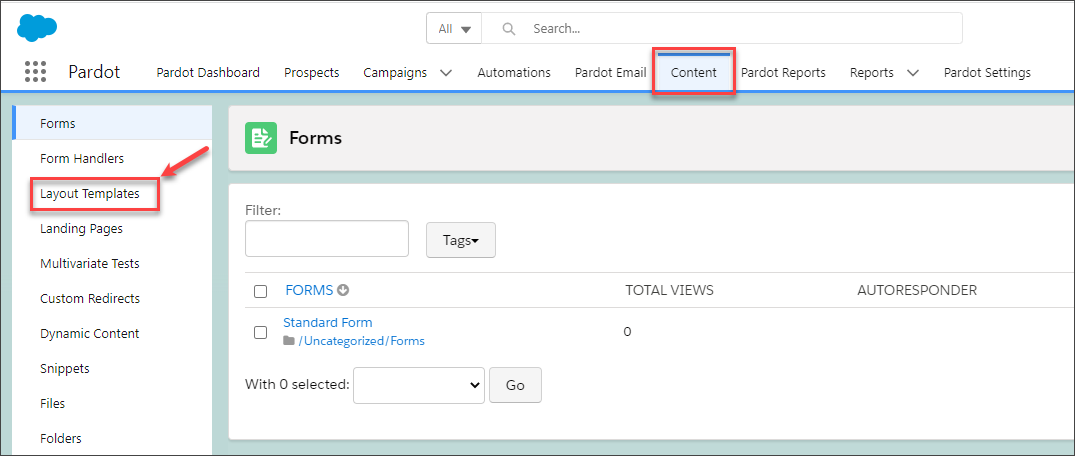
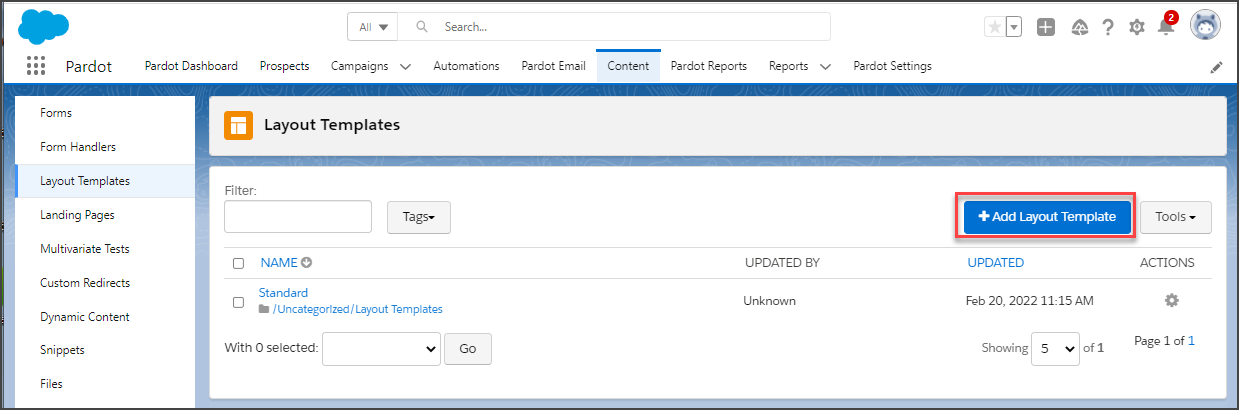
3. Click + Add Layout Template.
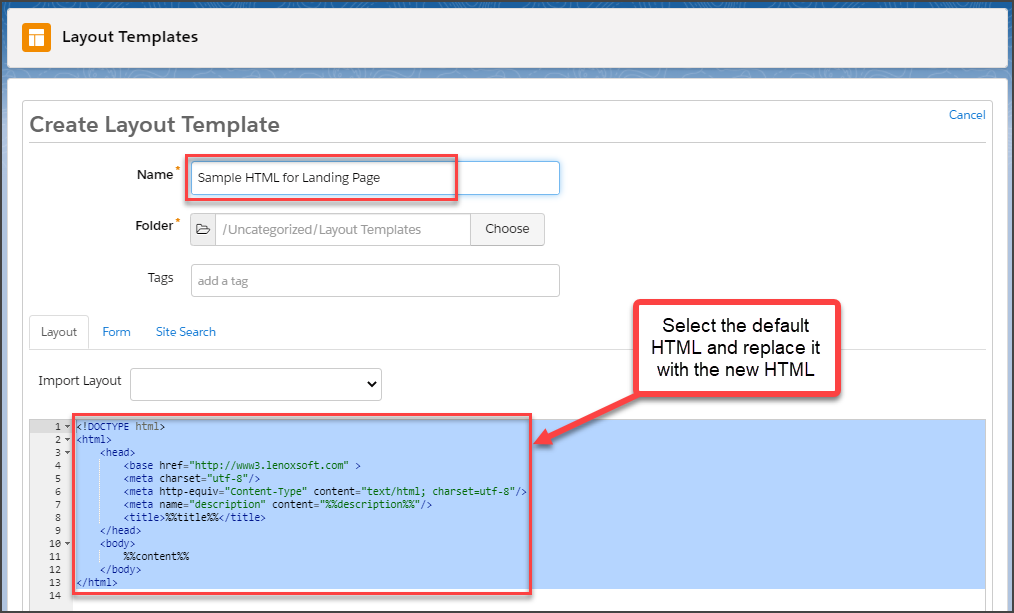
4. Name the layout template, select the default HTML, and overwrite it with the HTML you paste in.
5. Insert your org’s Qualified JavaScript snippet at the bottom of the header of the HTML layout template, immediately before the closing </head> tag, as shown here:
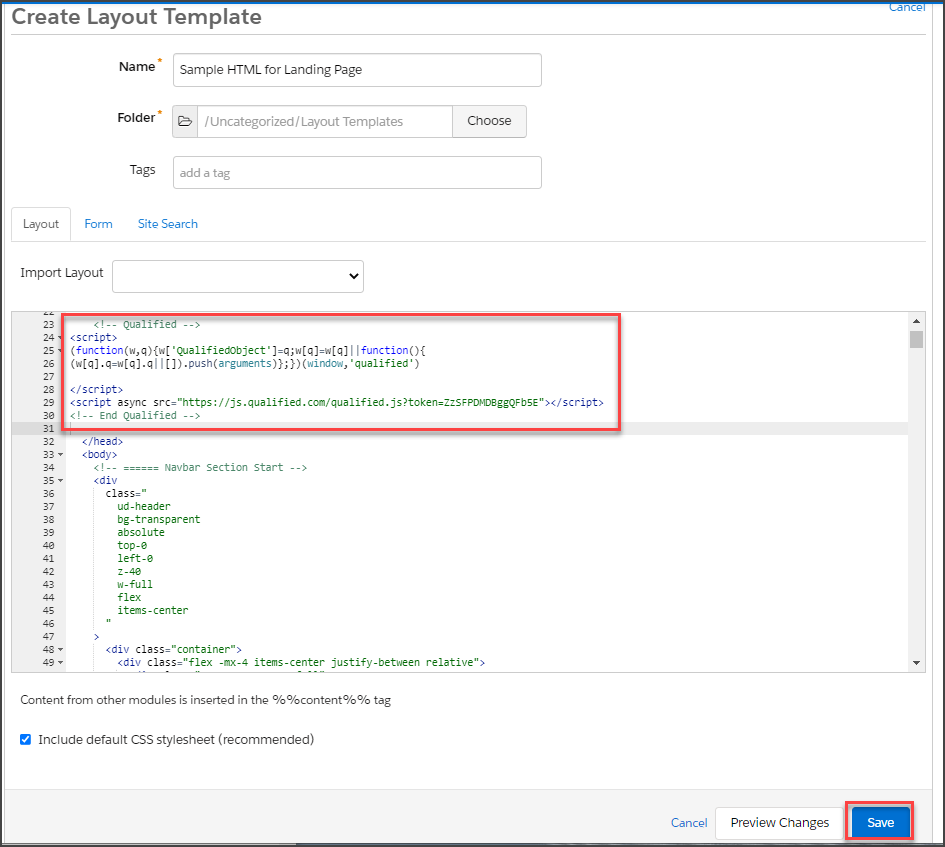
6. Click Save at the bottom of the layout template to save it in the folder you selected. Any Pardot landing pages built with this Pardot layout template will run the Qualified JavaScript snippet on them.
Adding the Snippet to Pardot Landing Pages (Stock Templates)
Pardot landing pages can also be created by using one of Pardot’s stock landing page templates and updating a copy of the template with the Pardot WYSIWYG landing page builder. The following is a high-level overview of how to add the JavaScript snippet to a landing page built from a Pardot landing page template.
1. In the Salesforce App Launcher, select the Pardot Lightning app.

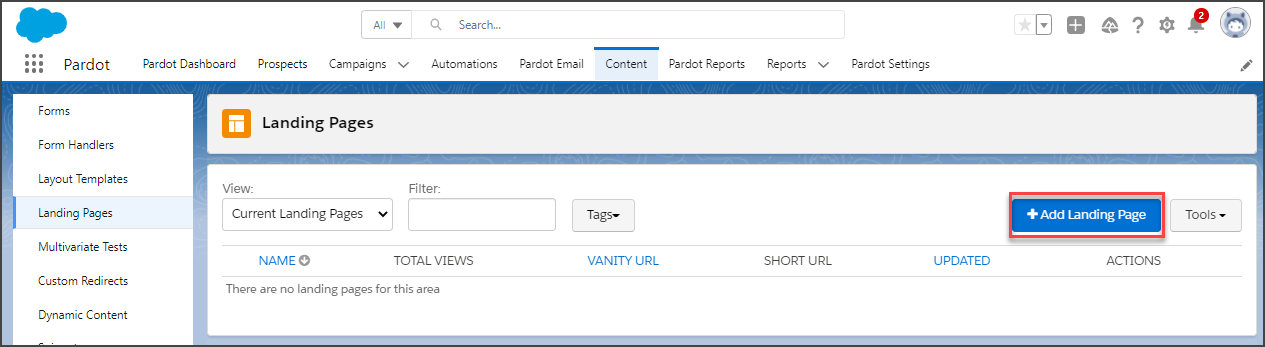
2. On the Content tab in the Pardot Lightning app, click Landing Pages in the left side-bar.
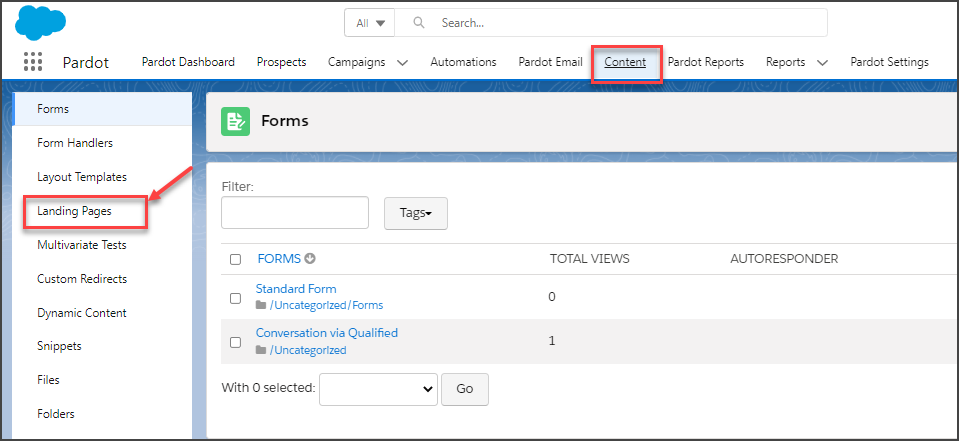
3. Click + Add Landing Page.
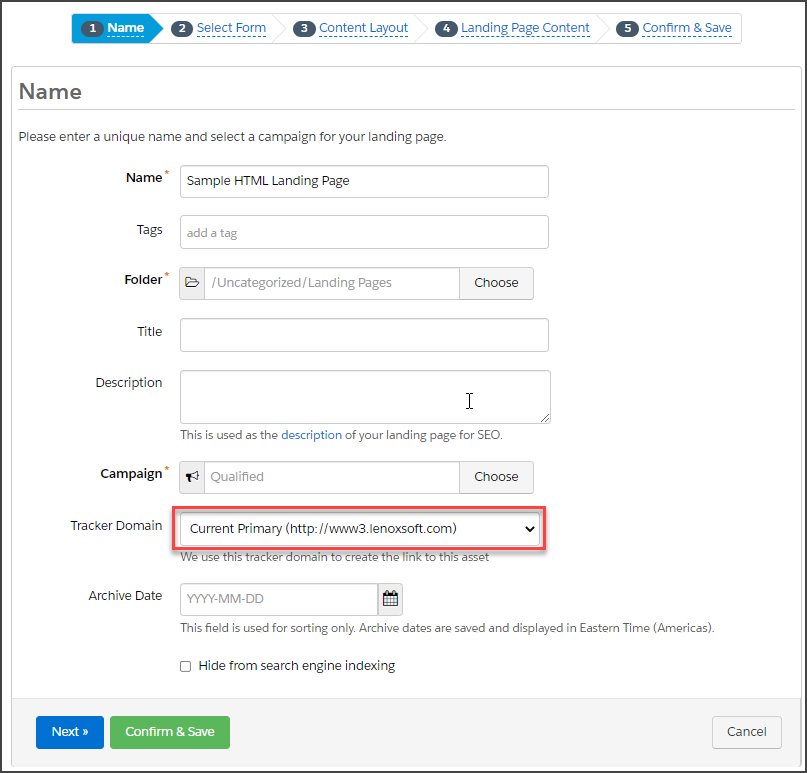
4. Name the landing page and click Next.
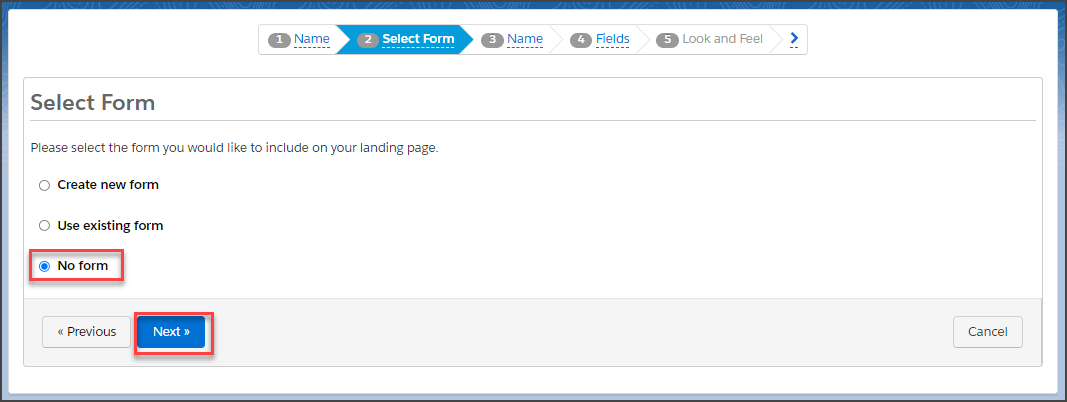
5. Indicate whether or not you want to include a form (new or existing) with your landing page and click Next.
6. On the Content Layout page, switch the radio button to Stock Templates, click to select the stock template you want, and click Next.
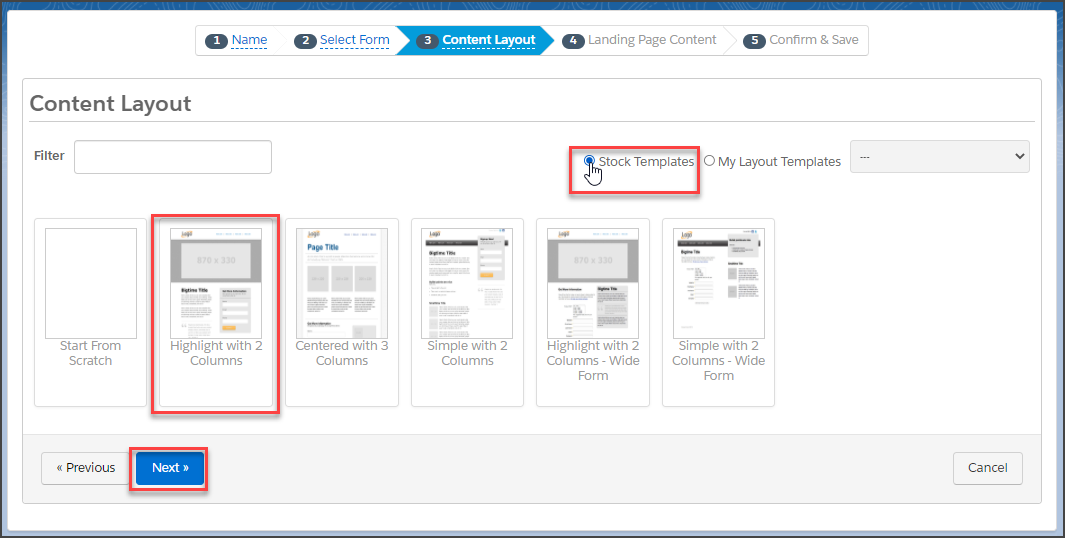
If you are using your own HTML, you would leave the radio button on My Layout Templates and select the Layout Template you built from the drop-down (see the previous section of this article).
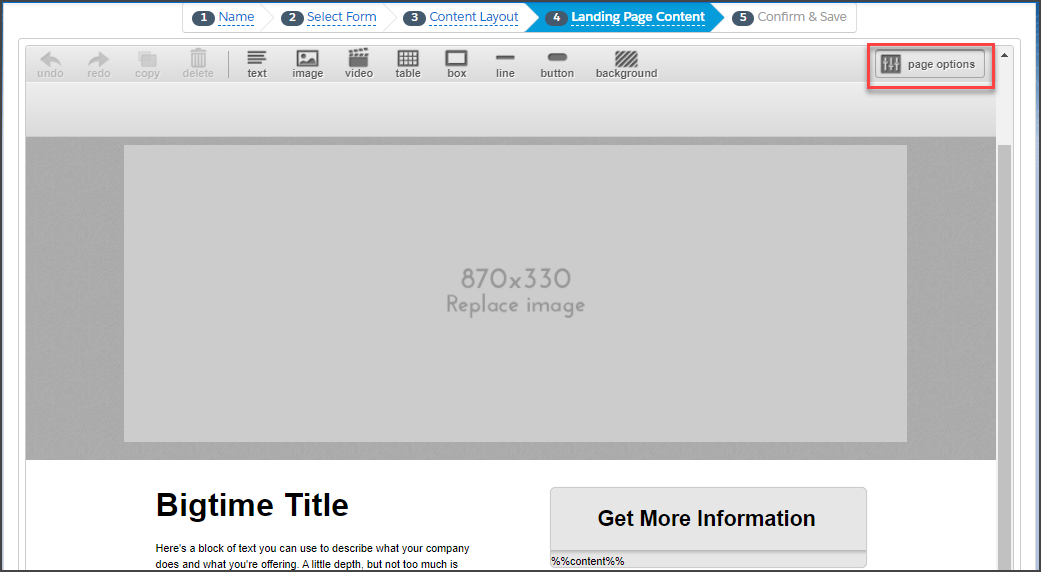
7. Once you have edited the copy of the template in the WYSIWYG editor, click page options in the upper right of the screen.
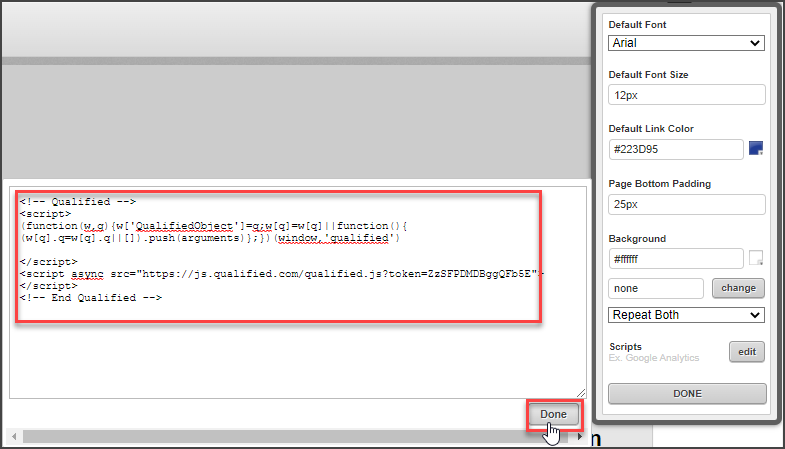
8. Click edit next to Scripts in the resulting dialog.
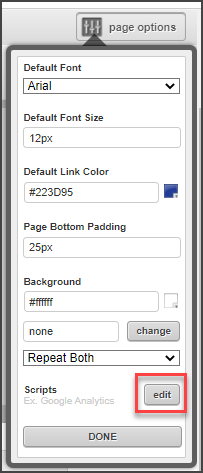
9. Paste in the Qualified JavaScript snippet and click Done.
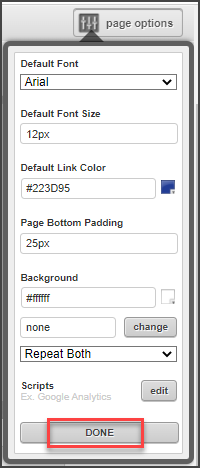
10. Click Done again on the page options dialog to close it.
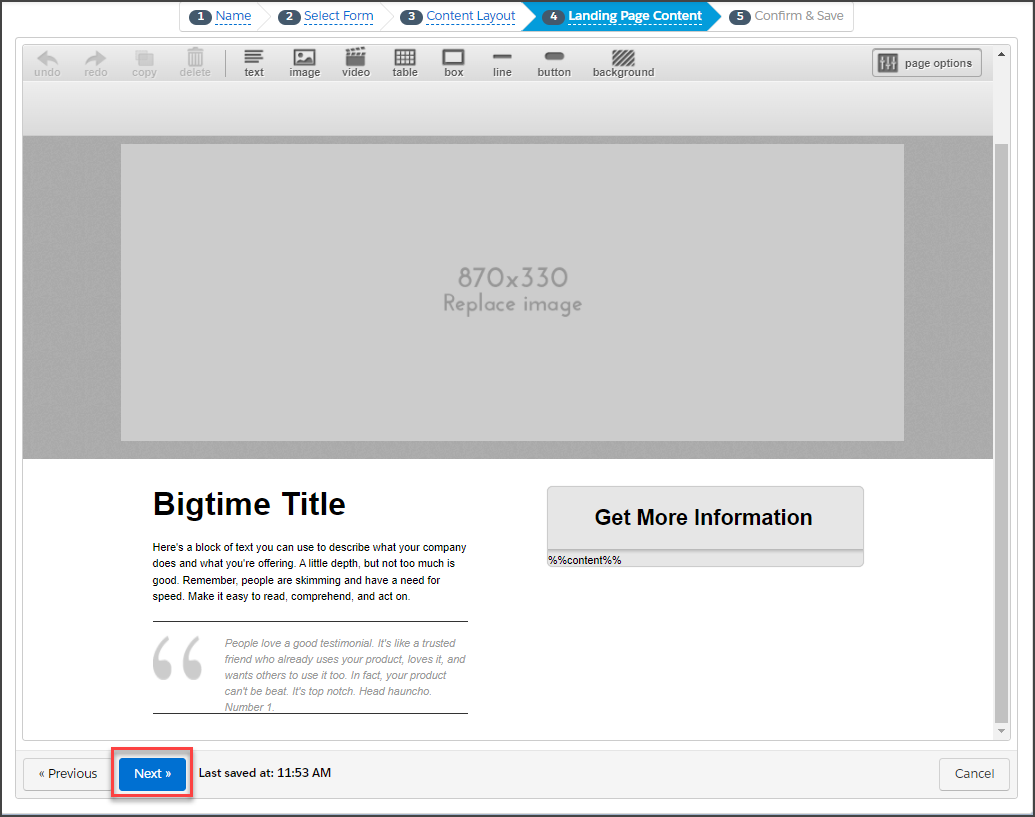
11. Click Next to go to the last screen of the Page Content editor.
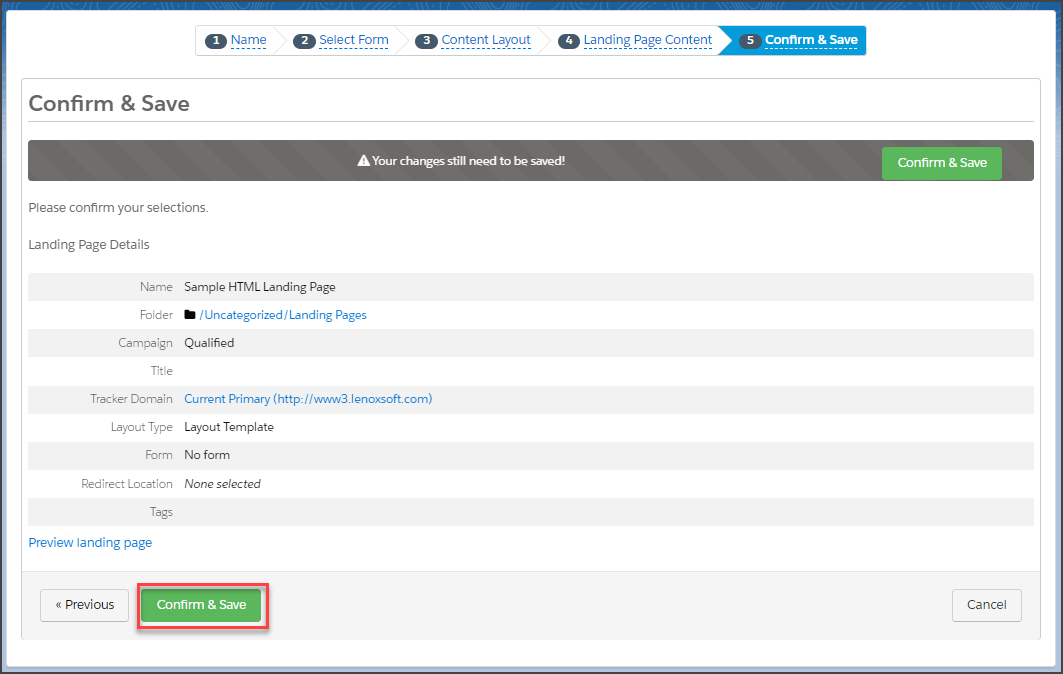
12. Click Confirm & Save to commit your changes to the copy of the Pardot landing page template. Once this landing page is added to your website, the Qualified JavaScript snippet will run on it, tracking any visitors to that page.
Setting Up Pardot Tracker Domains for Your Landing Pages
By default, Pardot content, such as a landing page, is hosted on the https://go.pardot.com domain (or https://go.demo.pardot.com for a development environment). That means that the actual web address (URL) of your Pardot landing page is something like:
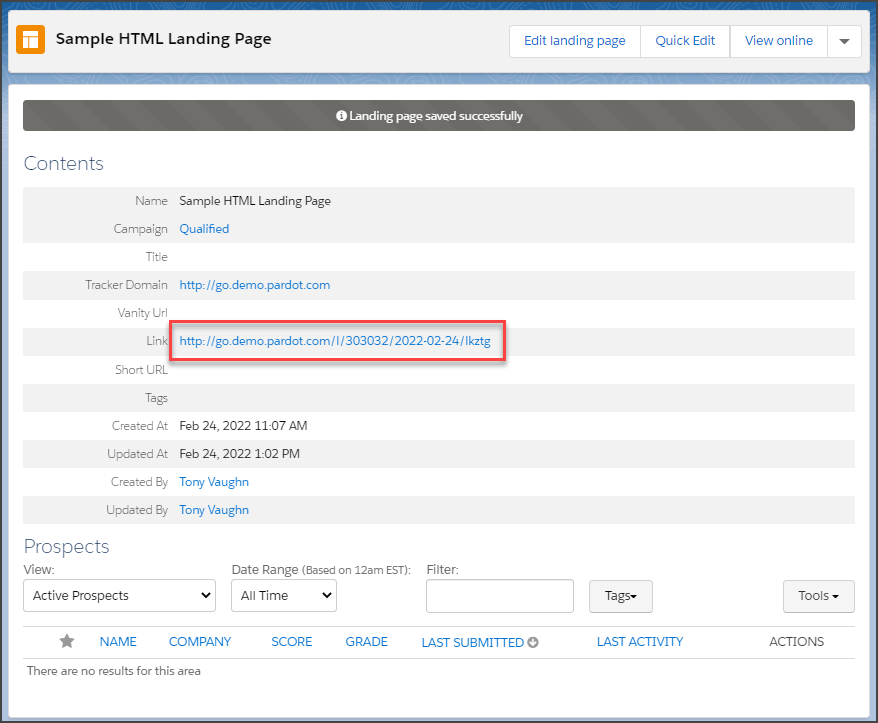
In order to keep your Qualified JavaScript snippet on your Pardot landing pages distinct from those of other companies using Pardot-hosted landing pages, it is necessary for you to configure one or more Pardot tracker domains with a name that is unique to your organization. The Pardot help documentation provides the steps to set this up with your webmaster. See Add a Tracker Domain.
Once you have your company’s tracker domains configured in Pardot according to the instructions in the above link, verify that your tracker domain is validated and enabled in Pardot.
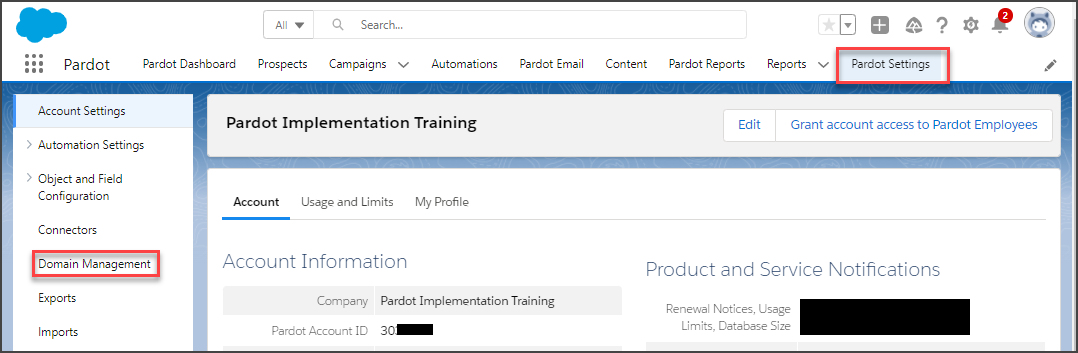
1. In the Salesforce App Launcher, select the Pardot Lightning app.
2. On the Pardot Settings tab, click Domain Management in the left sidebar.
3. On the Domain Management page, verify that the tracker domain is validated, enabled, and (optionally) the primary domain for your organization.
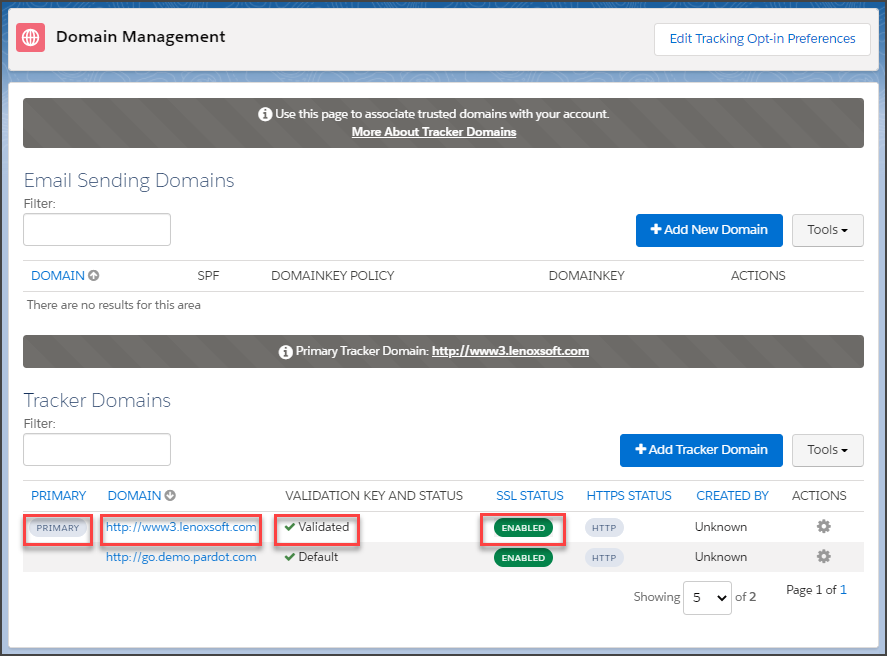
It is also useful to set it as your primary domain so that all landing pages will have it selected by default when you create them.
To make an existing tracker domain the primary domain, click the gear icon to the right of the tracker domain in the Domain Management page and select Set as Primary from the resulting drop-down actions.

When building a landing page, the Tracker Domain field will default to the one that is set as the primary and can be changed by selecting the drop-down arrow to the right and choosing from active tracker domains.
Heading 1
Heading 2
Heading 3
Heading 4
Heading 5
Heading 6
Lorem ipsum dolor sit amet, consectetur adipiscing elit, sed do eiusmod tempor incididunt ut labore et dolore magna aliqua. Ut enim ad minim veniam, quis nostrud exercitation ullamco laboris nisi ut aliquip ex ea commodo consequat. Duis aute irure dolor in reprehenderit in voluptate velit esse cillum dolore eu fugiat nulla pariatur.
Lorem ipsum dolor sit amet, consectetur adipiscing elit, sed do eiusmod tempor incididunt ut labore et dolore magna aliqua. Ut enim ad minim veniam, quis nostrud exercitation ullamco laboris nisi ut aliquip ex ea commodo consequat. Duis aute irure dolor in reprehenderit in voluptate velit esse cillum dolore eu fugiat nulla pariatur.
Lorem ipsum dolor sit amet, consectetur adipiscing elit, sed do eiusmod tempor incididunt ut labore et dolore magna aliqua. Ut enim ad minim veniam, quis nostrud exercitation ullamco laboris nisi ut aliquip ex ea commodo consequat. Duis aute irure dolor in reprehenderit in voluptate velit esse cillum dolore eu fugiat nulla pariatur.

Block quote
Ordered list
- Item 1
- asdfasdf
- asdfasdf
- asdfasdf
- Item 2
- Item 3
Unordered list
- Item A
- Item B
- Item C
Bold text
Emphasis
Superscript
Subscript
|
|---|
|


.svg)


