
Eloqua - Integration
Qualified offers a direct integration with Eloqua, empowering your sales team using data stored within your marketing automation platform to target your most important website visitors.
<span id="connecting-eloqua"></span>
Connecting to Eloqua
The Eloqua integration pulls contact information into Qualified to help identify those visitors on your website and allows Qualified to create and update Eloqua contacts.
To set this up, we’ll want to first connect to your Eloqua instance and then tell Qualified which information from Eloqua you’d like to share and both pull into your Qualified visitor fields as well as map back to new Eloqua contacts.
Once the information from Eloqua has been pulled into Qualified, you can use this information to alert your sales team to Eloqua contacts on the site, update that information, and sync into Salesforce.
Before connecting with Eloqua, ensure the user you're using for the connection has proper permissions. In order to be able to interact with your Eloqua data, your user account needs permission to:
- Read and write to contacts
- Read visitors and contact fields
- Write to forms and form data
The user will also be making calls against Eloqua’s API and must have Advanced Users - Marketing permissions granted in the security groups section of the user management area of Eloqua. Finally, first-party cookie support must be enabled by Oracle.
Some Eloqua instances enable contact-level security, which restricts access to data based on different user roles. Users might only have access to contacts located in their geographical region, for instance.
Because these permissions affect what data the user can access, it is important that the Eloqua user connected to the integration has the appropriate permissions.
Establishing the Connection
To get started, we need to establish a connection to Eloqua:
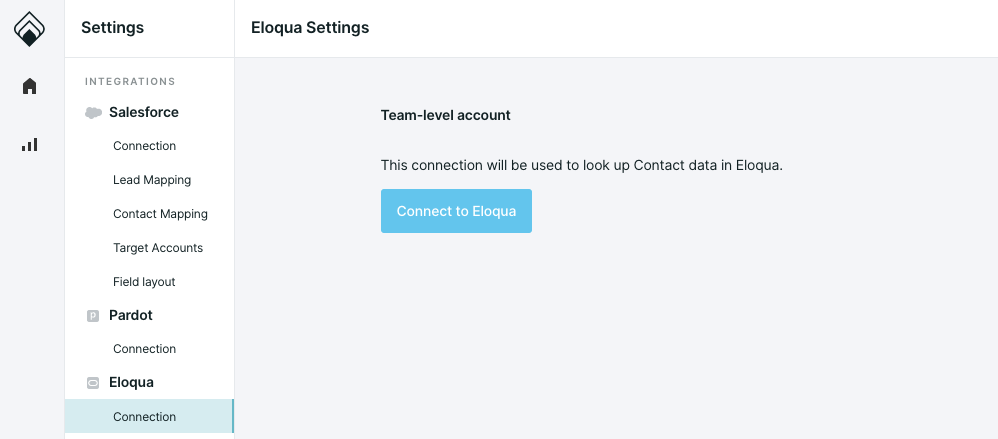
- Log into Qualified.
- Select the Gear icon to navigate to the Settings.
- Select Connection under Eloqua.
- Click Connect to Eloqua.
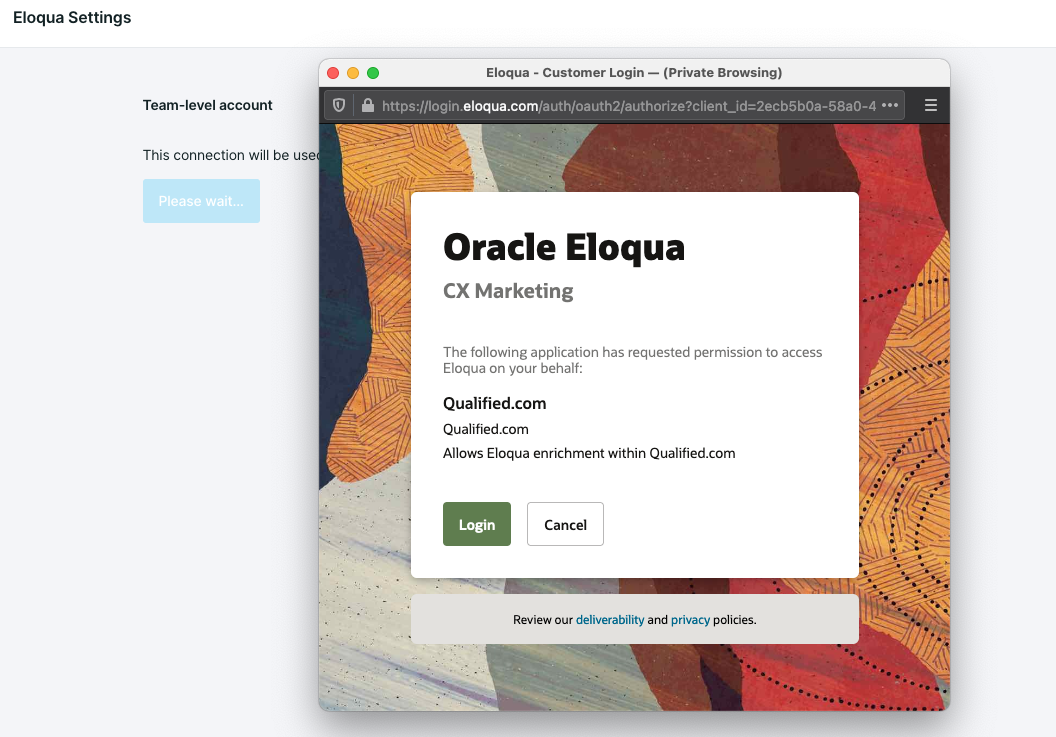
A pop-up from Eloqua will then appear, requesting permission for Qualified and asking for your Eloqua login information. To finalize the connection:
- Select Login from within the pop up screen to login to Eloqua.
- Enter your Eloqua Company Name. Please note that this must match exactly the company name as set up within your Eloqua org.
- Enter your email and password used to log into your Eloqua account.
- Click Sign In.
- Select Sign In again to approve access for Qualified.com through your Eloqua user.
- Click Accept on the screen confirming your login information.
Once connected, you’ll see an Update Fields button on the Eloqua connection page. Press this whenever you add new fields in Eloqua which you would like to use within Qualified.
Reading Eloqua Cookies
Every time a visitor lands on your website, Qualified will automatically look for a cookie to see if we know who the visitor is based on the systems you use, such as Eloqua and Salesforce. This requires first-party cookie support in Eloqua.
Eloqua sets a number of tracking cookies that allow you to track your Eloqua contact and visitor behavior. When one of your Eloqua contacts lands on your website, Qualified will read this specific Eloqua cookie allowing visibility into who those visitors are in real-time.
<span id="creating-contacts"></span>
Creating Contacts in Eloqua
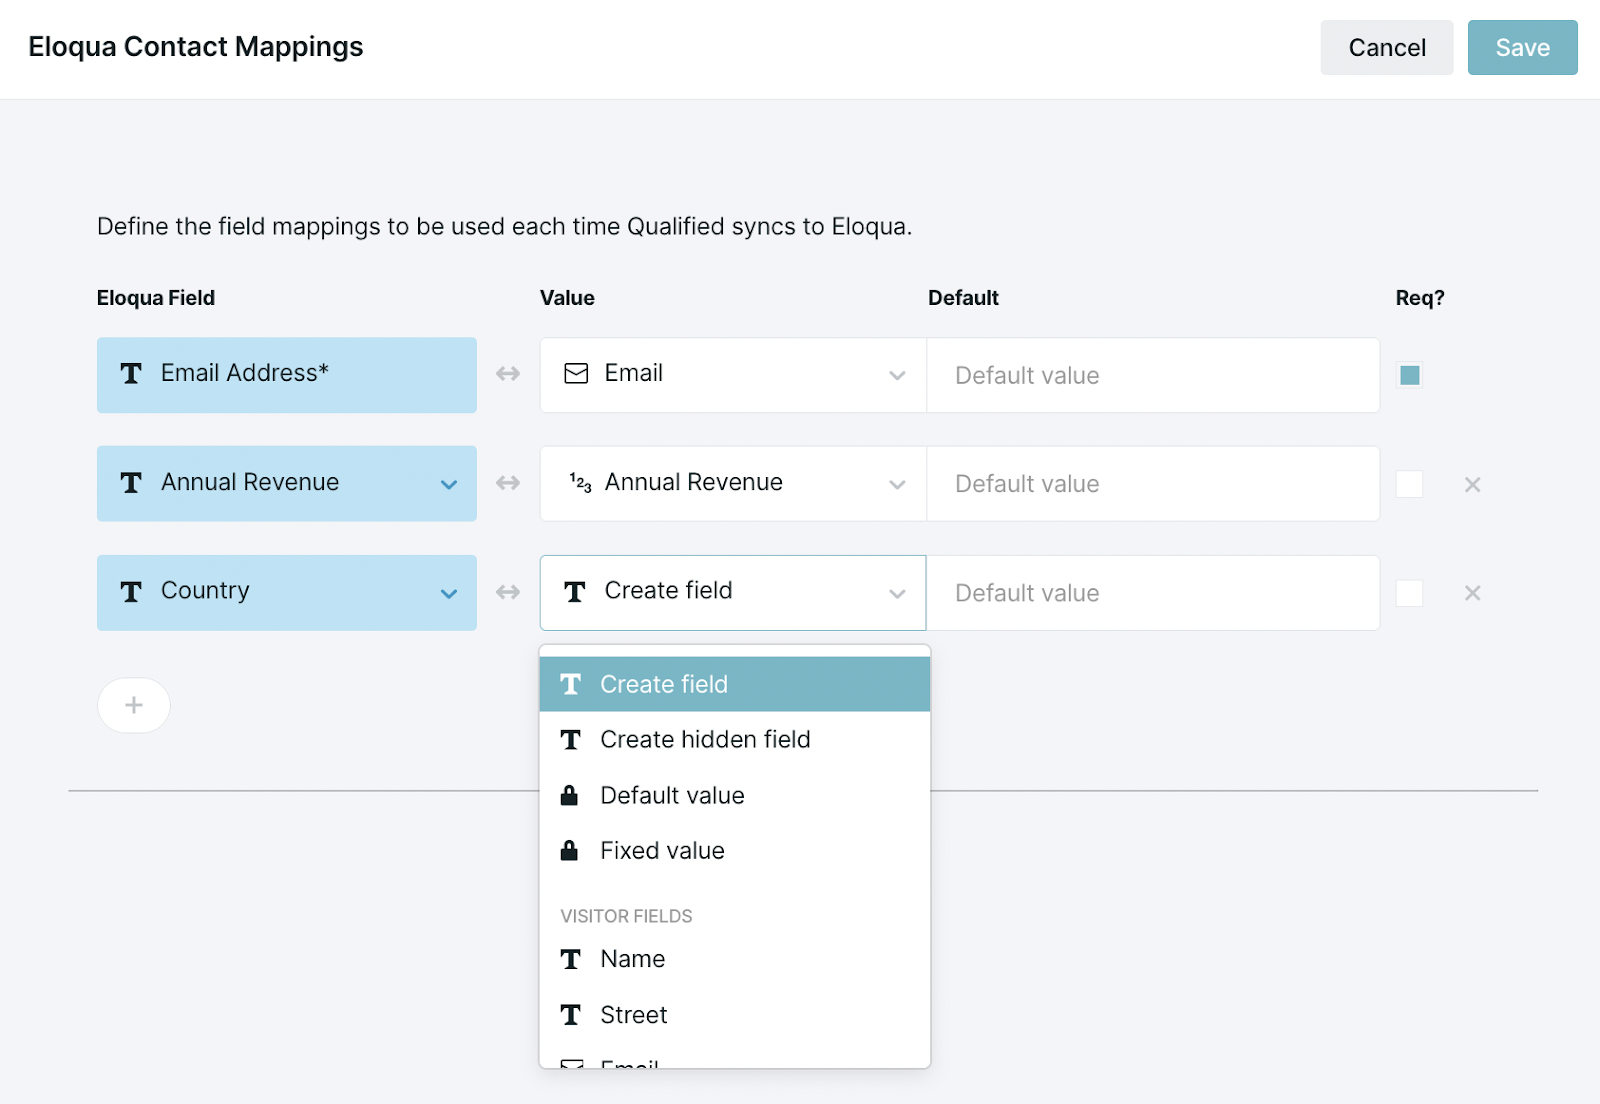
Map Fields in Qualified
To create contacts in Eloqua, we'll start with the most basic fields, such as name, email, and company. You’ll want to add these three fields to your contact mapping area to ensure that this information is captured by your chatbot or sales team and included when creating the contact in Eloqua.
Keep in mind that Eloqua requires an email for a contact to be created, so this information must be included.
To create your contact mappings follow the steps below:
- Navigate to Settings -> Eloqua -> Contact Mapping within Qualified.
- Select the ‘+’ symbol to map a field to Eloqua .
- Select the corresponding Qualified Visitor Field that you’d like that information to live in within Qualified in the second column as shown below.
If you’d like, you can add a default value to the other non-required Eloqua fields, such as [not provided] to be a filler if the visitor did not include this information about themselves as shown below.
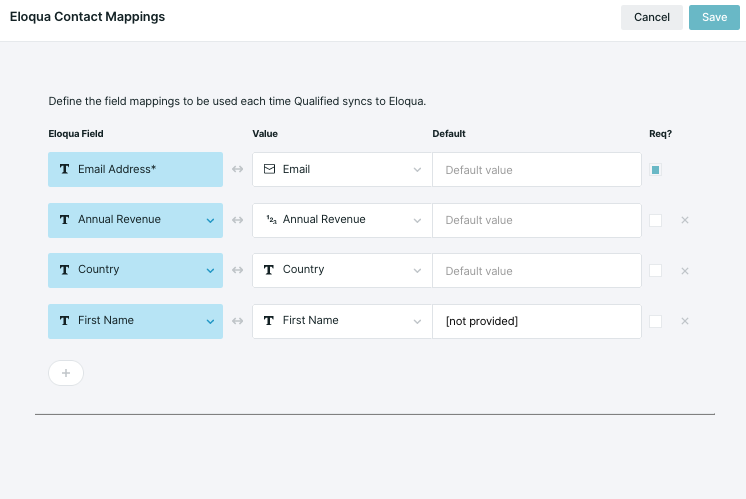
You can map as much information into Eloqua as you’d like here, including hidden field data which we’ll go over in the next step.
Salesforce & Eloqua
If you're using our Salesforce and Eloqua integrations, you might have questions about how they work together. First, we'll look at Eloqua and sync your visitor fields using the information in Eloqua. This allows Qualified to look for an email address in Eloqua which, in turn, might help us also identify who that person is within Salesforce (an existing lead or contact).
Once we've synced the information from Eloqua, Qualified can push that visitor's information into Salesforce.
- When someone lands on the website, we try to identify who the person is and gather info about the person and the company they work for by reading the Eloqua cookie.
- Qualified will then pull information in (in real-time) from all of the apps you've connected (including Eloqua, Salesforce, Clearbit, and 6sense) into your visitor fields.
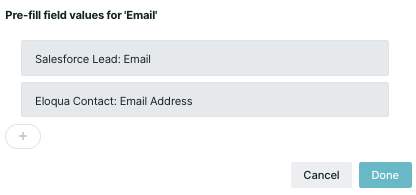
- If any information is conflicting, you determine the rank order of what system should take precedence using prefills in your visitor field area as shown below. (This is typically Salesforce > Eloqua.) When syncing back into Salesforce, we'll always use Salesforce as your source of truth.
- We serve up the experience you've created specifically for your Eloqua leads and contacts.
Strict Record Matching
By default, Qualified matches website visitors to Salesforce lead and contact records by email address. With strict record matching enabled, a visitor will be matched to a Salesforce record only if they first match a record in Eloqua.
Their corresponding Salesforce record will be identified according to the fields configured within the Salesforce settings page and not by their email address.
Note: Because all Salesforce records must be identified via Eloqua, Qualified will not create leads directly in Salesforce when this setting is enabled.
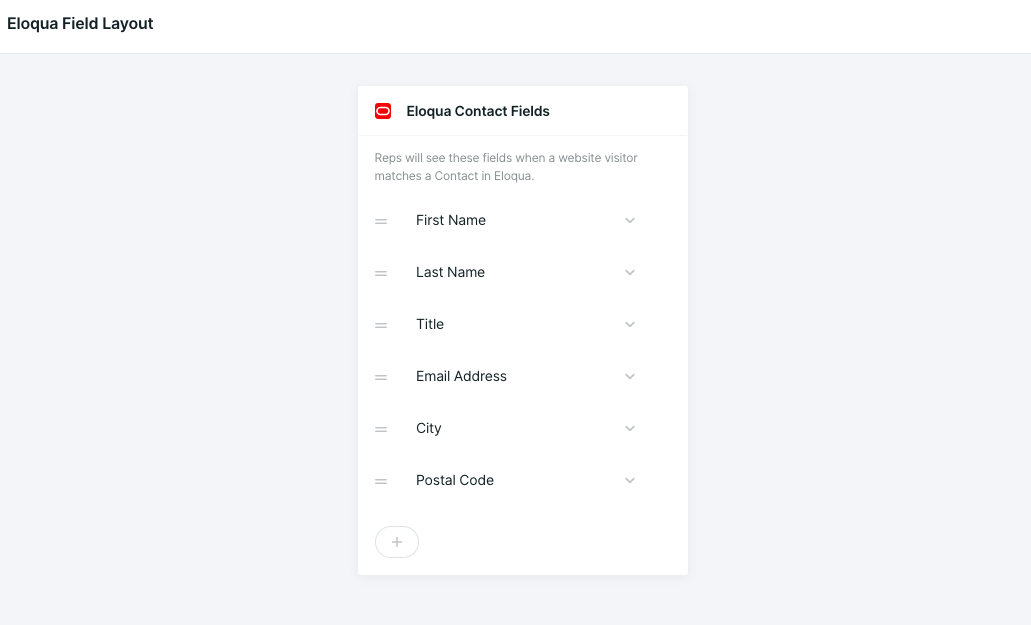
Customize the Visitor 360
Your field layout will allow for you to change the priority in which you display the Eloqua information to your sales reps in your Qualified Live Stream and Visitor 360. It’s also an opportunity to display Contact information from Eloqua that you don’t necessarily want to map in the above area.
To get started you’ll want to navigate to Settings -> Eloqua -> Field Layout.
Add fields to the layout from Eloqua or drag and drop to change the order in which the information is shown.
Heading 1
Heading 2
Heading 3
Heading 4
Heading 5
Heading 6
Lorem ipsum dolor sit amet, consectetur adipiscing elit, sed do eiusmod tempor incididunt ut labore et dolore magna aliqua. Ut enim ad minim veniam, quis nostrud exercitation ullamco laboris nisi ut aliquip ex ea commodo consequat. Duis aute irure dolor in reprehenderit in voluptate velit esse cillum dolore eu fugiat nulla pariatur.
Lorem ipsum dolor sit amet, consectetur adipiscing elit, sed do eiusmod tempor incididunt ut labore et dolore magna aliqua. Ut enim ad minim veniam, quis nostrud exercitation ullamco laboris nisi ut aliquip ex ea commodo consequat. Duis aute irure dolor in reprehenderit in voluptate velit esse cillum dolore eu fugiat nulla pariatur.
Lorem ipsum dolor sit amet, consectetur adipiscing elit, sed do eiusmod tempor incididunt ut labore et dolore magna aliqua. Ut enim ad minim veniam, quis nostrud exercitation ullamco laboris nisi ut aliquip ex ea commodo consequat. Duis aute irure dolor in reprehenderit in voluptate velit esse cillum dolore eu fugiat nulla pariatur.

Block quote
Ordered list
- Item 1
- asdfasdf
- asdfasdf
- asdfasdf
- Item 2
- Item 3
Unordered list
- Item A
- Item B
- Item C
Bold text
Emphasis
Superscript
Subscript
|
|---|
|


.svg)


