
<span id="top"></span>
Salesforce Integration
The native Salesforce integration is the cornerstone of the Agentic Marketing Platform. Connecting your Salesforce org is a foundational step that allows Qualified to use your system of record to identify visitors, personalize conversations, and create or update Lead and Contact records.
To ensure the highest level of security, we strongly recommend following the Principle of Least Privilege when creating your integration user. Instead of assigning a full System Administrator profile, you should create a dedicated custom profile or permission set that grants only the specific permissions required for the Qualified integration to function.
This guide will walk you through our recommended best practices for establishing a secure and powerful connection.
- Connecting to Salesforce
- Testing in Salesforce Sandbox
- Mapping data to Salesforce
- Configuring Campaigns & Attribution
- Creating Target Account Lists
- How Qualified Matches Visitors to Salesforce Accounts
<span id="connecting"></span>
Connecting to Salesforce
The native Salesforce integration is the cornerstone of the Agentic Marketing Platform. Connecting your Salesforce org is a foundational step that allows Qualified to use your system of record to identify visitors, personalize conversations, and create or update Lead and Contact records.
To ensure the highest level of security, we strongly recommend following the Principle of Least Privilege when creating your integration user. Instead of assigning a full System Administrator profile, you should create a dedicated custom profile or permission set that grants only the specific permissions required for the Qualified integration to function.
This guide will walk you through our recommended best practices for establishing a secure and powerful connection.
<span id="step-1"></span>
Step 1: Decide your default push destination
Determine where Qualified will create new leads and update existing records across your Salesforce and connected Marketing Automation Platform. If your system architecture is designed to have all data flow through a Marketing Automation Platform before moving to Salesforce, you can restrict your Salesforce integration user permissions appropriately for your situation.
<span id="step-2"></span>
Step 2: Choose your integration user strategy
The first step is to decide which type of Salesforce user account will connect Qualified and Salesforce. While several strategies are possible, we strongly recommend creating a Dedicated, Qualified-only User for the most secure, stable, and reliable integration. The table below outlines the pros and cons of each approach.
<table><thead>
<tr>
<th>Setup</th>
<th>Pros<br></th>
<th>Cons</th>
</tr></thead>
<tbody>
<tr>
<td>⭐️ Dedicated, Qualified-only integration user</td>
<td>This is best practice and the recommended option. The user is granted precise permissions and all updates made within Salesforce are clearly attributable to Qualified.</td>
<td>This requires the purchase or use of a dedicated Salesforce user license, which may require time to set up at your company.</td>
</tr>
<tr>
<td>Shared integration user with other connected apps</td>
<td>If you already have an Integration User for other apps, this may be faster than creating a new, dedicated Qualified User.</td>
<td>Qualified must share the permissions and limits of the shared integration user. If this user’s access is shut down, all connected apps will be impacted. You will be unable to easily determine which system is creating or updating records.</td>
</tr>
<tr>
<td>Existing individual user</td>
<td>This is both the fastest and most affordable option, because it uses an Individual User that already exists in your Salesforce. There’s no need to create anything new.</td>
<td>This method poses a significant security risk by granting full system access. All data changes are attributed to the individual user, making platform-specific auditing difficult, and the integration will break if the user leaves the company or their account is compromised.</td>
</tr>
</tbody></table>
<span id="step-3"></span>
Step 3: Create & Configure the Integration User
Please work with your Salesforce Administrator to create a custom profile or permission set with the following minimum required permissions.
The Permission Checklist
Use this checklist to verify that the user account has the required permissions.
General Permissions
- API Enabled: The "API Enabled" checkbox is checked on the user's Profile or an assigned Permission Set.
- Access Activities: The "Access Activities" checkbox is checked.
- Edit Events & Tasks: The "Edit Events" and/or "Edit Tasks" checkboxes are checked.
- View and Edit Converted Leads: Verify this permission is UNCHECKED.
- Approve Uninstalled Connected Apps: If the Integration user is not an admin (NOT RECOMMENDED), this permission must be checked to ensure that the Connected App can be approved.
Object-Level Permissions:
- Leads: Read, Create, Edit
- Contacts: Read, Edit
- Accounts: Read, Create, Edit
- Opportunities: Read
- Campaigns: Read, Edit
- Objects related to Leads, Contacts, Accounts: Read
3. Minimum Field-Level Access
The integration user must have Read access to all fields that Qualified needs to reference and Edit access to all fields that Qualified will update.
Because each Salesforce org has different field customizations, consider starting by granting Read access to all standard and custom fields on the supported objects (Leads, Contacts, Accounts, Opportunities, Activities, Campaigns, Campaign Members).
Then, narrow down Edit access only to the fields that Qualified will write to during normal operation (for example, Lead Status, Owner, or Campaign Status).
To use Related Object Filtering, your Salesforce integration must have Read access to the following metadata objects:
- EntityDefinition
- FieldDefinition
- EntityParticle
- PicklistValueInfo
If these permissions are missing, related custom objects or fields may not appear when building filters.
Any new fields added after implementation should be reviewed and granted appropriate access if they are used by Qualified.
⚠️ Important: Your Qualified Success Architect can help you navigate creating your integration user for your unique Salesforce environment. You will be able to identify which fields are required for the business teams who will be operating Qualified by first connecting Qualified to a Salesforce Sandbox and iterating on your required user permissions. This approach ensures Qualified can function reliably while still following the Principle of Least Privilege.
4. Dashboard Field Access
To power the Qualified Dashboards in your analytics suite, specifically the "Revenue Influence" and "Pipeline Influence" dashboards, the integration user requires at least Read access to the following fields.
- Account Object: LastModifiedDate, Id, Website, Name, Owner.Name
- Opportunity Object: Id, Name, StageName, Amount, CloseDate, IsClosed, CreatedDate, AccountId
<span id="step-4"></span>
Step 4: Complete Security Prerequisites
Restrict API Access by IP Address (Recommended)
For an added layer of security, we strongly recommend restricting API access to only Qualified's servers. This ensures that the integration user can only be accessed from our trusted network.
A Salesforce Administrator can do this by setting Login IP Ranges on the integration user's custom profile and adding the following static IP addresses:
- 34.236.78.183
- 52.20.17.105
- 3.92.37.95
Review Salesforce Automation
Please ensure there are no validation rules, Apex triggers, or flows that would prevent the API user from successfully creating or updating the objects listed in the permission checklist.
<span id="step-5"></span>
Step 5: Connect to Qualified
Once your user is created and configured, you can establish the connection.
- In Qualified, navigate to Settings → Integrations → Salesforce → Connection.
- Click Connect to Salesforce.
- A Salesforce pop-up window will appear. Enter the login details for the dedicated integration user.
Note: you may need to click "Use Custom Domain" before entering your credentials to properly authenticate. - Click Log In and follow any verification prompts.
- After logging in for the first time, install Qualified as a Connected App in Salesforce Setup.
You will know the connection is successful when you return to the Salesforce settings page in Qualified and see the integration user's name displayed under the “Org-level account” section.
<span id="step-6"></span>
Step 6: Post-Connection Configuration
With the connection active, you can now configure several settings to fine-tune how data flows between Qualified and Salesforce:
- Update Salesforce Fields: Click this button to sync any new or changed fields from your Salesforce objects (Lead, Contact, Account, etc.) into Qualified. It's a good practice to do this any time your Salesforce admin makes changes to your page layouts.
- Sync Frequency: Use this setting to control how often Qualified pulls the latest data from Salesforce, ensuring the information your team sees is always current.
<span id="next-steps"></span>
Next Step: Sales Rep Connections
This guide covers the main org-level connection required for Qualified to sync with Salesforce. After this org-level connection is complete, your individual sales reps will also need to connect their personal Salesforce accounts to Qualified.
This is a simple, one-click process that does not require any special permissions for the reps. This personal-level connection is what ensures records, like Leads and Contacts, are correctly assigned and attributed to the specific sales rep who interacted with a visitor.
<span id="sandbox-testing"></span>
Testing in Salesforce Sandbox
If you have a Salesforce account, most likely you also have a test sandbox environment. Sandboxes are mainly used to create multiple copies of your production environment, so that you have an exact replica of your production environment without affecting your live data during your test period.
Salesforce sandbox testing is part of Qualified’s Enterprise and Ulitmate plan. If you do not have this feature but would like to test in sandbox, please contact your Qualified Success Architect.
Connecting to your Sandbox in Qualified
Once your sandbox is ready for testing, you can connect it to Qualified to begin your setup and testing.
1. Log in to your Qualified admin account.
2. Go to Settings → Integrations → Salesforce → Connection.
3. In the “Org-level account” section, click the Or connect to sandbox link under the blue button.
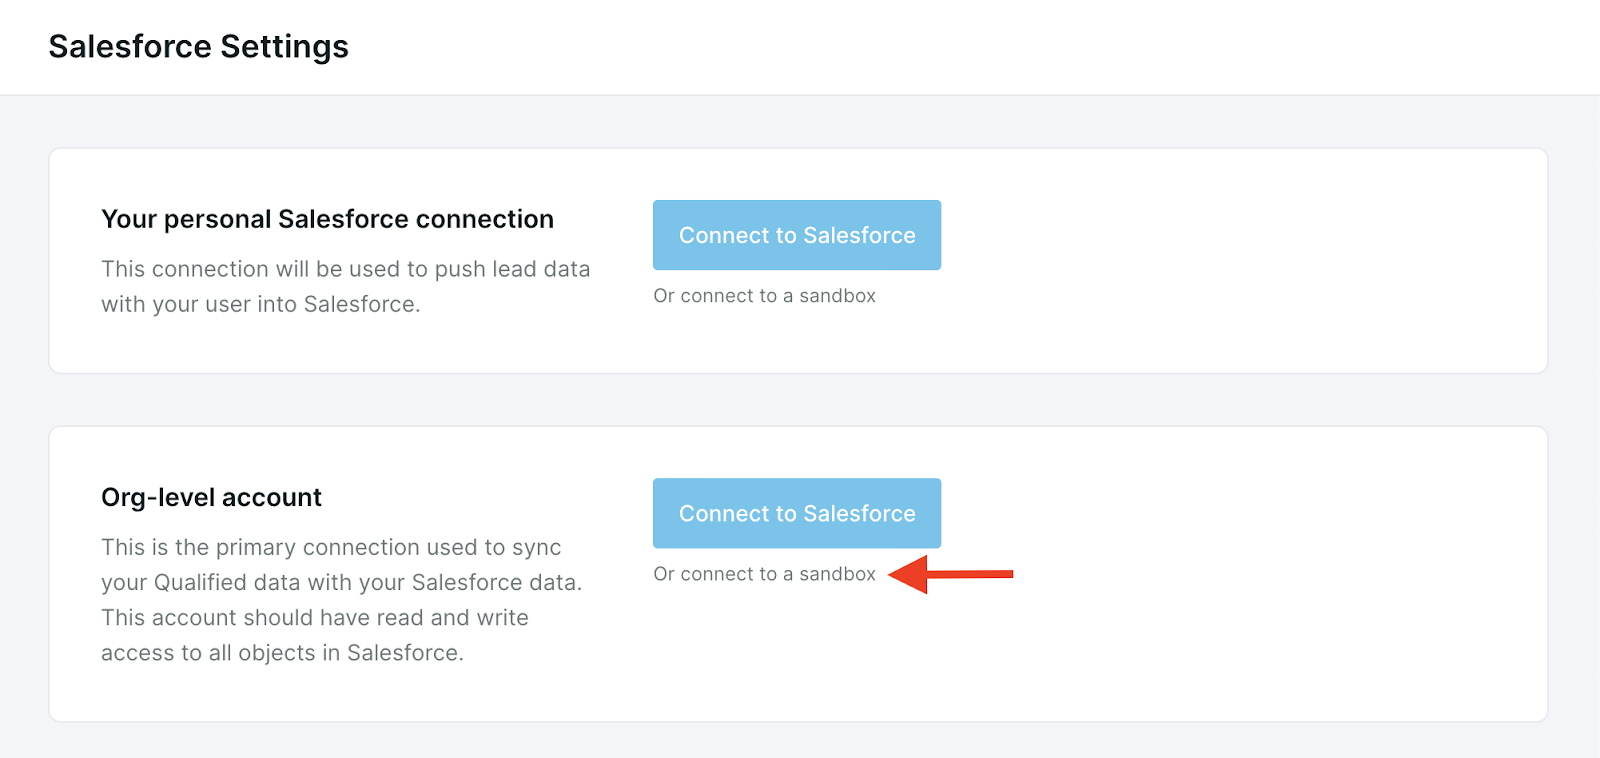
You’ll also notice on this page that there are two places where you’ll need to connect to your Sandbox: Connecting with a Personal account and Connecting with a Team level account.
Connecting a personal account
Personal user accounts are used by each rep when creating Salesforce objects such as leads or contacts.
Each user in your org will need to connect using their own personal Salesforce credentials. Most likely for your sandbox testing, however, you won’t need to connect all reps at this time and can wait until you’re using your Salesforce production environment.
Connecting the org-level account
The org-level account is used by the system to read and write data as necessary. To learn more on how these two connections work together head to the top of this article to view details on connecting to Salesforce Production as this information is the same.
Limitations of sandbox connections
There are some limitations to using the Sandbox for testing and connecting to Qualified.
- When using a Sandbox connection, you cannot have campaign attribution; you won't be able to create campaign members from lead or contact records.
- If you create fields and map them in Qualified and your sandbox, these fields do not exist in your production environment. As such, your mappings will most likely fail. Check to make sure that all fields are created in your sandbox and production before going live.
Recommended tests in sandbox
- Create a new lead through a chatbot experience and create a lead through the Qualified app.
- Verify that the new lead created by Qualified is assigned to the expected sales rep.
- Update an existing lead via mapped field values through a chatbot experience and the Qualified app,
- Update existing contacts via mapped field values through a chatbot experience and the Qualified app.
- Ensure Salesforce events are logged on leads and contacts for conversations and meetings booked.
Once the above testing scenarios are completed, promote your Salesforce team-level connection from sandbox to production. You’ll see the option to “Promote to Production” in your Salesforce connection area.
When you press this button, we’ll keep your mappings in place but replace your credentials with your Production credentials so that it’s a smooth transition. The remainder of the Experience Build will be completed while you are connected to production.
Moving to production
When you’re done with your testing in the sandbox environment, you’ll now want to move to production before you go live with Qualified. You’ll see the option to Promote to Production Org in your Salesforce connection area.

When you press this button, we’ll keep your mappings in place but replace your credentials with your production credentials so that it’s a smooth transition.
Make sure all of the fields that you’ve created within Qualified and tested in your sandbox also exist in your production instance. If they do not, your mappings will fail.
<span id="mapping-data"></span>
Mapping data to Salesforce
Learn how to map data from Qualified to Salesforce so when sales reps use the application, they can create Leads, or update an existing Lead or Contact. We'll also explore how to map hidden fields into Salesforce for reporting purposes by your sales and marketing managers.
To get started, go to Settings → Integrations → Salesforce → Lead Mapping.
Mapping Data to Basic Required Fields
Many implementations start by mapping a basic set of information to Salesforce to create and convert Leads into an Account, Contact, and Opportunity.
Let's start with the most basic required fields in Salesforce: name, email, and company. You'll notice when you first open this page that these lead fields are dynamically pulled in because they're required by default to create a lead in Salesforce. You'll now want to go in and select the visitor field in Qualified that will map to Salesforce.
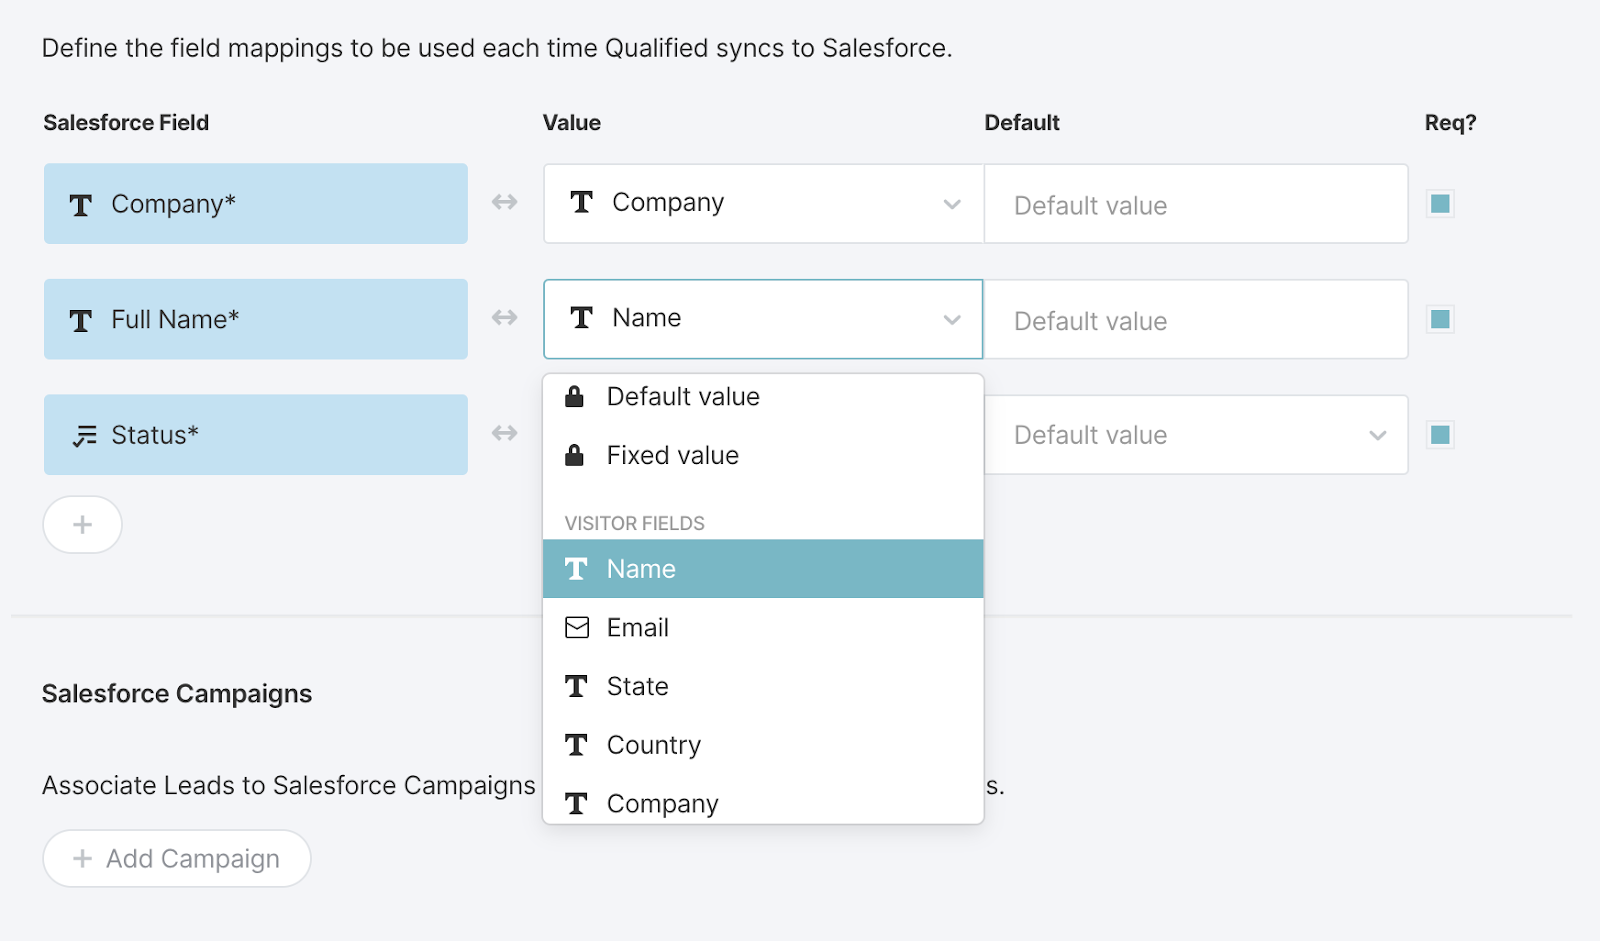
If you don't see one of your Salesforce fields in this list, it means that the user you've connected to Salesforce with doesn't have access to that field. You can change this setting in Salesforce by navigating to Setup → Object Manager → Lead → Field → Set Field Level Security.
If you don't see the visitor field that you'd like to match up with your Salesforce field, select "Create Field" from the drop-down menu to create it.
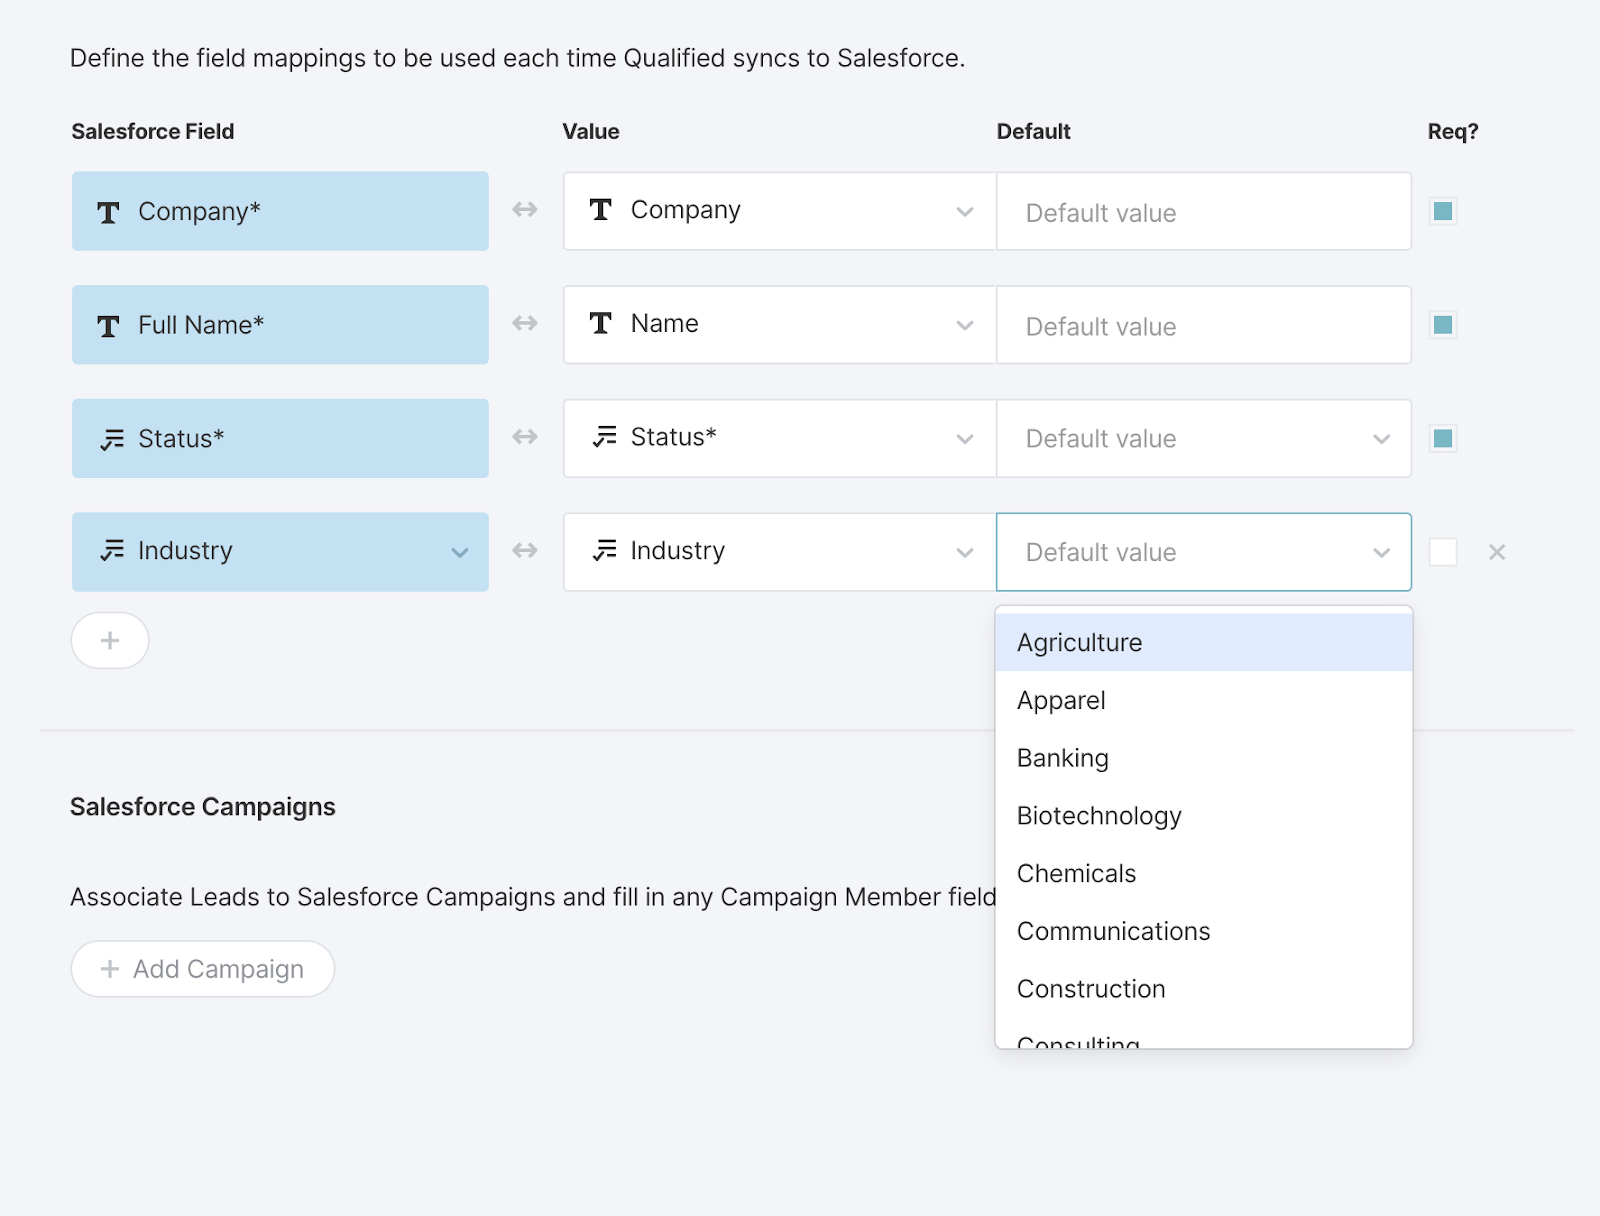
Mapping Data to More Complicated Data Types
What's a data type? It is the "type" of data that a Salesforce field will accept in that field. In the basic example above, the field "Company" is a text field, meaning it will accept a string of characters, and the field "Email" is an email field, which means that it must contain a valid email address. Let's show an example of a more complex (and quite common) data type such as a picklist.
It's pretty common in Salesforce for fields like "company size" or "industry" to have a default set of values set by your Salesforce admin. As a result, when you map data into these fields, it's a good idea to only allow the values set by your Salesforce admin, and once you select the field from Salesforce the mapping automatically pulls in these values as shown here:
Fields Not Supported
There are some Salesforce fields that we cannot map into at this time:
- Lookup fields
- Multi-select picklists
- Formula fields
Mapping Checkbox Data to Salesforce
Mapping to a checkbox can be a bit more complex than other data fields as checkboxes are always true or untrue (checked or unchecked) and are often used to trigger workflows within your Salesforce instance.
Before mapping your checkbox, you'll notice two options during the data mapping process: default or fixed value. A default value allows you to map a value to the field only if the field is already empty.
Because checkboxes in Salesforce are never empty (meaning they are always true or untrue), in most cases you'll not want to use this option in your mapping. Instead, the fixed value option will allow you to always override whatever is in the field in Salesforce with a predetermined value (in this case: true).
If you'd like to mark your checkbox as 'true', meaning you'd like to check it when a lead is created or updated in Salesforce, you must then select 'true' as your fixed value.

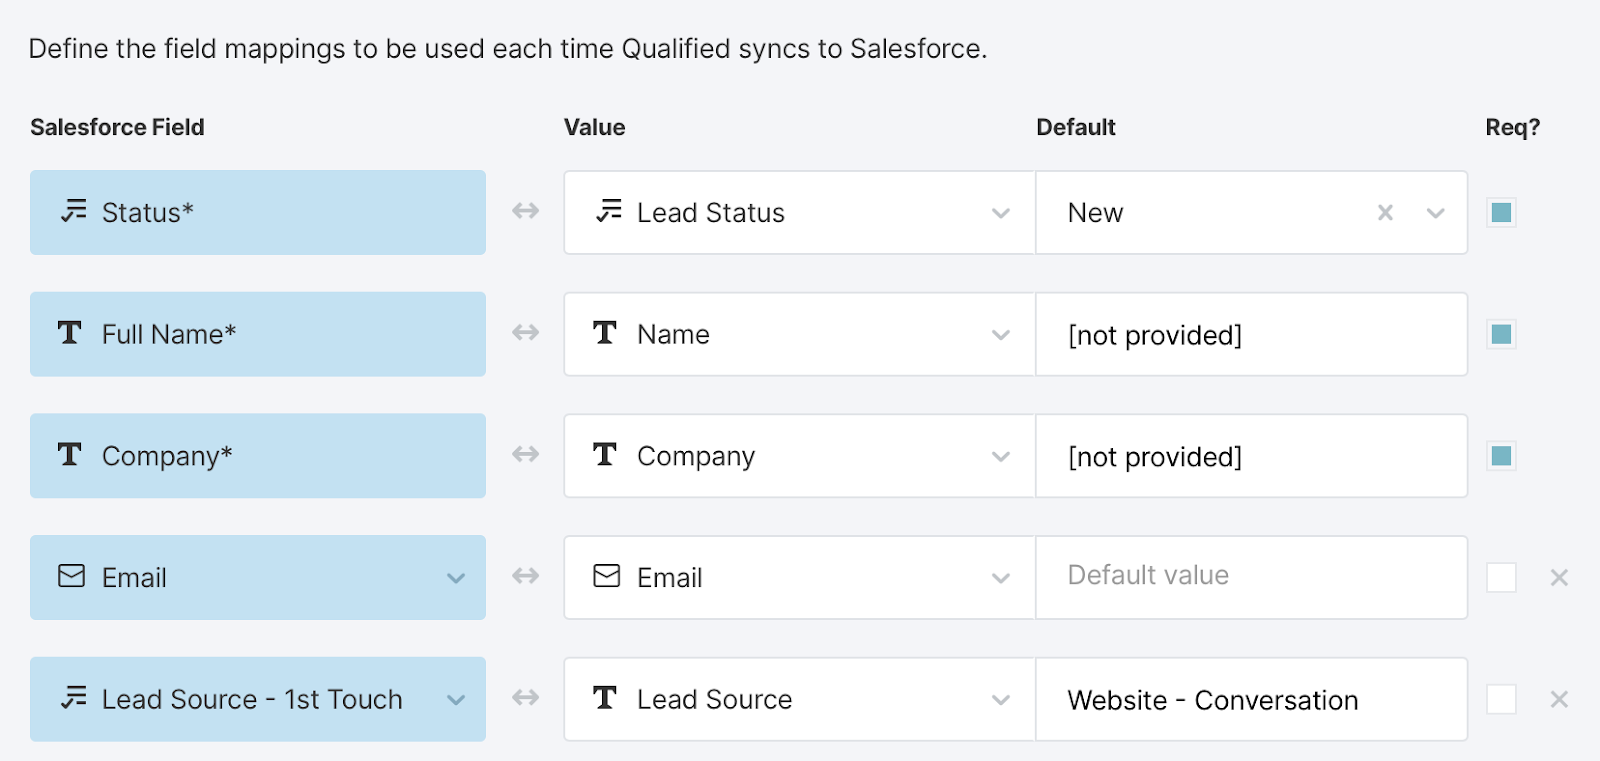
Mapping Hidden Field Data to Salesforce
It's a common practice to have some field values hardcoded when creating leads in Salesforce. This prevents your sales reps from setting these values manually and instead allows Qualified to set the values based on your rules.
The most common of these fields on the lead object is the lead source. Setting a hardcoded ("hidden") value to this field will tell you that the lead originated from a Qualified conversation on your website and can be used later by marketing managers and sales managers for reporting purposes.

<span id="campaigns"></span>
Configuring Campaigns & Attribution
Now that you’re familiar with campaign attribution and how it works within Qualified, you’ll want to get started setting up your campaign in Salesforce and your attribution mapping within Qualified.
Creating Your Campaign in Salesforce
To get started, create your Qualified campaign in Salesforce. This campaign is going to help you track your conversational marketing efforts, using your Qualified app.
When creating your Salesforce campaign, we recommend calling it “Qualified.com” to make sure that you can distinguish between a ‘qualified’ lead and our app, Qualified.
There are a few other fields you'll want to look at when creating your campaign:
- Type: Set the type to 'web conversations.'
- Status: Most likely your campaign for Qualified will be ongoing, so you'll want to set the status as 'In Progress' for now.
- Start & End Date: You can leave this blank or fill in the dates that you'd like to run this particular campaign.

Setup in Campaign Attribution Qualified
In order for Qualified to know which campaign you’d like to associate with your leads and contacts, set this up within Lead Mapping and Contact Mapping. To get here, navigate your way to Settings → Integrations → Salesforce → Lead Mapping and next, Contact Mapping.
On this screen you’ll see how to map information into your Salesforce fields from Qualified. Scroll down to the bottom and you’ll see Campaign Attribution.

Once this is set, Qualified will now know which Salesforce campaign to associate your leads or contacts to by default.
Leads and contacts are mapped separately, so you need to map both to your Qualified campaign. If you’d like to associate your new Pardot Prospects to a Pardot Source Campaign, you can do this in the Pardot Prospect mapping area, as well.
Lead Source
Setting your lead source is important to help you report on where your leads in Salesforce came from. Before finishing your Campaign Attribution setup, make sure that your lead source field in Salesforce is being populated by Qualified when a lead is created.
To do this, you’ll want to first browse to your Settings → Integrations → Salesforce → Lead Mapping area if you’re not already still there.
From here, look for your ‘Lead Source’ field or select to create one as shown below. Once you’ve created the field, set your default value on that field to “Website Conversation” or "Qualified.com Conversation" so that later on in your reports you can determine how many leads were created specifically from Qualified.
<span id="target-accounts"></span>
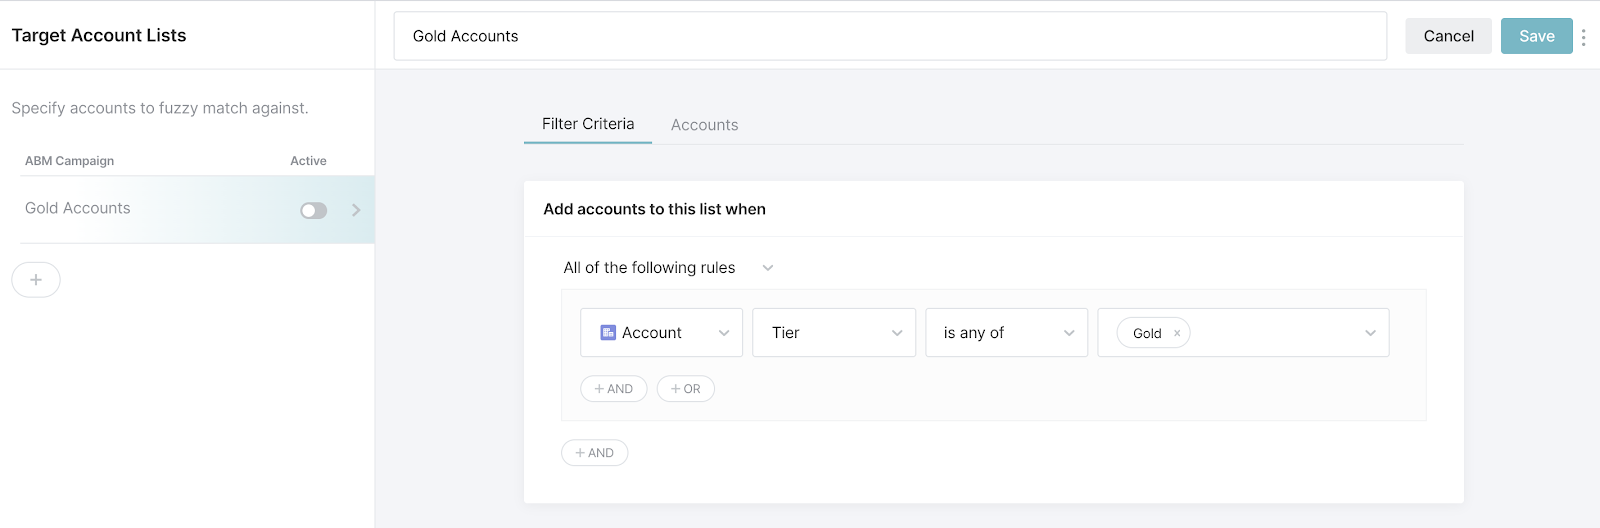
Creating Target Account Lists
Our Target Account Lists allows for you to create lists based on your high-value Accounts or Opportunities in Salesforce to later trigger specific Experiences or alerts for the visitors that belong to these Accounts and Opportunities as soon as they hit your site.
Getting Started
- Log in to your Qualified admin account.
- Go to Settings → Integrations → Salesforce → Target Accounts.
- Click the + Create new target account list button.
- Enter a name… for the list.
- Add the criteria using the Salesforce Account or Opportunity fields.
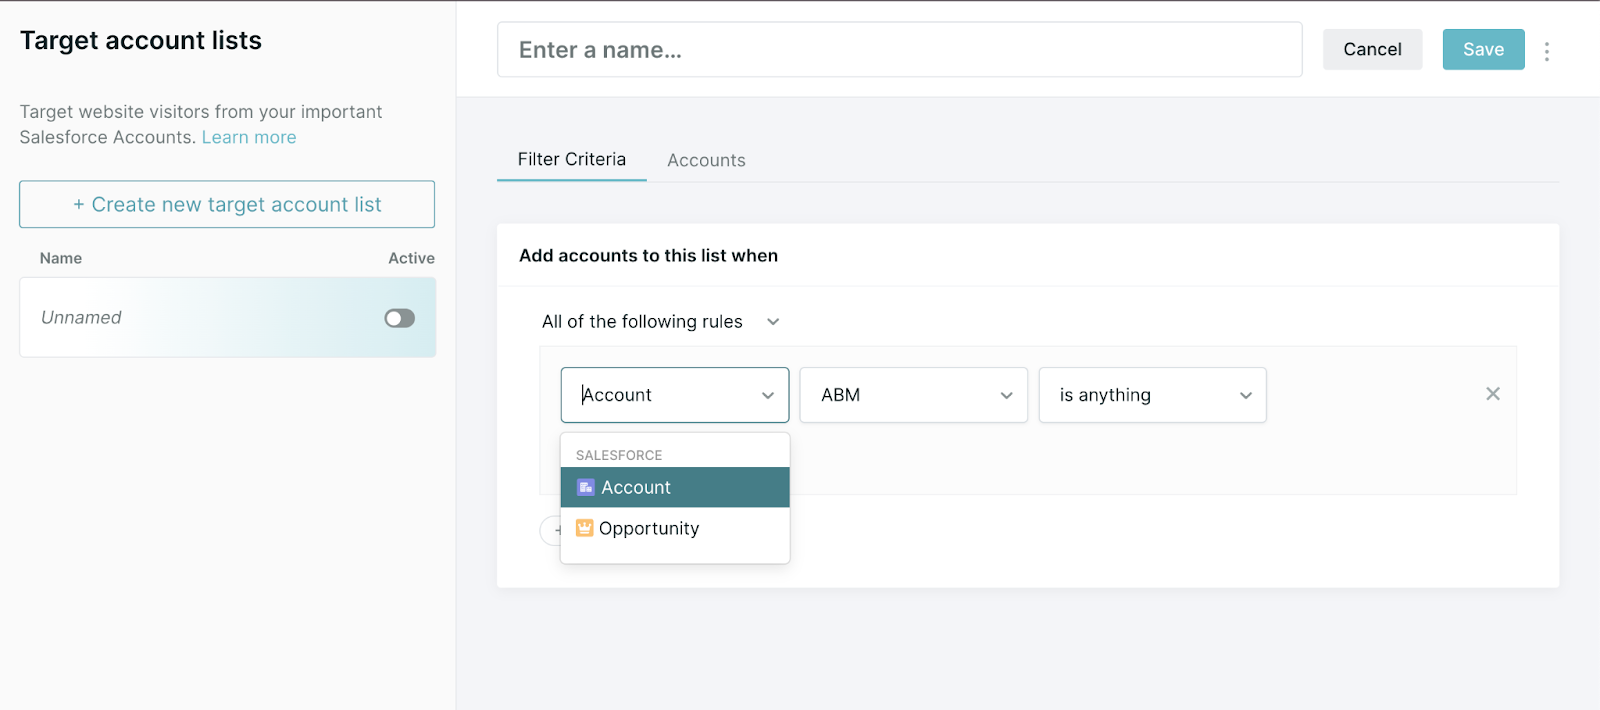
You can create lists based on any criteria in Salesforce including custom fields such as "Tier" or standard fields such as account owner or type. We recommend also creating a few lists for your open opportunities, allowing you to alert your sales team when one of their open opportunities is on the site.
Some common Target Account lists include open opportunities, diamond accounts, ABM accounts, and current customers.
Viewing Your List Details
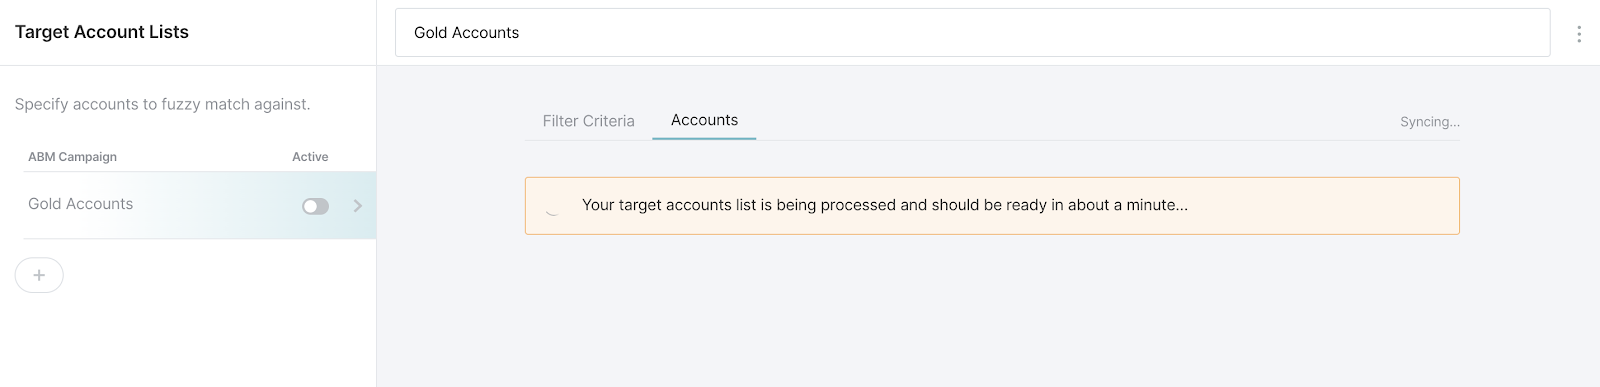
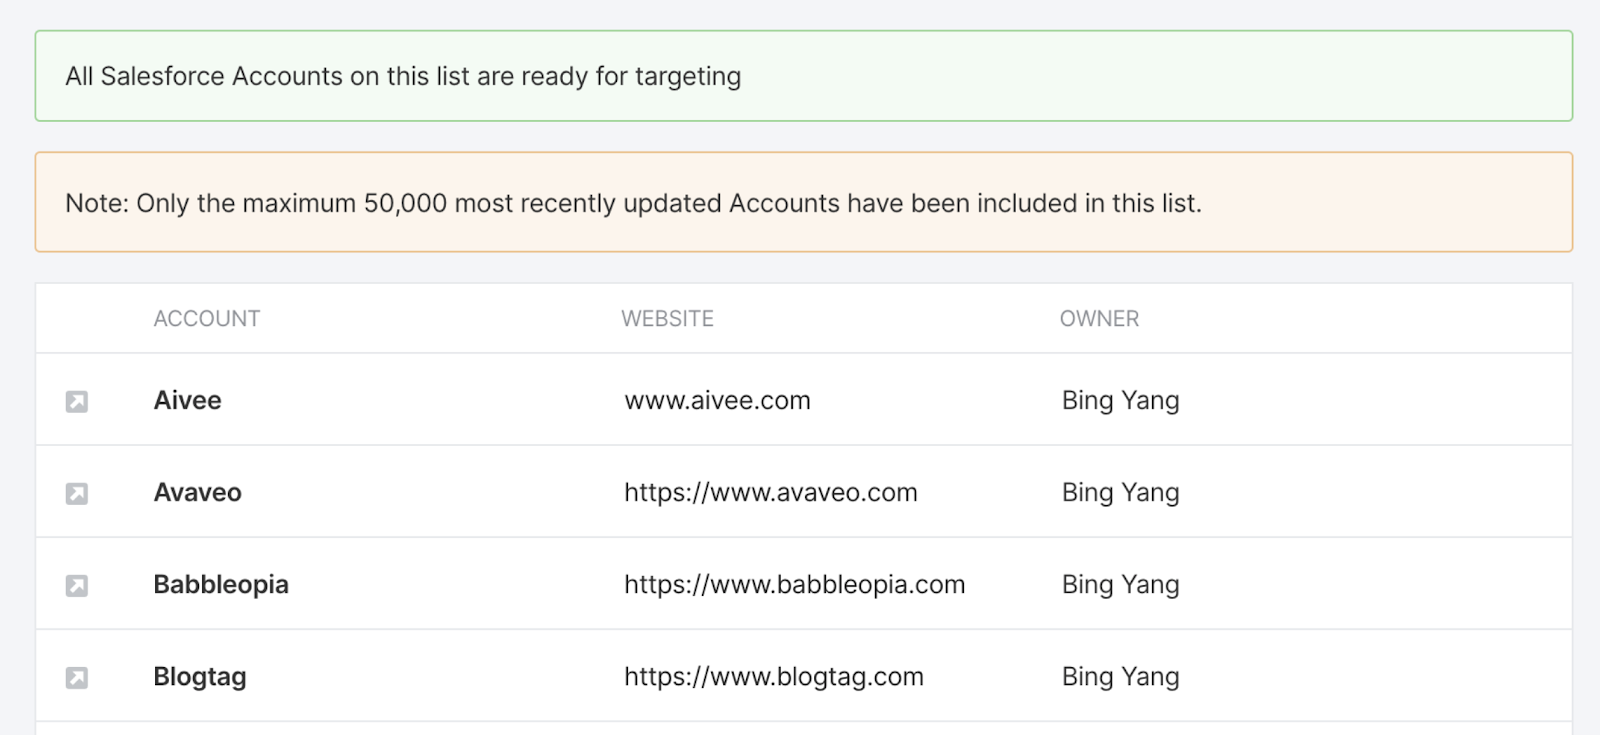
To see the list, you’ll use the tab on the same page called “Accounts" where we'll show all accounts matching your list criteria. Click on this tab to see your accounts start to load onto the page. Next, add filter criteria in order for Qualified to populate your list.
Please note there is a limit of 50,000 accounts that can be on any list at one time. If your list is over 50,000 add more filter criteria to narrow it down.
Populating your list might take some time to load as we sync over your account information and pull data from your Salesforce Instance.
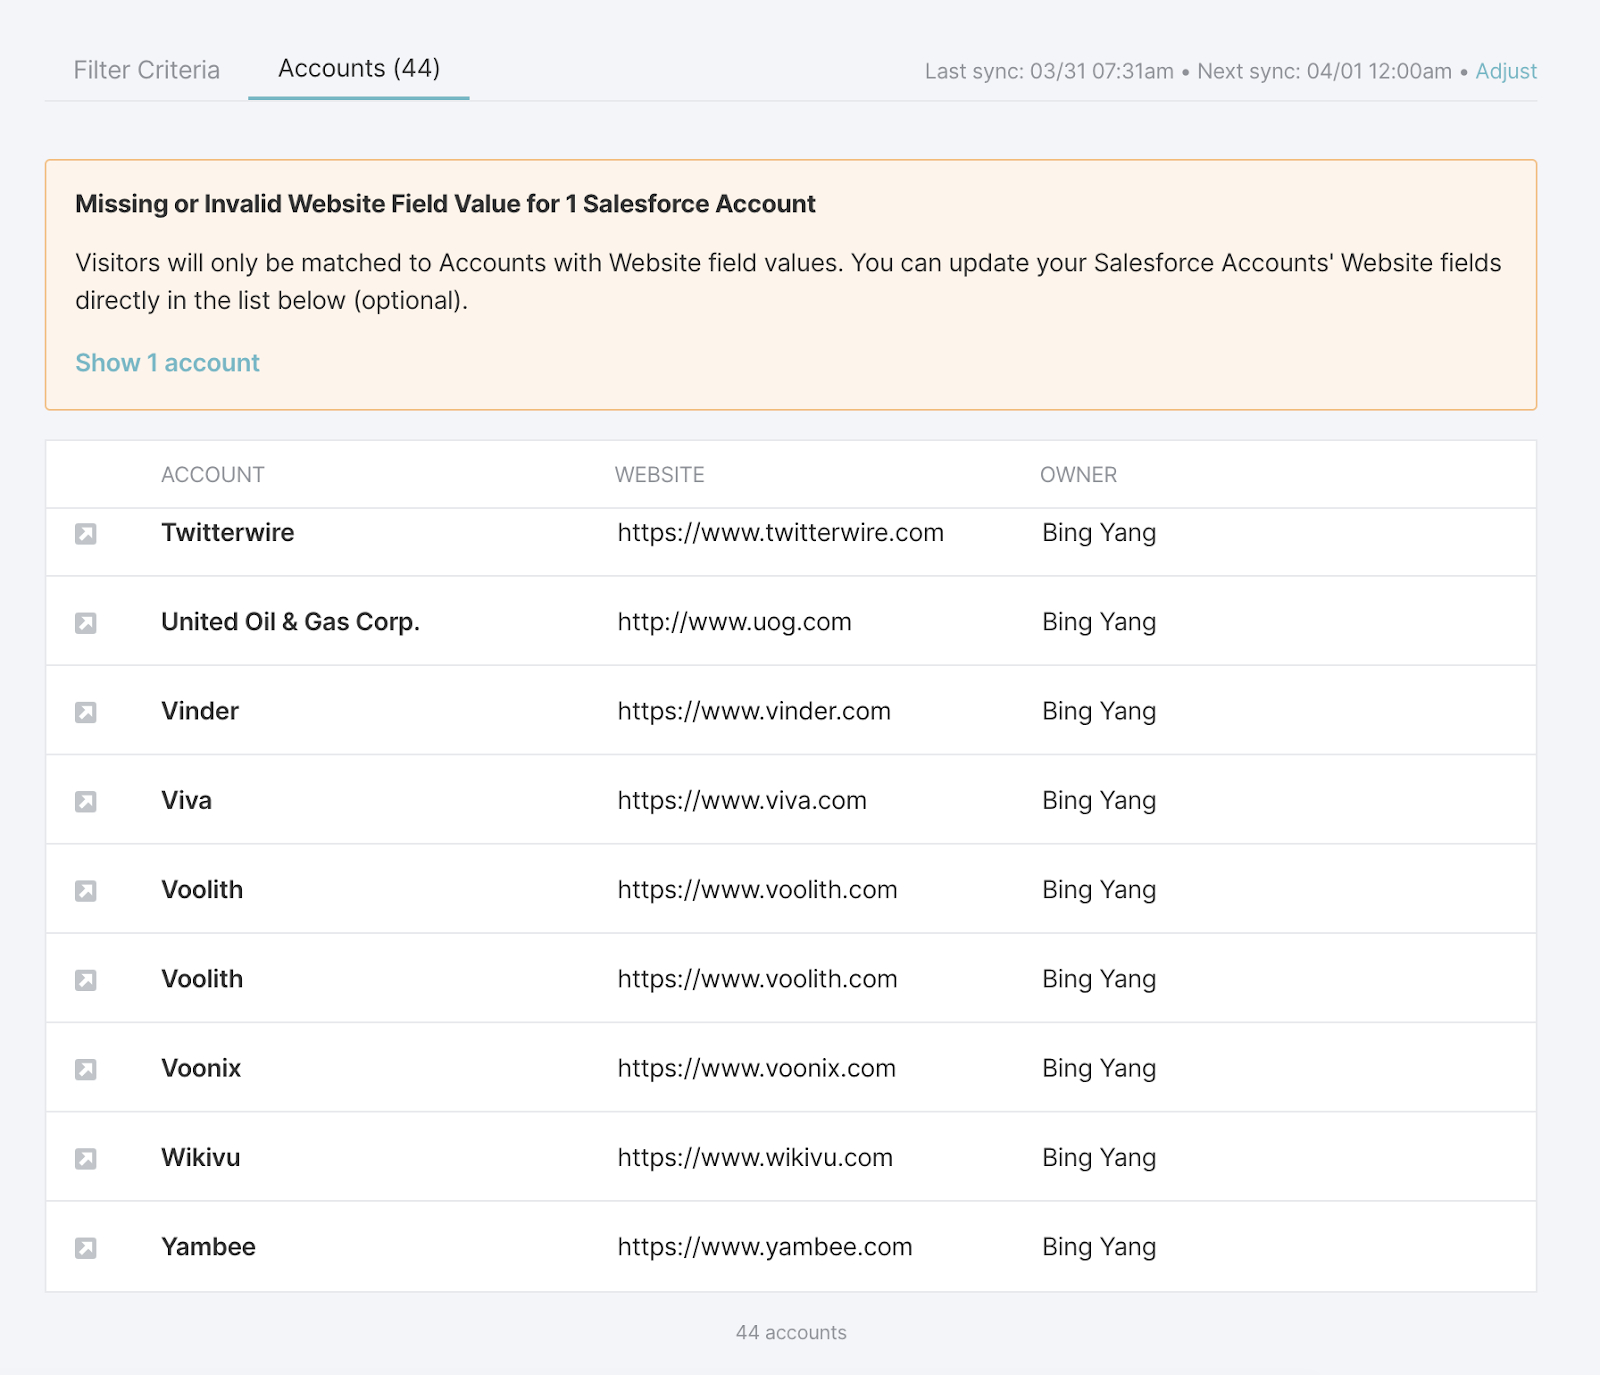
It’s important to note that the domain names given here must be correct in order for us to match website visitors to your Target Accounts. If no domain name is provided here for your accounts, we’ll not be able to match visitors correctly and any experiences you’ve created specifically for these Accounts will not fire properly.
You can use any website address format that is valid, such as:
- http://qualified.com
- www.qualified.com
- qualified.com
- https://qualified.com
- https://www.qualified.com
- http://www.qualified.com
How We Handle Duplicate Accounts in Lists
When creating your Target Account lists, we’ll pull in information directly from your Salesforce instance based on the criteria that you’ve selected.
If there are multiple duplicate accounts, we’ll show them all in your list. For example, you’ll see in our example list below that our Salesforce instance has two Accounts that fit the criteria we’ve filtered on named “Voolith.” Both accounts are shown in the Target List.
When a visitor comes to the site from a company with a duplicate Account in Salesforce (like our Voolith Account above), we’ll do our best to match the visitor with the correct account in your Salesforce instance by:
- First, look at which account has the most opportunities attached and use this account.
- If there are no opportunities, we'll look at the account with the most contacts.
- If there are no contacts or opportunities attached to the accounts we'll then use the account last modified in Salesforce.
Syncing from Salesforce
We'll sync your information from Salesforce every day at 12:00 am according to the time zone of Salesforce instance.
<span id="matching-visitors"></span>
How Qualified Matches Visitors to Salesforce Accounts
When a visitor arrives on your site, we use a few tools to decipher if they belong to one of your Target Accounts. This process, called "fuzzy matching," helps us identify their company domain name.
Fuzzy Matching
Fuzzy matching is a technique used in computer-assisted translation as a special case of record linkage. It works with matches that may be less than 100% perfect. We check several sources to identify the closest account match.
How Qualified Matches Accounts
Qualified matches visitors to accounts by referencing their email address and reverse IP address lookup integrations:
- If we have the visitor's email address and you have our Clearbit Enrichment integration, we'll use the company domain supplied by your data enrichment integration (Company Field: Website).
- If you do not have a data enrichment integration and we have the visitor email address, we will try to match the email address domain to the website domain in the account.
- Finally if the email address is not available we look at the company domain that we get from Clearbit Reveal (Company Field: Website) or 6sense (Field: Website) based on the visitor's IP address.

If an account is a fuzzy match, this is highlighted within the Visitor 360:

If duplicate Salesforce accounts are found, Qualified follows logic to update only one account.
Heading 1
Heading 2
Heading 3
Heading 4
Heading 5
Heading 6
Lorem ipsum dolor sit amet, consectetur adipiscing elit, sed do eiusmod tempor incididunt ut labore et dolore magna aliqua. Ut enim ad minim veniam, quis nostrud exercitation ullamco laboris nisi ut aliquip ex ea commodo consequat. Duis aute irure dolor in reprehenderit in voluptate velit esse cillum dolore eu fugiat nulla pariatur.
Lorem ipsum dolor sit amet, consectetur adipiscing elit, sed do eiusmod tempor incididunt ut labore et dolore magna aliqua. Ut enim ad minim veniam, quis nostrud exercitation ullamco laboris nisi ut aliquip ex ea commodo consequat. Duis aute irure dolor in reprehenderit in voluptate velit esse cillum dolore eu fugiat nulla pariatur.
Lorem ipsum dolor sit amet, consectetur adipiscing elit, sed do eiusmod tempor incididunt ut labore et dolore magna aliqua. Ut enim ad minim veniam, quis nostrud exercitation ullamco laboris nisi ut aliquip ex ea commodo consequat. Duis aute irure dolor in reprehenderit in voluptate velit esse cillum dolore eu fugiat nulla pariatur.

Block quote
Ordered list
- Item 1
- asdfasdf
- asdfasdf
- asdfasdf
- Item 2
- Item 3
Unordered list
- Item A
- Item B
- Item C
Bold text
Emphasis
Superscript
Subscript
|
|---|
|


.svg)


