
Salesforce Functionality
Qualified can automatically create new Salesforce leads, update lead and contact records, and add leads and contacts to Salesforce campaigns. New information is synced to Salesforce automatically via an Experience step or manually by a sales rep in the Visitor 360.
- Syncing Visitors to Salesforce
- Salesforce Lead Assignment
- Salesforce Events & Playback URLs
- Creating New Salesforce Accounts
<span id="syncing-visitors"></span>
Syncing Visitors to Salesforce
Automatic Syncs by Experiences
Most Experiences include a step that syncs information with your Salesforce org. When building or updating an Experience, select the Push to an external system step:
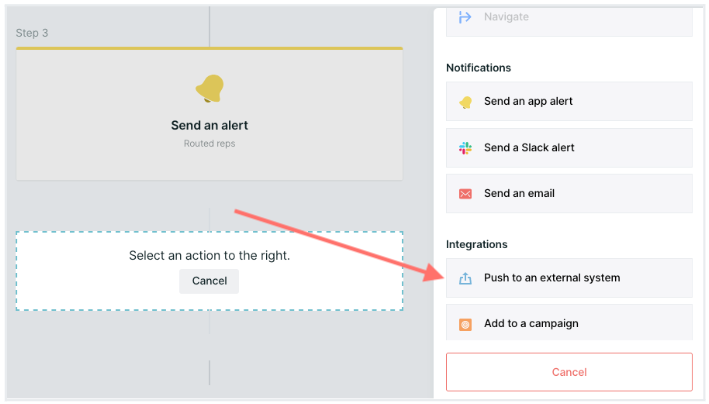
From the Destination drop-down menu, select Salesforce. Then choose what type of action occurs and when it happens.
Create Lead
Qualified can create a new lead within your Salesforce instance, and you decide when that happens.
At this time, Qualified creates leads in Salesforce but does not create new contact or account records.
Update Existing Lead or Contact Record
Qualified can also update your existing Salesforce records with information learned from a visitor conversation. You decide which fields Qualified is permitted to update.
From Update behavior, choose when the lead or contact records are synced.
Manual Syncs by Sales Reps
Sales reps can also manually sync new information about visitors to Salesforce.
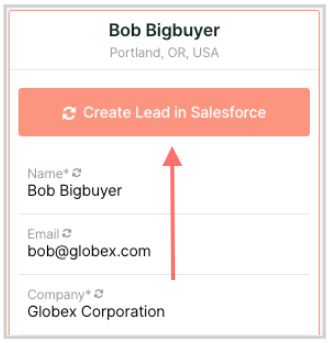
In particular, when sales reps pounce on visitors, they must manually create a lead record as they learn new information about the visitor. As reps engage with visitors and add information to the Visitor 360, there are two options:
- For visitors without a matching email in your Salesforce instance, reps can click Create Lead in Salesforce in the Visitor 360 to create a new lead record and be assigned ownership:
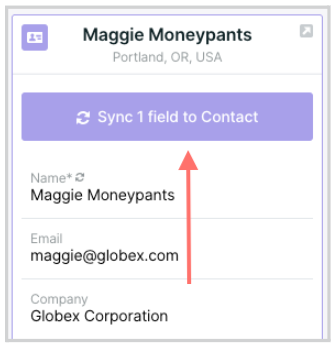
- For visitors that are matched to your Salesforce instance, sync new details with existing lead or contact records in Salesforce by clicking Sync field(s) to Contact in the Visitor 360:
Sync Visitors to Salesforce Campaigns
Qualified can also add leads and contacts to specific Salesforce campaigns. There are two methods:
- Insert an Add to a campaign step when building an Experience. Use the resulting drop-down menus to select Salesforce and the name of your campaign. Click + Field to simultaneously sync other campaign member fields.
- Add Salesforce campaign mapping within Qualified. Every lead or contact that Qualified maps information to is added to the campaign you specify.
How Qualified Avoids Duplicates
When Qualified initiates a sync, existing duplicate records may be found. Qualified decides which record to match based on the following logic:
- Duplicate Salesforce leads or contacts with the same email: The most recently updated lead or contact is prioritized.
- A Salesforce lead and contact share the same email: The matched contact is used by Qualified.
- Duplicate Salesforce accounts are found: The account with the highest number of opportunities takes precedence. If the number of opportunities between the two accounts is identical, then the account with the highest number of contacts is used. If the accounts are still tied, then the one most recently updated is recognized by Qualified.
- A visitor email matches multiple lead, contact, or prospect records in your marketing automation platform: The most recently updated record is used.
Troubleshooting
Why was my lead not created in Salesforce?
Review your Experience to confirm that it includes a Push to an external system step. If not, add one.
If you push Qualified leads to a Marketing Automation Platform by default and now the Salesforce lead is missing, there may be an issue with your Marketing Automation Platform - Salesforce connection. Review that connection and any possible sync errors.
Why was my existing lead not updated in Salesforce?
Test your Experience in an incognito browser and create a new lead in Salesforce. Close that browser window, open a new incognito one to start a fresh session, and test the Experience again with the same email address.
If your test lead does not update correctly, go to Settings → Integration → Salesforce → Lead Mapping. Verify that the affected lead field is mapped.
If your test lead updates correctly, then compare the visitor’s information in Qualified to the Salesforce lead. The visitor may not have entered new lead field information.
<span id="lead-assignment"></span>
Salesforce Lead Assignment
Leads can be created and updated directly from Qualified by either your reps or automatically from an experience. New leads will automatically be assigned to the rep they interacted with or who they booked a meeting with. Otherwise, the lead will be assigned to the Salesforce user used for the Org-level connection. If needed, you can utilize the owner ID field to assign an alternate lead owner.
Understand Leads With Qualified
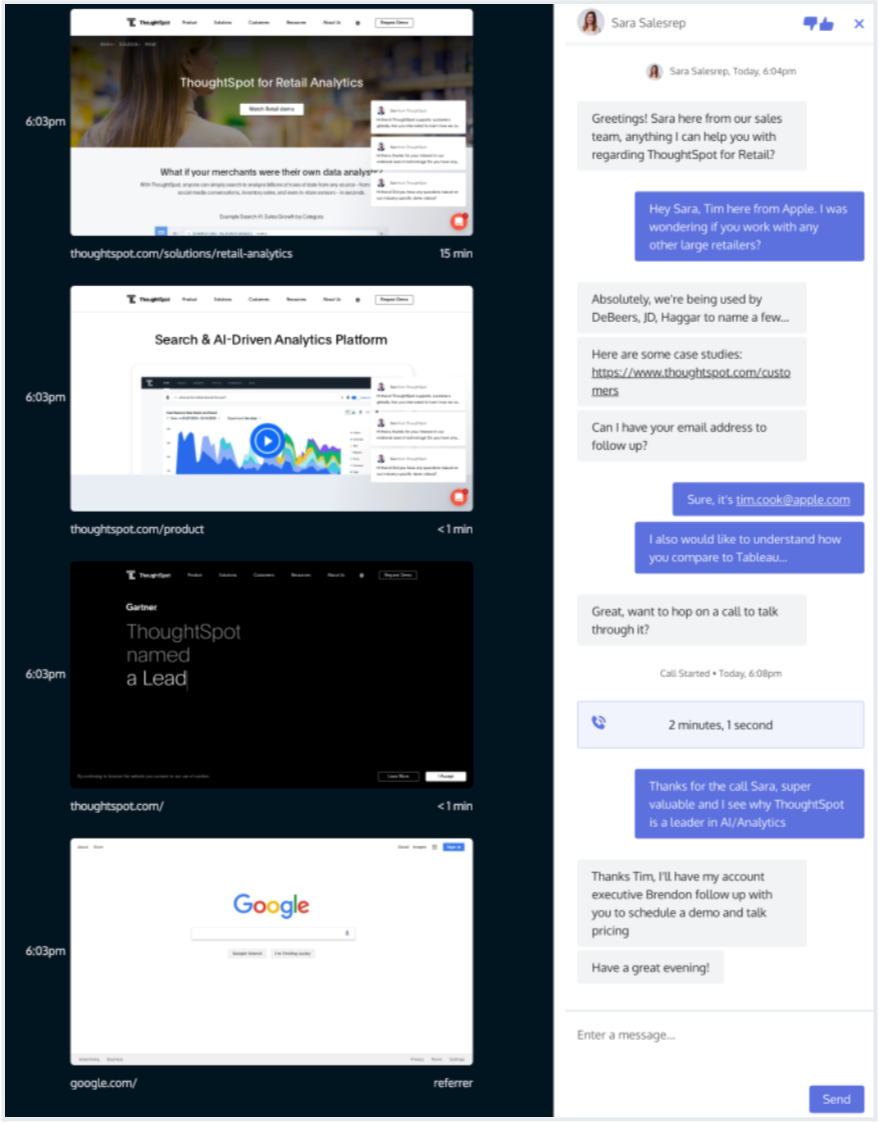
Qualified acts as a first contact point for your prospects while visiting your website. For some visitors, we’ll know who the visitor is based on marketing cookies, previous visits, and information they enter into the Qualified chatbot.
Once we have an idea of who the visitor is, we’ll check your Salesforce instance for any existing records. If an existing contact or lead matches that information, we’ll surface it in Qualified so your team has a holistic understanding of that visitor.
In other cases, visitors will not have existing records in your Salesforce instance. While they interact with Qualified, our chatbot or your team members will collect their information and add it to the visitor's profile in Qualified.
That information can then be passed into Salesforce where a new lead will be created. There are two ways a lead can be created by Qualified:
- Synced directly by a rep
- Synced automatically by a Salesforce push step in an Experience
Qualified uses the individual Salesforce connection to assign leads to the correct sales rep after an interaction. You’ll want to ensure all Qualified users set up their individual Salesforce connections when they build their user profiles in Qualified.
If a user does not have a Salesforce connection, we’ll automatically assign the new lead to the Org-level connection user.
How Qualified Assigns Leads
When creating leads in Salesforce from Qualified, the lead assignment is based on how that visitor interacted with Qualified and your team. Leads created via Qualified do not utilize your Salesforce Lead Assignment Rules.
- Visitor chats with a rep - The new lead will be assigned to that rep.
- Visitor books a meeting with a rep - The new lead will be assigned to that rep.
- Visitor engages with an experience but does not book a meeting or have a conversation - The new lead will be assigned to the org-level connection user.
- Visitor chats with a rep or books a meeting, but that rep has not set an individual Salesforce connection - The new lead will be assigned to the org-level connection user.
- Visitor comes in as an existing lead - Qualified will respect the existing lead ownership and will not change it.
<span id="sfdc-events"></span>
Salesforce Events & Playback URLs
When a sales rep chats with an existing contact or a new or existing lead in Salesforce, we create an event in Salesforce and include a playback URL for anybody to review the conversation.
Salesforce Events Created by Qualified
Qualified creates a Salesforce event when we detect one of your leads or contacts and they chat with your sales rep, chat with a chatbot, or book a meeting with the Qualified messenger. Most Salesforce activity records are created a few minutes after a conversation ends, but it may take up to an hour. If the visitor keeps your website open in their browser, we wait to see if they return to the conversation before creating the Salesforce event.
When a visitor chats with a rep or chatbot, a Salesforce event is created with these populated fields:
- Assigned To: rep who chatted with the visitor or the name of the Salesforce org-level connection user.
- Subject: Conversation via Qualified
- Name: the visitor’s synced Salesforce contact name
- Start: date and time the chat began
- End: date and time the chat finished
- Description: See full conversation in Qualified [playback URL]
- Created By: name of the Salesforce org-level connection user
Note: If a visitor chats with a rep that is not connected to your Salesforce org, the Assigned To field will display the name of your Qualified integration user.
If a visitor books a meeting with a rep, an additional Salesforce event is created with these populated fields:
- Assigned To: rep with the new scheduled meeting
- Subject: Meeting Booked via Qualified with [rep’s name]
- Name: the visitor’s synced Salesforce contact name
- Start: date and start time of the scheduled meeting
- End: date and finish time of the scheduled meeting
- Description: See full conversation in Qualified [playback URL]
- Created By: name of your Qualified integration user
Note: If the meeting was scheduled with multiple reps, the Assigned To name may vary. If the meeting was booked from an Experience step then, the Meeting owner specified while building the Experience is listed. If the meeting was instead booked while chatting with a live rep, then that rep manually chooses who the meeting owner is.
<span id="playback-url"></span>
Qualified Playback URLs
Playback URLs show you a record of your rep and visitor’s interactions. Without logging in to Qualified, click this link to see:
- A full chat transcript
- The visitor’s browsing history on your website
- If and when a voice call occurred during the conversation
Conversations with a visitor can span multiple sessions. If a visitor returns while using the same device, Qualified recognizes them and will automatically update the playback recording with any new interactions and conversations.
<span id="creating-accounts"></span>
Creating New Salesforce Accounts
Create new Salesforce accounts for your most promising website visitors that aren’t tracked in your Salesforce org yet. Qualified Signals allows you to create new ICP accounts in Salesforce without leaving Qualified.
If you’re interested in the ability to create new ICP accounts via Qualified Signals, reach out to your Qualified Success Architect.
Confirm Salesforce Permissions
Verify that your Salesforce integration user has the Create Accounts permission. (If you implemented Qualified Signals in early 2022, you likely need to update your Salesforce integration user to add this permission.)
Ask your Salesforce admin if your org has custom validation rules for new account creation. If so, make sure you satisfy those rules when mapping fields in Qualified.
Map Account Fields
Decide which fields you want to include in all new Salesforce Accounts from Qualified. Then, follow the step-by-step instructions included here.
Choose Which Accounts to Create in Salesforce
Create a Signals account list that only displays accounts that are Not in Salesforce yet:
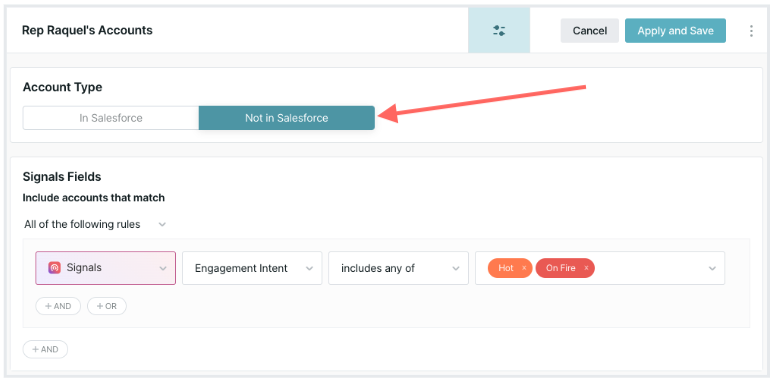
We recommend applying other filters to ensure that only worthwhile accounts are added to your Salesforce org. For example, apply an Ideal Customer Profile filter to focus on optimal accounts. You can also filter for Hot and On Fire Engagement Intent to narrow down to the accounts already interacting with your website frequently.
Create Accounts from Qualified
Qualified admins can write new accounts to Salesforce in two ways.
Create Accounts for an Entire Signals Account List
To create new Salesforce accounts for every account in a Signals account list:
- Open the Signals account list.
- Click Push to Salesforce in the upper-right corner:
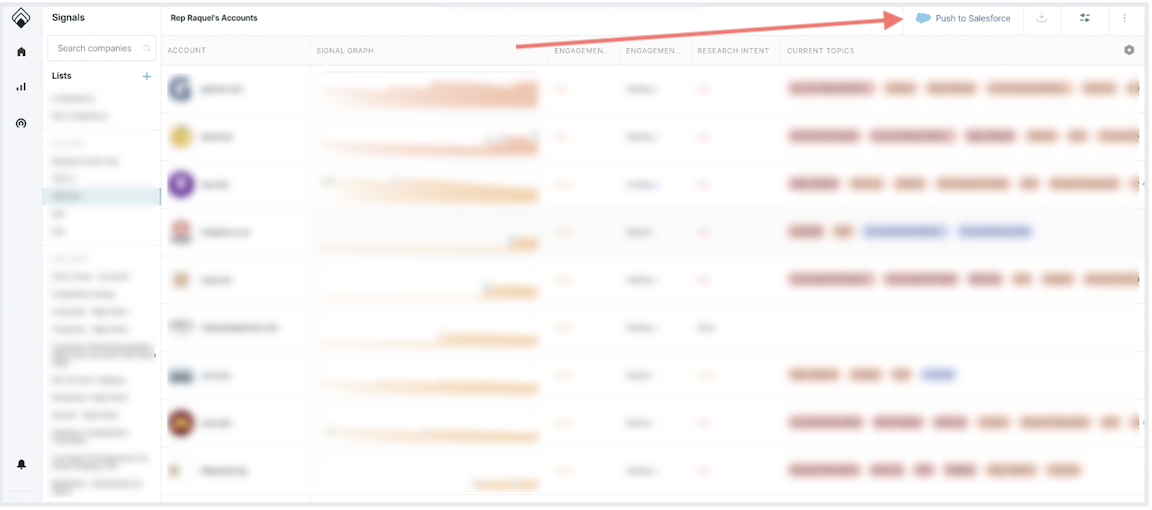
- Click Yes on the pop-up confirmation window.
Because this is a Salesforce sync, this may take a few moments. When Qualified completes the process, your account list automatically refreshes. The accounts which were successfully written into Salesforce will not be visible in the same account list because they no longer match the Not in Salesforce criteria.
If zero accounts appear in the refreshed account list, then all of them were successfully created in Salesforce. If some accounts remain, however, then that means Qualified was unable to create new Salesforce accounts for them. In this case, we recommend trying to create the Salesforce account from the individual Account 360.
Create a Single Account from an Account 360
Qualified admins can also create a new Salesforce account from the Account 360. When you open an individual account, click Create in Salesforce in the overview bar on the right:
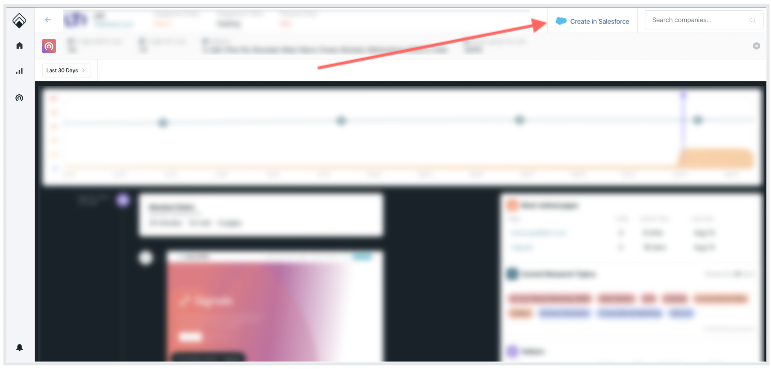
When the account is successfully created in Salesforce, the Create in Salesforce button disappears from the Account 360.
When Qualified is Unable to Create a Salesforce Account
Requirements to create new accounts can vary by Salesforce org. First, confirm that your Salesforce integration user has Create Accounts permission. Once granted, try pushing the Signals account list again.
When you click Create in Salesforce from the Account 360 and Qualified is unsuccessful, an error with more information appears:
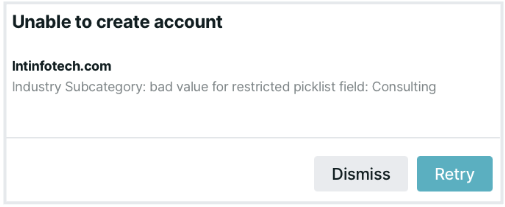
Depending on the error, you may need to update a visitor field within Qualified or change your custom validation rules in Salesforce before clicking Retry.
Heading 1
Heading 2
Heading 3
Heading 4
Heading 5
Heading 6
Lorem ipsum dolor sit amet, consectetur adipiscing elit, sed do eiusmod tempor incididunt ut labore et dolore magna aliqua. Ut enim ad minim veniam, quis nostrud exercitation ullamco laboris nisi ut aliquip ex ea commodo consequat. Duis aute irure dolor in reprehenderit in voluptate velit esse cillum dolore eu fugiat nulla pariatur.
Lorem ipsum dolor sit amet, consectetur adipiscing elit, sed do eiusmod tempor incididunt ut labore et dolore magna aliqua. Ut enim ad minim veniam, quis nostrud exercitation ullamco laboris nisi ut aliquip ex ea commodo consequat. Duis aute irure dolor in reprehenderit in voluptate velit esse cillum dolore eu fugiat nulla pariatur.
Lorem ipsum dolor sit amet, consectetur adipiscing elit, sed do eiusmod tempor incididunt ut labore et dolore magna aliqua. Ut enim ad minim veniam, quis nostrud exercitation ullamco laboris nisi ut aliquip ex ea commodo consequat. Duis aute irure dolor in reprehenderit in voluptate velit esse cillum dolore eu fugiat nulla pariatur.

Block quote
Ordered list
- Item 1
- asdfasdf
- asdfasdf
- asdfasdf
- Item 2
- Item 3
Unordered list
- Item A
- Item B
- Item C
Bold text
Emphasis
Superscript
Subscript
|
|---|
|


.svg)


