
Mapping Signals Data to Salesforce Accounts
When a visitor is matched to a Salesforce account, Qualified can push Signals data to your mapped Account fields in Salesforce and display activity in an embedded Account 360 view on the Account in Salesforce associated with the visitor.
In this article, we’ll review the steps to set up Signals in Salesforce.
- Account Mapper Prework
- Salesforce User Permissions
- Mapping Signals Fields
- New Account creation field mappings
- Embedded Visualforce Component
<span id="prework"></span>
Account Mapper Prework
Before you start mapping fields, your Salesforce Admin needs to create new fields in Salesforce for Qualified Signals data. There are two methods to create the new fields:
- Download our Signals unmanaged package, which includes a collection of custom fields added to the Account object, reports, and dashboard components to showcase Signals data.
- Manually create custom fields in Salesforce on the Account object.
<span id="user-permissions"></span>
Salesforce User Permissions
To bring Signals Data in your Salesforce, it’s important to ensure your Qualified Integration User has been granted the following permissions:
IMPORTANT! If you already implemented Qualified Conversations, and are now expanding to Qualified Signals, update the same integration user’s permissions to add Create and Edit access on Accounts.
<span id="mapping"></span>
Mapping Signals Fields
Now that your Salesforce admin has added new fields on the Account object in Salesforce, you can begin mapping Signals data to those fields inside of your Qualified Admin account. Follow the steps below:
- Go to Settings → Integrations → Salesforce → Connection.
- Find the “Salesforce fields” section and click the Update Fields button.some text
- If you do not see this option, then your Salesforce Admin will need to connect an Org-level Salesforce account to Qualified by following the steps provided here: Connecting to Salesforce (ADD LINK)
- Next, go to Settings → Signals → Salesforce.
- Under the “Signals Fields” section, map all available Signals fields (left column) to the correlating Salesforce Account fields (right column) as shown below.
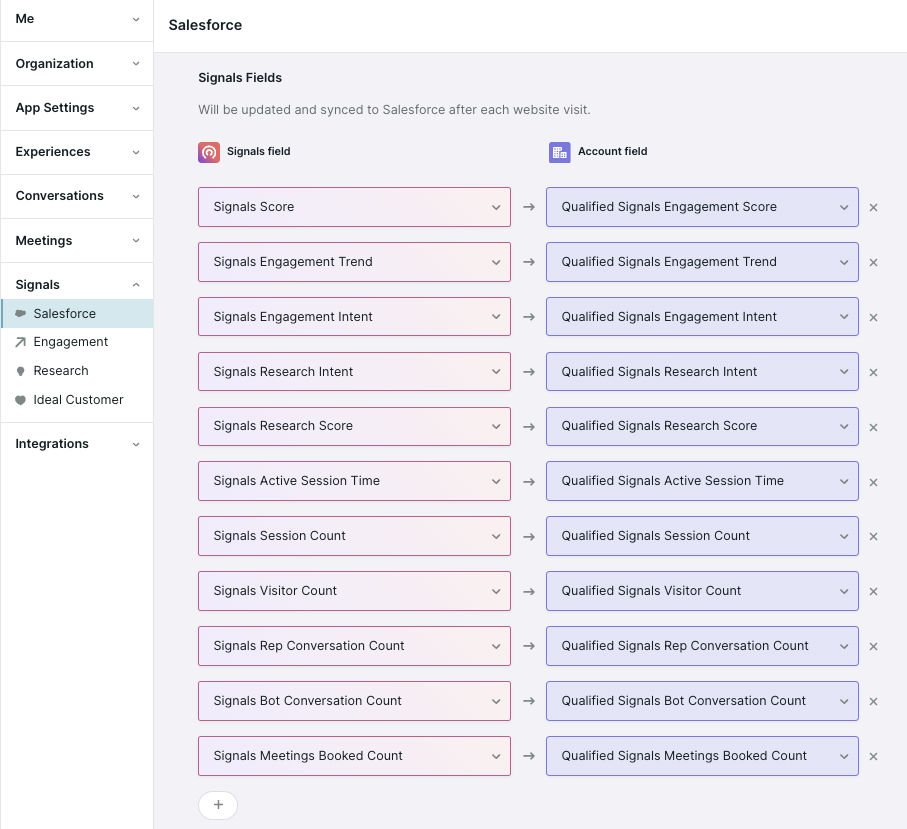
- Click Save.
Review our Signals Plays in Salesforce to learn more about how you can leverage Qualified Signals data in Salesforce to grow the pipeline.
Pushing Signals Data to Salesforce
Qualified pushes an Account's Signals data into Salesforce at 9:00 pm PT when there are no website visitors from that account in the last 24 hours. When someone from that account does visit your website, Qualified pushes any updated Signals fields into Salesforce within five minutes after the visitor’s session ends.
<span id="account-creation"></span>
New Account Creation Field Mappings
Signals can identify new ICP Accounts visiting your website and push the most relevant ones into Salesforce without leaving Qualified.
This feature is not available on all Qualified plans. If you’re interested in this feature, please reach out to your Qualified Success Architect.
Confirm Salesforce Permissions
Before you begin mapping Account fields in Qualified, you’ll want to verify a couple of settings with your Salesforce admin:
- Verify that your Salesforce integration user has the Create Accounts permission in Salesforce.
- Ask if your Salesforce org has custom validation rules for new Account creation. If so, make sure you satisfy those rules when mapping fields in Qualified.
Map Account Fields
In your Qualified Admin account:
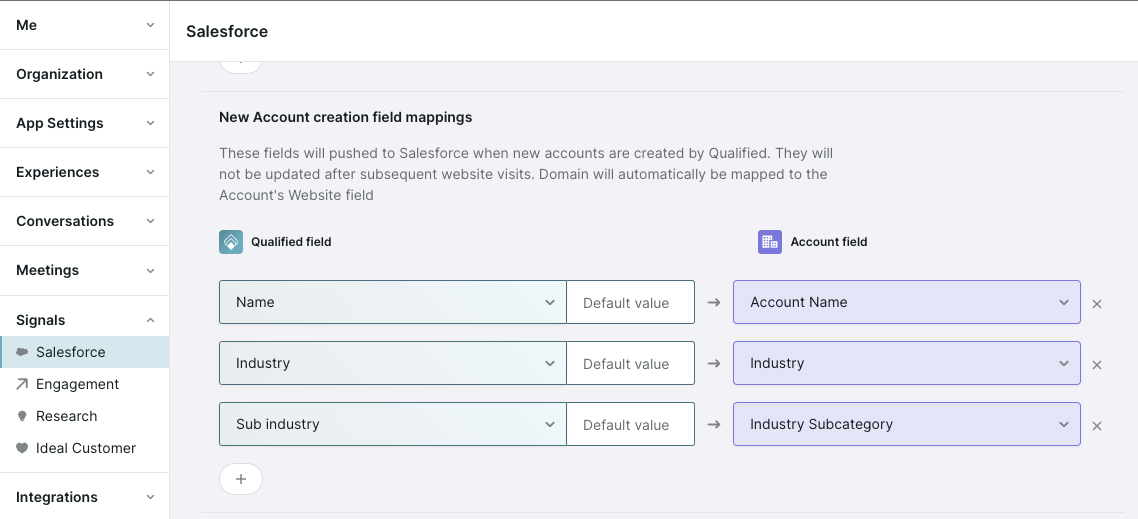
- Go to Settings → Signals → Salesforce.
- Under the “New Account creation field mapping” section, map the Qualified field (left column) to the correlating Salesforce Account field as shown below.
- If needed, use the Default value textbox to override the Qualified field value when pushing a new Account to Salesforce. If left blank, the Qualified field value will be written to the new Account record.
Check out the Not in Salesforce Signals Play to learn how to create a list of ideal accounts in Qualified and create the most relevant ones into Salesforce.
<span id="visualforce"></span>
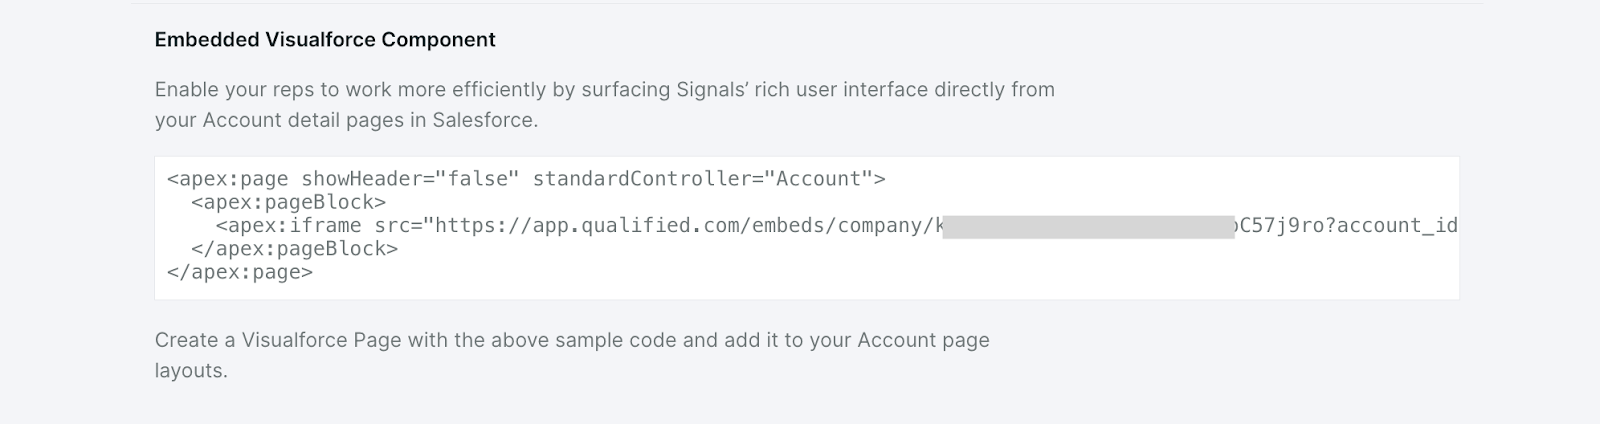
Embedded Visualforce Component
Enable your reps to work more efficiently by surfacing the Signals Account 360 snapshot to your Salesforce Account page layout. Work with your Salesforce Admin to complete the following steps:
- Inside your Qualified Admin account, go to Settings → Signals → Salesforce.
- Find and copy the code snippet under the “Embedded Visualforce Component” section, and provide it to your Salesforce Admin.
3. In Salesforce, your Salesforce admin will then update your Account Page layout to add the Visualforce Page. While your Salesforce instance may vary, the following steps are typically how it’s done.
- Go to Setup and use the Quick Find search to find Visualforce Pages.
- Above the list of Visualforce Pages, click New.
- Enter a Label and Name, such as “Qualified Signals”.
- In the Visualforce Markup editor, delete the default text and paste the code snippet you copied from Qualified in Step 2 above.
- Click Save.
- Using the Quick Find search, navigate to Object Manager.
- Click Account.
- Click Page Layouts.
- Select the account page layout where you want to add the Signals Account 360 snapshot.
- In the “Account Layout” header, click Visualforce Pages.
- Locate your newly saved Qualified Signals Visualforce Page. Drag and drop it into your account page layout.
- Click Save.
Recommended Dimensions
We recommend making the Qualified Signals Visualforce at least 735 pixels wide, which will display the Account 360's Engagement Score, Research Intent, and most recently viewed page. If you want to also include the activity panel, we recommend 1,250 pixels wide.
Heading 1
Heading 2
Heading 3
Heading 4
Heading 5
Heading 6
Lorem ipsum dolor sit amet, consectetur adipiscing elit, sed do eiusmod tempor incididunt ut labore et dolore magna aliqua. Ut enim ad minim veniam, quis nostrud exercitation ullamco laboris nisi ut aliquip ex ea commodo consequat. Duis aute irure dolor in reprehenderit in voluptate velit esse cillum dolore eu fugiat nulla pariatur.
Lorem ipsum dolor sit amet, consectetur adipiscing elit, sed do eiusmod tempor incididunt ut labore et dolore magna aliqua. Ut enim ad minim veniam, quis nostrud exercitation ullamco laboris nisi ut aliquip ex ea commodo consequat. Duis aute irure dolor in reprehenderit in voluptate velit esse cillum dolore eu fugiat nulla pariatur.
Lorem ipsum dolor sit amet, consectetur adipiscing elit, sed do eiusmod tempor incididunt ut labore et dolore magna aliqua. Ut enim ad minim veniam, quis nostrud exercitation ullamco laboris nisi ut aliquip ex ea commodo consequat. Duis aute irure dolor in reprehenderit in voluptate velit esse cillum dolore eu fugiat nulla pariatur.

Block quote
Ordered list
- Item 1
- asdfasdf
- asdfasdf
- asdfasdf
- Item 2
- Item 3
Unordered list
- Item A
- Item B
- Item C
Bold text
Emphasis
Superscript
Subscript
|
|---|
|


.svg)


