
Navigating Qualified
Now that you’re setup as a chat rep, let’s get you more familiar with how to navigate Qualified.
- Going Available for Chat
- Additional Chat Settings
- Muting Alert Sounds
- Using Live Streams
- Conversation Console
- Signals Account 360
<span id="going-available"></span>
Going Available for Chat
Setting yourself as “Available” in Qualified means you’re open to receiving routed visitors for live chat. When you’re “Available”, you also control whether or not voice and video calls are permitted and if auto pounce is enabled.
How to Set Yourself Available
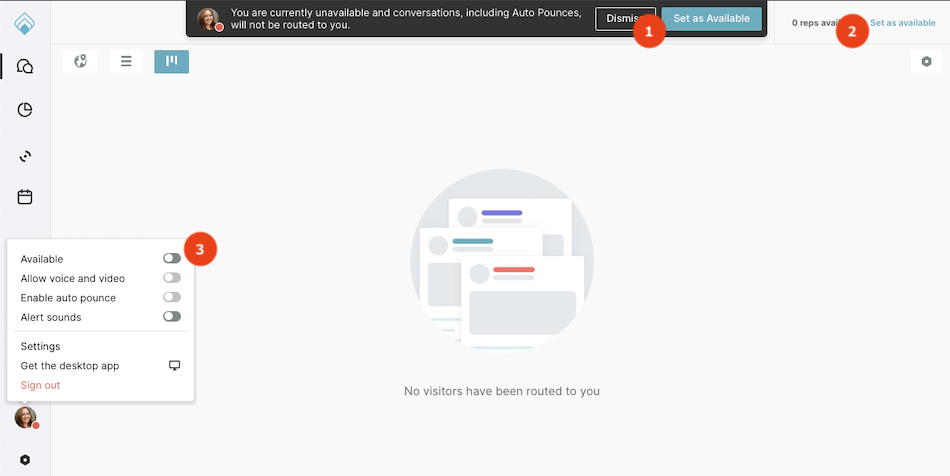
There are three ways to set yourself as available so visitors and their chats are routed to you.
- Click “Set as Available” from the header when you first log in.
- Click “Set as Available” in the top-right corner.
- Click your profile photo in the bottom-left corner and toggle on “Available”.
Only set yourself as “Available” when you’re ready for visitor chats. If you remain available after your work day, for example, visitors may wait for a conversation endlessly.
You can only update whether or not you’re available when using Qualified from your browser or the desktop app. You can not make yourself “Available” when using the Qualified mobile app, but are still able to start live chats with visitors.
When You're Automatically Set to Unavailable
Your status is automatically changed to “Unavailable” when your computer has no internet connection for at least five minutes. This can happen when:
- Your laptop is closed
- Your computer is idle and goes to sleep
- Your internet connection stops working
We most frequently see this happen when you take a break and the screensaver turns on for over five minutes.
<span id="additional-settings"></span>
Additional Chat Settings
Voice and Video Availability
“Allow voice and video” is enabled by default when you set yourself “Available”. If you do not see this option and are interested in using it, contact your Qualified Success Architect.
During live chats, this enables you and visitors to call each other. (No live audio or video will play until a microphone or camera is proactively turned on.)
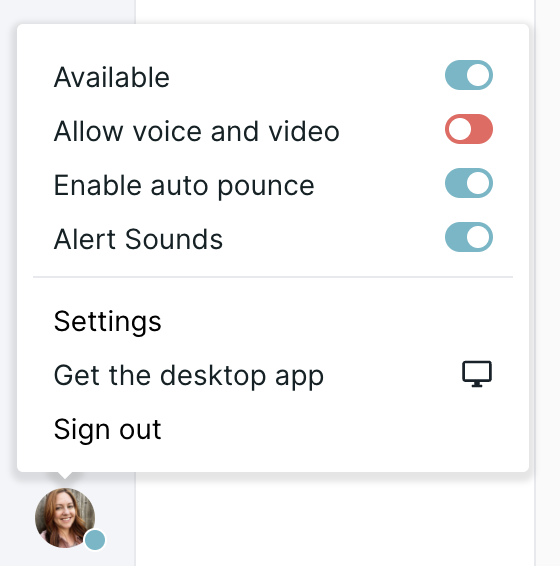
If you do not want to permit calls to or from visitors, click your profile image and toggle off “Allow voice and video”
Enable Auto Pounce
“Enable auto pounce” is enabled by default when you set yourself “Available”. If you do not see this option and are interested in using it, contact your Qualified Success Architect.
Auto pounce uses Qualified AI to greet visitors and start conversations on your behalf. Once a visitor responds, you will be alerted to continue the conversation. Learn more about Auto Pounce here.
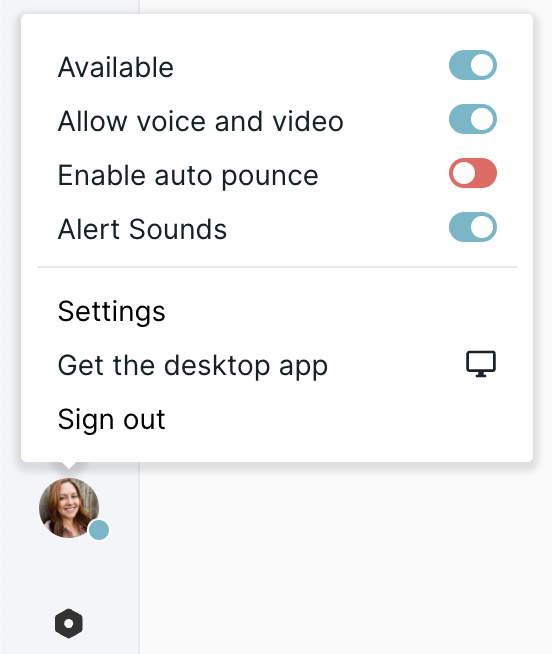
If you do not want Qualified AI to automatically pounce on visitors on your behalf, click your profile image and toggle off “Enable auto pounce”
<span id="muting-alert-sounds"></span>
Muting Alert Sounds
If you need to temporarily mute alert sounds while on a call or during a meeting, you can do so without logging out of Qualified.
Click on your photo on the bottom left-hand corner of your screen, then toggle off the “Alert Sounds” option.
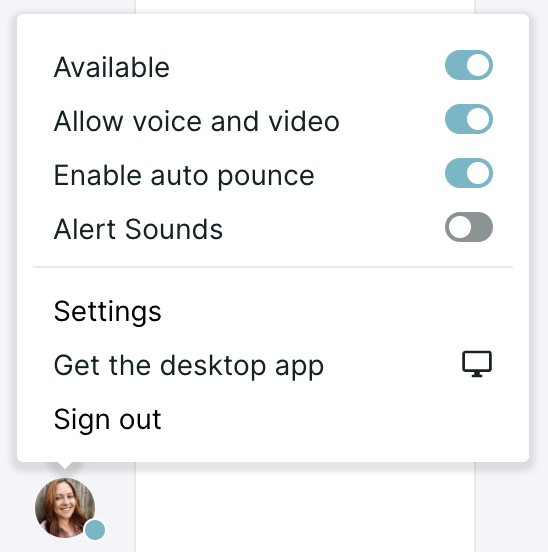
Don’t forget to toggle “Alert Sounds” back on after your call or meeting to ensure you don’t miss an inbound chat request or pounce alert.
<span id="using-live-streams"></span>
Using Live Streams
Qualified Live Streams allow chat reps to watch website visitors arrive on the site and be automatically segmented into predefined streams in real-time. That allows chat reps to prioritize the most important visitors to proactively engage with.
Getting Started
When you first log into Qualified, you’ll be on the Home screen where you may see visitors on your company’s website in real-time, bucketed into Live Streams. Think of this screen as the command center for your website.
Your Qualified Admin will configure the Live Streams to show you:
- The visitors your business cares about the most.
- Those visitors routed directly to you for a live chat conversation or proactive engagement.
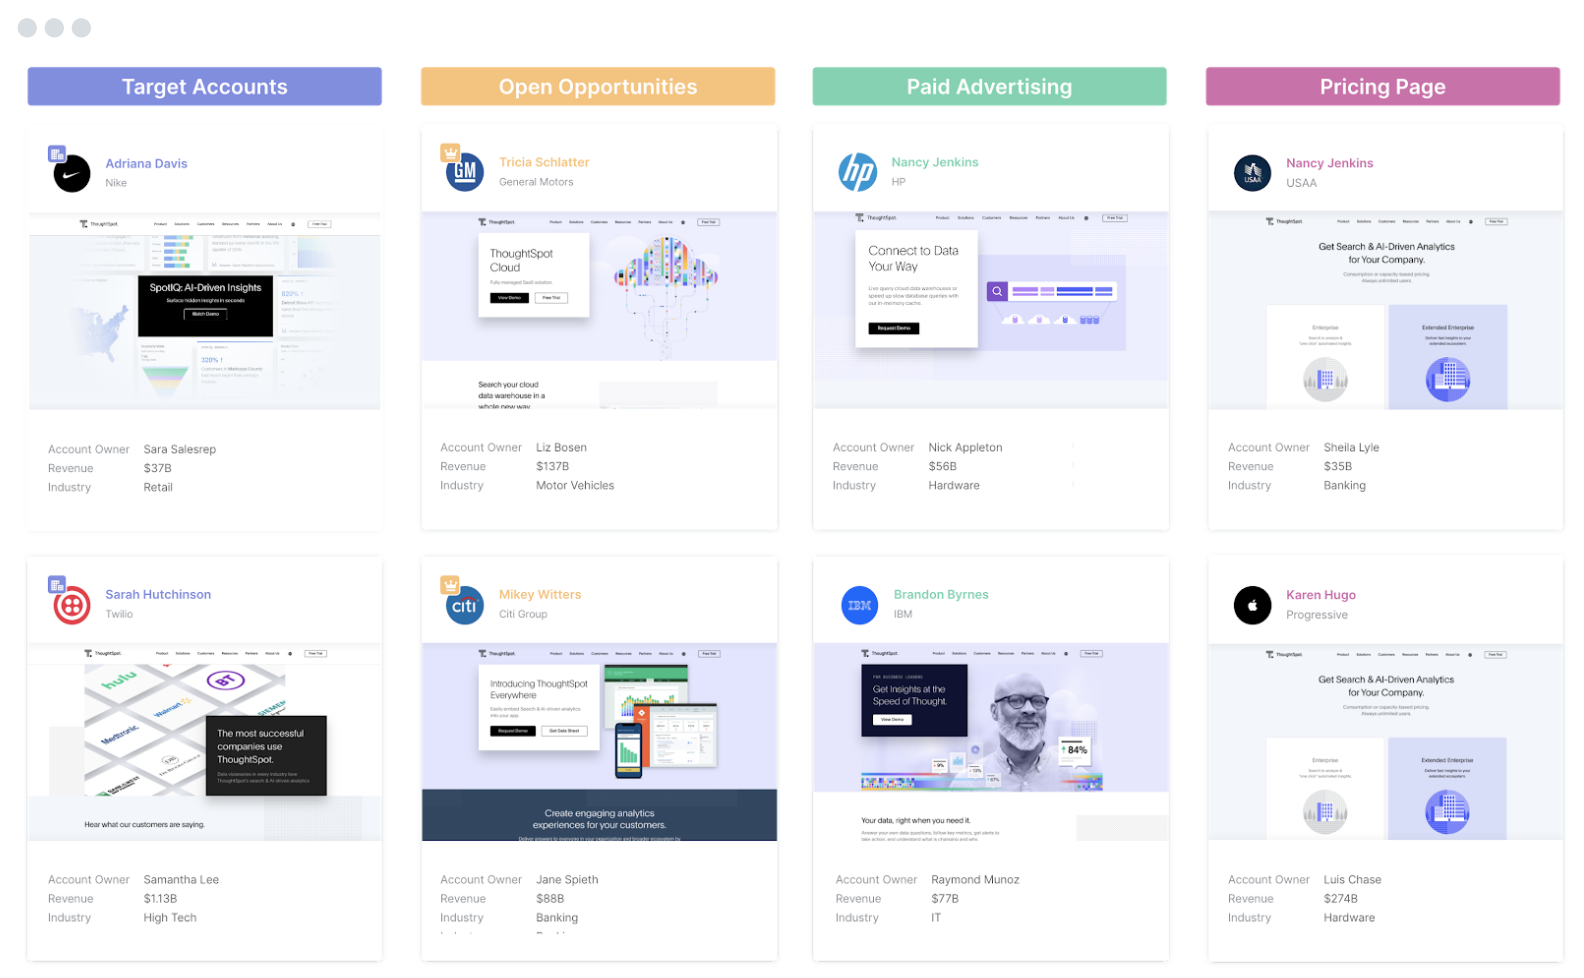
In each Live Stream you'll see:
- Visitor segments: The title of the Stream indicates the visitor’s segment.
- Visitor cards: A visitor card represents each visitor in that segment.
Each Live Stream segment will have a dedicated color and will be ordered from highest to lowest priority, left to right, on your screen.
You will only see visitors in a Live Stream if they fit the criteria for that live stream segment and have been routed to you.
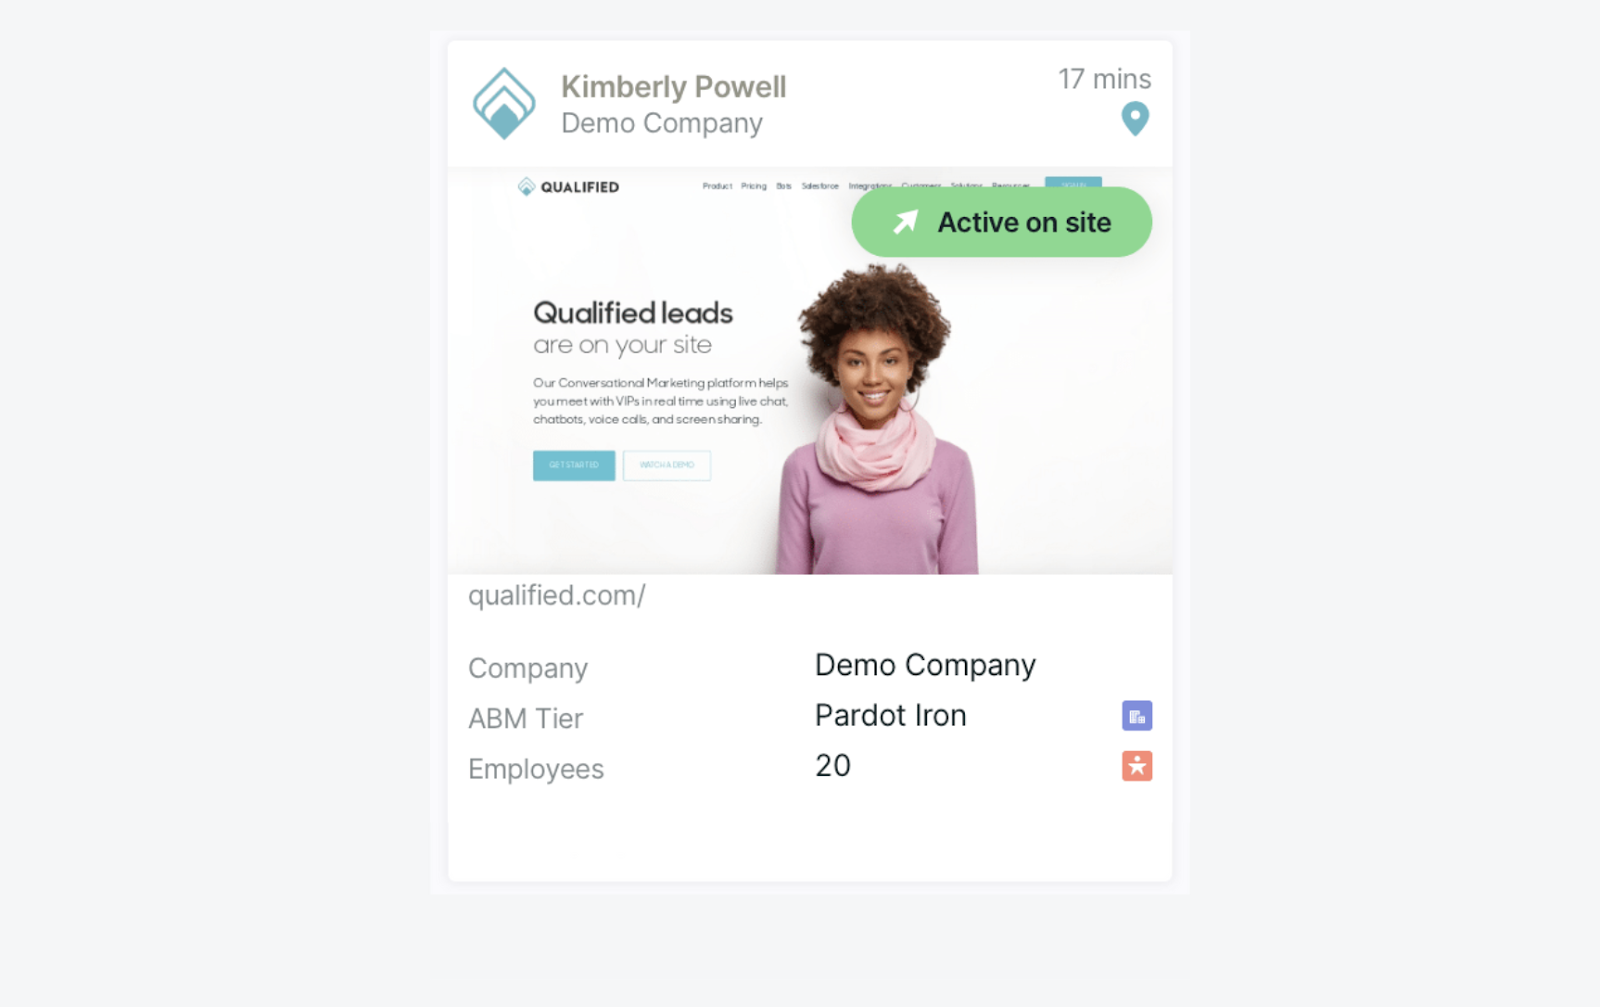
Visitor Cards
As visitors arrive on your website, Qualified will automatically sort those visitors into each Live Stream segment and visitor cards will populate underneath each stream. Visitor cards represent a live person on your site who is either ready to engage with your Qualified chatbot or can be proactively engaged by a chat rep.
Visitor card information will include:
- Website activity & bot engagement
- Firmographic information
- Salesforce data
- Routing status
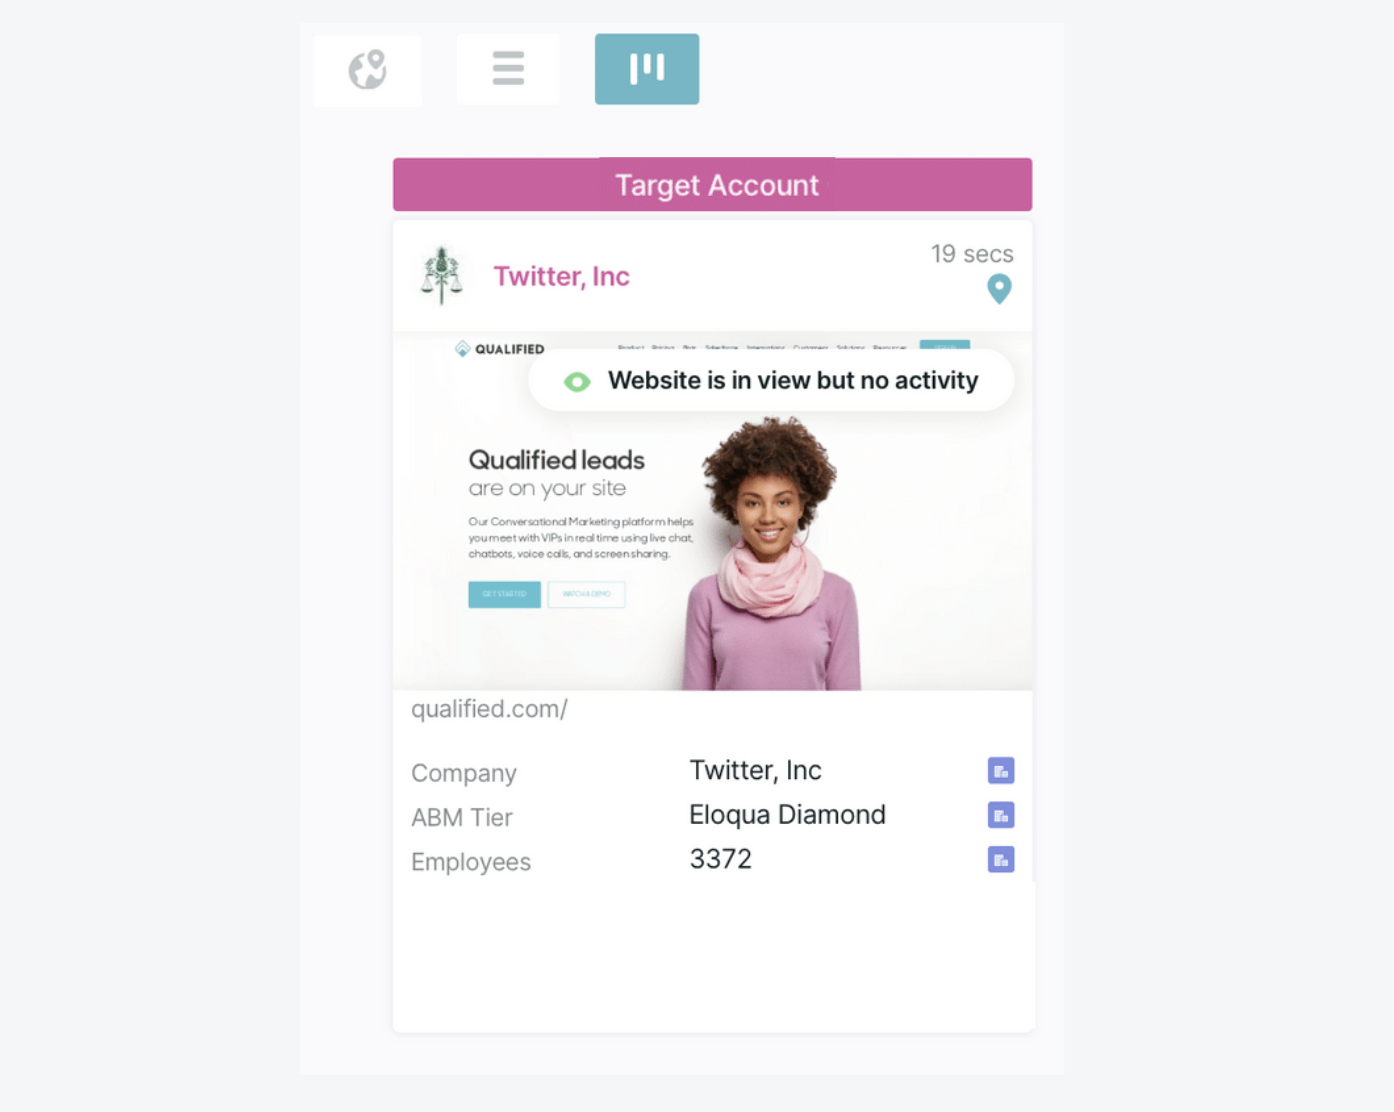
Changing Views
In addition to the Live Stream command center, you can toggle to a list or map view using the buttons located on the top left-hand corner. Changing views will not disrupt how visitors are segmented.
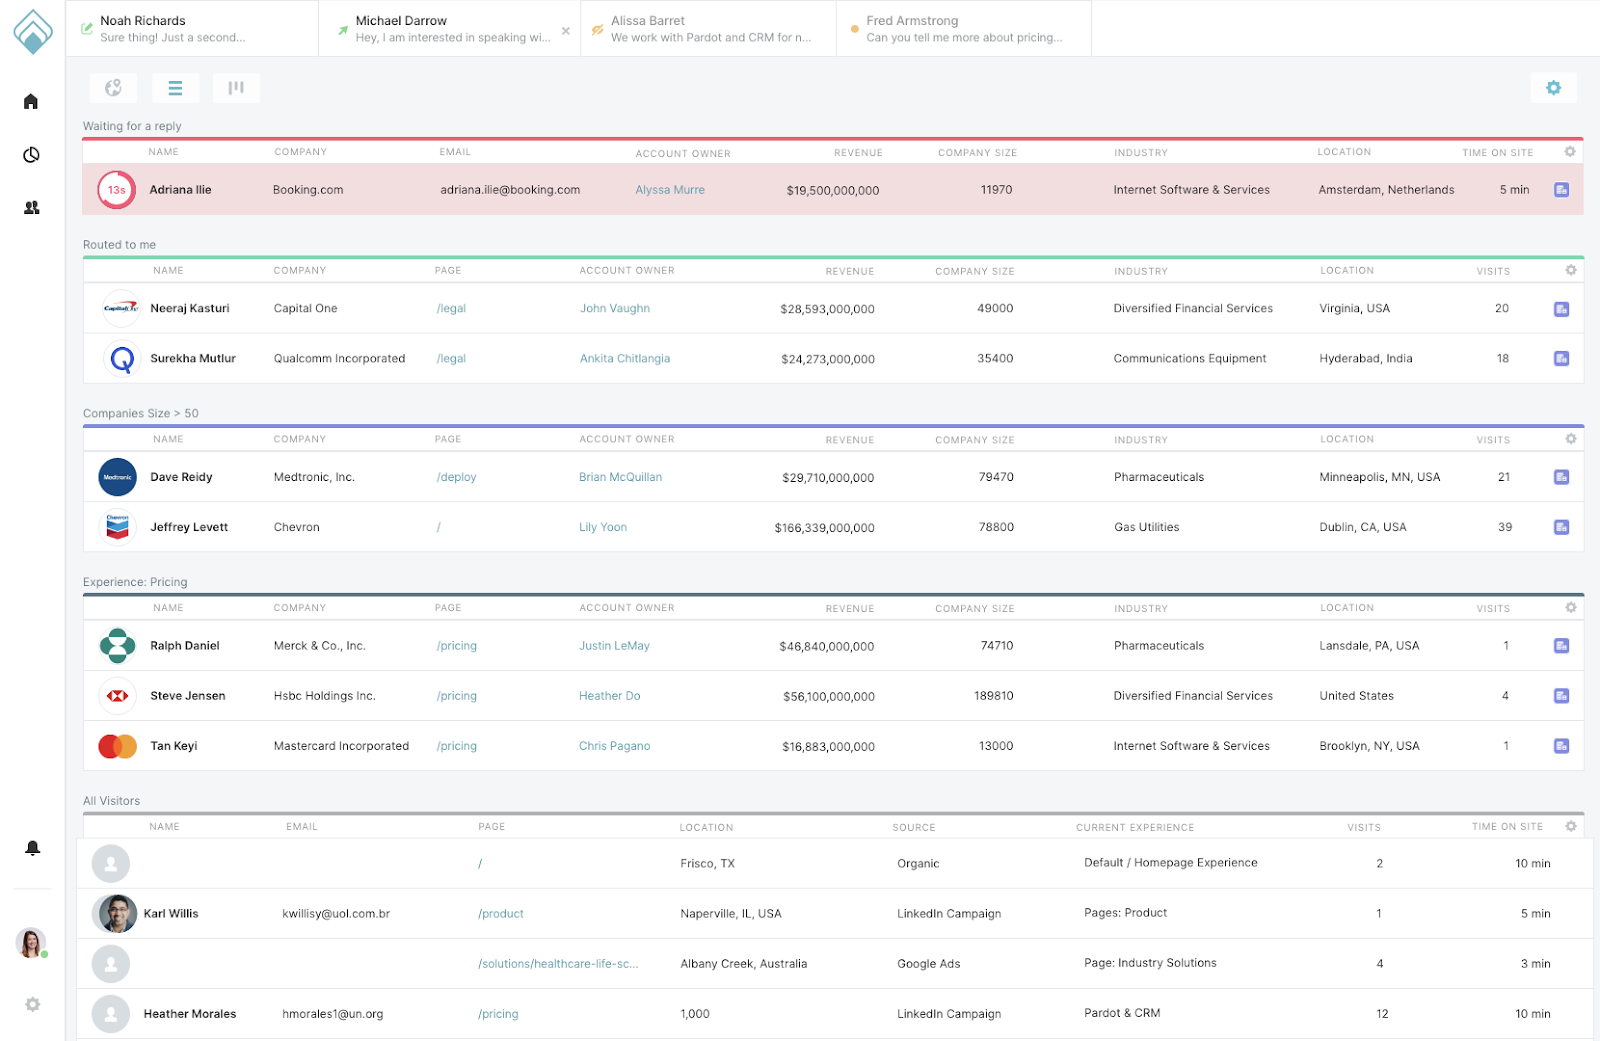
List View
Toggle to the list view to see all of your visitors and their information condensed into one segmented column. Visitors will still appear as Live Streams and will be in priority order from top-down in order of importance.
Map View
In the map view, each circle on the map represents a visitor on your website. Hover over the circle to see the visitor card, and click into the card to open Qualified. Here you can start a conversation with the visitor or view their digital body language on the website.
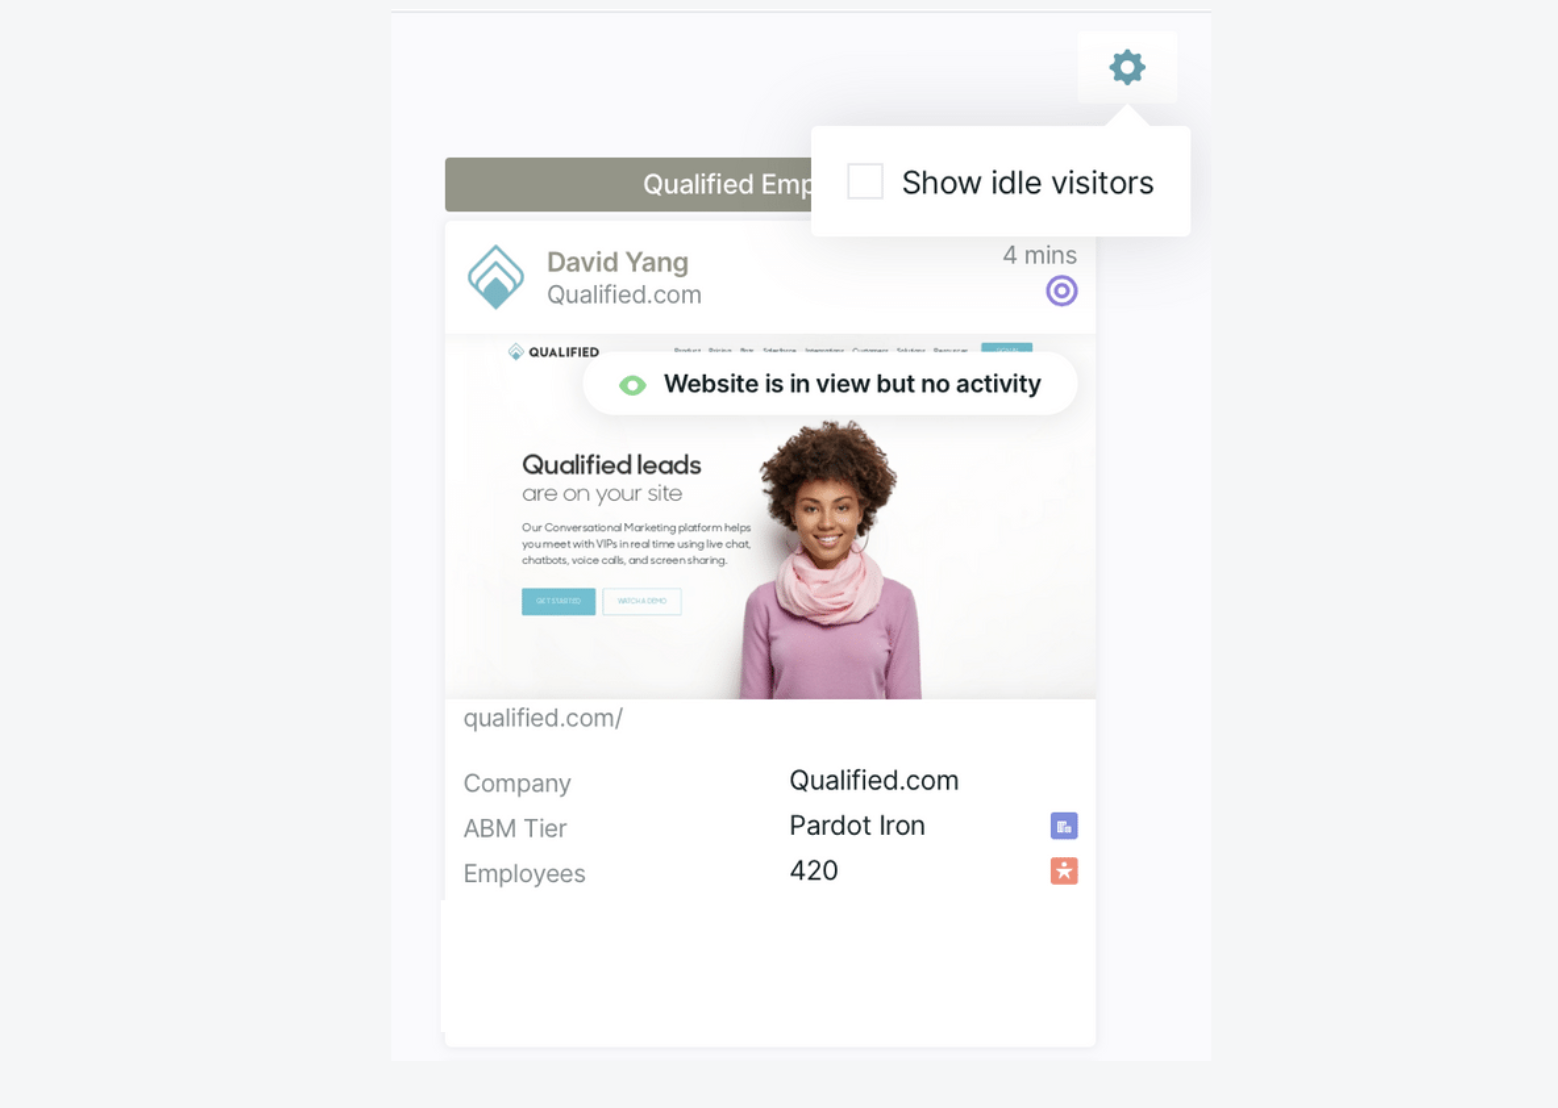
Viewing Idle Visitors
By default you’ll see all active visitors on the website, but there will be times when you’d like to also see idle visitors as well. To view those visitors who are idle on your website:
- Select the gear icon in the upper right-hand corner.
- Select "Show idle visitors."
Routing & Chatting with Visitors
Routing gets the right visitors into the hands of the right sales reps. Qualified conversation routing is extremely flexible and can route according to:
- Target Account information
- Visitor Location
- Salesforce data such as Lead, Contact, Account, or Opportunity
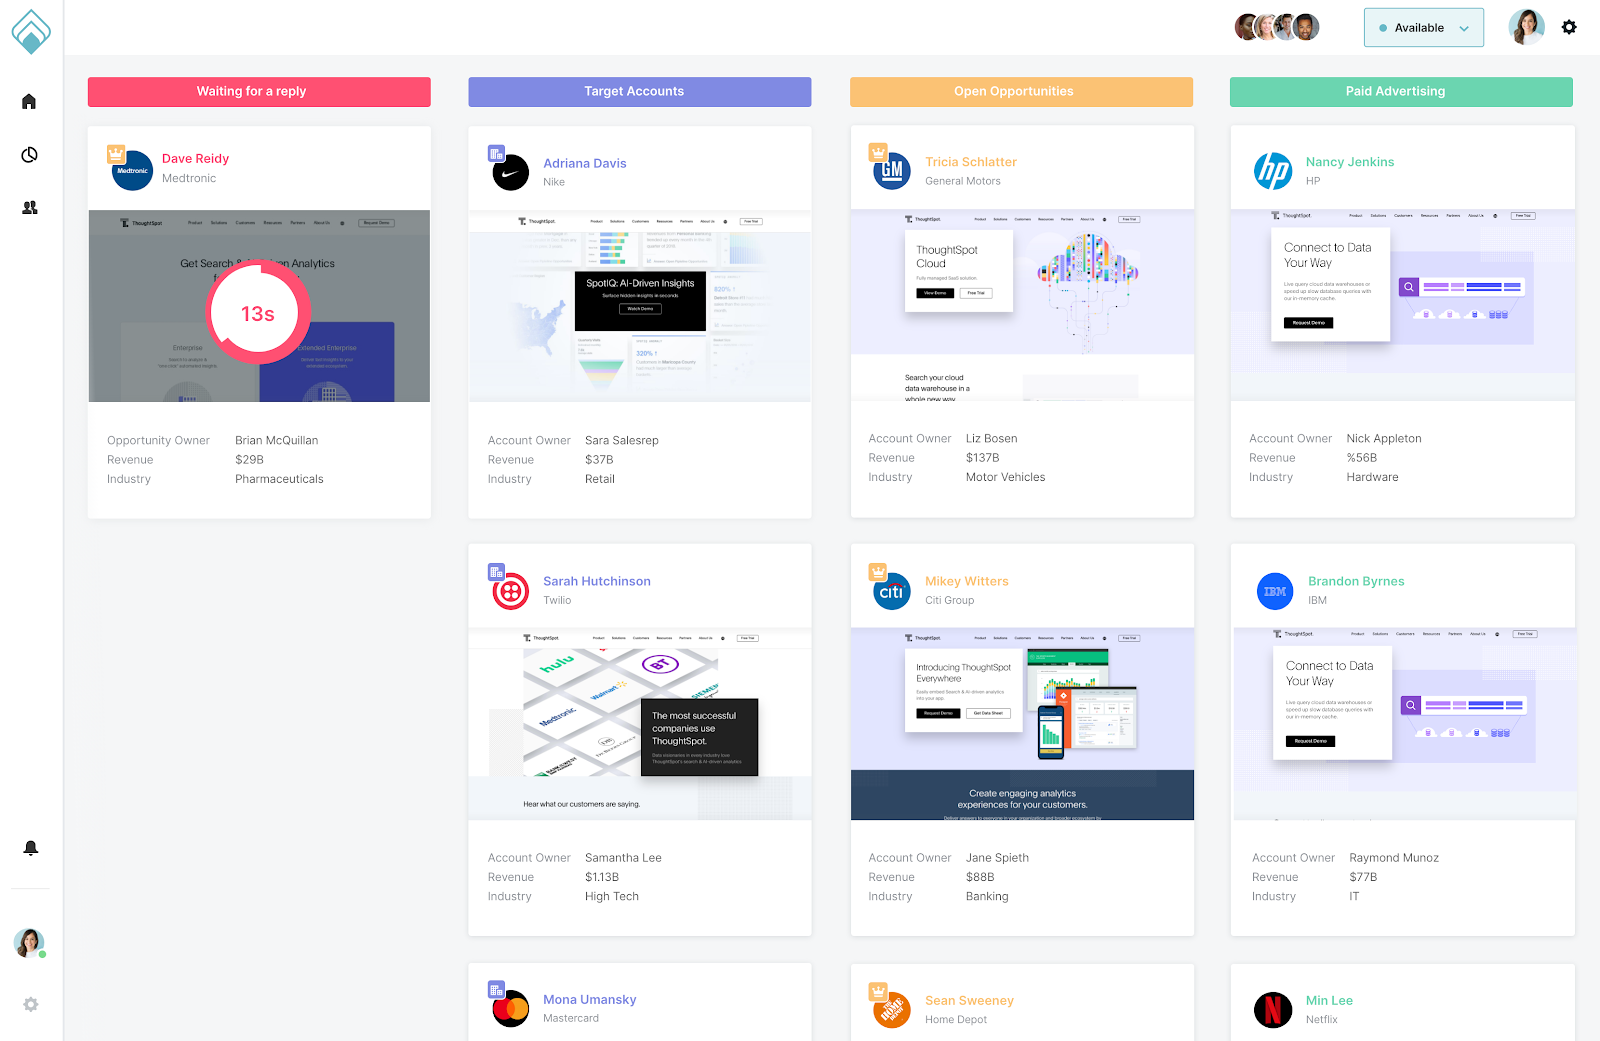
When a visitor lands in one of your Live Streams, that means they’ve been routed to you using the conversation routing rules set up by your Qualified Admin. Hover over the pin icon in the visitor card to see the routing details of each visitor.
When a visitor requests to chat with someone, you’ll see their visitor card appear in the “Waiting for a reply” Stream with a countdown giving you around 30 seconds to join the chat before the visitor is redirected to the Meeting Booker.
To join the chat, click on the visitor card and click the “Start a Conversation” button to begin a conversation.
<span id="conversation-console"></span>
Conversation Console
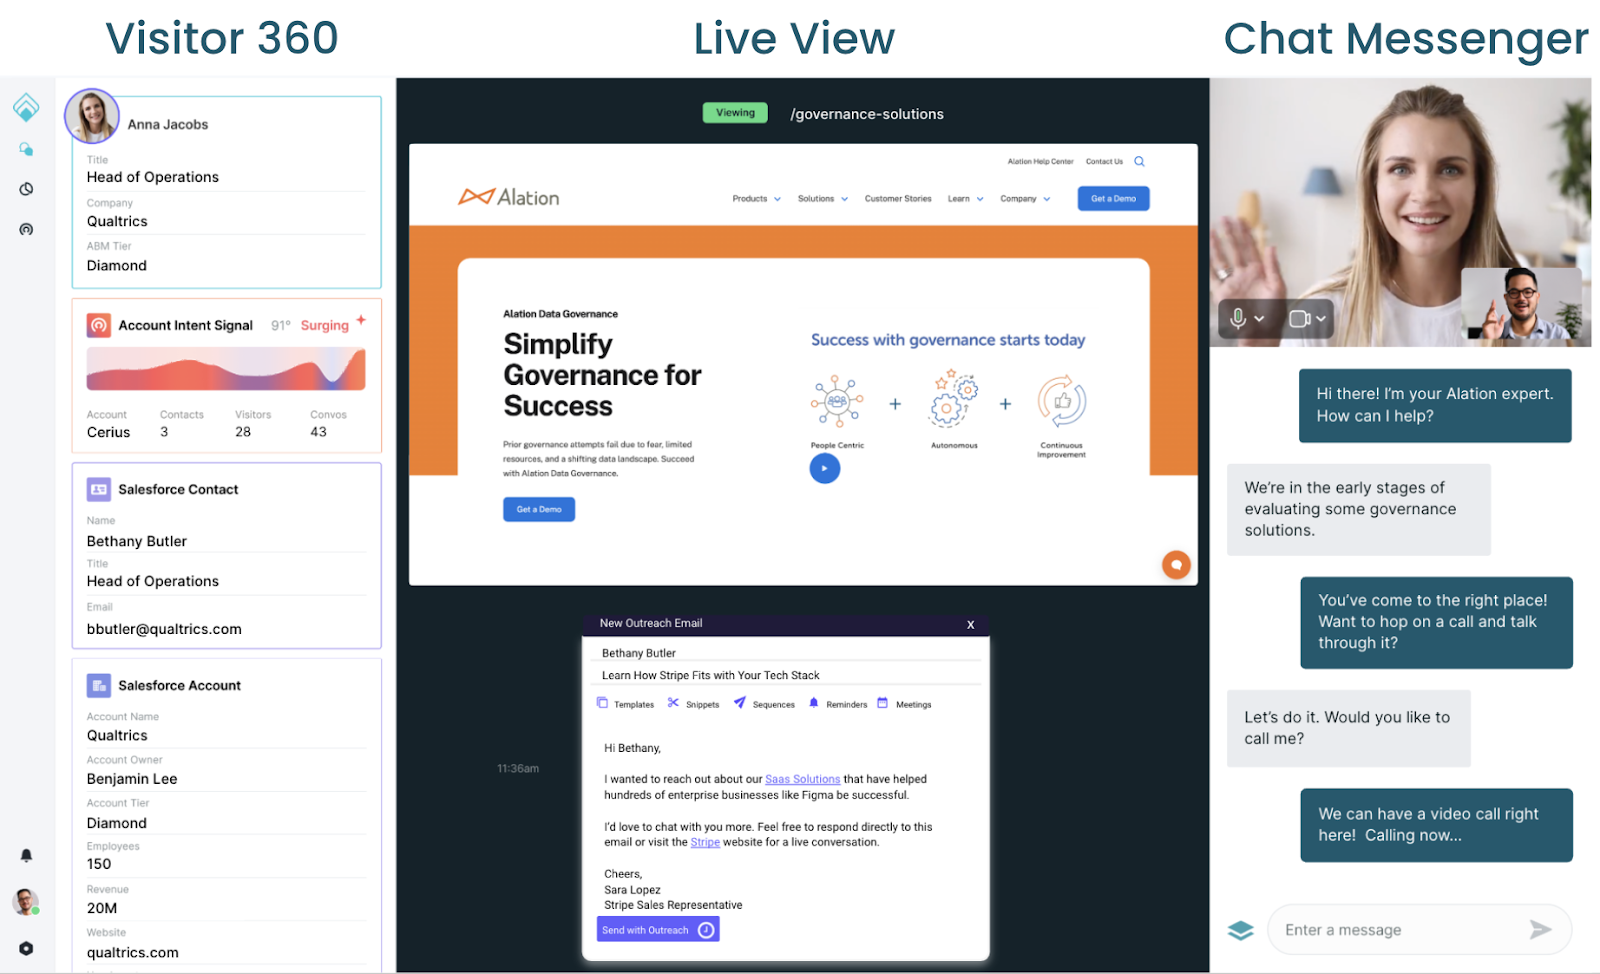
When you click on a visitor card from the home page, you’ll access the Conversation Console which are broken down into three sections:
- Visitor 360 - everything known about the visitor at that time
- Live View - website browsing history and real-time mirror of the visitor’s browsing activity.
- Chat Messenger - where reps chat with visitors live, take voice/video calls, and offer the meeting booker. Also, scroll up to view previous interactions with the chatbot or reps.
<span id="visitor-360"></span>
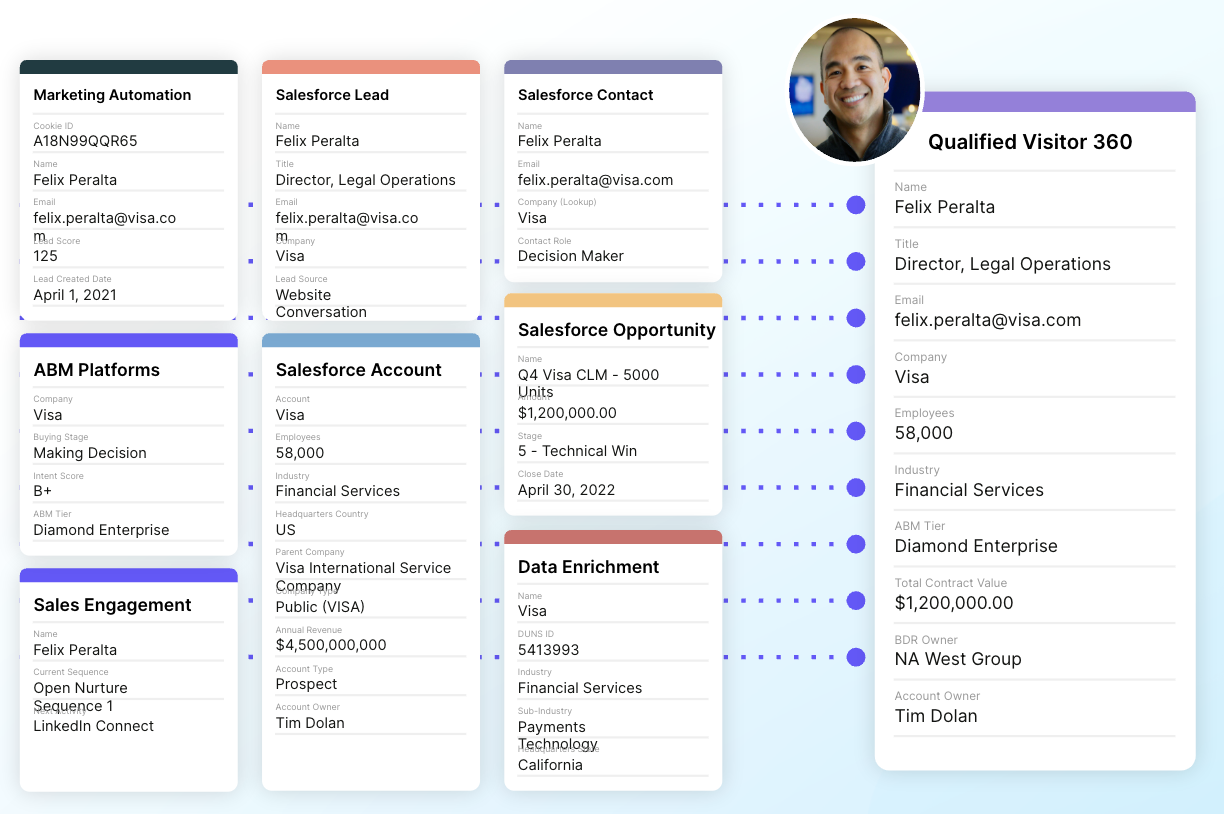
Visitor 360
The Visitor 360 gives visibility into everything we know about the visitor through all your systems connected to Qualified. See what’s included below:
- Visitor Details
- Account Signals
- Experience
- Meetings
- Connected Systems
Visitor Details
The visitor card combines data across all connected sources to provide a summarized view for reps. Qualified Admins can configure which visitor fields are displayed in this card in visitor field settings.
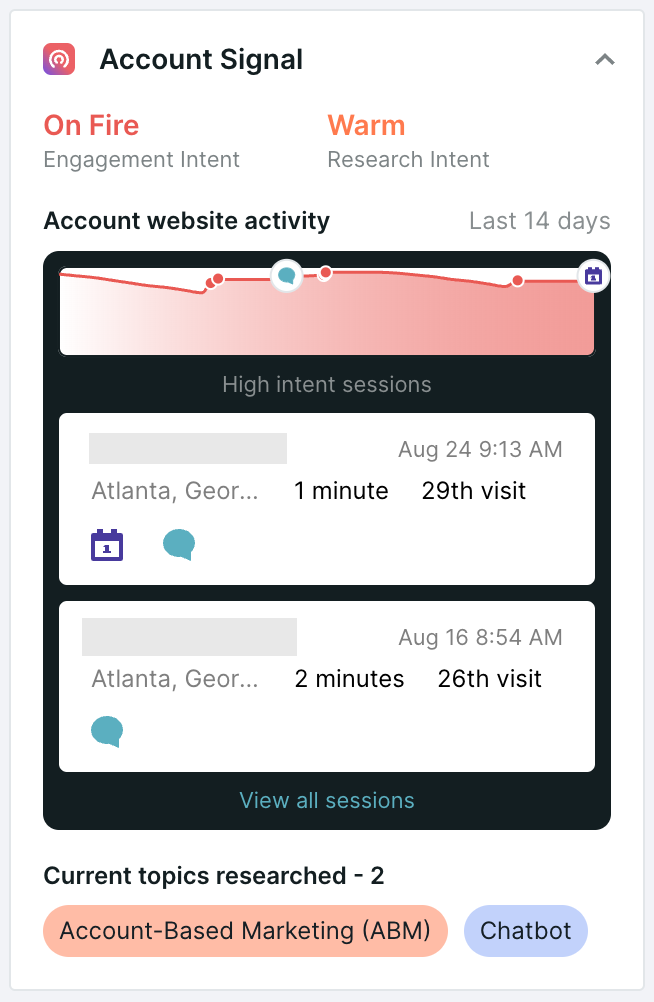
Account Signals
The Account Signal card brings Signals data into the visitor view, providing context to the rep on the overall account engagement and propensity to buy. Reps can click into the Signals card to view additional details.
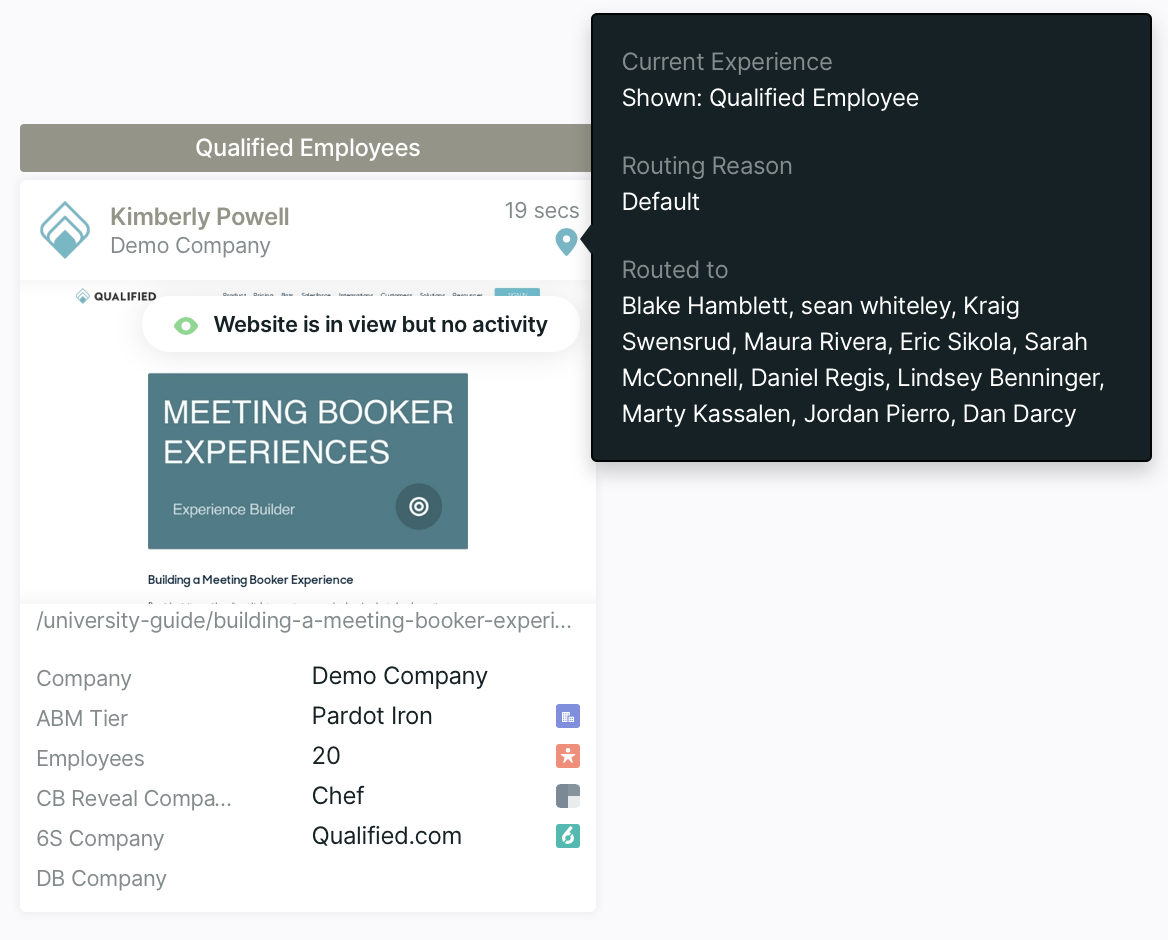
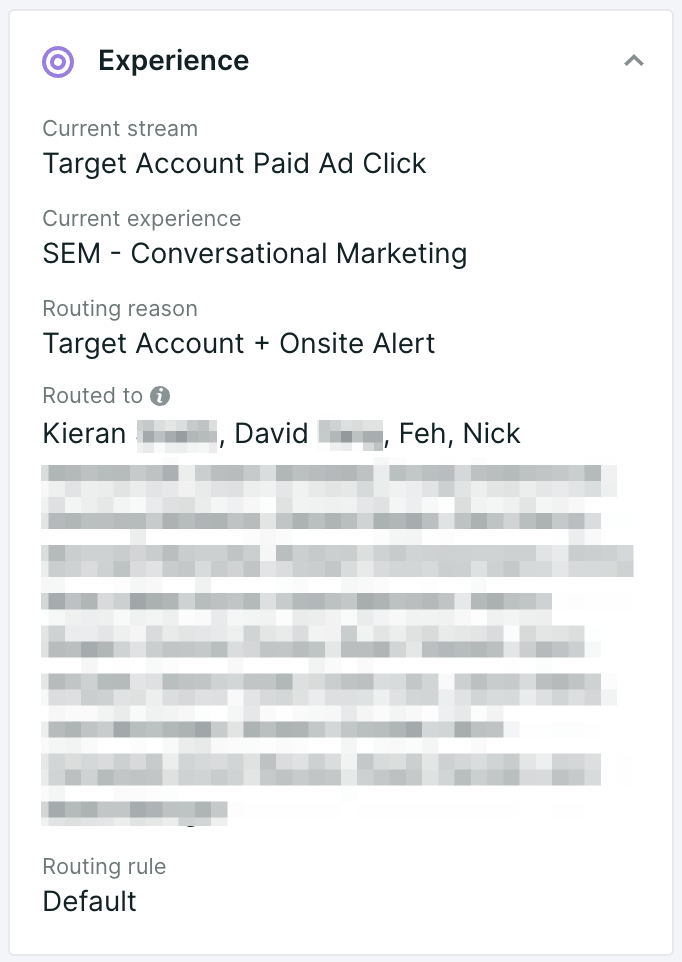
Experience
The Experience card gives visibility to the rep into which Stream and Experience the visitor is currently included in, and conversation routing details.
Meetings
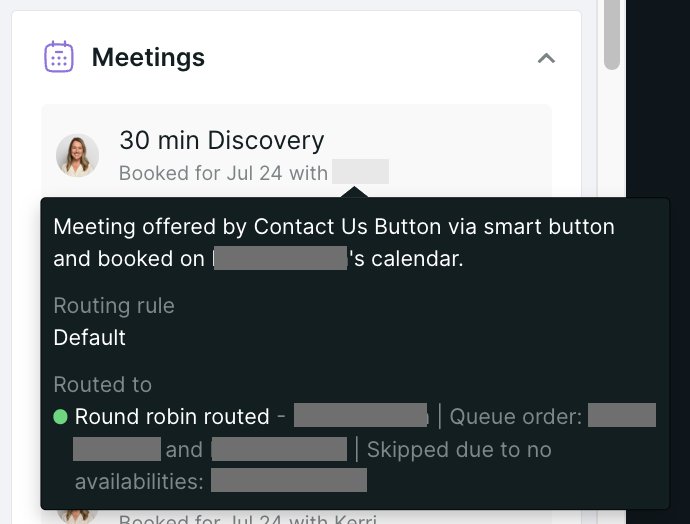
The Meetings card shows all meetings offered, booked, and/or canceled for the visitor along with the date the meeting was booked for.
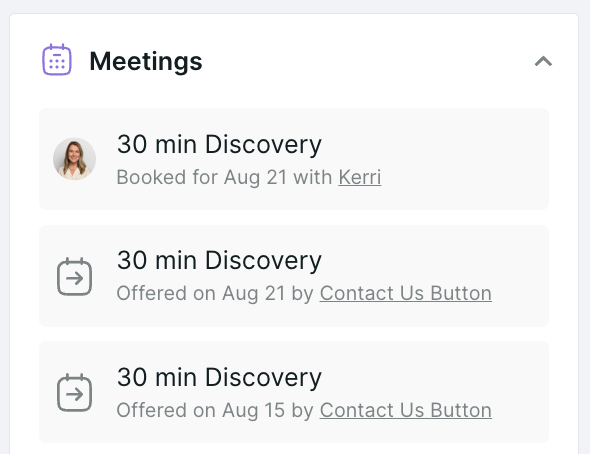
Hovering on the meeting text displays additional details including the medium the meeting was offered through (for example through a Smart Form, Smart Button, Personal Meeting Link, or Chat) and the routing rule used to route the meeting.
Connected Systems
The remaining cards display data for any systems connected to Qualified. The fields in each of the cards can be edited by Qualified Admins.
- Salesforce (Leads, Contacts, Accounts & Opportunities)
- Sales Engagement Tools (Outreach, Salesloft)
- Marketing Automation Platforms (Marketo, Hubspot, Pardot, Eloqua)
- Reverse IP and Data Enrichment (Clearbit, Demandbase, 6Sense, ZoomInfo)
<span id="live-view"></span>
Live View
Once visitors arrive on your website, we track history about their visit. You can review their browsing history in the Live View.
Should they leave your website and return later, their new session’s browsing activity is added to the same Live View stream. This centralizes all information about a visitor so you can efficiently review their digital footprint.
Three types of activities are included and timestamped:
- How they Arrived on Your Website
- Which Pages They Browsed
- Which Page the Visitor is Viewing Live with Cursor Tracking
How They Arrived on Your Website
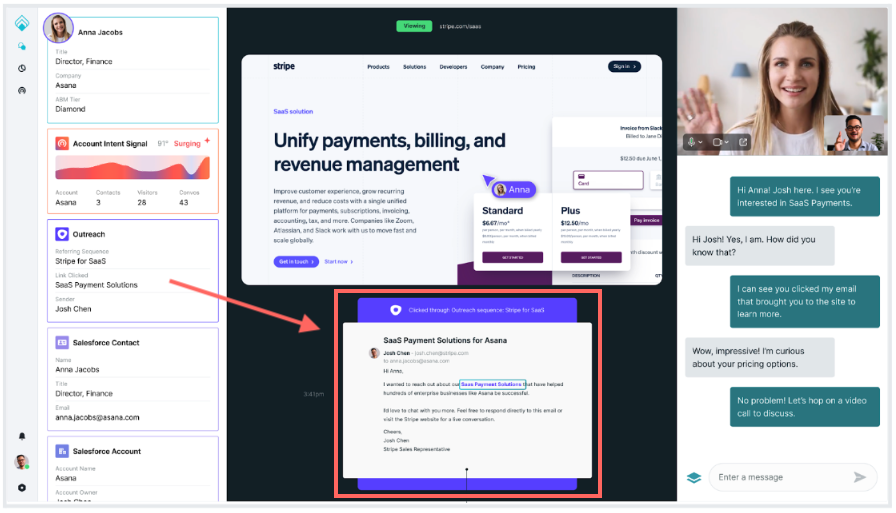
Scroll to the bottom of the Live View to view the first page on your website they saw and if they were referred from a different website, email, or advertisement.
For example, you can see if they clicked on a LinkedIn or Google ad. Alternatively, they may have clicked through a Salesloft or Outreach email:
Which Pages They Browsed
Every page on your website that they viewed is included and organized chronologically. Per visited page, you’ll see:
- A visual screenshot of that page
- What time the visitor arrived on that page
- How long they remained on that page
Which Page the Visitor is Viewing Live with Cursor Tracking
This is a real-time mirror of a visitor’s browsing activity. Watch as they navigate around your website, scroll down pages, and move their cursor around the screen.
When a visitor scrolls far down a page, something on that page is likely compelling. Use this clue to personalize your opening chat message.
<span id="chat-messenger"></span>
Chat Messenger
The chat messenger is where reps chat with visitors live, take voice/video calls, and offer the meeting booker. You're also able to view previous interactions with the chatbot or reps. Learn more about all of these features, and more: Qualified Live Chat
<span id="signals-account-360"></span>
Signals Account 360
The Signals Account 360 is a robust account profile that presents an account’s engagement with your campaigns and their likely purchase intent over time. Sales reps and executives alike can view the Signals Account 360 to identify which accounts and opportunities are most likely to close.
Which Accounts Have a Signals Account 360
Qualified Signals creates an Account 360 for every newly recognized account the first time someone associated with that account visits your website. There are two scenarios when this happens:
- A visitor is matched with an account in your Salesforce instance.
- A visitor is not matched to your Salesforce instance but we can infer which company they’re associated with due to your data enrichment integrations, like Clearbit Enrichment.
Viewing an Account 360
To open an account’s Account 360, all Qualified users can:
- Click the Signals icon on the left.
- Click on the title of an account list.
- Click on a specific account name.
The Account 360 includes:
- Account overview
- Timeline of ABM-related activities
- Activity panel highlighting sales and marketing campaign engagement
- Live View of visitor sessions
Add the Account 360 to your Salesforce account page layout to surface relevant Signals data where your team already monitors their accounts.
<span id="account-overview"></span>
Account Overview
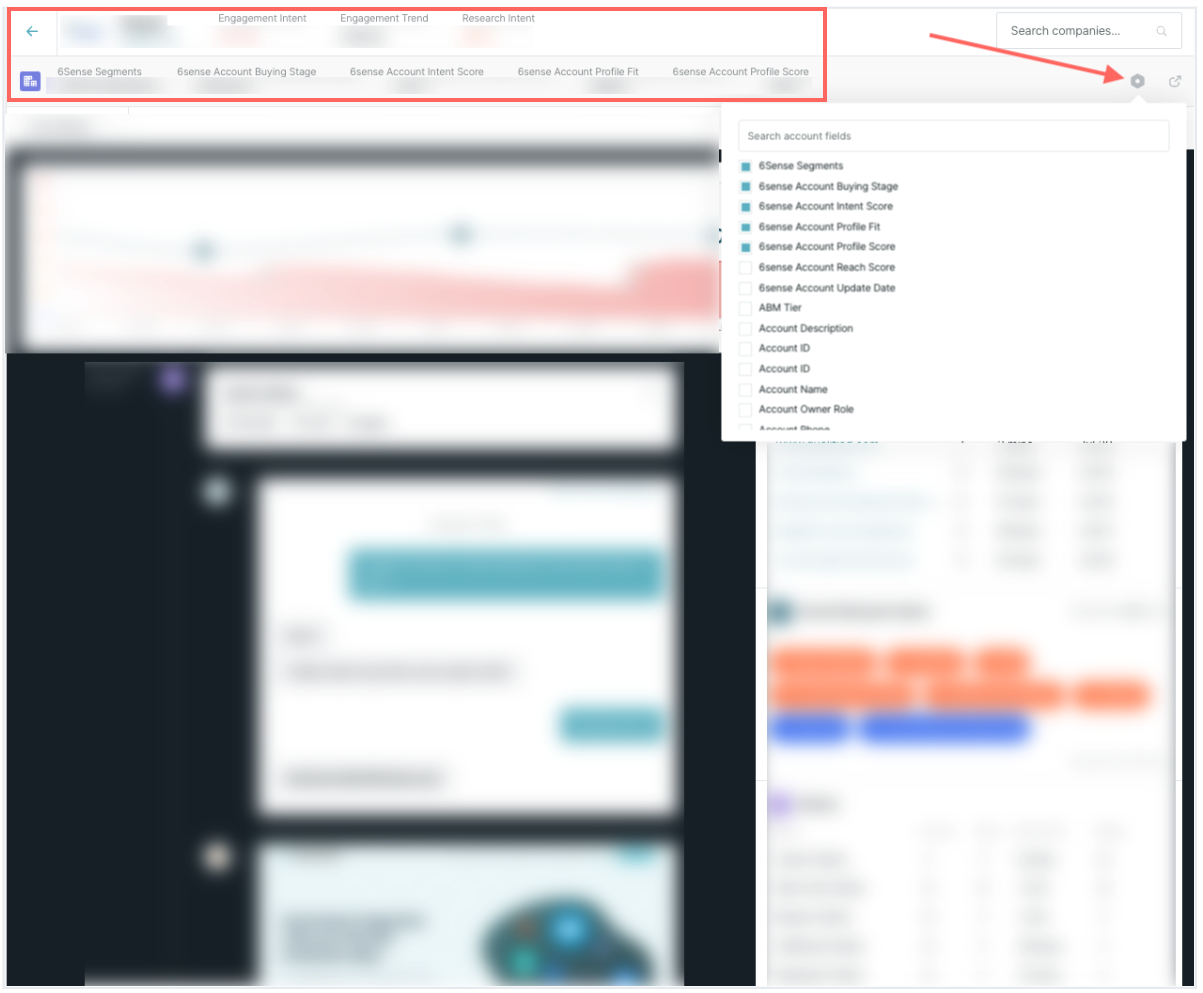
High-level information about the account is visible along the top of the screen. The first row shows the account’s Signals data, like Research Intent and Engagement Intent.
To customize what appears in the second row, click the Gear icon and check your wanted fields. You can also click the neighboring Arrow icon to open the account’s Salesforce record in a new browser tab:
<span id="timeline"></span>
Timeline
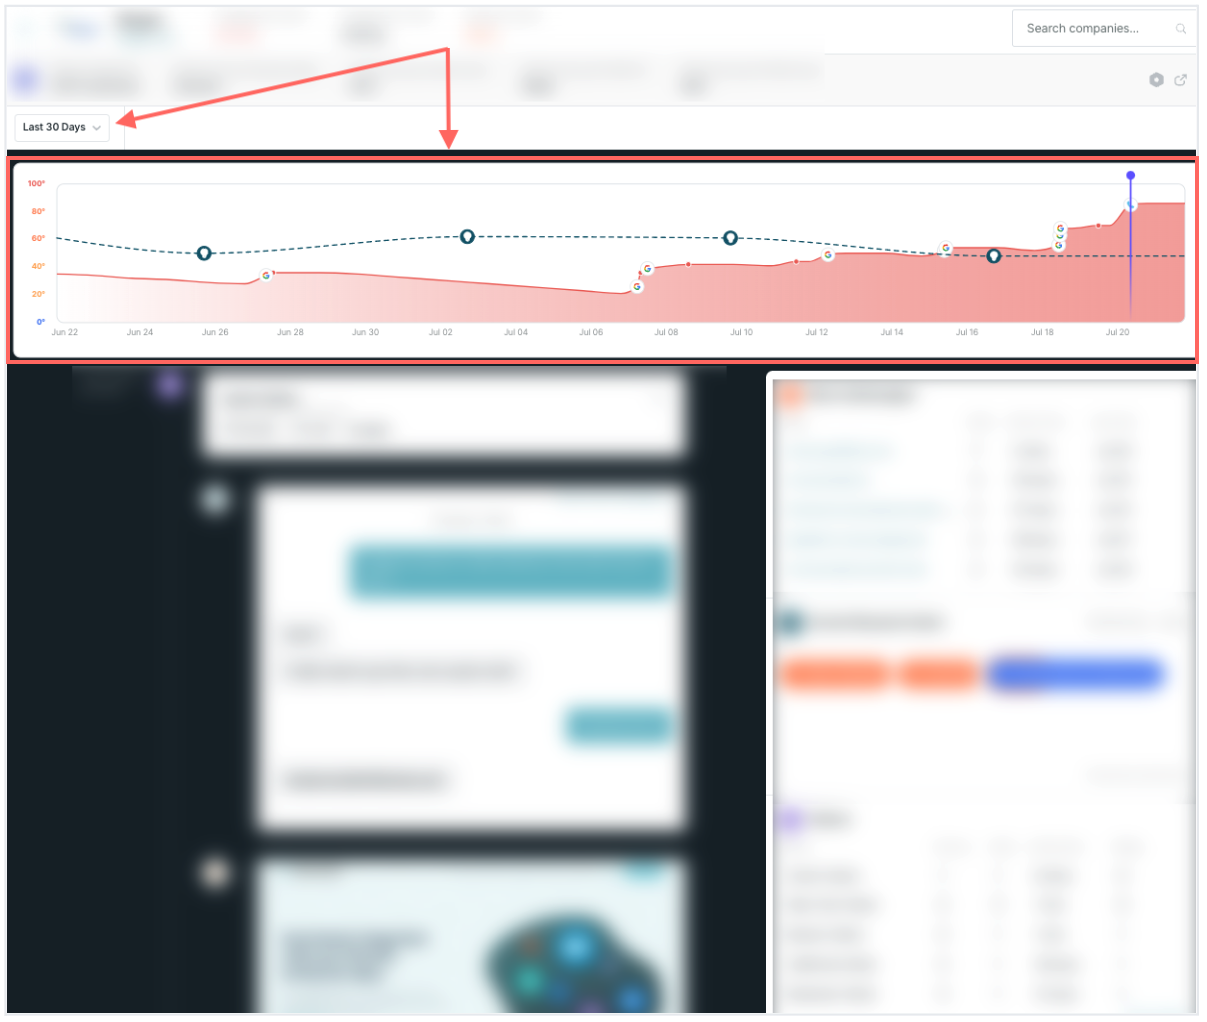
The Account 360 includes an interactive timeline that defaults to the Last 30 Days. You can adjust the time period from the drop-down menu:
There are a few key components.
Research Intent Over Time
The dotted line graph is the account’s Research Intent over time. The Lightbulb icon specifies when it was calculated because Research Intent is calculated only once per week.
When you hover over the Lightbulb icon, the tooltip shows which topic was factored into the Research Intent.
You may notice that the Research Intent graph doesn’t extend the full time period. The graph starts after you first select which topics are used to calculate it.
Engagement Score Over Time
The shaded portion is the account’s Engagement Score over time. A high score suggests that visitors from that account have purchase intent.
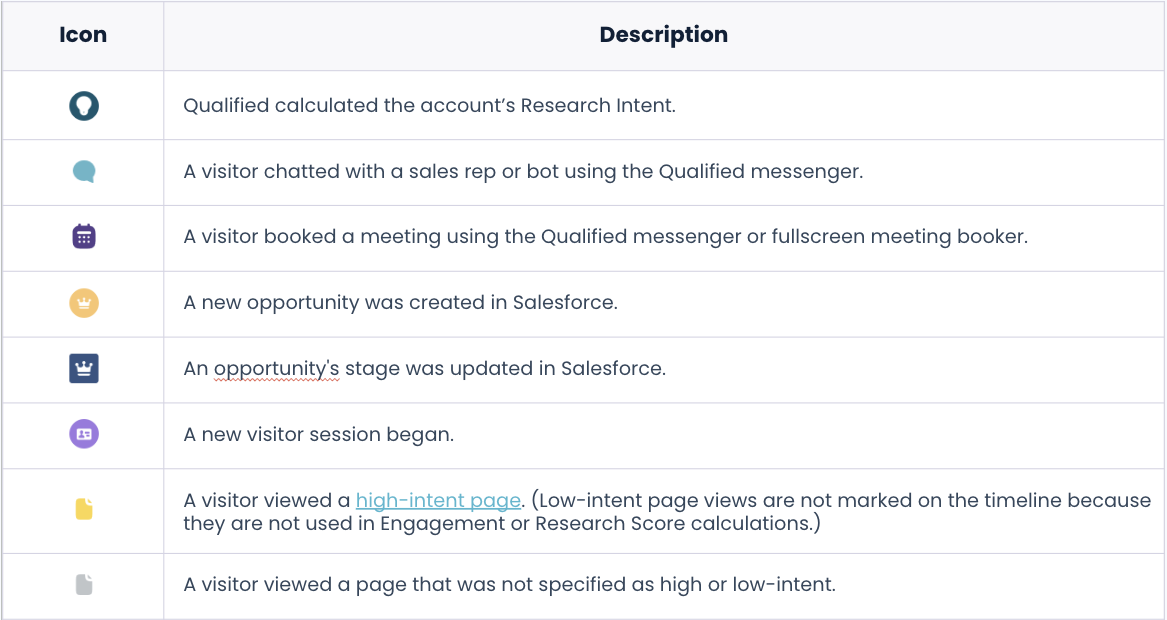
Meaningful Event Icons
Icons are placed on the Engagement Score timeline when an activity affects the Engagement Score. Hover over each icon for more information about that event. When you click on it, the Live View scrolls to that event. These icons include:
<span id="activity-panel"></span>
Activity Panel
To help you understand trends, more granular details about an account’s interactions with your company are listed:
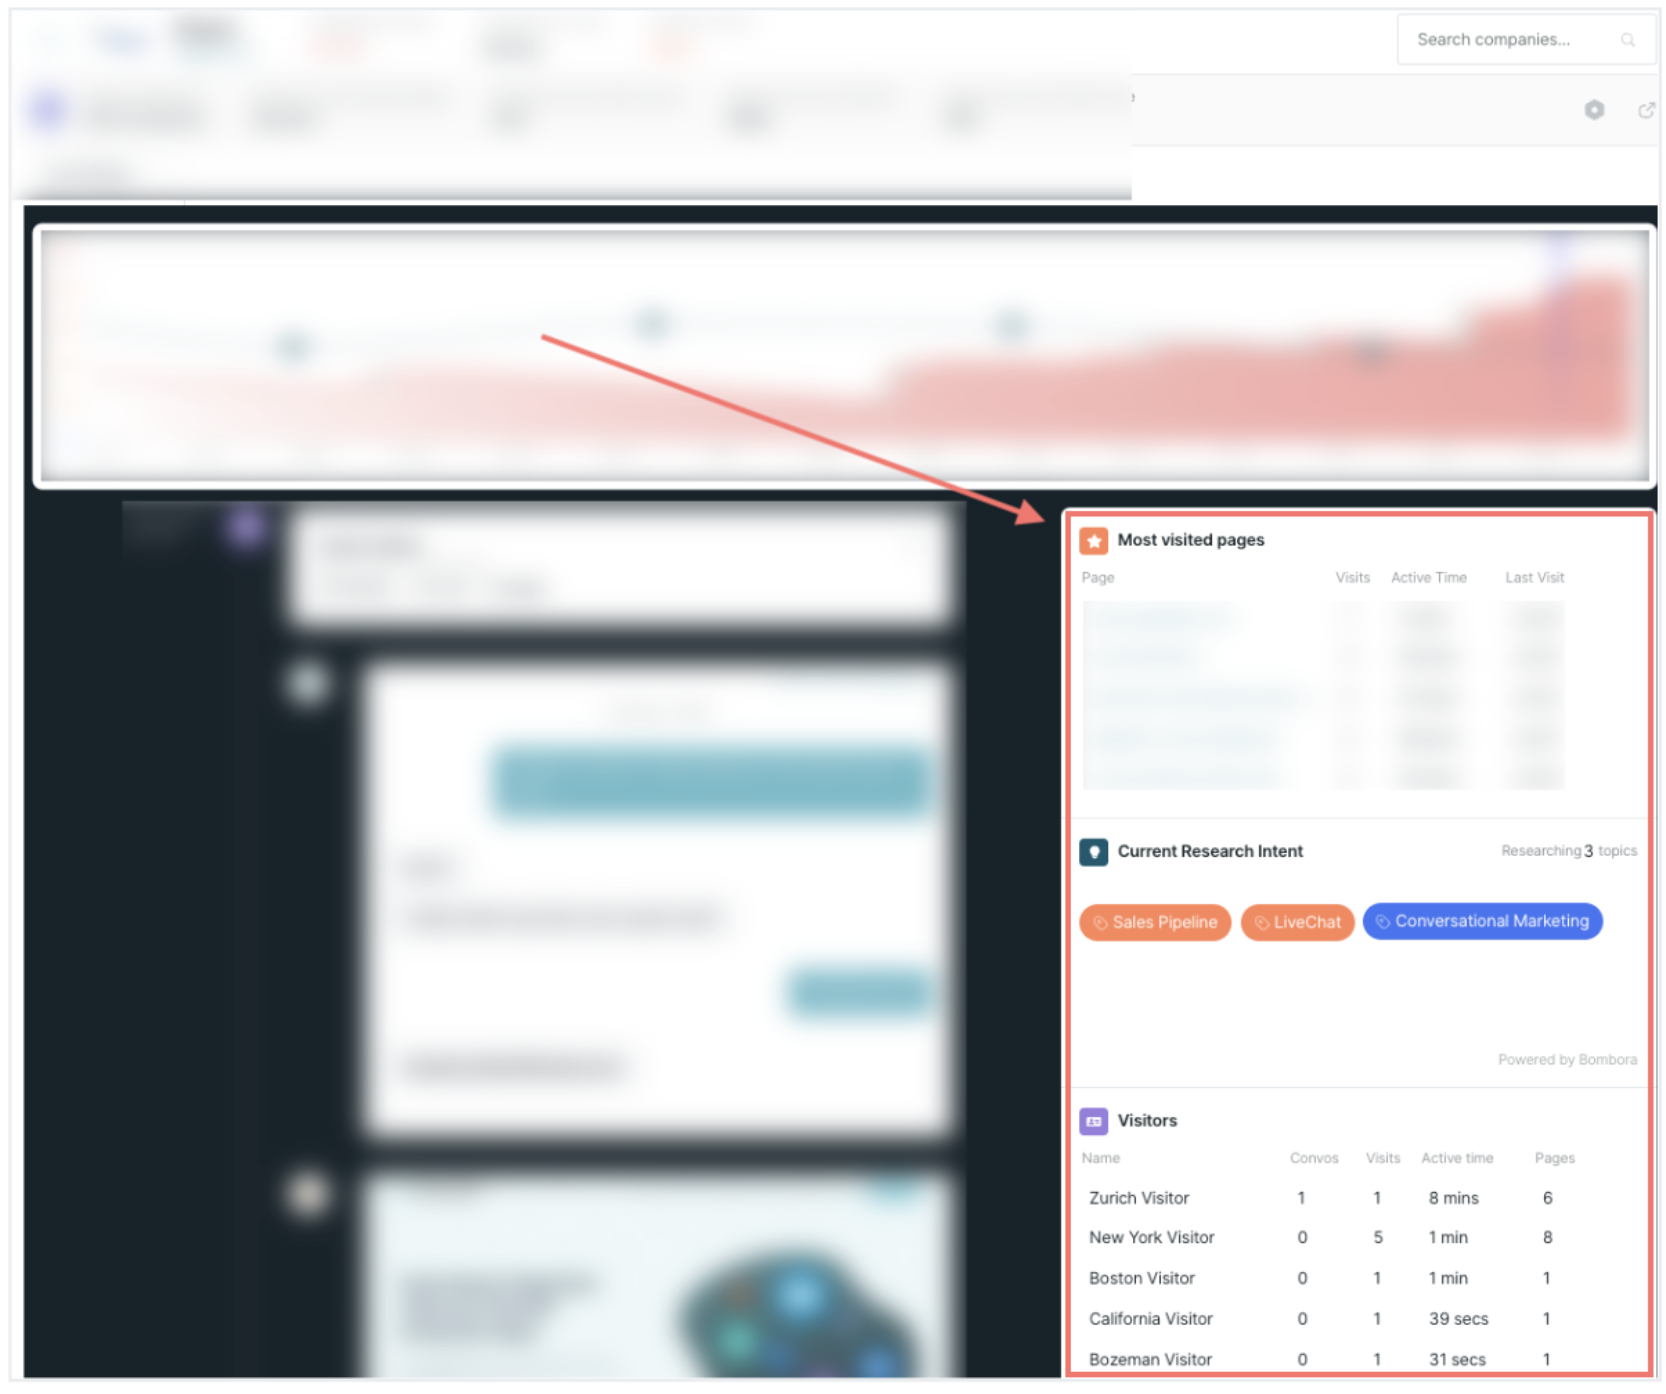
For example, it shows what topics visitors from that account are researching, which ads they click through, and how many conversations they’ve had with your sales reps.
<span id="account360-live-view"></span>
Live View
When you open the Account 360, the Live View appears on the left. This aggregates all information Qualified tracks about an account in one place. Scroll through the Live View to review:
- How the visitors arrived on your website, like clicking through a LinkedIn ad or Outreach email, and, if relevant, an image of the ad or the email’s text
- Which pages they browsed, including per visited page:
- A visual screenshot of that page
- What time the visitor arrived on that page
- How long they remained on that page
- When a Salesforce opportunity is created or its stage is updated
- When a visitor has a conversation with a sales rep or bot in the Qualified messenger
You can click on the visitor cards to open their Qualified session. To open their lead or contact record in Salesforce, click the Arrow icon on the right:
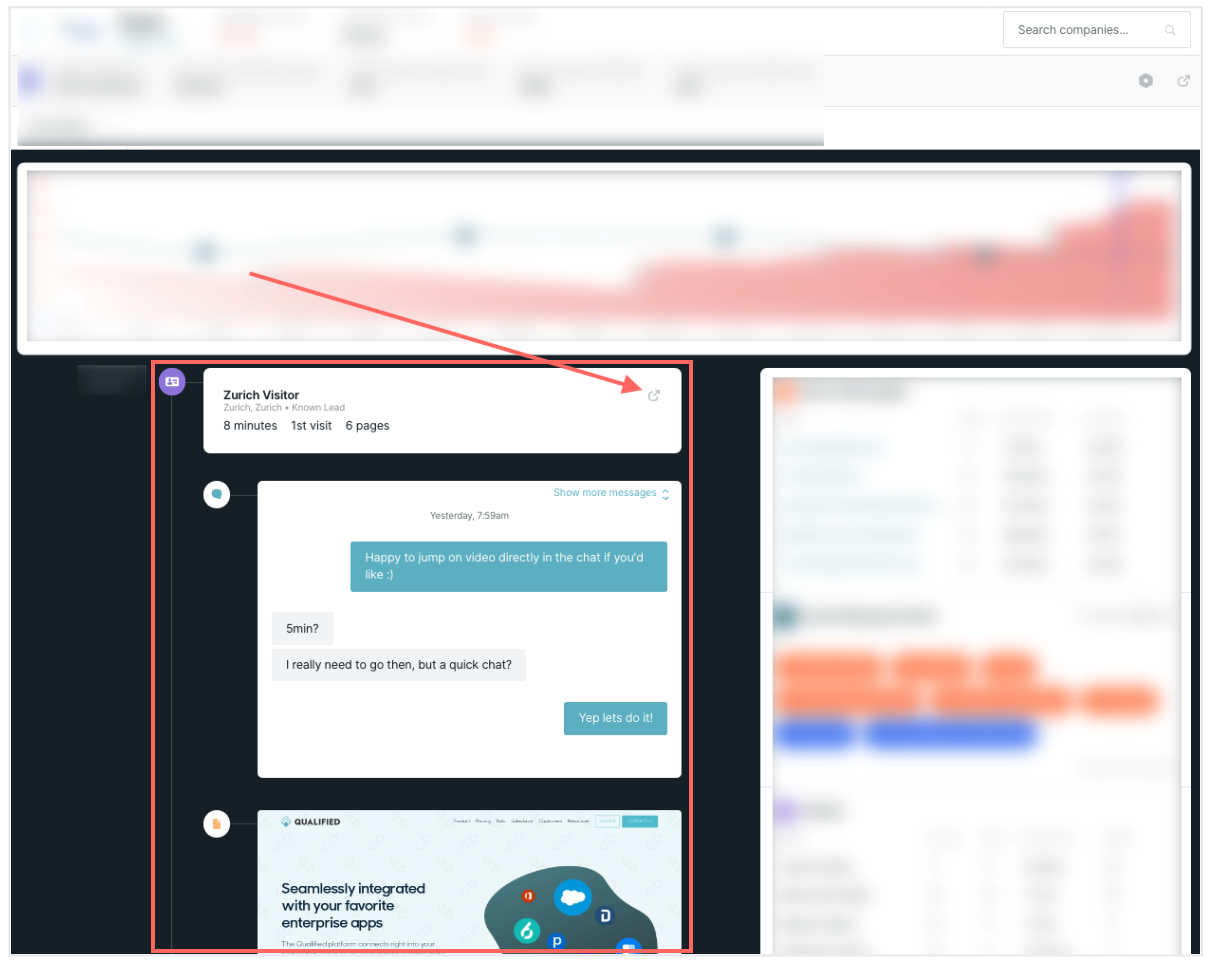
Click on a visitor from the right activity panel or Chat icon on the Engagement Score timeline to open their session in the Live View.
Heading 1
Heading 2
Heading 3
Heading 4
Heading 5
Heading 6
Lorem ipsum dolor sit amet, consectetur adipiscing elit, sed do eiusmod tempor incididunt ut labore et dolore magna aliqua. Ut enim ad minim veniam, quis nostrud exercitation ullamco laboris nisi ut aliquip ex ea commodo consequat. Duis aute irure dolor in reprehenderit in voluptate velit esse cillum dolore eu fugiat nulla pariatur.
Lorem ipsum dolor sit amet, consectetur adipiscing elit, sed do eiusmod tempor incididunt ut labore et dolore magna aliqua. Ut enim ad minim veniam, quis nostrud exercitation ullamco laboris nisi ut aliquip ex ea commodo consequat. Duis aute irure dolor in reprehenderit in voluptate velit esse cillum dolore eu fugiat nulla pariatur.
Lorem ipsum dolor sit amet, consectetur adipiscing elit, sed do eiusmod tempor incididunt ut labore et dolore magna aliqua. Ut enim ad minim veniam, quis nostrud exercitation ullamco laboris nisi ut aliquip ex ea commodo consequat. Duis aute irure dolor in reprehenderit in voluptate velit esse cillum dolore eu fugiat nulla pariatur.

Block quote
Ordered list
- Item 1
- asdfasdf
- asdfasdf
- asdfasdf
- Item 2
- Item 3
Unordered list
- Item A
- Item B
- Item C
Bold text
Emphasis
Superscript
Subscript
|
|---|
|


.svg)


