
Bulding Automatic Experiences
An Automatic Experience can be triggered to appear automatically when visitors arrive on your website. They can be configured to target different audience segments, high-intent pages, referral sources, or just visiting a particular page.
- Creating New Automatic Experiences
- Experience Build Actions
- Formatting in the Experience Builder
- Using Variable Tags for Personalization
- Blocking Personal Email Addresses
- Testing Automatic Experiences
- A/B Testing
- Configuring Multilingual Experiences
<span id="new-automatic-experiences"></span>
Creating New Automatic Experiences
An Automatic Experience is one that you can trigger without any other action from your visitor on any page of your site. Experience can be made up of multiple actions, such as a simple greeting, gathering more information about your visitor (qualifying questions), booking a meeting with a rep, or live chat with your reps or the AI SDR.
To create a new Automatic Experience as a Qualified Admin:
- Go to Settings → Experiences → Automatic.
- Click the + Create automatic experience button at the top.
- Add a descriptive name in the Name this experience… field.
- Add the criteria to determine which visitors will be shown this experience.
- Click the Save Experience button in the top right corner.
- Build the experience flow by clicking the + Add Action button under the visitor criteria. Learn more about Experience Build Actions.
Experience Priority
As we’ve already mentioned, Automatic Experiences are triggered automatically when a visitor arrives on your website. But what happens when a visitor matches the criteria with multiple Automatic Experiences? That’s where the experience’s priority order comes into play.
When a visitor arrives on your website, Qualified will determine if the visitor matches the criteria of the first “Active” automatic experience. If so, they will receive that experience. If not, we’ll see if they match the next experience, and so on until they match an experience. If they don’t match an experience criteria, then they will not receive an automatic experience during their visit.
Drafting Experiences
When creating Experiences, you can make edits to an unpublished draft version and then save your changes either to the draft or publish it as a live experience. If saved to the draft, changes can be published to overwrite a new Experience version when you are ready to go-live. Admin users will be able to see if an Experience has an unpublished draft and view either the draft or the live experience. When an experience is published, there will be an option to include notes on the changes that were made.
When viewing conversation flow analytics, additional version history details will be available including the user who made the edits and the change notes. Note that you can only have one draft at a time, anyone with the correct permission set can view the version history and notes and you are not able to test draft experiences or revert to an old version (though you are able to view them in the version history).
Archiving Experiences
When you’ve deactivated an Experience and no longer intent to use it, we recommend archiving the Experience so you’re still able to see analytics related to that Experience, and you can also unarchive it.
To archive an Experience, click on the three dots in the top right corner of the Experience builder and click Archive, and then confirm by clicking Archive again. This will move the experience to the bottom of the list in an “Archive” section.
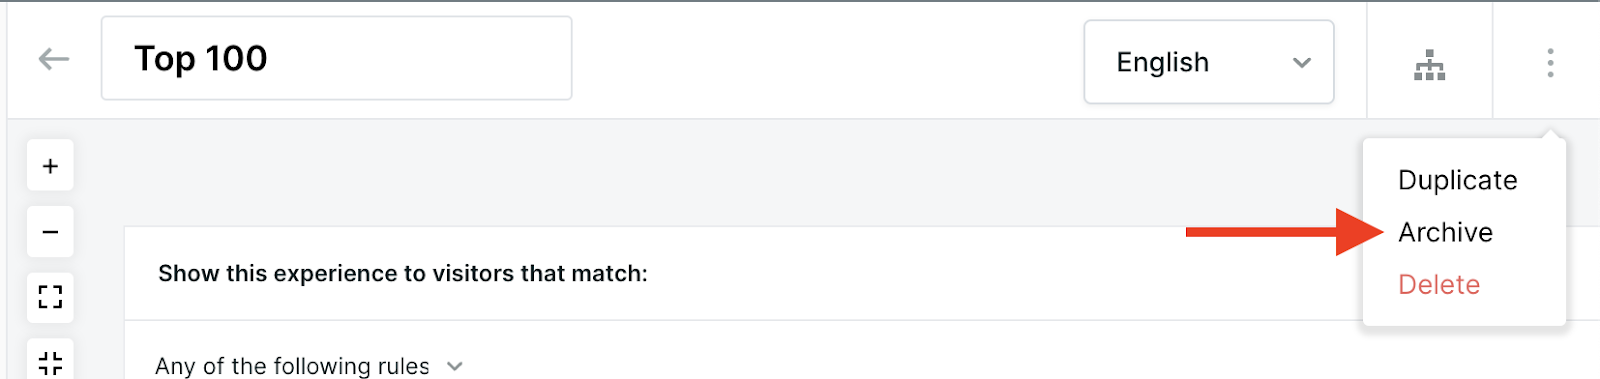
To unarchive an experience, click on the three dots in the top right corner of an archived experience and click Unarchive.
<span id="experience-build-actions"></span>
Experience Build Actions
In the Qualified Experience Builder, use steps as the building blocks to create unique Experiences for your visitors on your website. A step, sometimes called a node, are the building blocks within your Qualified Experiences.
How to Add Experience Steps
Navigate to Settings icon → Experiences to create a new Experience or edit an existing one. Click the + Add Action button within the Experience to add a new step.
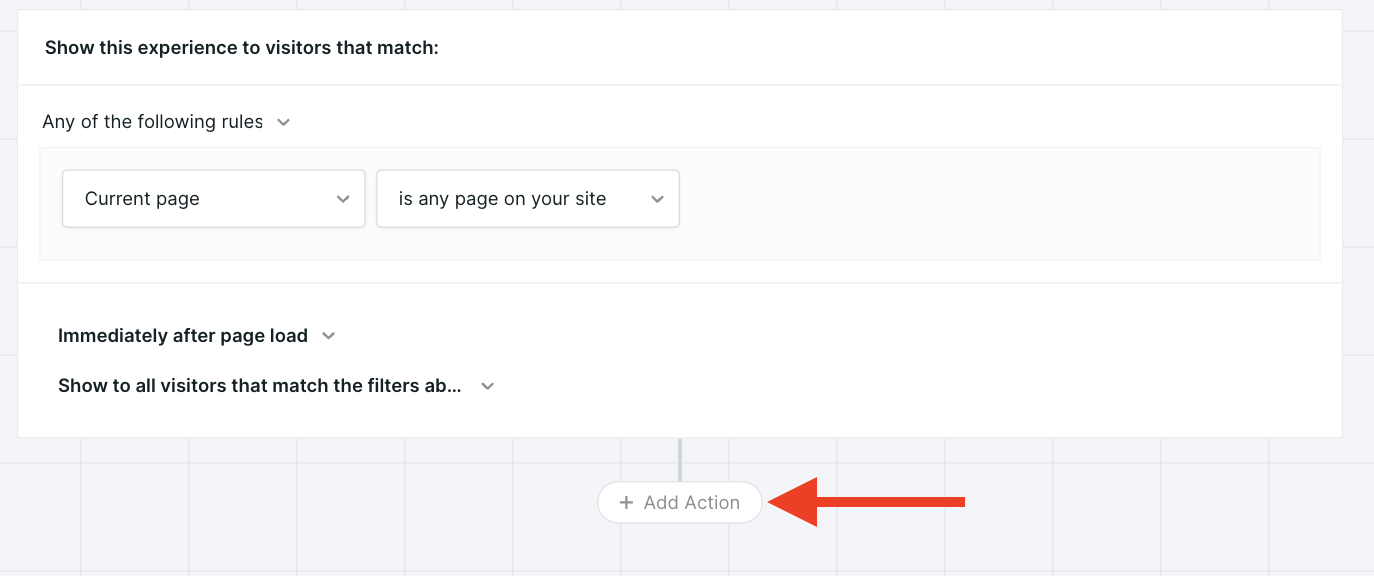
You’ll see a list of actions appear on the right side of your screen.
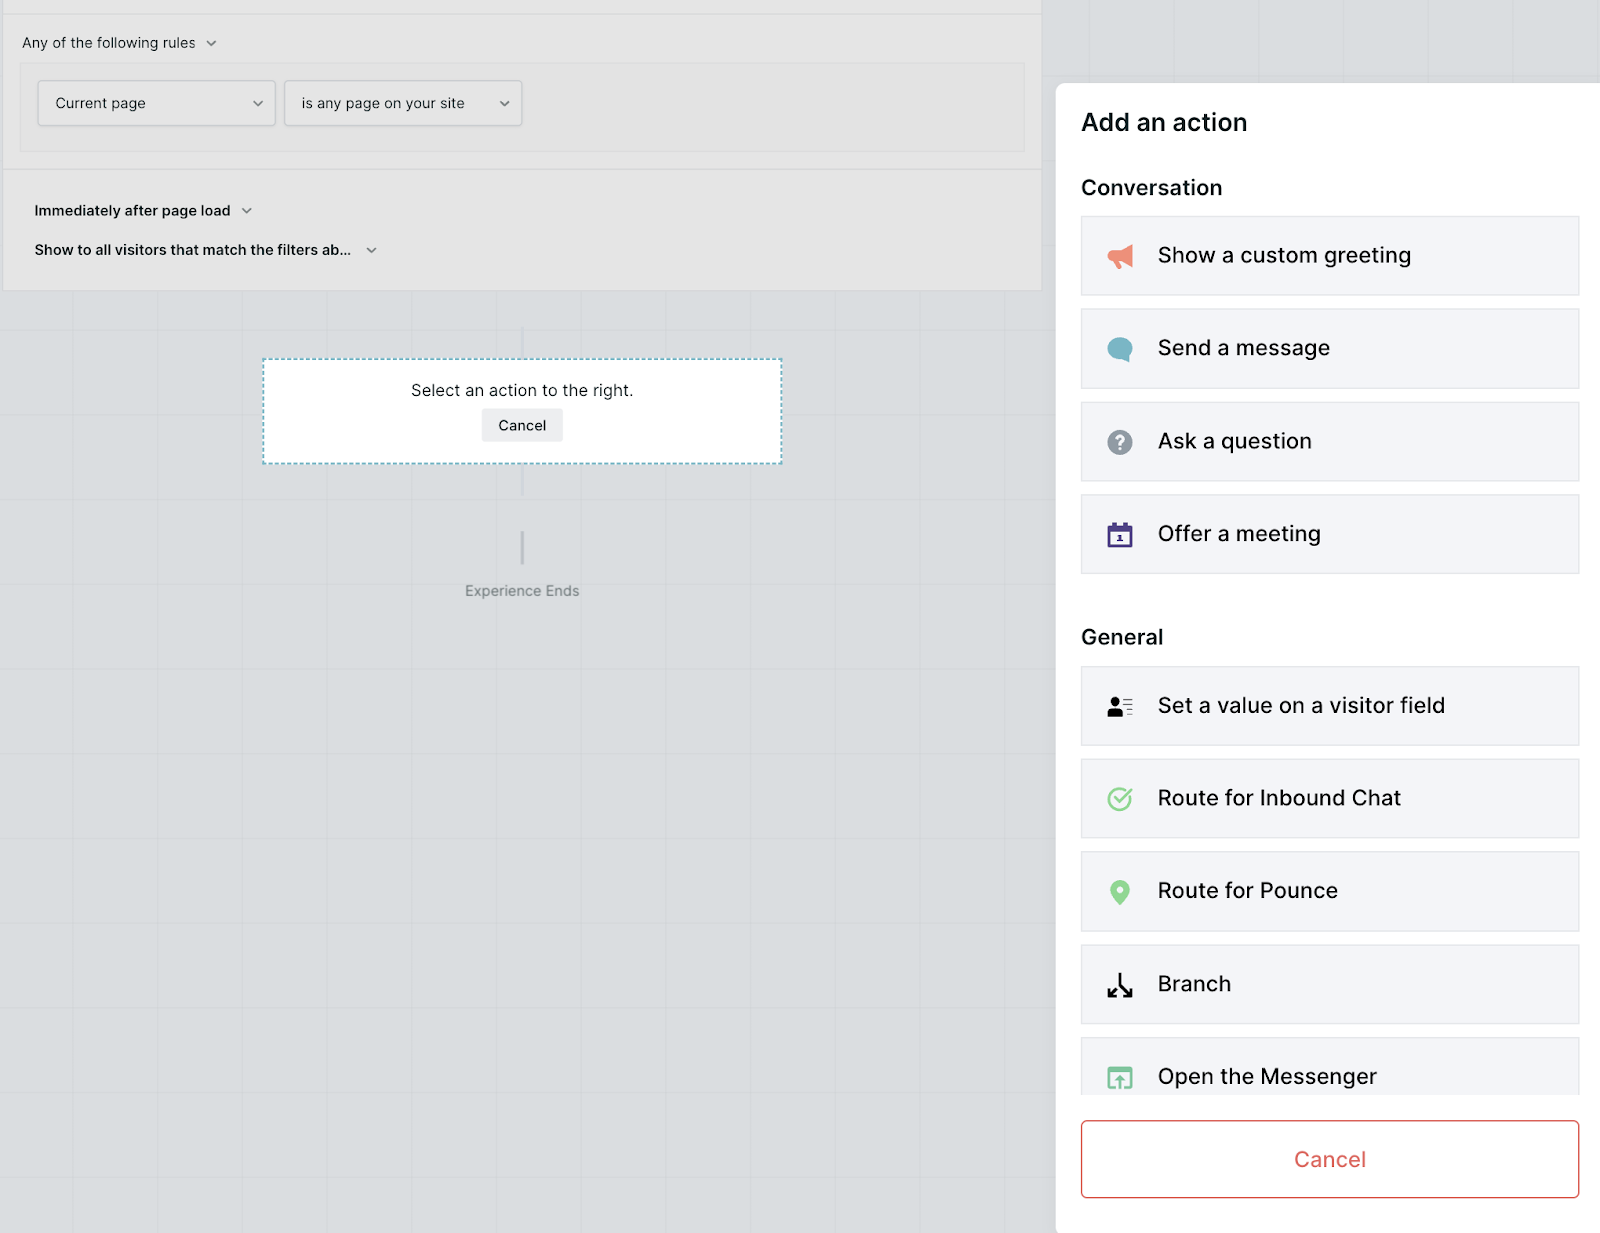
Conversation actions
Show Custom Greeting
A custom greeting will appear when your visitor enters your site or the page that you’ve designated your Experience to show up on. Typically, this will be the first thing they see, so you’ll want to make your message as engaging and friendly as possible.
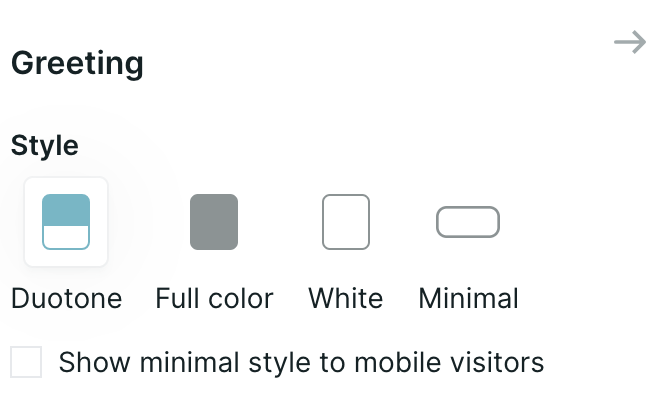
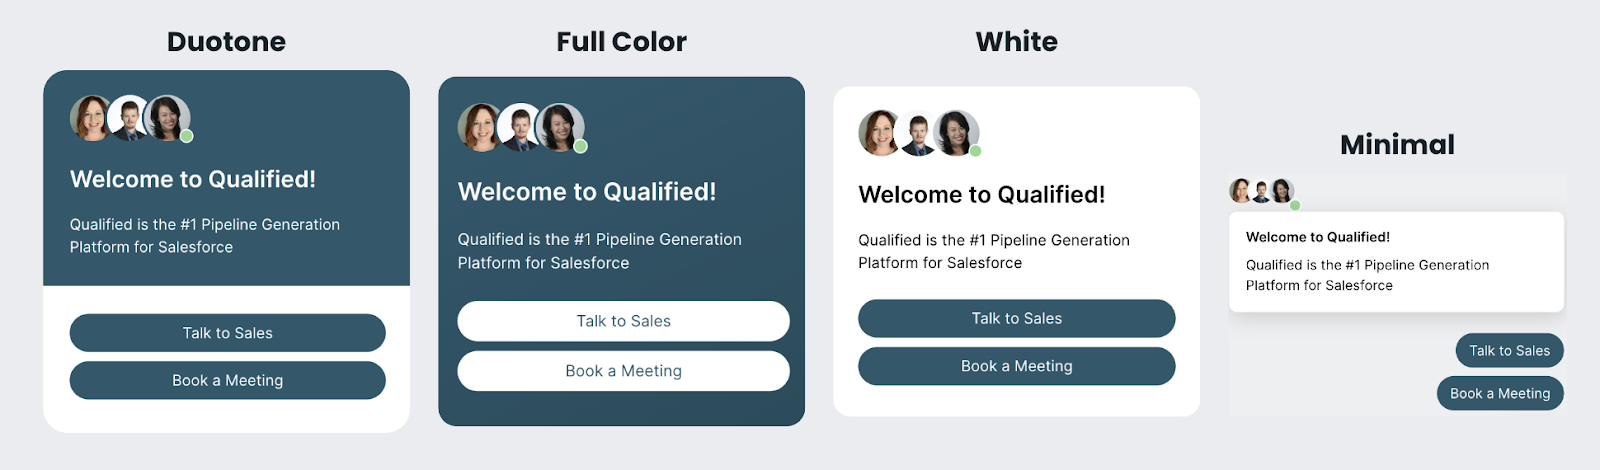
Greeting Style: Choose from four different styles: Duotone, Full color, white, and minimal.
If you’d like to change the colors or button styles, click here to learn about customizing the Messenger theme.
Check the box "show minimal style to mobile visitors" when choosing the Duotone, Full color or White style to ensure mobile visitors receive a better experience for their device.
Graphic: You choose a graphic to display in the custom greeting as well:
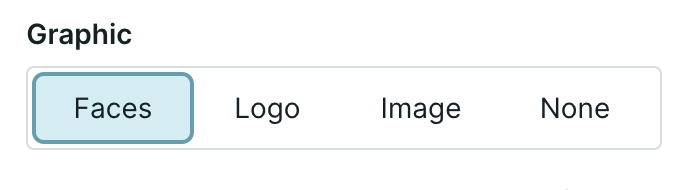
- Faces: Prioritizes reps that are available and then randomly selects other Qualified users
- Logo: Show the theme logo setup in Messenger theme, or upload another logo
- Image: Upload an image that will display at the top of the Custom Greeting (only available with Full color and White greeting styles)
- None: No graphic will be shown in the Custom Greeting
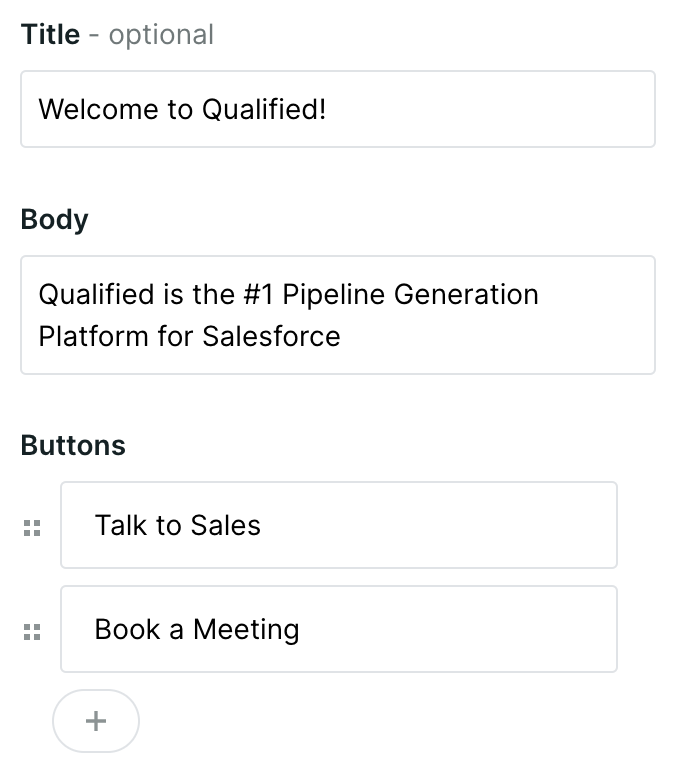
Title, Body, and Buttons: customize the text in the greeting by adding a Title (optional), Body, and Buttons.
Send a Message
When creating your Experiences there are times when you don’t necessarily want your visitors to take any action, but you’d like to send them a message while they make their way down your Experience flow. To do this, select a message to send to your visitors.

You can also send a message to your visitors to break up your conversation, making your Experience more human. Notice the Experience below where we’ve sent a message followed by a question to break up the messages the visitor is receiving.
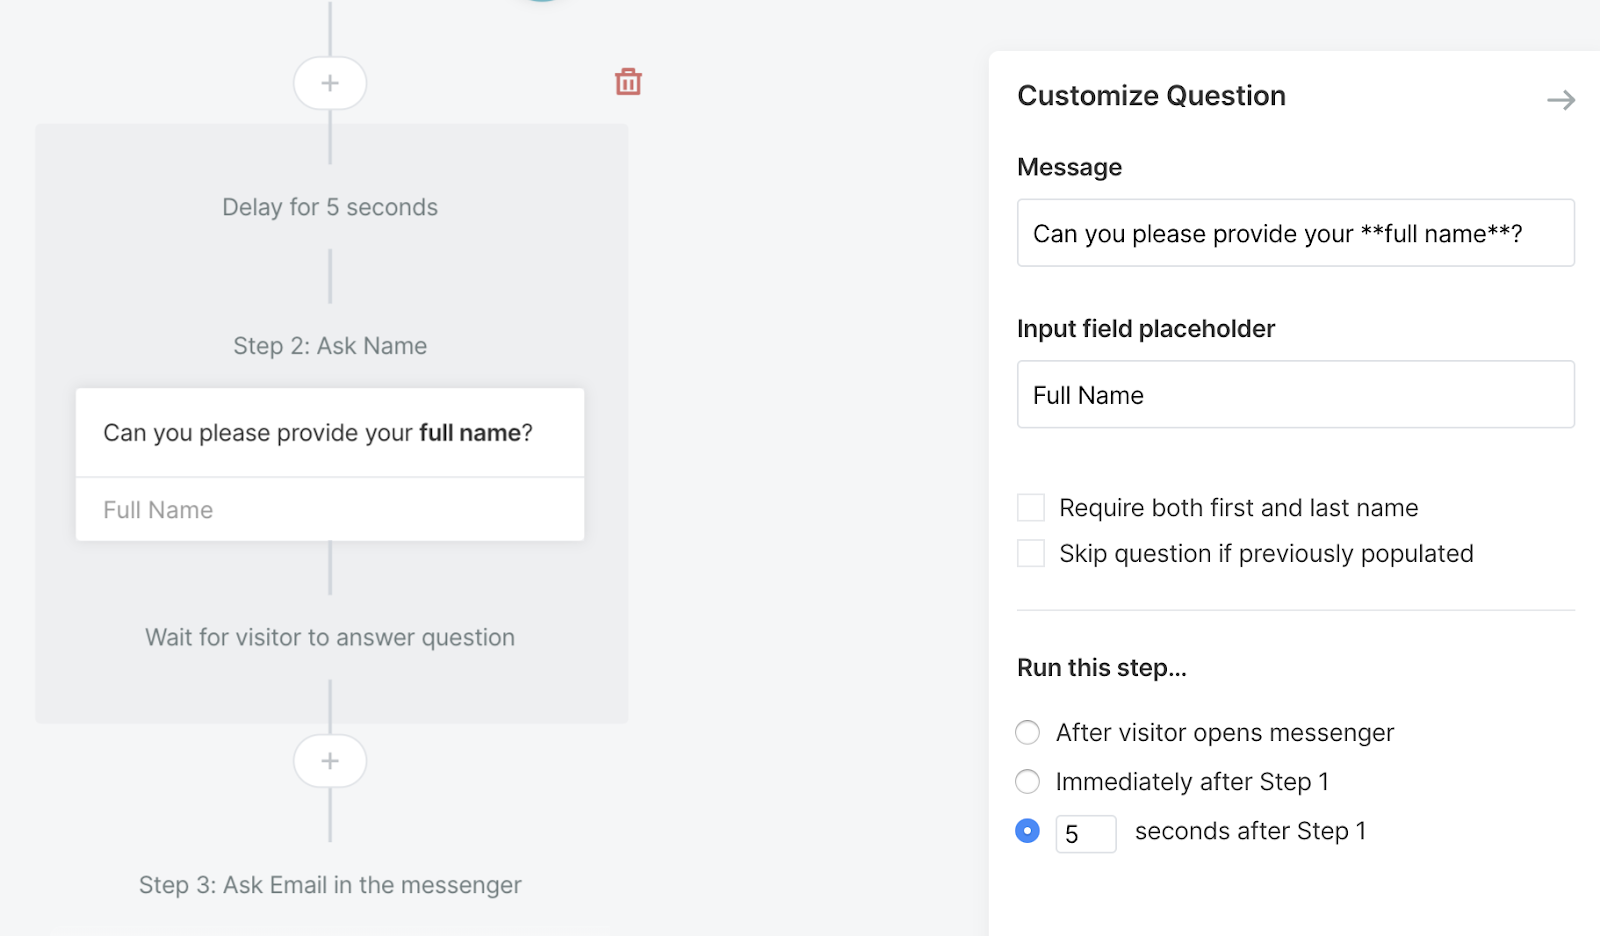
Ask a Question
Asking a question to your visitors gives you a chance to learn information about them that you otherwise couldn’t get from a data enrichment tool such as Clearbit Reveal or 6sense.
We have two different options when asking a question:
- Ask a custom question (this can just be used for branching within your Experience) or
- Ask a question to populate your current visitor field (this can also be used in your branching)
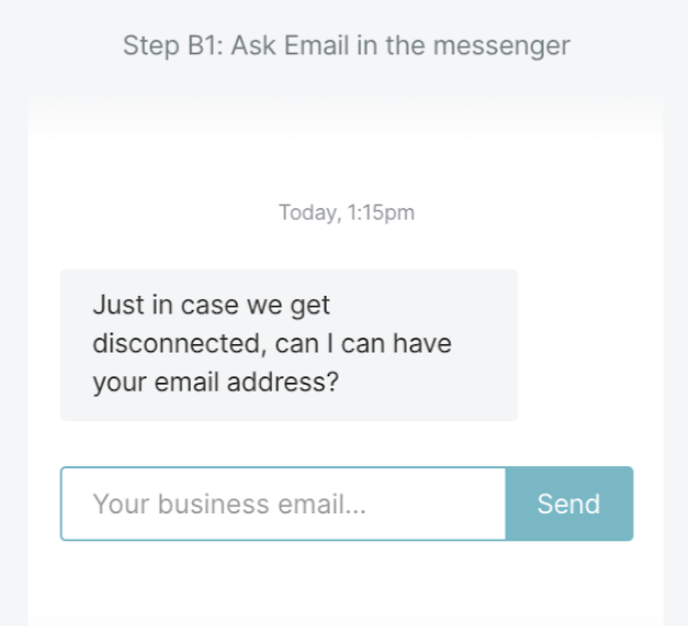
The most common first question will typically be to ask your visitor for their email address, so that:
- You can add this visitor as a Lead into Salesforce and
- You’ll be able to get more information about them using Clearbit Enrichment once you have their email address.
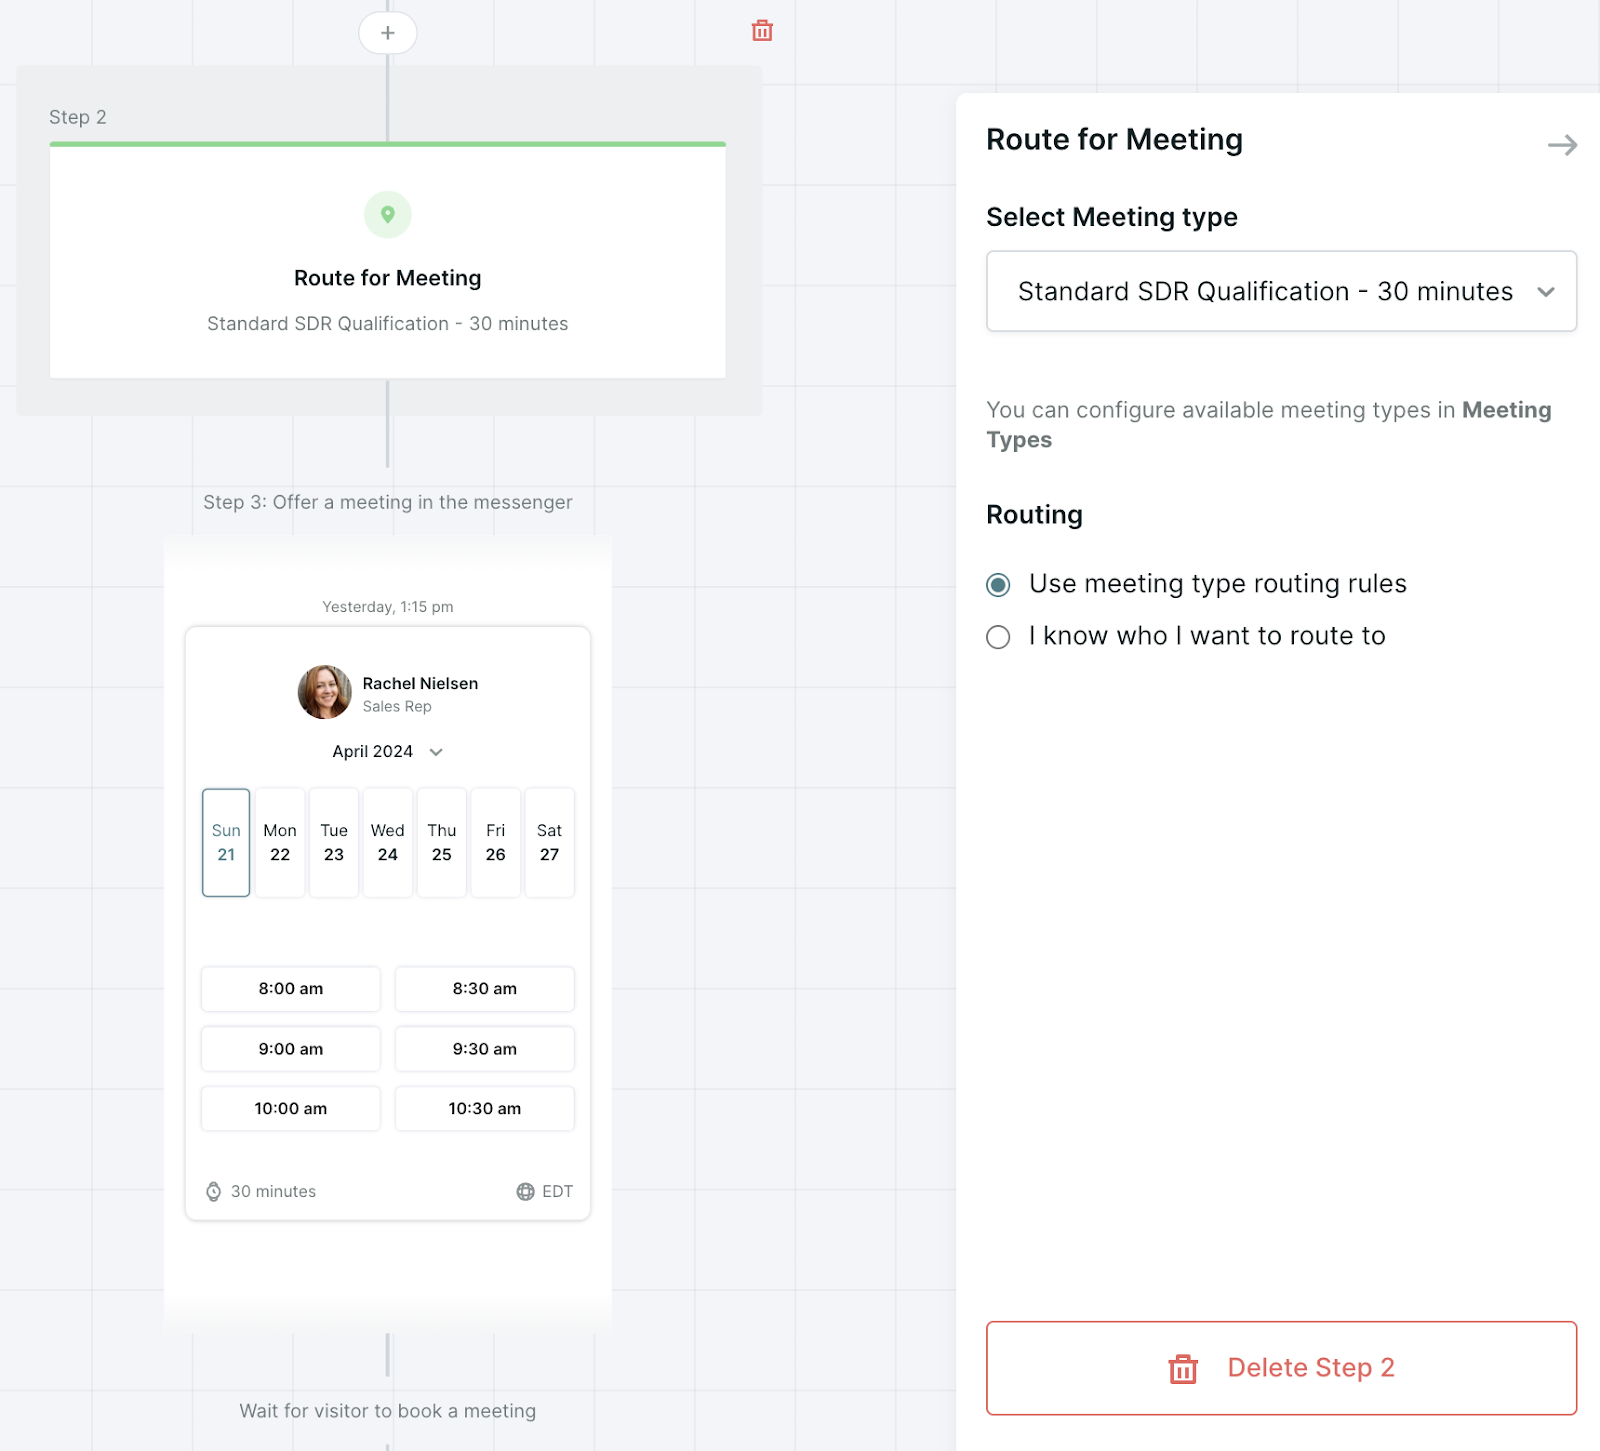
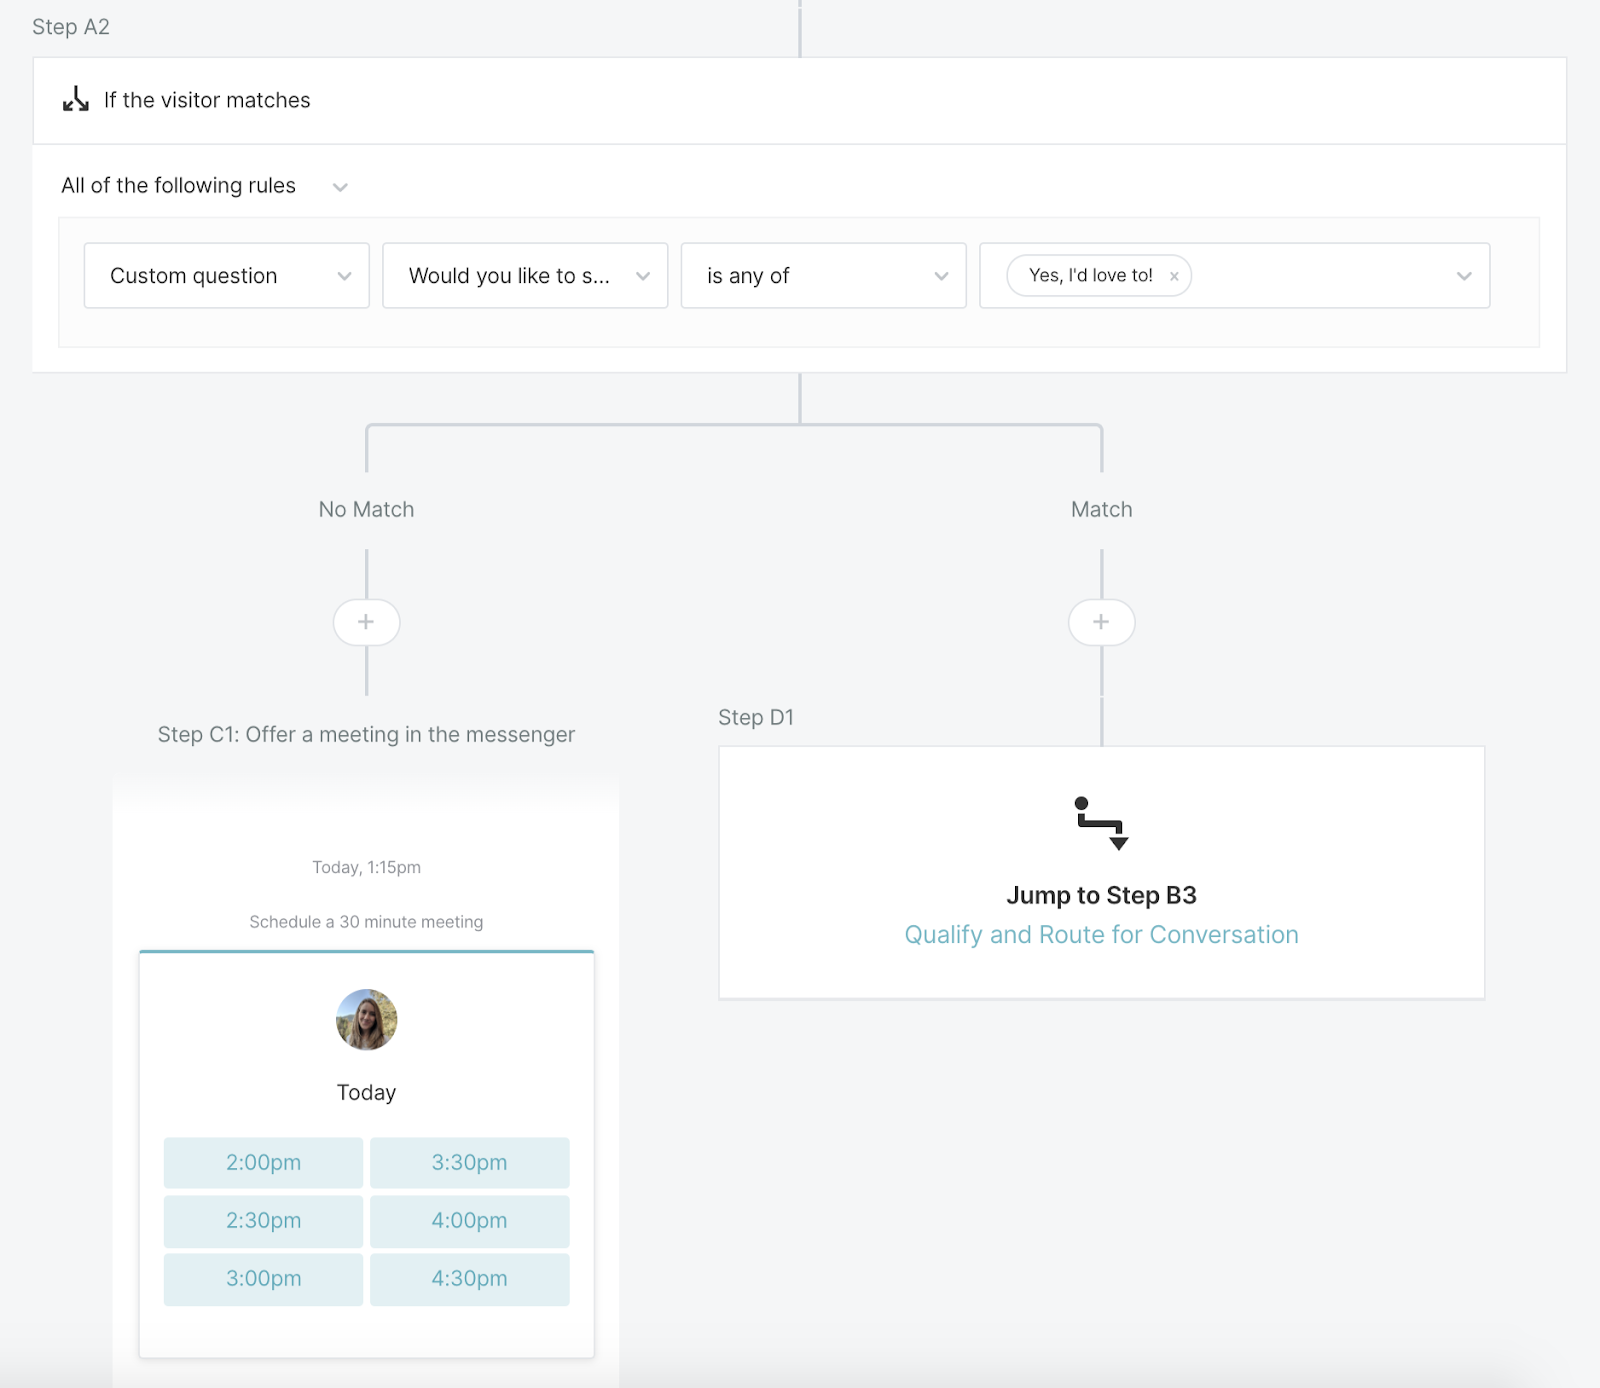
Offer a Meeting
You can offer a meeting at any time during your build-out of your Experience. Give visitors an option to bypass chatting if they’re too busy, and give them the option to book a meeting instead.
After choosing the Offer a Meeting action, you’ll see a Route for Meeting node appear. Click on the node to select the Meeting Type you’d like to offer and choose how you’d like to route the visitor: using the meeting type routing rules (most common) or choosing someone specific to route to.
General actions
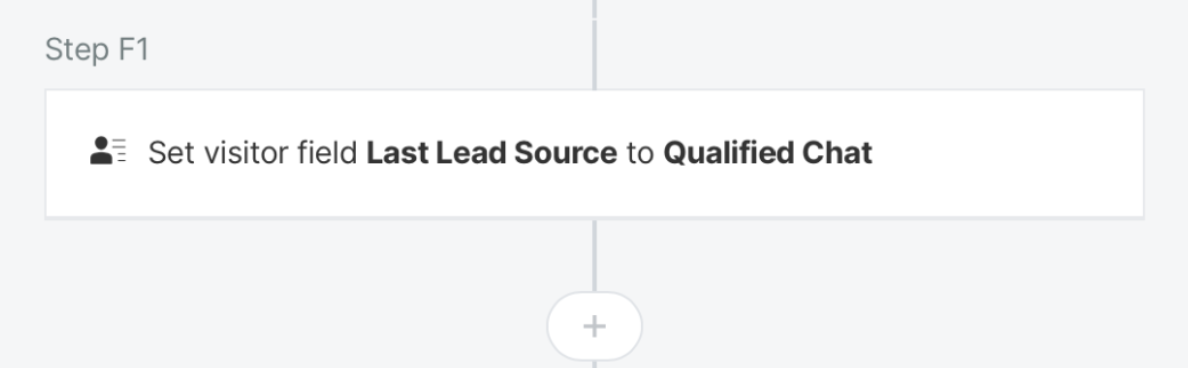
Set Value on a visitor field
With this step, you’re able to set visitor field values during an Experience. For example, set a field labeled ‘chat’ to ‘true’ and later sync that into Salesforce or create a field to keep track of your lead source.
<span id="inbound-chat"></span>
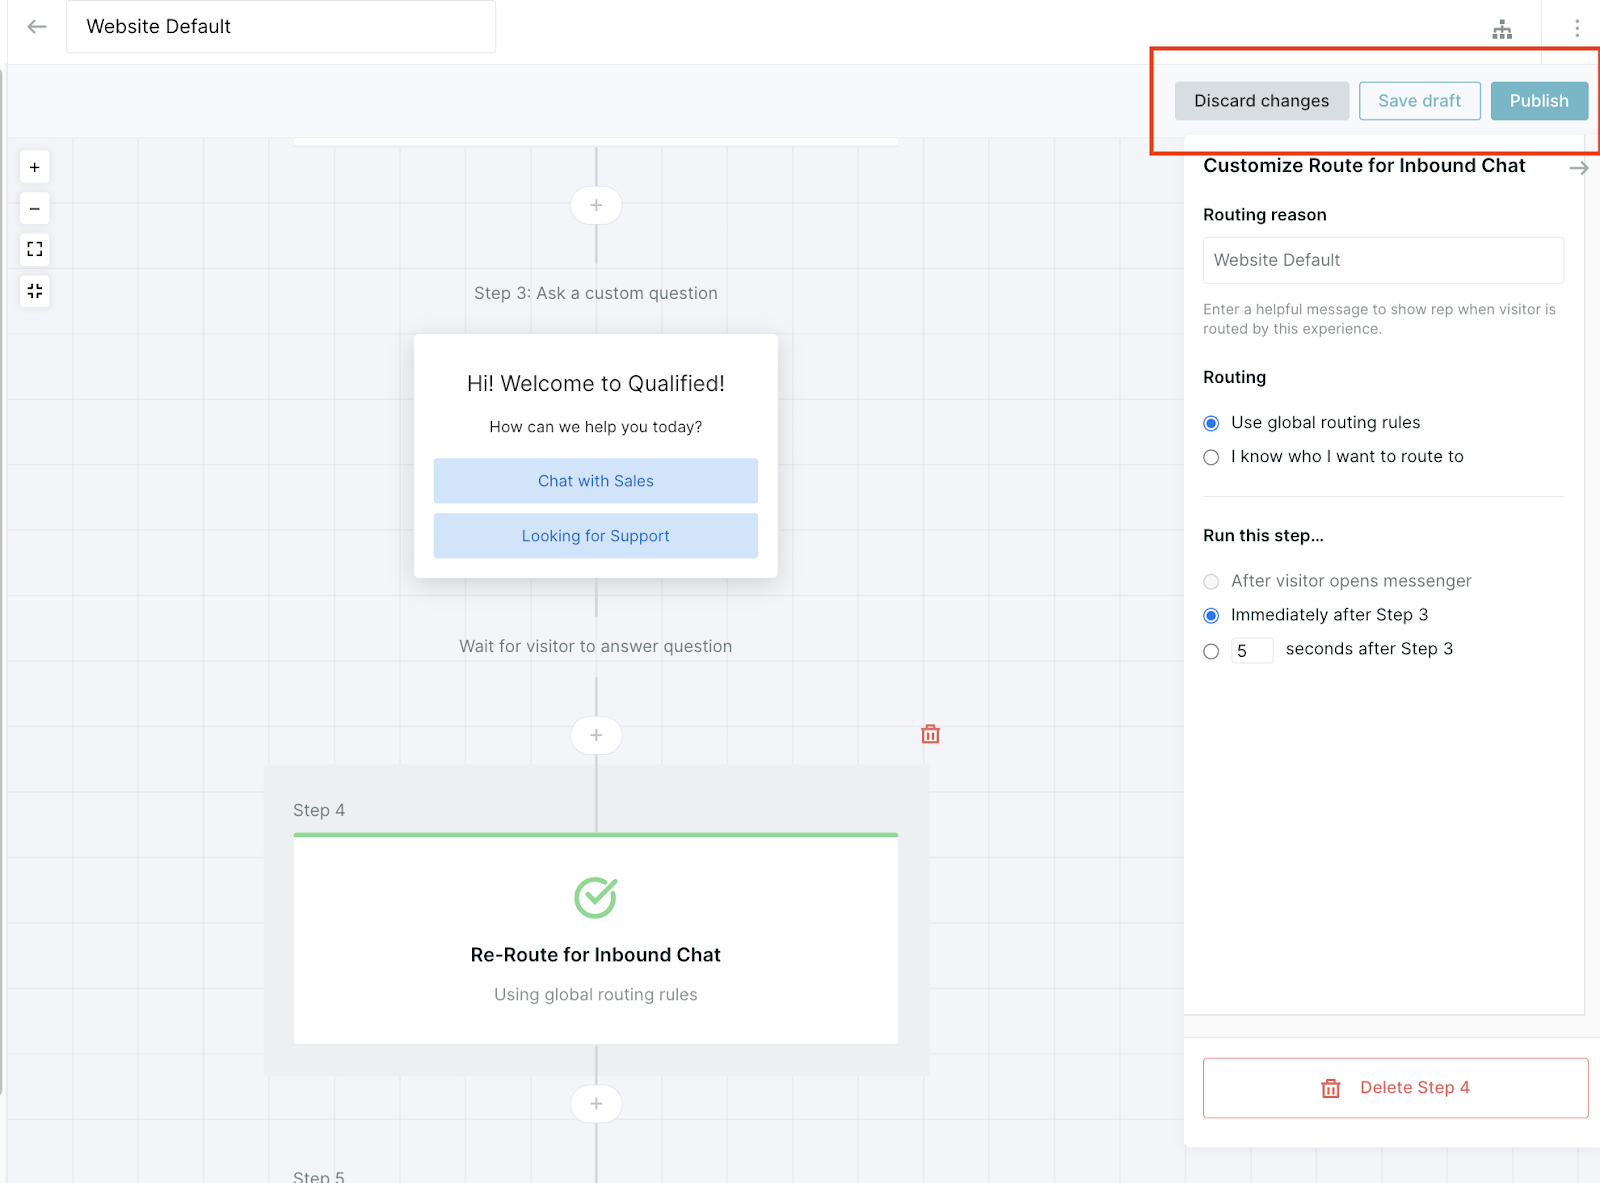
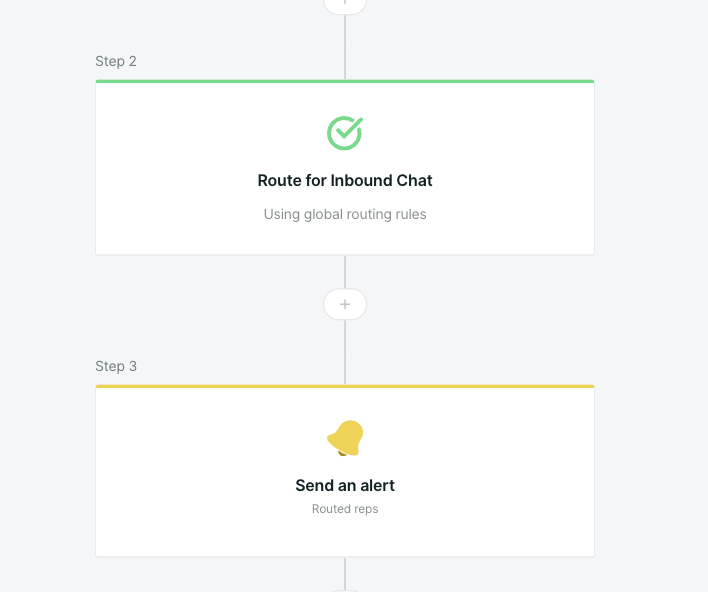
Route for Inbound Chat
You’ll want to use this step to get your visitors to the right users on your team by either allowing visitors to live chat with your team or route them to your meeting booker if no one is available.
When you select this step, we’ll do some work for you to make sure that you have the correct branching in place. We’ll first check to see if your users are available for chat with the visitor and, if not, give them the option to book a meeting.
<span id="route-pounce"></span>
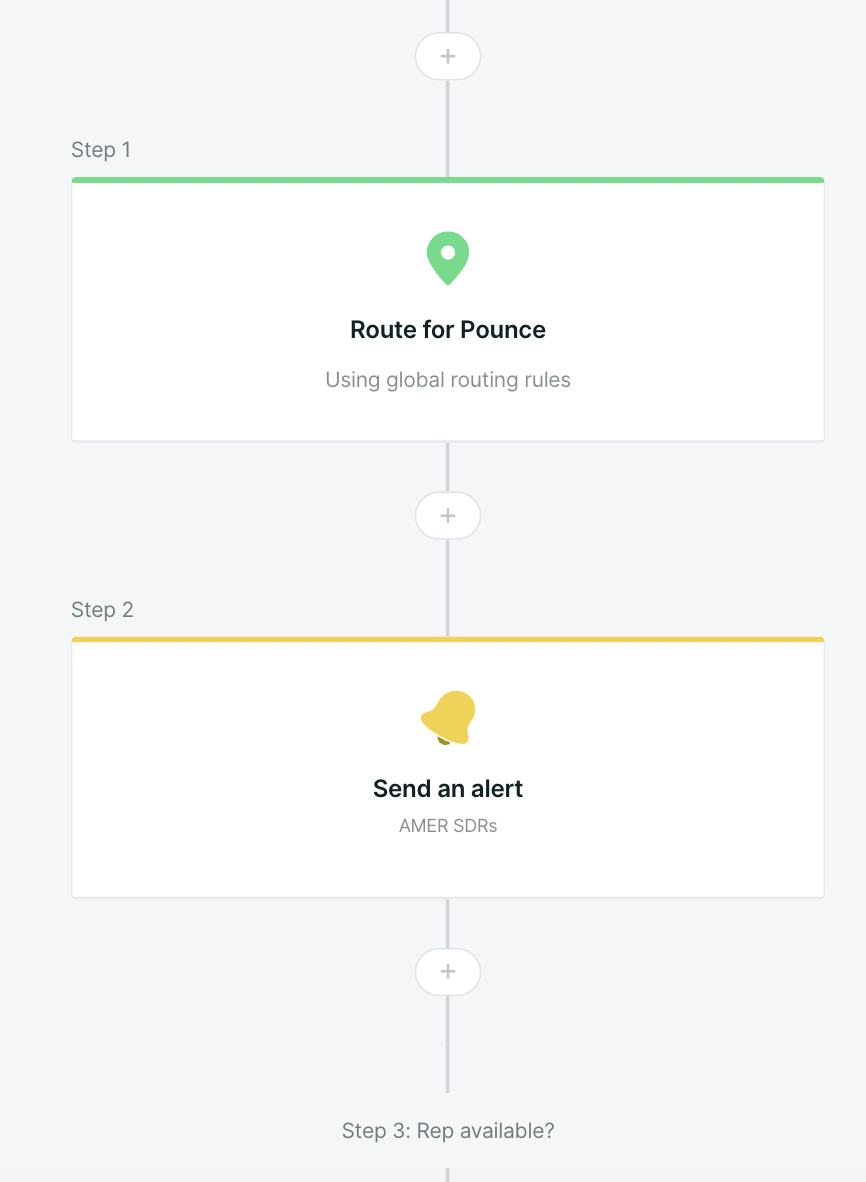
Route for Pounce
We highly recommend starting each Experience with a Route for Pounce step.
By doing this, you're enabling your sales reps to pounce and see visitors in that Experience. This step can respect global routing rules or specific routing rules, but it is critical in enabling sales reps to see and pounce on visitors.
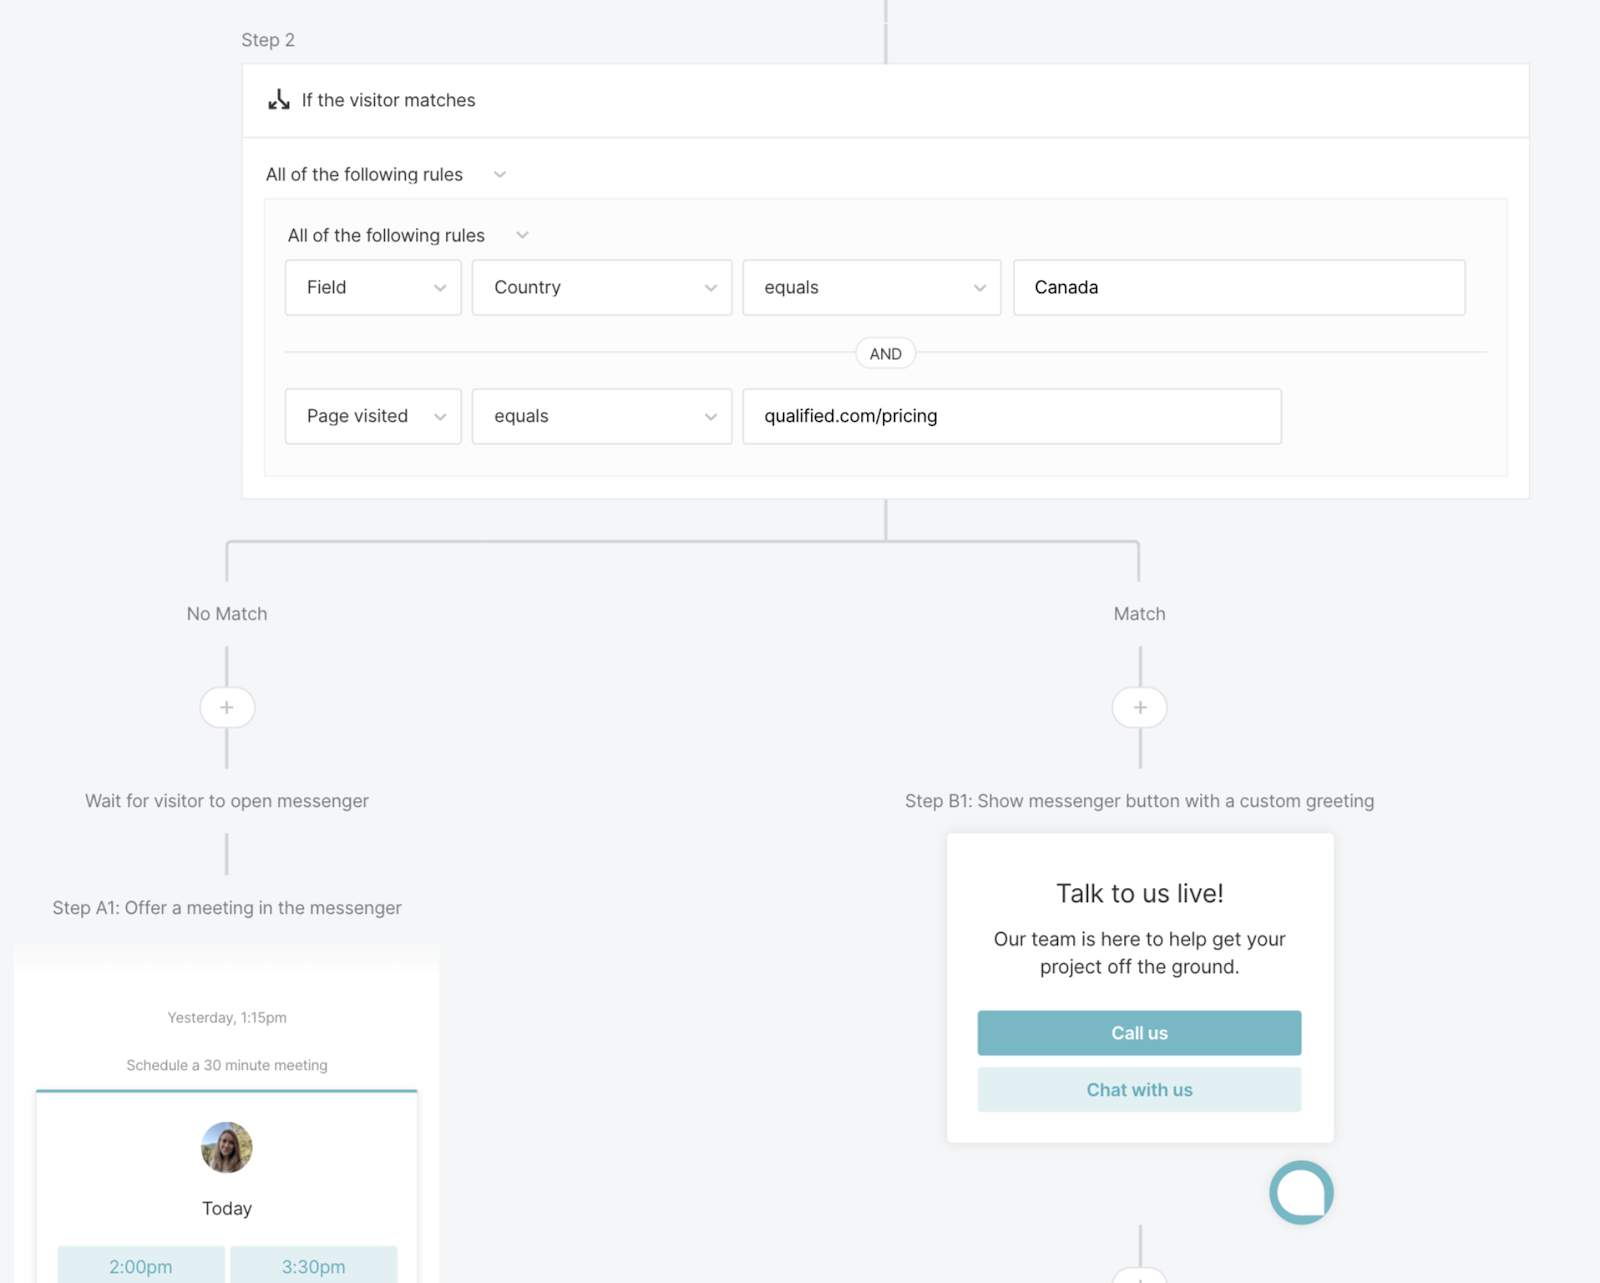
Branch
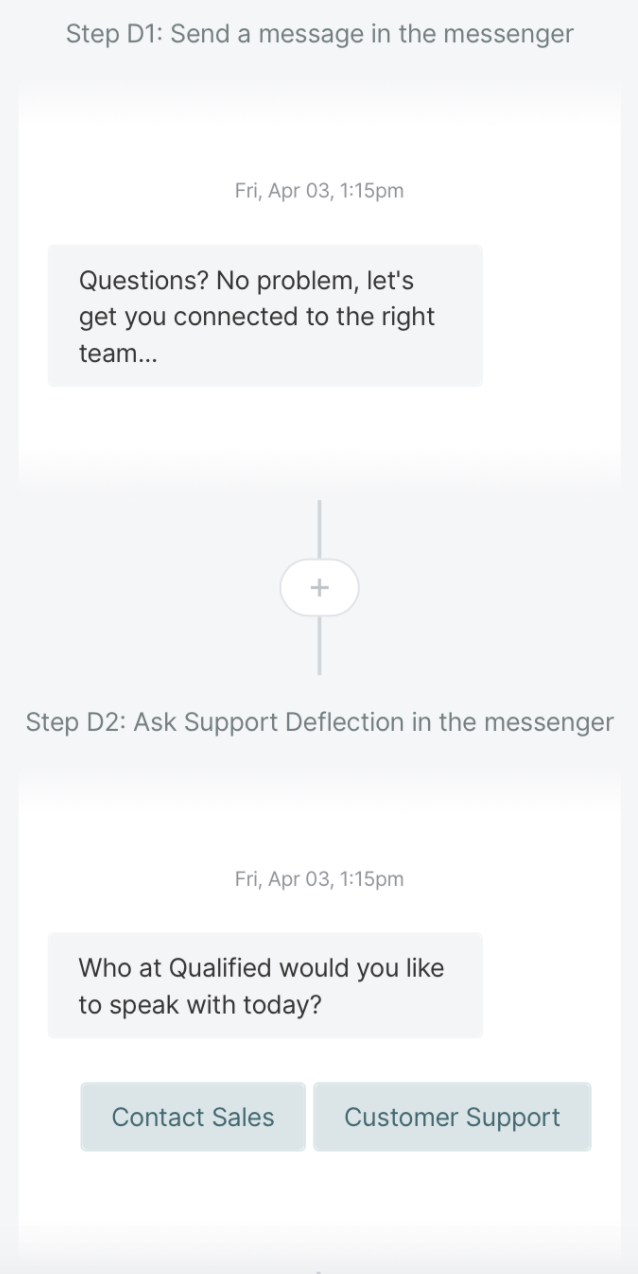
The branch step allows you to create logic based on buttons from Custom Greeting or custom questions that you’ve asked previously in the Experience. Use this logic to move your visitors through different branches of your Experience such as live chat, booking a meeting, or branching to allow certain visitors to skip the line and get in touch with your team immediately based on data enrichment information.
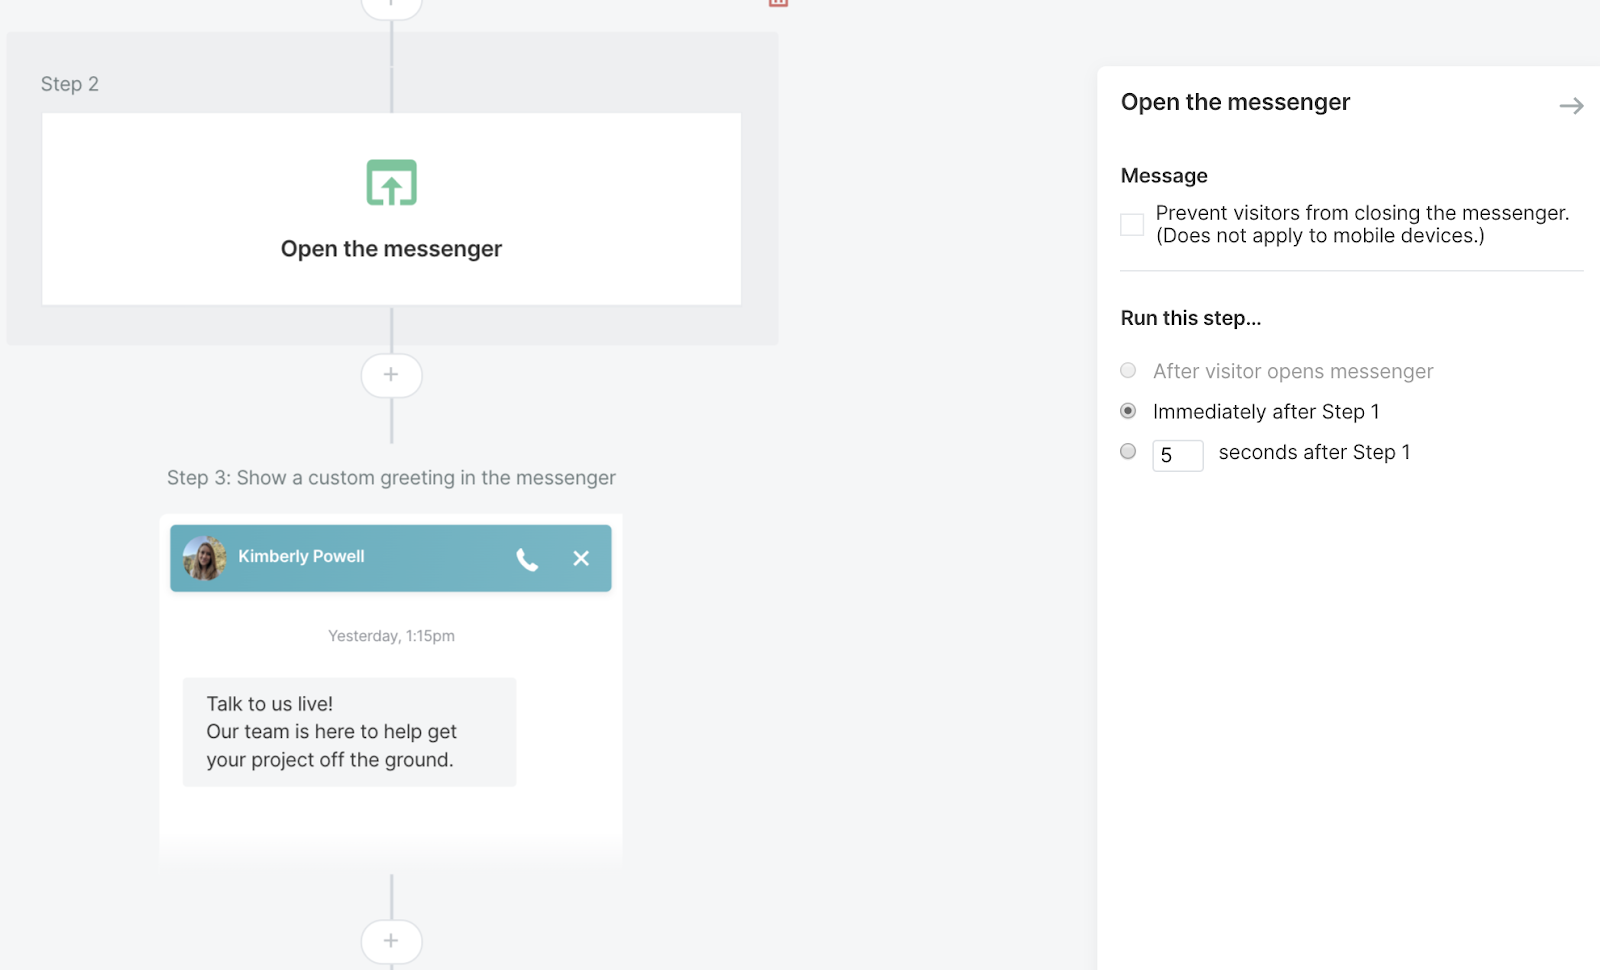
Open the Messenger
This step automatically opens the Qualified messenger for your visitors, rather than relying on them to open it up first. You can also control whether or not your visitors can close Qualified on their own. This action is great when using Qualified for conversational content.
Jump to a Step
Jumping to another step allows for you to move your visitors quickly to another part of your Experience that has previously been created.
For example, let’s say you’re using branching to take your visitors down one side of your Experience, but they need to be routed back to chat with your sales team. You can do this by adding Jump to a step, which will automatically move them where you want within the Experience.
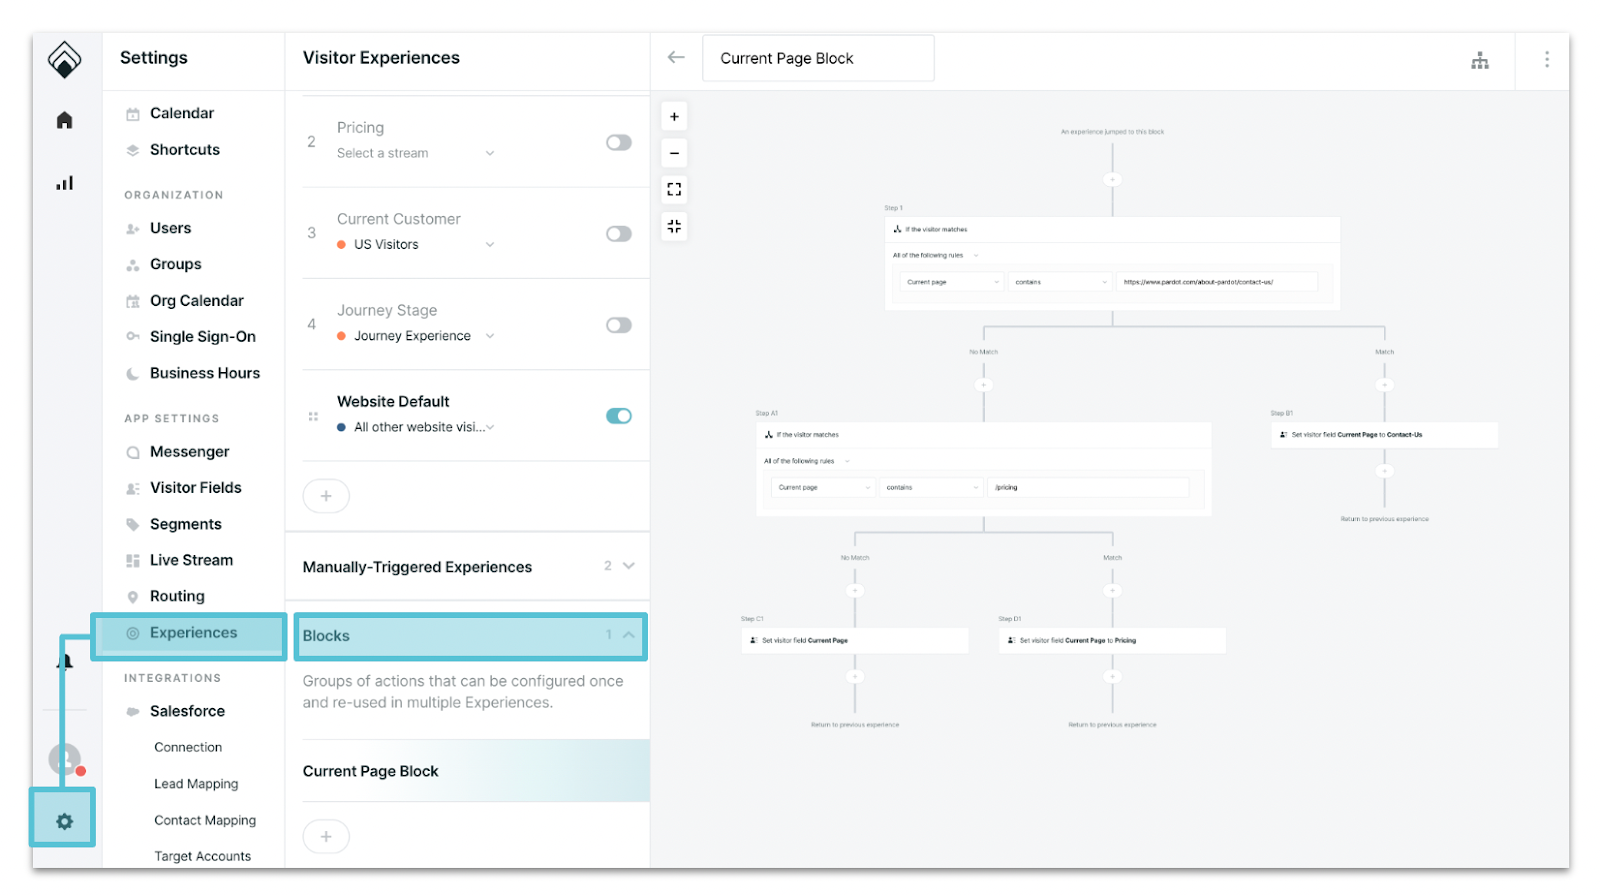
Run a Block
As you’re building Experiences, you may find yourself building the same things over and over again. Introducing Blocks. Blocks are collections of steps inside an Experience.
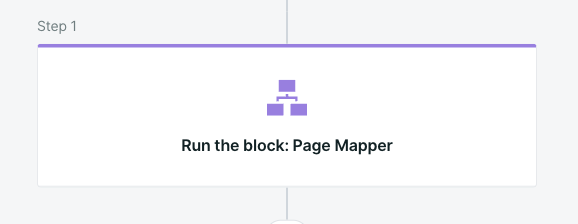
Blocks are an easy way to package together repeatable steps or actions that you want to use across a large number of Experiences. A great use for a block might be your qualification questions. Learn more about Blocks here.
Once you start managing large numbers of Experiences, blocks prove very helpful in ensuring the correct steps are triggered and they also make updating your many bespoke Experiences much easier.
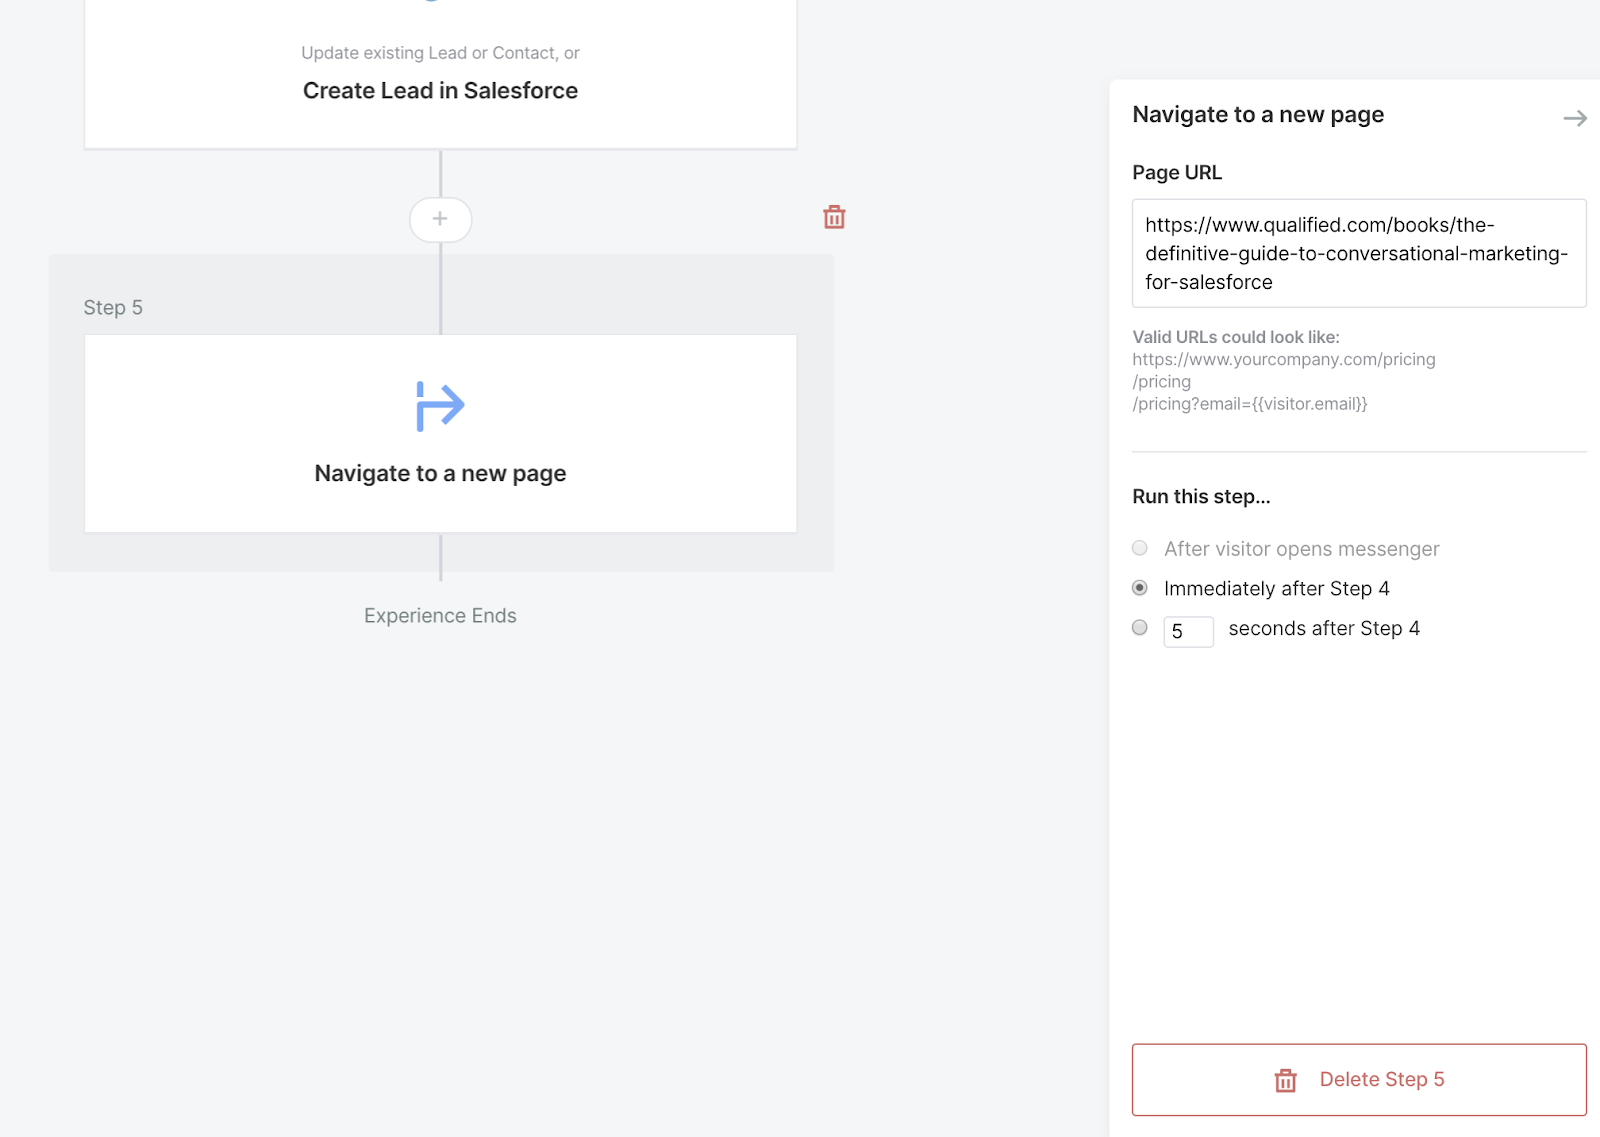
Navigate
The navigate step will automatically redirect your visitors to another URL once they hit this step. For example, use this step to navigate your visitors to gated content after collecting their email address.
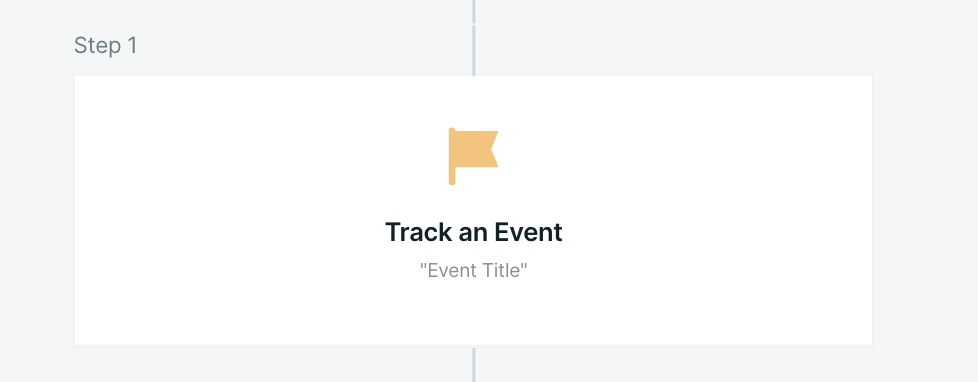
Track an Event
If you have Google Analytics or Facebook conversion tracking set up, you most likely want to track which visitors converted after interacting with your Qualified bot or a sales rep via the live chat option. You can use the 'Track an Event' step to track which visitors converted after using your Qualified.com app within your Google Analytics or Facebook conversation tracker.
Notifications actions
Alerts are only sent to reps if and when you add a Send Alert step to an Experience. If no Send Alert step is present, then there is no catalyst for text or voice notifications.
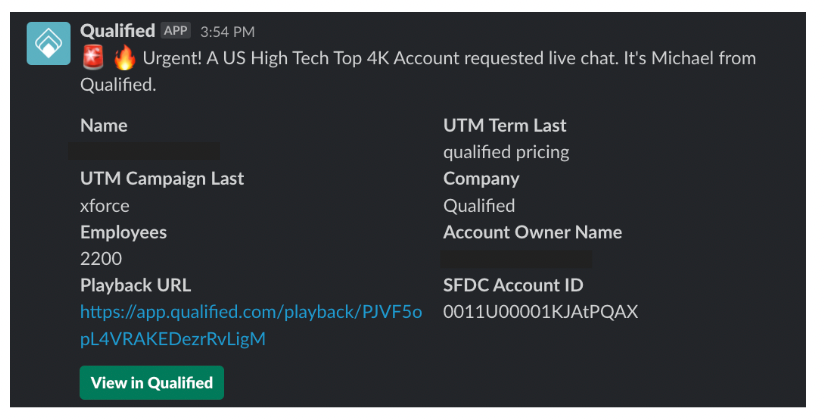
Send an app alert, Send a Microsoft Teams alert, & Send a Slack alert
As a Qualified Admin, you can trigger alerts to your reps as part of an Experience. These alerts can be triggered in the Qualified app, Slack, or Microsoft Teams.
Reps can further customize their in-app alerts including enabling or disabling voice alerts, choosing a notification sound, or configuring alerts for desktop and mobile app based on individual Live Streams.
Let's say you want to create a visitor Experience where Qualified notifies a rep when they select a specific answer to a question. Create an Experience step to send an app alert or send a Slack or Microsoft Teams alert.
Once you have selected an alert step, you can configure who (or what channel or Team) the alert is routed to and what you want the alert to say.
Send an email
Qualified sends an email to your rep, informing them that a visitor is on the site. The email is sent from "app@qualified-alerts.com" and can include all the visitor fields that you included in the Experience.
<span id="integrations"></span>
Integrations
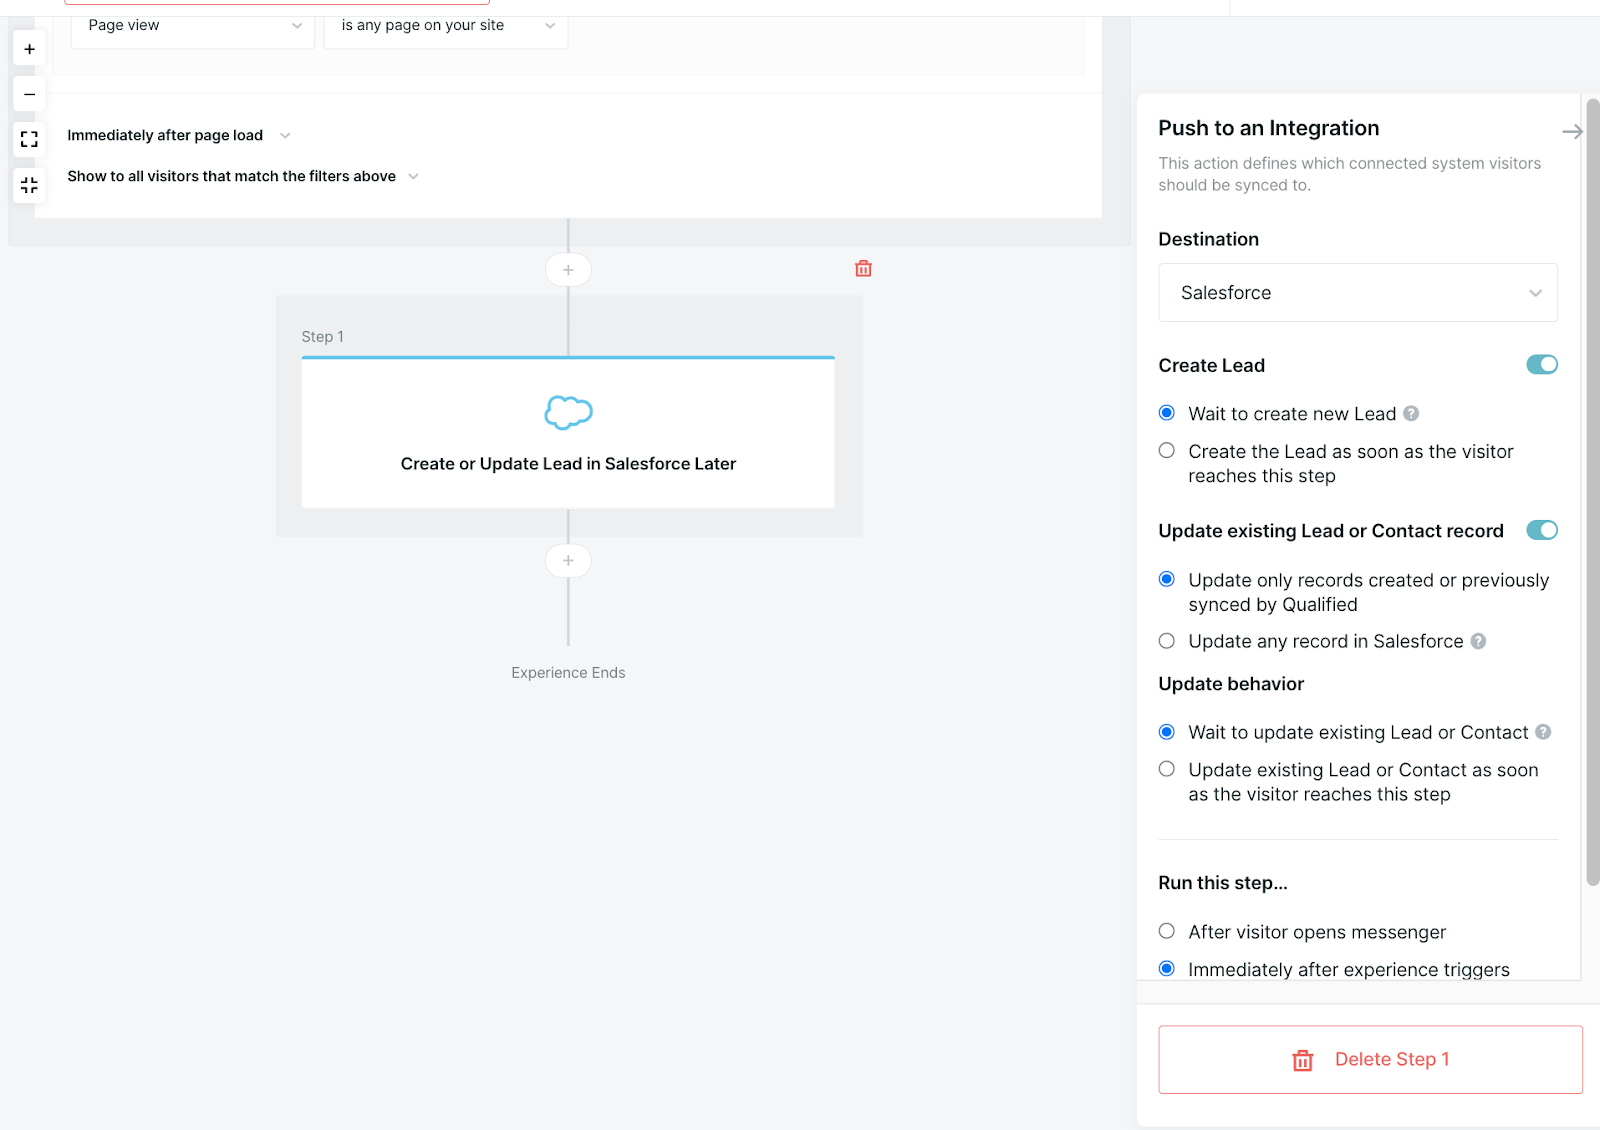
Push to an External System
Commonly referred to as a "push step," this allows you to sync data from a visitor into Salesforce or your marketing automation platform. You can choose when to create or update a lead including whether it should happen immediately or if it should happen after the visitor leaves an Experience (allowing any other data, after this push step, to be synced to your system of record).
You can also defer pushing updates to external systems until after a visitor has given all their info by selecting the appropriate setting in "Update Behavior".
Add to a Campaign
By adding this step, you can ensure that all existing Leads and Contacts and new records created will be attributed to the campaign (with the campaign member field selected, if so chosen).

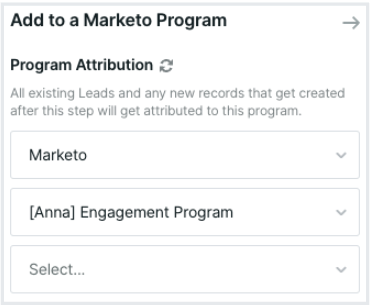
Add to a Program
If you connect to Marketo, use this step to automatically add Marketo leads to your Marketo programs.
<span id="formatting"></span>Formatting in the Experience Builder
Whether you're chatting with your visitors in live chat or styling your experiences, Qualified offers a few styles that you can use to format your text and add personality to your conversations.
Bold
To use bold text, you'll use two asterisks to identify those words as bold. For example: "This is my **very important** text." will render as: "This is my very important text."
Italics
To use italic text, you'll use one asterisk to identify those words as italicized. For example: "I *really* need to have my text italicized." will render as: "I really need to have my text italicized."

Looking to use bold and italics? Try it with three asterisks!
Centering Headers
# This symbol (the hashtag) before any text, will center the header.
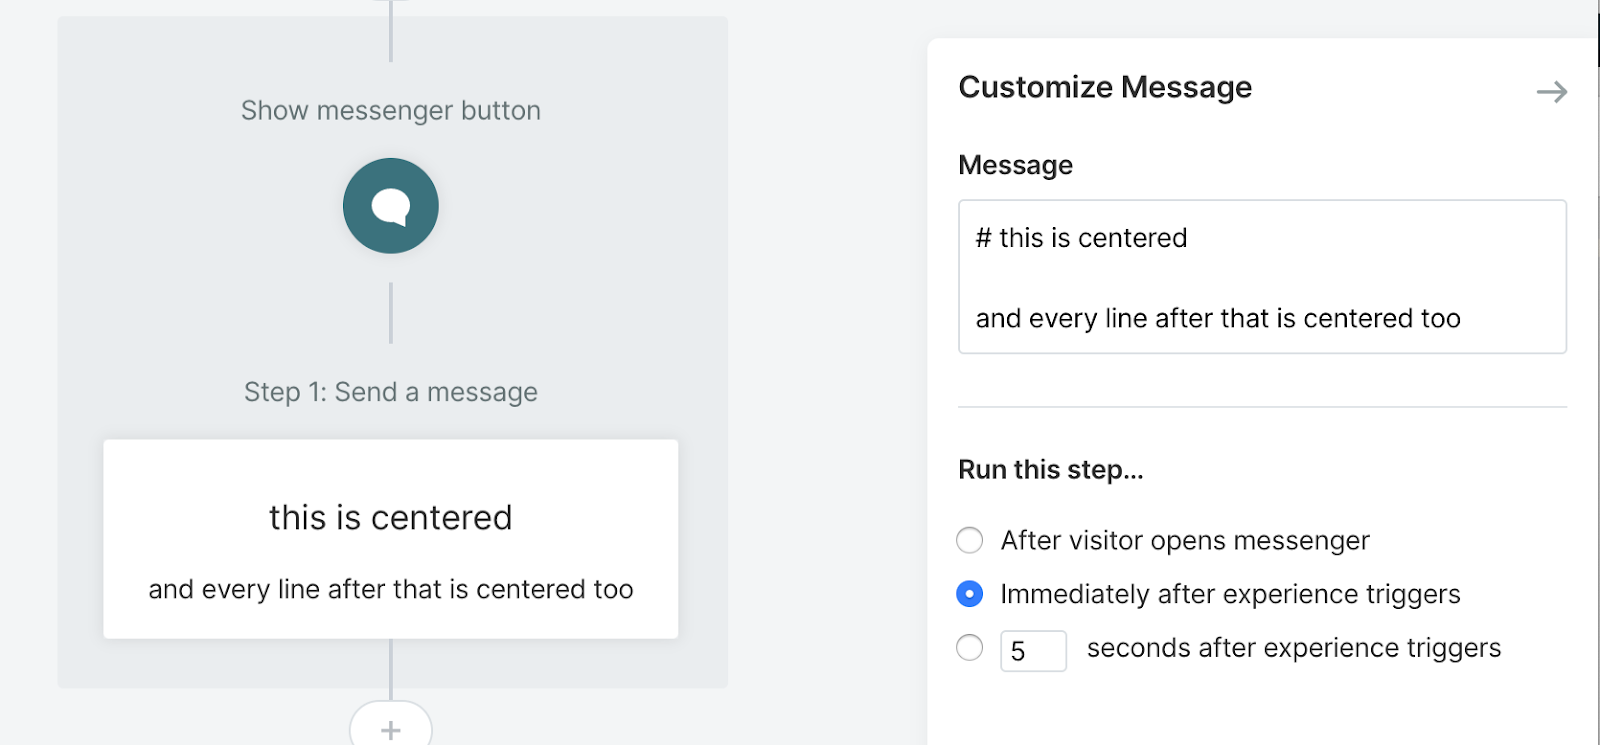
You'll want to note that this option only works for those Messages and Custom Questions that appear before your Qualified messenger is opened.
Line Break
To create a line break, just hold down the 'shift' key and press 'enter' while in your live chat window or experience.
Hyperlinks
Qualified will automatically link any URL used within the messages of your experiences. For example, if you were to copy and paste a link to https://www.qualified.com it would look something like this: https://www.qualified.com
However, sometimes, the links you would like to include in your Experience have more complicated URL strings. The problem is that these longer, more complicated looking URLs are sometimes ugly and distracting. To solve for this, we recommend using Markdown syntax and create a hyperlink.
The format for hyperlinks includes two parts: the readable text to show in the live chat messenger, and then the URL itself.
The readable text must be surrounded with brackets, followed by the URL which is surrounded by parentheses, as follows:
[readable_text](https://www.company.com)
Here is an example of creating a hyperlink with Markdown syntax:
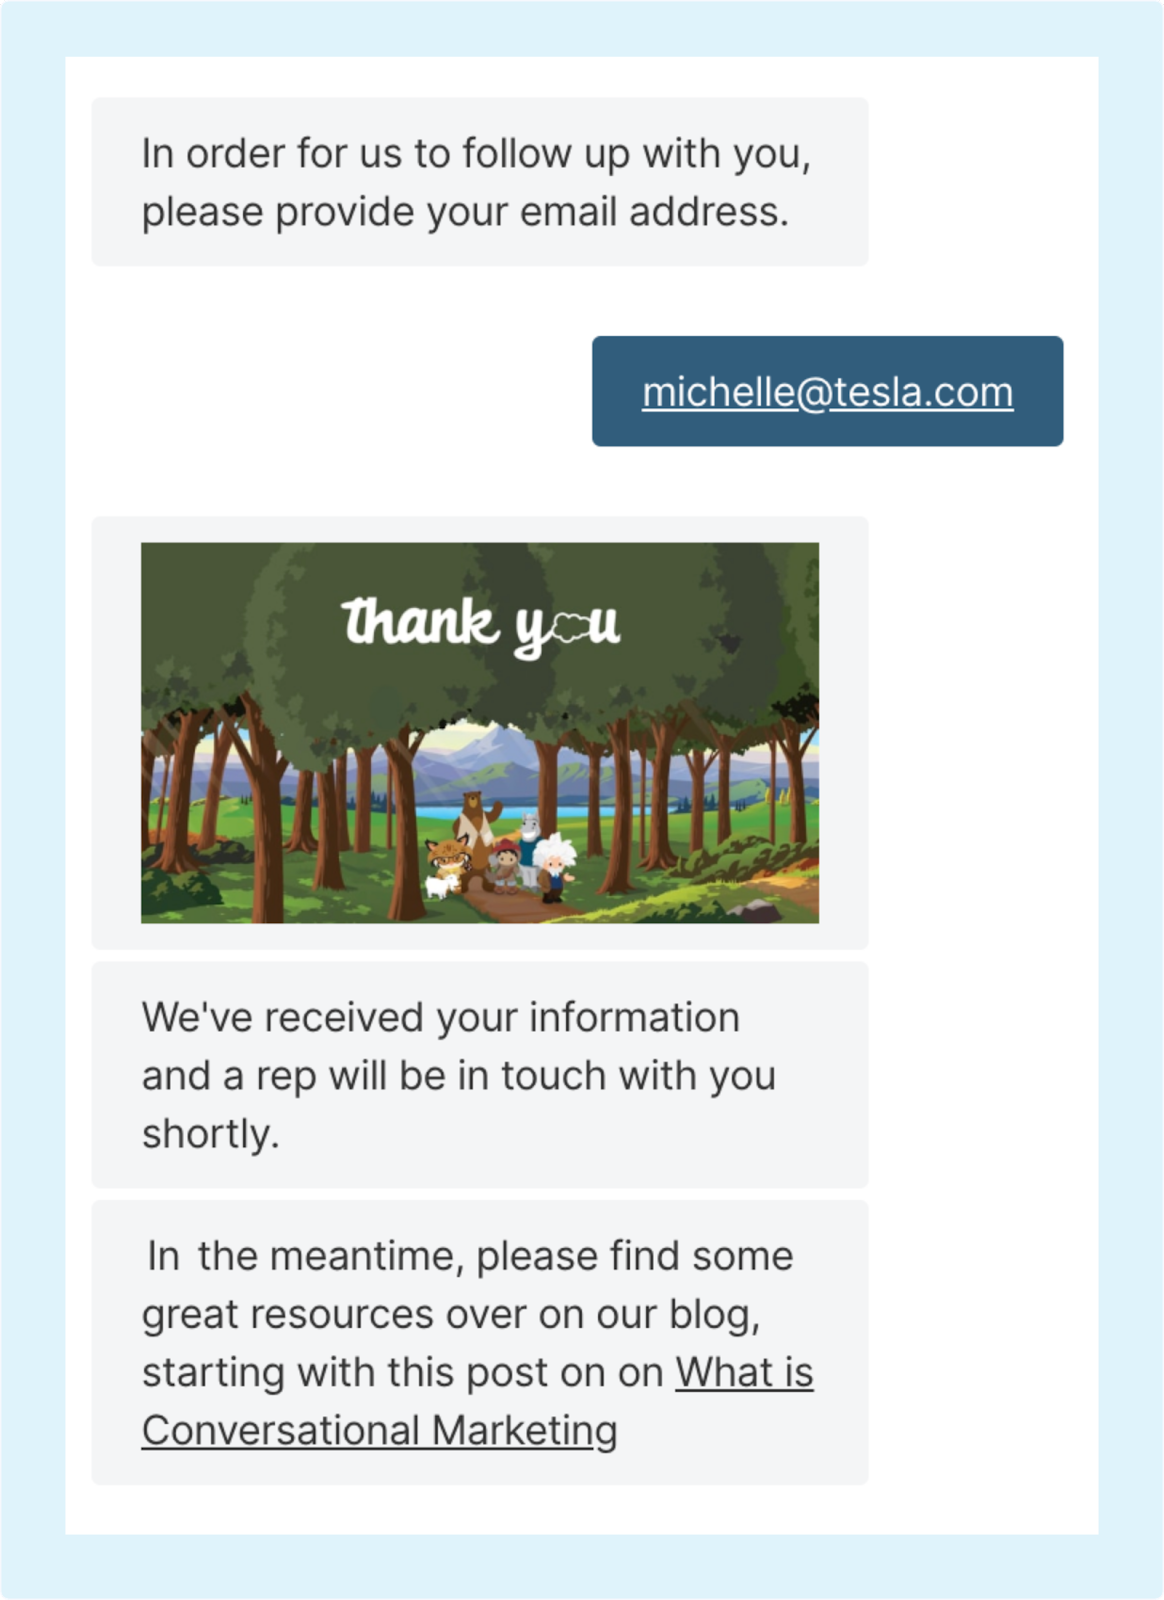
[What is Conversational Marketing](https://www.qualified.com/blog/what-is-conversational-marketing)
Placing a hyperlink formatted with Markdown syntax into the text of an Experience will format the hyperlink with the link location hidden behind the text you've chosen.
Emoji
Add 🎉 emojis 🎉 to your experience or live chat by placing your cursor where you'd like to enter an emoji.
Next, hold down the control + command + space bar keys on a Mac or press "Win + . "or Win+ on a Windows computer. Once the emoji keyboard appears, select the emoji to insert in your text.
Gifs & Images
Everyone loves a good animated GIF, and www.giphy.com is a great source for thousands of animated GIFs that you can include in any of your messages. All you need to do is to find a Giphy link that matches the format shown below, and paste the link into your messenger, shortcut, or bot experience.
https://media.giphy.com/media/[GIPHY_ID]/giphy.gif
Or, add in your own personalized GIF to customize your greeting like the one shown below:
Using Markdown for Sending Images
In addition to hyperlinks, you can use markdown syntax for sending images in the messenger. Images will only display a width of 268px so they can fit in the Qualified messenger.
The format for images includes 3 parts: (a) an exclamation point, (b) some alt text surrounded by brackets, (c) the URL to the image surrounded by parentheses, as follows:

So an example image would look like this

Placing an image using markdown will appear in the messenger, as shown below:
Using Markdown for Sending Clickable Images
In addition to sending images, you can use markdown syntax for sending clickable images in the messenger. Clickable images are great if you're sending something that you want the visitor to expand, such as an infographic.
The format includes a combination of the link format and the image formats above, and looks like this:
[](hyperlink_to_your_destination.html)
<span id="using-variable-tags"></span>
Using Variable Tags for Personalization
The Qualified Variable Tag Builder is used throughout Qualified to personalize your Experiences as well as prefill information into your visitor fields.
Variable tags are a special Qualified syntax that allow you to use data stored in a visitor field within a chatbot or Experience on your website and populate visitor fields with data arriving inbound from other systems.
Where to Use Variable Tags
You can use the variable tag builder in two main places within Qualified.
- When creating your Experiences and
- When pre-filling visitor fields from other sources.
Experience Builder Variable Tags
Using variable tags in Experiences allow you to personalize an Experience for your visitor by calling them by first name, addressing them by company name, or pulling in any other vital information you might already know about them.
To access the builder in your Experience, open an Experience and click your custom greeting or custom question step within the Experience. Next, begin to edit that step and you’ll see a blue icon appear on the right-hand side. Click on this icon to open the variable tag builder and see your options for personalization as shown below.
You can select from General fields (fields that Qualified will pull in from your URL or automatically based on IP address), Fields (visitor fields within Qualified), or external fields (information pulled in from outside sources like Salesforce, Pardot, Marketo, etc.)
Visitor Fields
Visitor fields are the fields in Qualified where you will store everything you wish to track and know about your website visitors. Visitor fields contain information you gathered from conversations with your lead, details they shared in a lead form or chatbot, or other information pulled from an external system, like Salesforce, Pardot, or Clearbit.
You can use the variable tag builder to prefill your visitor fields when setting a field within an Experience.
Fallbacks
You can use fallbacks in the variable tag builder if information doesn’t come through about the visitor. For example, if you’re setting up an Experience to greet your visitor by name, you might want to include a fallback just in case the visitor's name isn’t known yet.
To use a fallback, select the variable tag you’d like and add your fallback in the text field to the right of the tag as shown below.
<span id="block-personal-email"></span>
Blocking Personal Email Addresses
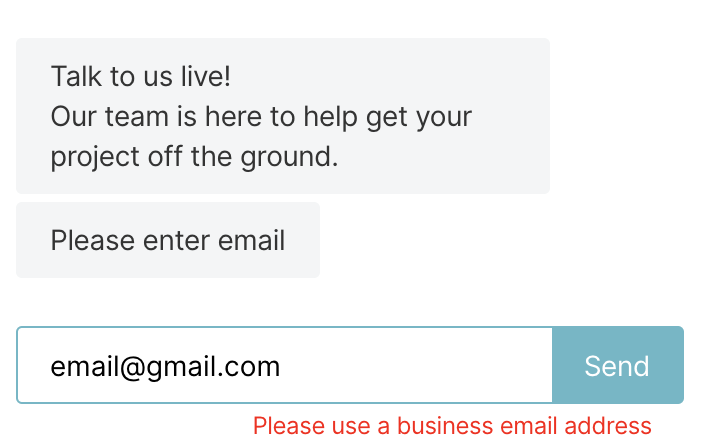
When you create experiences in Qualified, typically one of the first questions you’ll want to ask your visitors is for their email address. The email address of a visitor can tell you a lot about who the person is and where they are coming from (especially when using Clearbit Enrichment to enrich your data).
In some cases, you will only want to collect business email addresses and exclude personal addresses such as gmail.com, yahoo.com, etc. Our chatbot AI can help with that. We’ll walk you through how to block these on an experience-by-experience basis.
Getting Started
To get started, open up the experience that you’d like to edit in our Experience builder or begin creating a new one. If you’re already asking for their email address, open this node and you’ll see an option to block personal addresses which you’ll want to make sure to check.
If you’re just starting the experience, select to add a new step in your experience and select the option to ask the visitor for their email address. Once you do this, you’ll then see the option to block personal email addresses.
Email Domains Qualified Blocks
Below are the personal email domains that we'll block when this option is turned on in your experience.
Default
aol.com, att.net, comcast.net, facebook.com, gmail.com, gmx.com, googlemail.com, google.com, hotmail.com, hotmail.co.uk, mac.com, me.com, mail.com, msn.com, live.com, sbcglobal.net, verizon.net, yahoo.com, yahoo.co.uk, mailinator.com
Global
email.com, fastmail.fm, games.com /* AOL */, gmx.net, hush.com, hushmail.com, icloud.com, iname.com, inbox.com, lavabit.com, love.com /* AOL */, outlook.com, pobox.com, protonmail.ch, protonmail.com, tutanota.de, tutanota.com, tutamail.com, tuta.io, keemail.me, rocketmail.com /* Yahoo */, safemail.net, wow.com /* AOL */, ygm.com /* AOL */, ymail.com /* Yahoo */, zoho.com, yandex.com
United States
bellsouth.net, charter.net, cox.net, earthlink.net, juno.com
Britain
btinternet.com, virginmedia.com, blueyonder.co.uk, freeserve.co.uk, live.co.uk, ntlworld.com, o2.co.uk, orange.net, sky.com, talktalk.co.uk, tiscali.co.uk, virgin.net, wanadoo.co.uk, bt.com
Asia
sina.com, sina.cn, qq.com, naver.com, hanmail.net, daum.net, nate.com, yahoo.co.jp, yahoo.co.kr, yahoo.co.id, yahoo.co.in, yahoo.com.sg, yahoo.com.ph, 163.com, yeah.net, 126.com, 21cn.com, aliyun.com, foxmail.com
France
hotmail.fr, live.fr, laposte.net, yahoo.fr, wanadoo.fr, orange.fr, gmx.fr, sfr.fr, neuf.fr, free.fr
Germany
gmx.de, hotmail.de, live.de, online.de, t-online.de /* T-Mobile */, web.de, yahoo.de
Italy
libero.it, virgilio.it, hotmail.it, aol.it, tiscali.it, alice.it, live.it, yahoo.it, email.it, tin.it, poste.it, teletu.it
Russia
mail.ru, rambler.ru, yandex.ru, ya.ru, list.ru
Belgium
hotmail.be, live.be, skynet.be, voo.be, tvcablenet.be, telenet.be
Argentina
hotmail.com.ar, live.com.ar, yahoo.com.ar, fibertel.com.ar, speedy.com.ar, arnet.com.ar
Mexico
yahoo.com.mx, live.com.mx, hotmail.es, hotmail.com.mx, prodigy.net.mx
Canada
yahoo.ca, hotmail.ca, bell.net, shaw.ca, sympatico.ca, rogers.com
Brazil
yahoo.com.br, hotmail.com.br, outlook.com.br, uol.com.br, bol.com.br, terra.com.br, ig.com.br, itelefonica.com.br, r7.com, zipmail.com.br, globo.com, globomail.com, oi.com.br
What Visitors See
When a visitor tries to enter their personal email address, our chatbot AI will determine that it's a personal email address. Instead of the normal option, the visitor will instead see a message asking them to input a business address before they can continue on, as shown below.
<span id="test-automatic-experiences"></span>
Testing Automatic Experiences
It's always a good idea to test your experience from start to finish before going live on your website. To test your experience, create parameters in your experience builder and use this as a way to view your experience live on your website. Once you're done with your testing simply remove your parameter to make the experience live on your website for your visitors to see.
Add Testing Parameters
While in the experience builder, select the experience you want to test. Up at the top of the experience, find where to input parameters as shown below:

You’ll need to first click on the experience rules to see the parameter option. These parameters will be parameters that you’ll append to the end of your website to see your experience in action. For example:
http://www.qualified.com?test=version1
It doesn’t matter what parameters you add for testing as long as they are unique and not something that any visitor will come across. A few examples might be:
http://www.qualified.com?experience=test1
http://www.qualified.com?test=may8
You’ll note that in order to view your experience, you’ll need to add the parameters to the end of your URL with a ? separating your website URL and the parameters you’ve chosen.
Turn on the Experience
The last step before testing will be to make sure that your experience is turned on and active as shown below.
You’ll want to note that even though the experience is now active, it can only be seen by those who use the testing parameter set above.
Go Live
When you’re done with your testing and need to go live, simply remove your testing parameters and leave your experience switched on.
Remember that experiences trigger in order. If you don’t see your experience on your site when you go live, you might have another previous experience overriding it.
<span id="ab-testing"></span>
A/B Testing
Using A/B testing within Qualified to test your experiences is a powerful tool that can help you determine which experiences are getting you more conversations, opens, and most importantly, leads. You can use A/B testing anywhere on your site to get the most value out of each visitor interaction.
Setting Up Your Experiences
First, decide which experiences you’d like to test against each other and on which pages.
We recommend starting somewhere that is high traffic, like your homepage so that you can get the best results possible. You’ll also want to keep in mind that you can only test two experiences against each other at this time.
To get started, create the two experiences in Qualified that you’d like to test. A few things you can try testing might be:
- Custom greetings
- Adding imagery to your greetings/messages
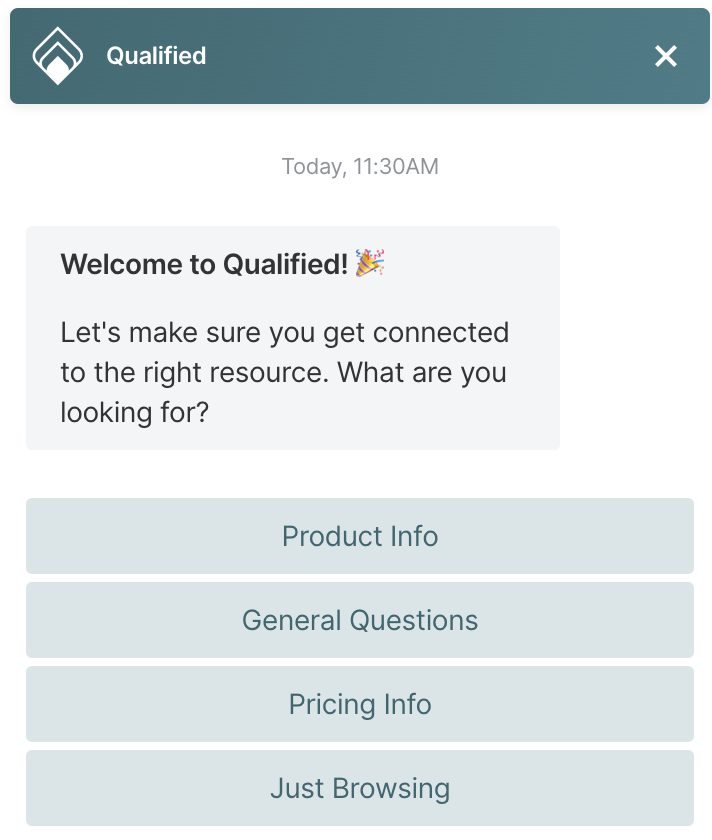
- Different options for branching in your greeting such as the one below (image)
Once your experiences are fully created, you’ll want to edit each one and select whether they are part of test group A or B.

If you do not see this filter in your Automatic Experiences, reach out to your Qualified Success Architect or help@qualified.com to turn on this feature in your account.
The final step you’ll want to complete is labeling your experiences with the group you’ve selected by naming it, such as "Experience Test (Group A)" and "Experience Test (Group B)." This will come in handy when looking at the results in your dashboard later on.
Results
As visitors come to your site, Qualified will automatically separate them into group A or B, ensuring that each experience gets 50% of the visitors coming to the site.
To determine the winner, let your A/B test run at least a few days (or a few weeks depending on your website traffic). Once your A/B test has been running for a while, check your dashboard to determine which experience is getting the most opens and generating the most leads for your team.

<span id="multilingual-experiences"></span>
Configuring Multilingual Experiences
If you have multiple marketing websites across different countries or continents, you most likely also have those websites in the native language of their visitors. Using the multi-language feature within Qualified allows you to create experiences specific to those websites and languages.
Getting Started
To get started, you’ll want to first take note of which languages you’ll need to create experiences for. By default, all Qualified experiences are in English and we support the following languages listed below:
- Czech
- Danish
- Dutch
- English
- Finnish
- French
- French (Canada)
- German
- Indonesian
- Italian
- Japanese
- Korean
- Norweigan
- Polish
- Portuguese (Brazil)
- Russian
- Spanish
- Spanish (Latin America)
- Simplified Chinese (Mandarin)
- Swedish
- Thai
- Traditional Chinese (Cantonese)
- Turkish
- Vietnamese
Once you’ve taken note of each language that you need, create your experience in your default language and save it. After you’ve created your base experience, use the duplicate experience option on the very top right of your screen to create an exact copy.
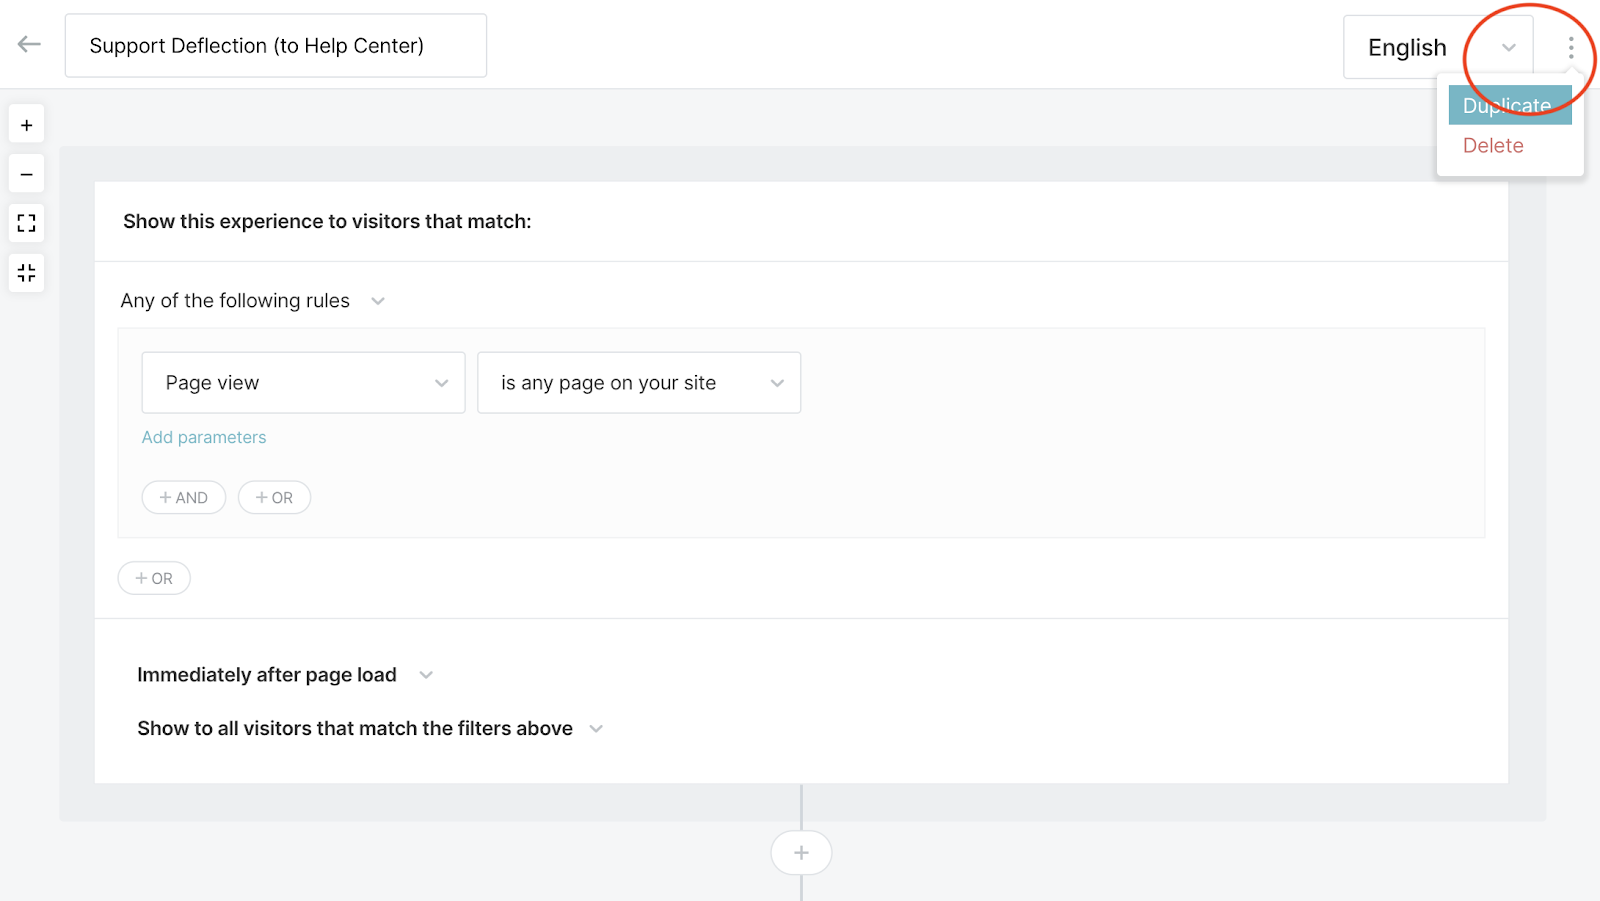
The copy of your experience will appear immediately after you’ve created it on your screen and will be deactivated by default appearing at the bottom of your list of experiences. Duplicate your base experience for each language that you use on your marketing sites.
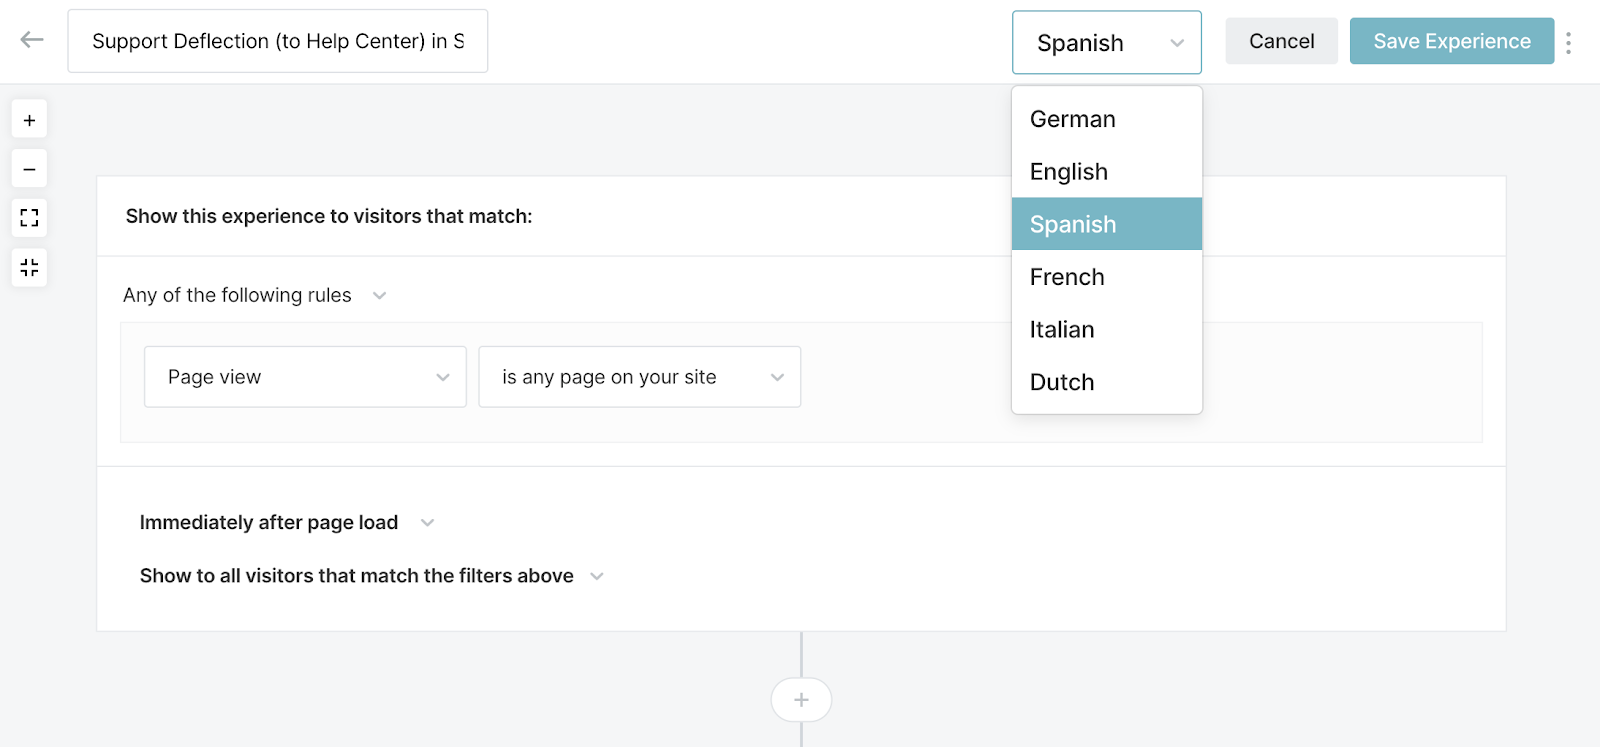
Selecting Your Language
Next, select the first language that you need your experience to be in at the top right of your screen. What you’re doing now is creating duplicates of your base experience in each language that you’ll need it to be in for your different language websites.
For example, if you have a website specifically designed for Spanish speakers you’ll want to select the Spanish language and save your experience with a name that labels it as such.
After you’ve saved your copy you can now start the translation process. You might have an internal employee that can provide the copy of each translation in your experience or you can use Google Translate to do the work for you.
What Qualified Translates
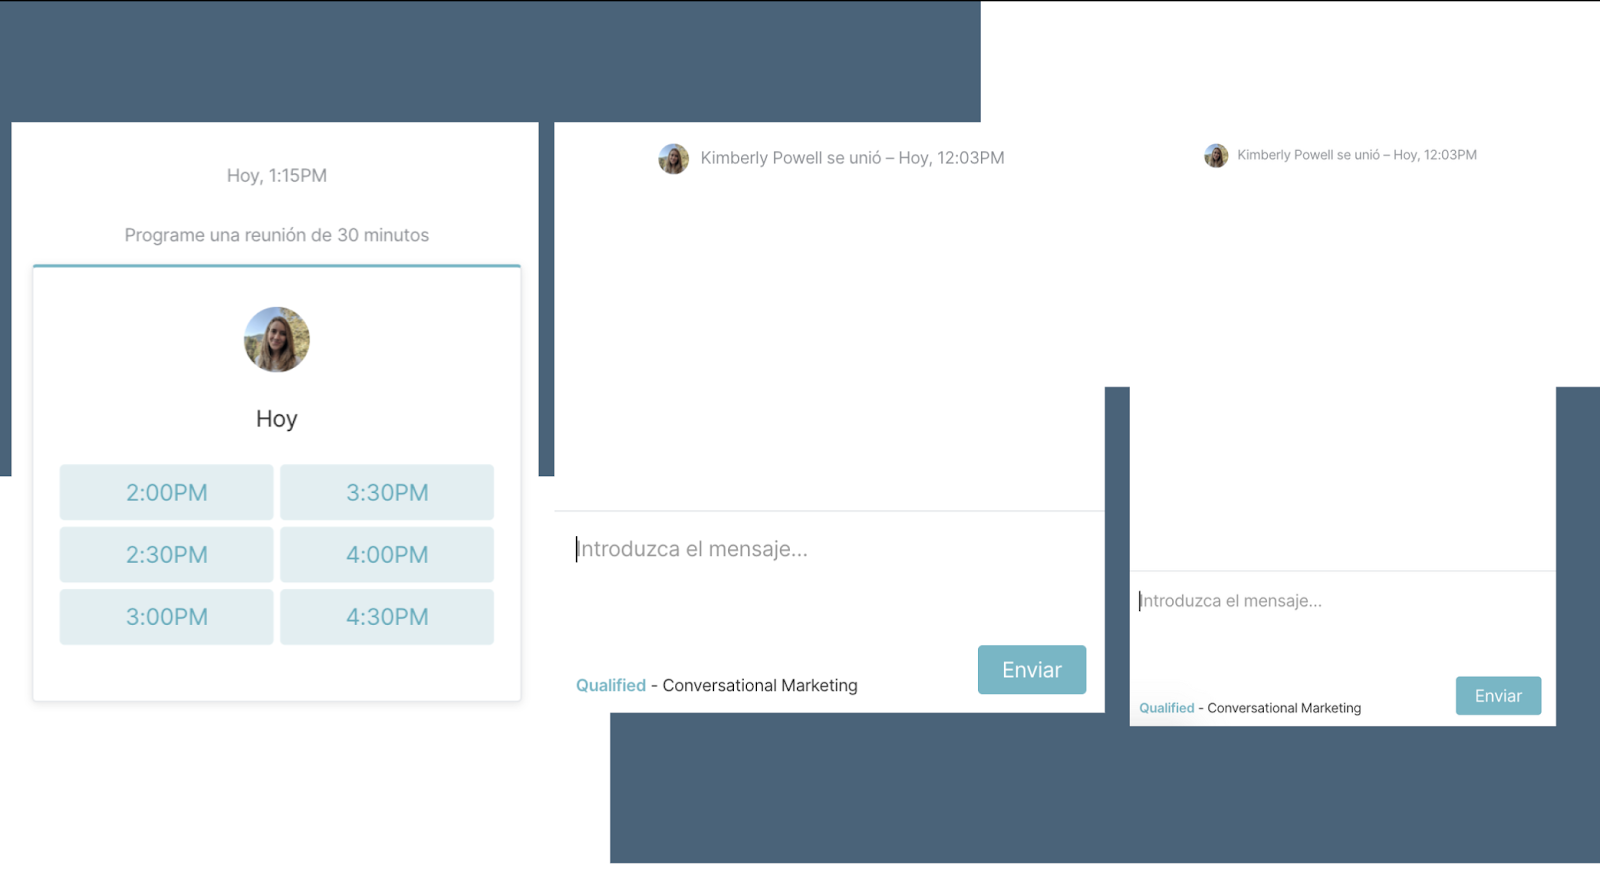
Qualified translates all buttons, alerts, errors, and system messages from Qualified including:
- Messenger buttons
- Meeting booker dates and instructions
- Chat prompts that show when a rep has entered and started a chat
At this time, Qualified does not translate the text you enter in experiences, such as the messenger greeting.
Customize the translations of the Messenger’s privacy disclosure for different languages under Messenger settings. Learn more here.
You'll want to take note that the Qualified app itself is not translated and will remain in English.
Heading 1
Heading 2
Heading 3
Heading 4
Heading 5
Heading 6
Lorem ipsum dolor sit amet, consectetur adipiscing elit, sed do eiusmod tempor incididunt ut labore et dolore magna aliqua. Ut enim ad minim veniam, quis nostrud exercitation ullamco laboris nisi ut aliquip ex ea commodo consequat. Duis aute irure dolor in reprehenderit in voluptate velit esse cillum dolore eu fugiat nulla pariatur.
Lorem ipsum dolor sit amet, consectetur adipiscing elit, sed do eiusmod tempor incididunt ut labore et dolore magna aliqua. Ut enim ad minim veniam, quis nostrud exercitation ullamco laboris nisi ut aliquip ex ea commodo consequat. Duis aute irure dolor in reprehenderit in voluptate velit esse cillum dolore eu fugiat nulla pariatur.
Lorem ipsum dolor sit amet, consectetur adipiscing elit, sed do eiusmod tempor incididunt ut labore et dolore magna aliqua. Ut enim ad minim veniam, quis nostrud exercitation ullamco laboris nisi ut aliquip ex ea commodo consequat. Duis aute irure dolor in reprehenderit in voluptate velit esse cillum dolore eu fugiat nulla pariatur.

Block quote
Ordered list
- Item 1
- asdfasdf
- asdfasdf
- asdfasdf
- Item 2
- Item 3
Unordered list
- Item A
- Item B
- Item C
Bold text
Emphasis
Superscript
Subscript
|
|---|
|


.svg)


