
Conversations Strategies
Qualified Conversations is the next generation of conversational sales and marketing for modern revenue teams. Here are the top plays to put into practice so you can start driving more pipeline than ever before.
- The 1-2 Punch for Sales & Marketing
- The Homepage Tour Guide
- The Pricing Page Expert
- The ABM Red Carpet
- The Open Opportunity Fast Lane
- The Form Companion
- The Boomerang
- The Resource Concierge
- The Smart Button
- Leveraging a Support Handoff
<span id="1-2-punch"></span>
The 1-2 Punch for Sales & Marketing
Learn how to configure the 1-2 Punch for Sales or the 1-2 Punch for Marketing as part of the Qualified Conversations playbook.
Valuable buyers are inundated with outbound emails every single day. For sales reps, it’s tough to break through the noise; so if their Outreach or Salesloft email is opened and clicked, that’s a hard-earned prize. But what happens next? Sales reps have no idea when a buyer is on the site. It’s a total black box. Rather than attaching a static PDF, include unique links in each email to drive traffic back to your site. This is the 1-2 Punch for Sales.
To execute the 1-2 Punch, you'll first want to configure Qualified for Outbound by connecting Qualified Conversations with your sales engagement tool of choice. Once connected, you'll be able to leverage sequence or cadence information to trigger a specific experience, place a visitor in a specific segment or live stream, or trigger a particular alert when that visitor arrive on the site.
Want to see it in action? Check it out in the video above!
But what about the 1-2 Punch for Marketing?
Similar to the 1-2 Punch for Sales, the 1-2 Punch for Marketing focuses on paid advertising. Every marketer knows paid ads are one of the most common ways to reach target audiences and drive inbound traffic; but tracking pipeline attribution and measuring ROI can be a challenge. If a buyer clicks through an ad and arrives on the site, what happens? Typically, we ask them to fill out a form, then send them on their way.
Instead, greet buyers from a paid ad campaign the moment they arrive. Using UTM parameters, sales reps can know exactly which ad was clicked that brought them to the site. They can then engage buyers with a custom message to shape a contextual conversation and book a meeting on the spot; turning them into instant pipeline and maximizing your ad spend.
To use the 1-2 Punch for Marketing, work with your Qualified Success Architect to enable UTM parameters in your Qualified instance. Once enabled, you'll be able to leverage that data to create custom segments, experiences and more. You'll also be able to see the ad below the visitor live view; showcasing exactly how they arrived to your website and giving your sales reps enough information to have a proactive and mind-blowing pounce.
<span id="homepage"></span>
The Homepage Tour Guide
Learn how to build the Homepage Tour Guide, an experience that serves as the entry point for your unknown website visitors.
The homepage is the anchor for your entire website and likely the most frequented page. With so much traffic on this priority page, it’s important to cut through the noise and find your most valuable visitors.
Ideally, you'll have some identifying information to quickly qualify them and personalize the buying experience. But what happens if visitors are unknown? How do you capture pipeline that may otherwise go unnoticed?
The Homepage Tour Guide serves as an entry point for your unknown website visitors.
Where to Use It
Use this strategy to surface your highest performing offers, like “request a demo” or “download our ebook,” and help visitors navigate around the site. Once they’re engaged, you can ask qualifying questions to gather more information, capture more leads in Salesforce, and get more buyers into a sales cycle.
How to Build It
Curious how to build the Homepage Tour Guide in the Qualified Experience Builder? Check out the video above!
<span id="pricing"></span>
The Pricing Page Expert
Learn how to build the Pricing Page Expert experience, instantly notifying your team when a visitor is on the pricing page.
Once a buyer is sold on your product and its benefits, their next step is almost always the pricing page. This is a critical point in the buying journey where high-intent buyers are looking to understand packaging, pricing structure, and whether they can justify the cost.
In the B2B world, pricing can be a bit nebulous and may warrant a conversation with a pricing expert. However, this can deter buyers. They don’t want to contact sales, they want a straight answer right then and there. If they can’t get the information they need, they’re going to bounce.
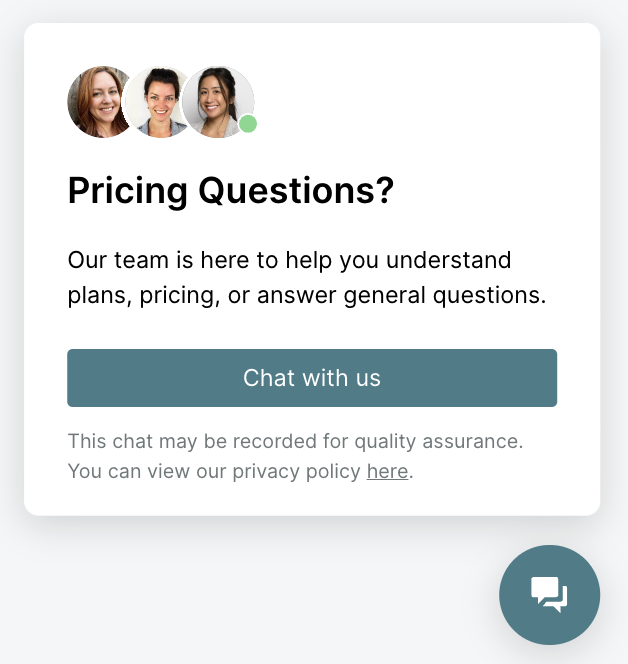
The Pricing Page Expert instantly notifies your team when a visitor is on the pricing page. If they meet your qualification criteria, sales reps can quickly jump into a conversation to answer questions in real-time. Alternatively, this Experience can also identify which visitors are not qualified, helping your sales reps focus on the right buyers in the right moment. Once they’re chatting with VIPs, sales reps can understand what matters most in a contract. After that, the business is theirs to win.
Curious about how to build it?
First, create an experience triggers based on the current page showing your pricing page.
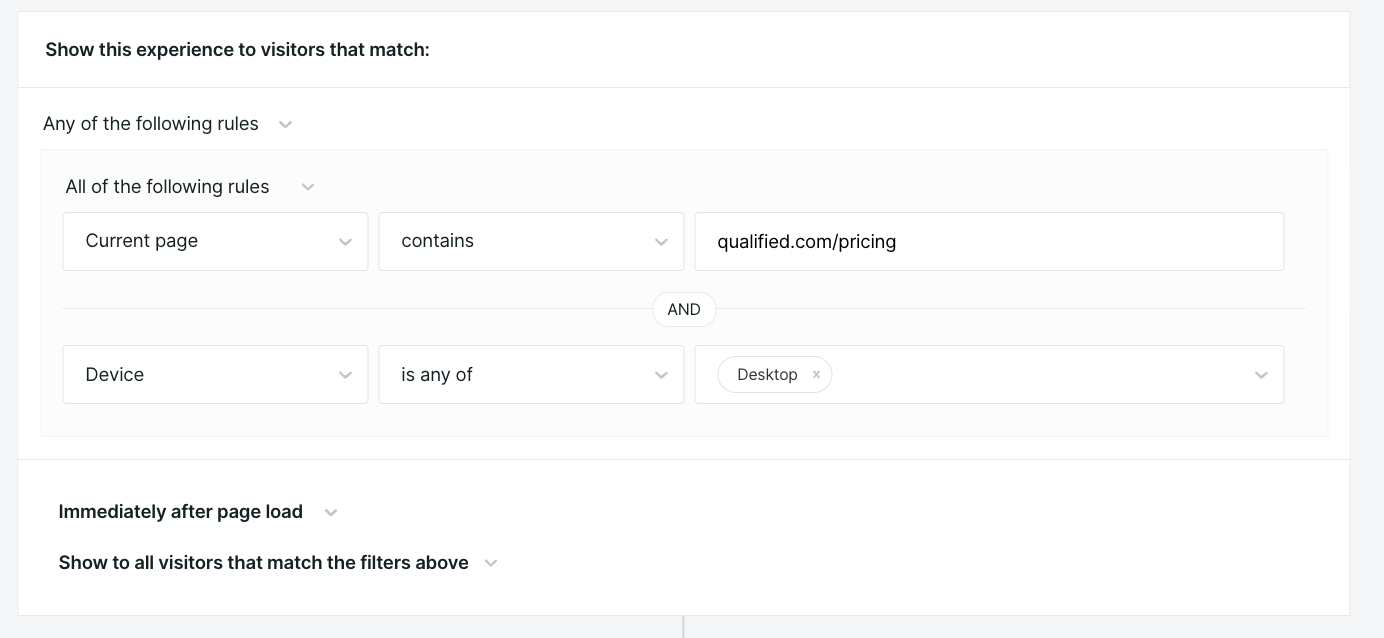
Then, create a custom greeting referencing the fact that they are on your pricing page and might have questions about your pricing, packages or other offerings.
Next, we recommend asking the visitor for their email to enrich the Qualified Visitor 360 and learn more information about whether this visitor is Qualified or not. And then, select a Route for Inbound step - creating a branch for live chat and for the Qualified Meeting Booker.
And that's it! You've got the beginnings of a pricing page experience!
<span id="abm"></span>
The ABM Red Carpet
Learn how to build the ABM Red Carpet and notify your account teams when your target account arrives on the site.
Account-Based Marketing (ABM) focuses your revenue teams on target accounts that meet your ideal customer profile. It’s proven to increase pipeline and revenue, but it requires a highly orchestrated effort across all your touchpoints—from ads to landing pages. With such a significant investment, it’s crucial to meet buyers during "the last mile" of the lead conversion journey on your site. Otherwise, you’re missing out on hard-earned pipeline.
With the ABM Red Carpet, your dedicated account teams are immediately notified when a buyer from a target account arrives. They can welcome them to the site, answer questions in real time, and even book the next meeting before they depart. This strategy delivers a memorable, VIP buying experience for your most prized accounts and turns your ABM strategy into a lead generation machine.
Curious how to build the ABM Red Carpet? Watch this video above, where one of our Qualified Success Architects builds the experience live and talks through just how simple it can be!
<span id="open-opportunity"></span>
The Open Opportunity Fast Lane
Learn how to build the Open Opportunity Fastlane and keep your deal momentum going!
Your revenue teams work hard to capture leads and convert them into Opportunities, but we all know it doesn’t stop there. Opportunities must be nurtured and ultimately turned into revenue. Yet, throughout a sales cycle, there can be hurdles: deals pause, contacts go dark, and sales reps lose momentum. All the while, buyers from an account with an open Opportunity may be actively browsing your site, but your sales reps have no idea.
The Open Opportunity Fastlane is a game-changing strategy that keeps deal momentum going. When a known visitor linked to an open Opportunity arrives on the site, it’s time to pull out all the stops. Immediately route them to the Opportunity owner, who can then capitalize on that “magic moment” when their interest is heightened and instantly start a productive sales conversation. This keeps deals moving forward and closes more business, faster.
So, where should I use this?
Use this experience across your website for all contacts associated with an open opportunity. Remember, routing is key. Route the conversation to the Opportunity owner so they can have contextual, productive sales conversations.
And what's the business impact?
Your Account Executives and sales team get connected immediately with contacts that are in their pipeline, and improve their chances of progressing their deals through the sales cycle.
And -- how exactly do I build this?
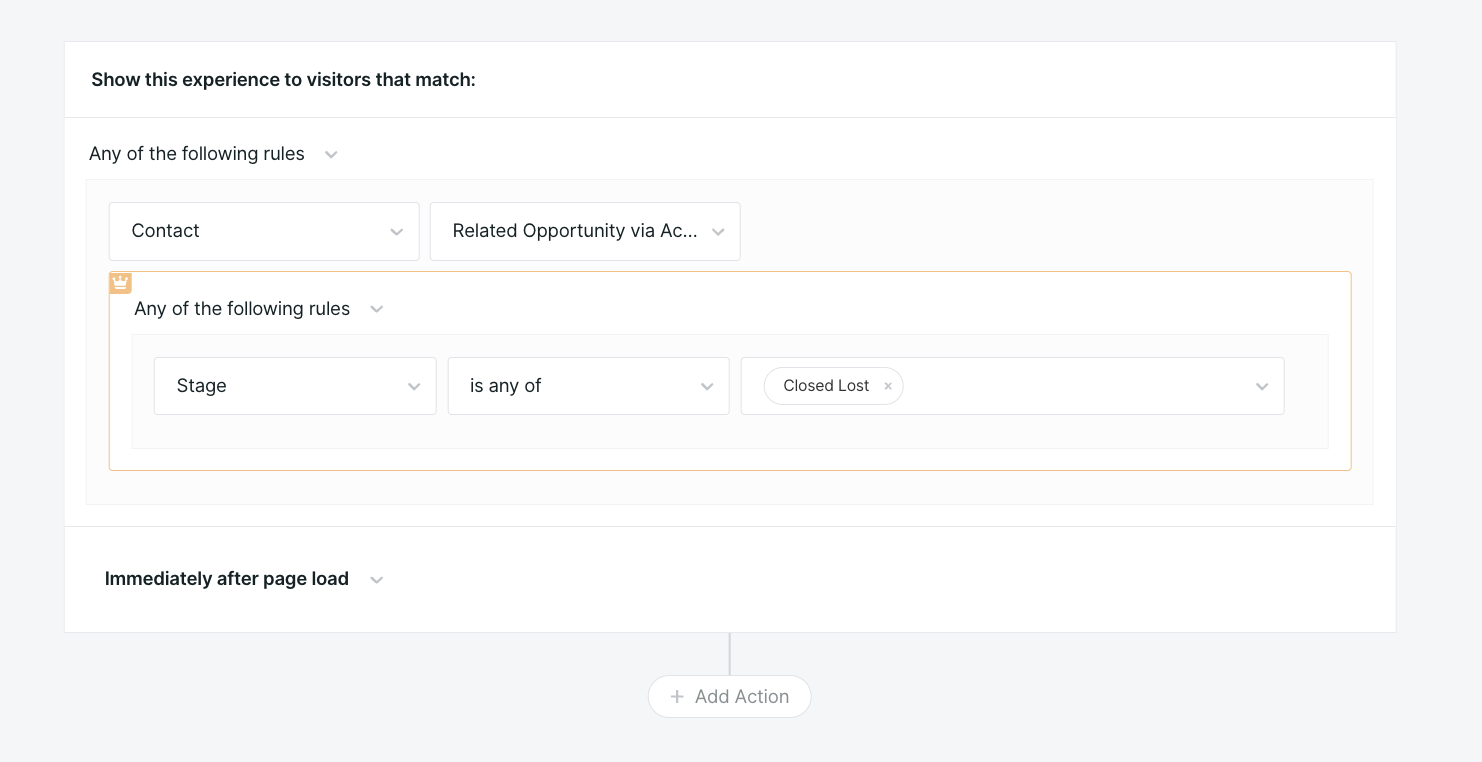
To build the Open Opportunity Fastlane, you'll want to start by creating a trigger that focuses on open opportunities. In Qualified, you'll build this experience trigger by selecting the Contact, then the related Opportunity via Account and then selecting the appropriate stages as seen below.
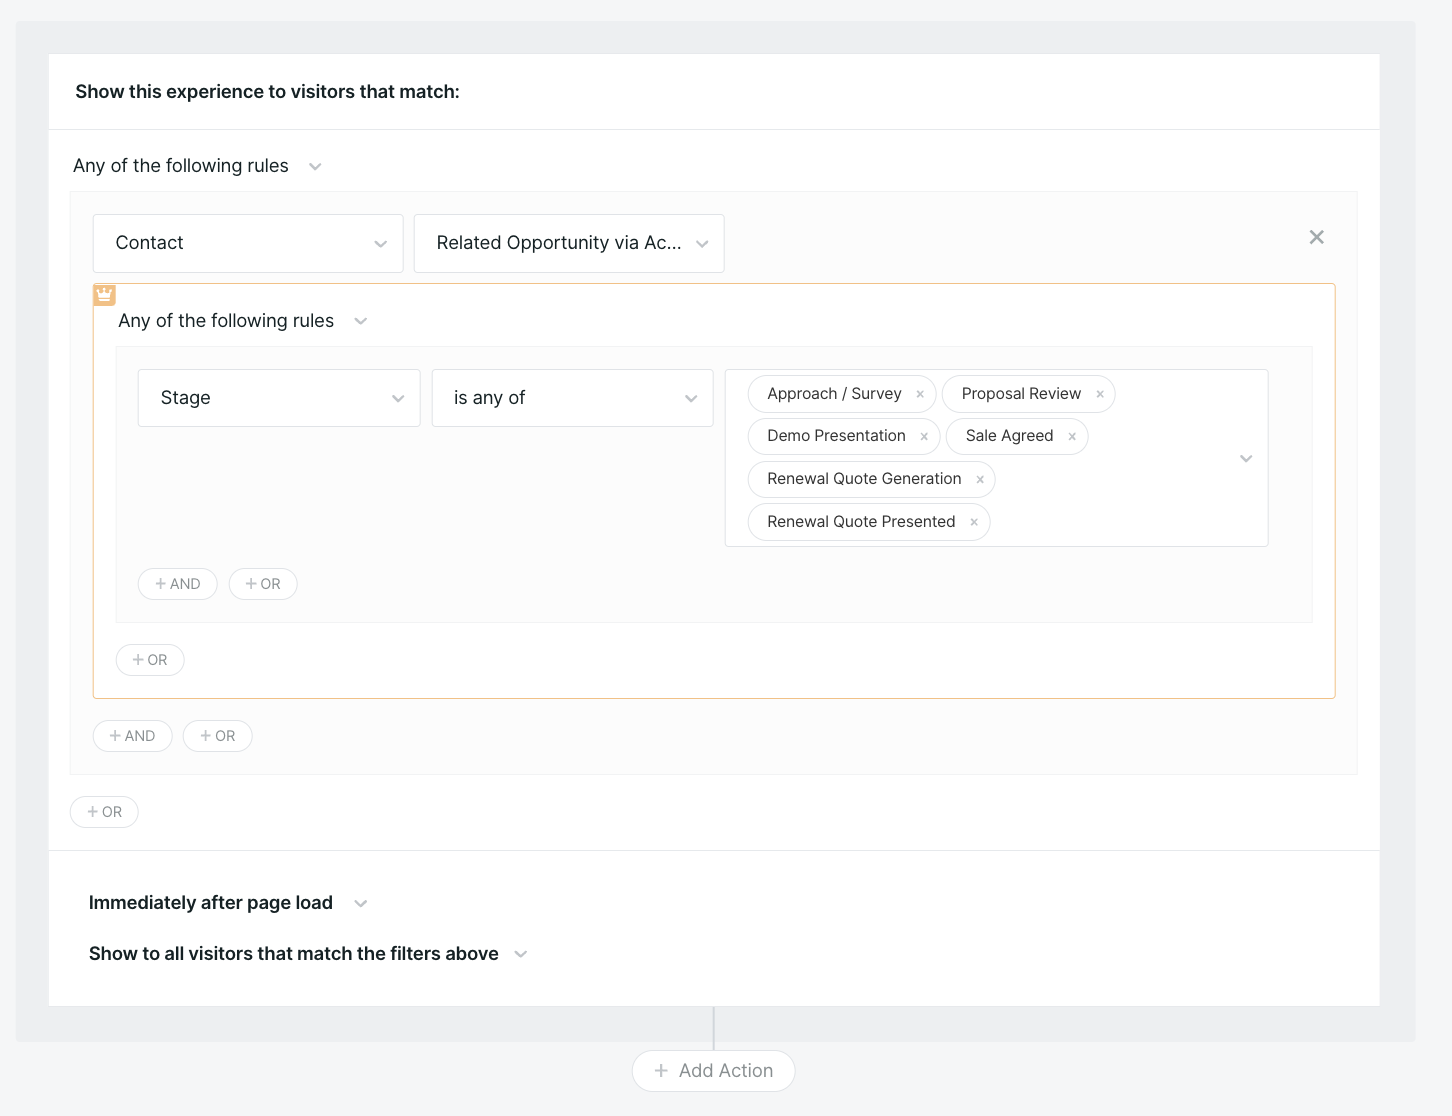
Once you've created the trigger, you can add alert steps such as app alerts, Slack or Microsoft teams alerts, provide the visitor with a personalized greeting by using a variable tag such as # **Welcome {{visitor.first_name | "to Our Company}}!** and then provide personalized and helpful content that might move the deal forward.
One potential trick could be referencing the account owner field on the opportunity (=visitor.company.external_fields.salesforce_account.owner#name) so that the experience greets the decision-maker by name and asks them if they'd like to be routed to their specific rep.
For example, your experience greeting could look something like:
"Hey Mike! Thanks for checking us out. Want to connect with your sales rep, Tony? Chat with him below, now!
And THAT'S how you create an Open Opportunity Fastlane that provides website visitors with the perfect VIP experience.
<span id="form-companion"></span>
The Form Companion
Learn how to build the Form Companion experience to give qualified buyers a chance to skip the line and help them connect with a sales rep in real time.
The world around us has changed, technology has changed, and B2B buyer expectations have changed, but the traditional pipeline generation process has remained untouched. For years, marketers have spent time and money driving traffic to the website then relied on form fills to generate leads. This strategy often results in asynchronous sales cycles that are slow and inefficient. Why not meet qualified buyers right on the website when they’re most interested in learning more?
If you’re uneasy about ditching forms altogether, then this play is for you. The Form Companion presents a Qualified Experience alongside your most popular forms, like "Contact Sales" or "Request a Demo." This gives your buyers the option to either submit the form or engage with a sales rep in real-time. Once you see the impact of real-time conversations, you can expand to other forms or landing pages across your site. With this play, you can fast-track qualified website visitors to instant sales meetings and watch your pipeline skyrocket.
Where should I use it?
Present this experience alongside your most popular forms, like your "Contact Sales" or "Request a Demo" forms. Then expand to other forms or landing pages as your team sees the impact of real-time conversations.
What's the Business Impact?
What if your sales team could have real-time conversations with your most qualified website visitors when they're knocking at your door and ready to talk to you? By using the Form Companion on your website, you will capture more leads, book more meetings, and maximize website conversions.
How exactly can I build this?
This experience relies on a few critical experience building best practices:
- First, invite visitors to join a live conversation. Let them know that they can either "jump the line" and talk to a specialist live or answer a few questions to help us give them a more personalized experience.
- Then, you'll rely on the "Ask a Question" experience node heavily. You can ask for a business email address so you can enrich the visitor's profile with data from third-party systems and find information such as company size, to help you quickly qualify that visitor.
- The more questions you ask, the more likely that visitor will drop off. You can see this visually happen in Qualified's Conversation Flow Analytics. To help minimize the chance of losing that visitor, make sure to check the box "Skip question if previously populated." This allows you to provide them with a custom "form companion" experience that acknowledges the information that we already know about the visitor from previous form fills, data enrichment tools or more.
- Then, once you've qualified the Lead, offer them the Qualified Meeting Booker and give them the opportunity to schedule time with a rep. Be sure to also use experience steps such as alerts to encourage your reps to pounce and have a real-life conversation with them. Just remember -- if a rep pounces, the Qualified experience will end and it's up to the rep to gather their email, answer qualification questions and book a meeting.
<span id="boomerang"></span>
The Boomerang
Learn how to use the Boomerang to catch buyers from closed/lost opportunities and revive sales conversations in real time.
Sales is not for the faint of heart. As a critical piece of the revenue engine, it can be full of highs and lows; even the most seasoned sellers lose a deal every so often. But just because a deal is lost, doesn’t mean it’s gone for good. Whether it’s buyer’s remorse or renewed interest, your sales reps should know when a closed/lost account is back on the site so they can jump in and deliver a supreme buying experience.
With the Boomerang, you can trigger a Qualified Experience that greets known buyers from a closed/lost Opportunity on the site. Then, instantly alert the account owner so they can engage them in a real-time conversation that references the previous sales cycle, provides helpful resources, and restarts the conversation. This is the buying experience that will blow away the competition and help your sales reps crush their quota.
But how do I build this?
First, create an experience with a trigger focused on Opportunities whose stage is "Closed Lost" (or your businesses stage naming convention).
Once configured, build a custom experience referencing the fact that this visitor may have engaged with your team in the past, but that it might now be time to re-engage. You'll want to ensure you have alerts configured in the Experience Builder to ensure your sales reps are aware that this visitor is "boomerang-ing" back and should receive a custom pounce. You'll also want to ensure you have a number of shortcuts built so your reps can provide them helpful resources that restart the conversation.
And then, you're off! That's the Boomerang!
<span id="resource-concierge"></span>
The Resource Concierge
Learn how to build an experience that recommends helpful content on your site and accelerates the buyer's journey down the funnel.
When top-of-funnel buyers arrive on your website, they may not know what they’re looking for or how to find it. Maybe they attended a recent webinar or saw a paid ad in their Google search results. Either way, they’re on your site to learn more, so don’t just leave them to their own devices. Instead, capitalize on their interest and help them navigate around the site to ensure they get the information they need before they’re gone for good.
The Resource Concierge welcomes visitors to the site and serves up relevant content— like customer stories, whitepapers, or guides. Once engaged, you can nurture the conversation, ask some qualifying questions, and book a sales meeting with qualified buyers right on the spot. This accelerates their journey down the funnel and dials up your pipeline generation.
So how do I build The Resource Concierge?
To build this experience, we highly recommend leveraging two types of experience steps: branching and custom picklist questions. By leveraging these two steps, you can learn more about your buyer, provide them with options and eventually either serve them up information (as a message) or navigate them to a new page (two OTHER experience steps you should familiarize yourself with).
To build the experience concierge, you'll want to leverage conversational content like our customer Thoughtspot. They leveraged markdown language in a custom greeting with a number of CTA buttons to provide (normally) gated content to their customers and provide them with relevant resources.
Another example of the experience concierge is our customer Jellyvision. They've created individual experiences for each of their top 10 performing blog posts that recommends either a product page, another blog post or to chat with a rep live; based on the visitor and the attributes known about the visitor from the Visitor 360.
Looking for more tips?
Our team has worked with hundreds of customers on implementing conversational content into their Qualified experiences. Connect with your Qualified Success Architect for more ideas or to learn more best practices on providing relevant resources to your customers today.
<span id="smart-button"></span>
The Smart Button
Learn how to build a smart button experience, changing your CTA from static to bespoke!
Every marketer knows the value of a call-to-action (CTA)—like “Contact Us” or “Request a Demo.” Peppering these buttons across your site prompts visitors to reach out for more information and kick-starts the sales cycle. Historically, these CTAs lead to static forms loaded with fields asking for personal information; but this creates friction for buyers. They don’t want to fill out forms, they want answers. The result: low conversion rates.
The Smart Button changes your CTAs from a static one-size-fits-all form to a bespoke buying experience. When visitors meet your ideal customer profile, trigger a real-time sales conversation with your sales team to open the door to a dynamic two-way conversation. This gets buyer questions answered in real-time and helps your sales teams instantly capture more pipeline.
Where should I use it?
Use this experience across your website when website visitors meet you qualification criteria. Serve up a button that says "Talk to Sales" or "Schedule a Meeting" when visitors match your ideal customer profile. This button will trigger either a live conversation or a chatbot experience, depending on what makes sense for your business.
What's the Business Impact?
The smart button increases your likeliness of capturing leads and opens the doors to more sales conversations. It dynamically opens up your messenger, increasing your likeliness of engagement.
How exactly can I build this?
Smart buttons can be built using Smart Button experience or Manual experiences. From a high-level, you'll want to target a specific call to action button on your website (for example: Contact Us / Book a Demo). To get started, setup a Smart Button experience (recommended!) or a Manual experience.
But first, a few examples of how leading companies are using Qualified smart buttons:
- To Show and Hide a Smart button based on qualification
- To present different experiences based on qualification
- To drive inbound calls.
Curious about building a smart button today? Check out our University and reach out to your Qualified Success Architect who can help share even more best practices.
<span id="support-handoff"></span>
Leveraging a Support Handoff
Qualified and its client-side API can be used for programmatic support hand-offs. When used and configured properly, your prospects will continue to receive a best-in-class buying experience using Qualified while existing customers will experience a seamless handoff to your support chat tool of choice.
This article provides examples of leveraging the client-side API to create a more programmatic hand-off between Qualified and common support tools. Please note: support handoffs are not a supported feature of the Pipeline Cloud platform. The below code are for example only. Please work with your web team to troubleshoot custom code.
Examples
First, see below for an example of how you can use Qualified’s API response to populate the pre-chat form in Salesforce’s LiveAgent:
<style type='text/css'>
.embeddedServiceHelpButton .helpButton .uiButton {
background-color: #606FF0;
font-family: "Georgia", sans-serif;
}
.embeddedServiceHelpButton .helpButton .uiButton:focus {
outline: 1px solid #606FF0;
}
</style>
<input type="hidden" name="liveagent.prechat:CaseStatus" value="New" />
<script type='text/javascript' src='https://service.force.com/embeddedservice/5.0/esw.min.js'></script>
<script type='text/javascript'>
var initESW = function(gslbBaseURL) {
embedded_svc.settings.displayHelpButton = true; //Or false
embedded_svc.settings.language = ''; //For example, enter 'en' or 'en-US'
embedded_svc.settings.storageDomain = 'YOURDOMAIN.com'; //(Sets the domain for your deployment so that visitors can navigate subdomains during a chat session)
// Providing context to an Agent using Service Cloud Chat from information gathered by Qualified requires using Prechat Forms and Prechat Form Details
// For an in-depth walkthrough on using Prechat and extra Prechat, see: https://help.salesforce.com/s/articleView?id=000383795&type=1
// If you have built a dedicated component or page for your Prechat form (not shown in this example), see: https://developer.salesforce.com/docs/atlas.en-us.live_agent_dev.meta/live_agent_dev/live_agent_creating_records_prechat.htm
qualified('getIdentity', function(visitorInfo) {
console.log("Here is the information from the Qualified getIdentity API call: " + visitorInfo);
// Sets the auto-population of pre-chat form fields that exist in our LiveAgent prechat form
embedded_svc.settings.prepopulatedPrechatFields = {
FirstName: "SampleFirstName", // example prefilled field
LastName: "SampleLastName",
Email: visitorInfo.field_values['email'], // example value pulled from Qualified's getIdentity result. Be sure to check the 'email' example matches the respective API field name in your Qualified Visitor Fields
Subject: "Sample prefilled subject"
};
// These Settings are used to find the appropriate fields where mapped values are placed.
embedded_svc.settings.extraPrechatInfo = [{
"entityName": "Contact",
"showOnCreate": true,
"linkToEntityName": "Case",
"linkToEntityField": "ContactId",
"saveToTranscript": "Contact",
"entityFieldMaps": [
{ "isExactMatch": true, "fieldName": "FirstName", "doCreate": true, "doFind": true, "label": "First Name" },
{ "isExactMatch": true, "fieldName": "LastName", "doCreate": true, "doFind": true, "label": "Last Name" },
{ "isExactMatch": true, "fieldName": "Email", "doCreate": true, "doFind": true, "label": "Email" }
]
},
{
"entityName": "Case",
"showOnCreate": true,
"entityFieldMaps": [
{ "isExactMatch": false, "fieldName": "Subject", "doCreate": true, "doFind": false, "label": "Subject" },
{ "isExactMatch": false, "fieldName": "Description", "doCreate": true, "doFind": false, "label": "Description" },
{ "isExactMatch": false, "fieldName": "Status", "doCreate": true, "doFind": false, "label": "Status" },
{ "isExactMatch": false, "fieldName": "CaseCategory", "doCreate": true, "doFind": false, "label": "Case Category" }
]
}
];
// This section provide data to Salesforce and the Agent without requiring direct inputs from the visitor on the Prechat Form
// The label names must match the Field Label in the Salesforce Object exactly
// These values will overwrite whatever is provided in the prepopulated Chat Fields (seen above) as well as the values populated by the visitor in the prechat form
embedded_svc.settings.extraPrechatFormDetails = [{
"label": "Email",
"value": visitorInfo.field_values['email'],
"displayToAgent": true
}, {
"label": "Subject",
"value": "Sample subject - overridden!",
"displayToAgent": true
}, {
"label": "Description",
"value": "Description of the issue passed in by Qualified.",
"displayToAgent": true
}, {
"label": "Case Category",
"value": "Messenger",
"displayToAgent": true
}, {
"label": "Status",
"value": "Completed",
"displayToAgent": false
}];
});
embedded_svc.settings.enabledFeatures = ['LiveAgent'];
embedded_svc.settings.entryFeature = 'LiveAgent';
embedded_svc.init(
'https://XXXXXXXX.my.salesforce.com',
'https://XXXXXXXX.my.site.com/XXXXXXXX',
gslbBaseURL,
'XXXXXXXX',
'XXXXXXXX', {
baseLiveAgentContentURL: 'https://c.la5-c1cs-ia5.salesforceliveagent.com/content',
deploymentId: 'XXXXXXXX',
buttonId: 'XXXXXXXX',
baseLiveAgentURL: 'https://XXXXXXXX.salesforceliveagent.com/chat',
eswLiveAgentDevName: 'XXXXXXXX',
isOfflineSupportEnabled: true
}
);
};
if (!window.embedded_svc) {
var s = document.createElement('script');
s.setAttribute('src', 'https://XXXXXXXX.my.salesforce.com/embeddedservice/5.0/esw.min.js');
s.onload = function() {
initESW(null);
};
document.body.appendChild(s);
} else {
initESW('https://service.force.com');
}
</script>In this code, we make the Qualified API call getIdentity to retrieve data about the visitor. The response provides the data that you have made available from your Qualified instance. Not seeing a value that you expect? Make sure you have it turned on in your Qualified Visitor Field configuration!
Next, we use the extracted data to populate the relevant fields in the Embedded Service Chat pre-chat form fields (embedded_svc.settings.prepopulatedPrechatFields). The values in this section there will be displayed to the visitor in the LiveAgent Prechat Form.
Then, we provide hidden fields to the Embedded Service Chat to any of the objects that we've located and related to this visitor (e.g. the Contact, Case, Account, etc.) using the Prechat Form Details (embedded_svc.settings.extraPrechatFormDetails).
Note: This method works if you are using the native Embedded Service Chat PreChat Form. If you have built your own PreChat form that you're using to collect visitor information before talking to an Agent, the related Salesforce documentation can be found here.
Example 2
Here’s an example of how you can use Qualified’s API response to update an Intercom user’s name using Intercom’s Javascript API:
// First, make the Qualified API call to retrieve data about the visitor
 qualified(‘getIdentity’, function(data) {
// Extract the relevant fields from the response data
  const name = data.field_values.name;
// Set up the Intercom settings object with your app ID and user data
  const intercomSettings = {
    app_id: ‘YOUR_APP_ID’,
    name: name,
    email: data.field_values.email,
    phone: data.field_values.phone,
    custom_attributes: {
      issue: data.field_values.issue,
      tier: data.field_values.tier
    }
  };
// Use the Intercom ‘boot’ method to initialize the Intercom Messenger
  Intercom(‘boot’, intercomSettings);
// Use the Intercom ‘update’ method to update the user’s name
  Intercom(‘update’, { name: name });
});
Much like in the example above, we first make the initial Qualified API call.
Next, we set up the intercomSettings object with your Intercom app ID and the extracted user data. This object is passed to the Intercom(‘boot’, intercomSettings) method to initialize the Intercom Messenger.
Finally, we use the Intercom(‘update’, { name: name }) method to update the user’s name in Intercom. Note that you’ll need to ensure that the Intercom Javascript API is properly loaded and accessible in your code.
The code provided above should be used as an example only. Due to the unique requirements of each business, Qualified is unable to support troubleshooting of custom support-handoffs leveraging this API call.
Heading 1
Heading 2
Heading 3
Heading 4
Heading 5
Heading 6
Lorem ipsum dolor sit amet, consectetur adipiscing elit, sed do eiusmod tempor incididunt ut labore et dolore magna aliqua. Ut enim ad minim veniam, quis nostrud exercitation ullamco laboris nisi ut aliquip ex ea commodo consequat. Duis aute irure dolor in reprehenderit in voluptate velit esse cillum dolore eu fugiat nulla pariatur.
Lorem ipsum dolor sit amet, consectetur adipiscing elit, sed do eiusmod tempor incididunt ut labore et dolore magna aliqua. Ut enim ad minim veniam, quis nostrud exercitation ullamco laboris nisi ut aliquip ex ea commodo consequat. Duis aute irure dolor in reprehenderit in voluptate velit esse cillum dolore eu fugiat nulla pariatur.
Lorem ipsum dolor sit amet, consectetur adipiscing elit, sed do eiusmod tempor incididunt ut labore et dolore magna aliqua. Ut enim ad minim veniam, quis nostrud exercitation ullamco laboris nisi ut aliquip ex ea commodo consequat. Duis aute irure dolor in reprehenderit in voluptate velit esse cillum dolore eu fugiat nulla pariatur.

Block quote
Ordered list
- Item 1
- asdfasdf
- asdfasdf
- asdfasdf
- Item 2
- Item 3
Unordered list
- Item A
- Item B
- Item C
Bold text
Emphasis
Superscript
Subscript
|
|---|
|


.svg)


