
Campaign Influence Reports & Dashboard
Campaign influence allows you to gain more insight into which marketing efforts contributed to closing opportunities. It allows for you to associate an opportunity to multiple marketing campaigns and weigh the revenue of the opportunity to each marketing campaign separately.
- Setting up Campaign Influence in Salesforce
- Campaign Influence 1.0 vs. Custom Campaign Influence
- Campaign Influence Reports to Create
- Creating a Campaign Influence Dashboard
<span id="setting-up"></span>
Setting up Campaign Influence in Salesforce
Before setting up campaign influence, you’ll want to have a good understanding of campaign attribution and have your campaigns set up in Salesforce and Qualified.
As a prerequisite to using campaign influence, you’ll also want to be using these Salesforce objects to track your marketing efforts and opportunities within Salesforce:
- Salesforce leads
- Salesforce opportunities
- Salesforce contact roles in opportunities
- Salesforce campaigns and parent campaigns (optional)
- Pardot campaigns (optional if using Pardot)
To get started, we’ll first need to start by configuring campaign influence in Salesforce, if it’s not done already.
If you use Pardot, you’ll want to make sure to first turn on Connected Campaigns to enable you to report on Pardot campaigns within Salesforce.
In Salesforce:
- Click on Setup.
- Enter Campaign Influence in the Quick Find box.
- Click Campaign Influence Settings.
- On the page, select Enabled.
- Click on Save.
<span id="1.0-vs-custom"></span>
Campaign Influence 1.0 vs. Custom Campaign Influence
When you begin to set up campaign influence in Salesforce, you’ll have a choice to make between Campaign Influence 1.0 and Custom Campaign Influence models.
Campaign Influence 1.0 is an out-of-the-box solution that gives 100% of the credit to the campaign first associated with an opportunity. It allows you to auto-associate your campaigns to opportunities and is easy to set up.
In contrast, Custom Campaign Influence allows you to split the revenue of your opportunity and weigh each marketing campaign against that revenue depending on the level of influence each campaign has.
For example, let’s say you choose to enable Custom Campaign Influence. You might have a few campaigns going on at one time: email, campaign, marketing events, and sponsored dinners where you get one-on-one time with your prospects.
You wouldn’t necessarily want your email campaigns to have the same weight as your sponsored dinner. Campaign influence custom models allow you to weigh those campaigns differently rather than having them all equally balanced.
Campaign Influence 1.0
Once you’ve enabled Campaign Influence 1.0 you’ll then want to set up your auto-association settings.
This is where you can define a number of days for a time frame or other filtering criteria that must be met before a campaign can be auto-associated to an opportunity. You might also choose to leave this blank so that all campaigns will be automatically associated with your opportunities.
When finished, you’ll see that out of the box 100% of the credit goes to the campaign first associated with an opportunity.
Custom Campaign Influence
Within Custom Campaign Influence you can choose from three different models:
- First-touch: focusing credit (opportunity revenue) on the campaign (touch point) that moved prospects through the awareness stage.
- Last-touch: focusing credit (opportunity revenue) to the campaign (touch point) that moved prospects through the consideration/negotiation stage.
- Even Distribution: giving equal credit to all the campaigns (touch points) that a prospect interacted with during the buying cycle.
With Customizable Campaign Influence, you define the weights for the first-touch campaign, last-touch, or stick to an even distribution model (all campaigns have equal percentage influence). Use any of the models that you’d like or even any combination fo them together.
Keep in mind that Salesforce uses two date fields to determine first and last touch for all models listed above.
- First touch: Salesforce will look at when the campaign member was created to decide which campaign was a contact’s first touch with your business.
- Last touch: Salesforce will look at the campaign members' last modified date to decide which campaign the contact interacted with before the opportunity's status became closed won.
<span id="reports"></span>
Campaign Influence Reports to Create
There are several reports you can create in Salesforce to help you see the value of your Qualified experiences. In this article, we’ll walk you through creating three reports in Salesforce to help track the impact of your Qualified experiences:
- Qualified campaigns with leads
- Qualified influenced opportunities
- Qualified influenced ABM opportunities
Getting Started
In order to build your own Qualified dashboards in Salesforce, you must use Salesforce Campaign Influence. Salesforce Campaign Influence allows you to associate an opportunity with multiple campaigns, rather than tracking individual leads.
To create any report in Salesforce about Qualfied's influence:
- Set up campaign attribution within Qualified and configure Campaign Influence in Salesforce.
- Create a campaign in Salesforce that tracks engagement with your Qualified app.
- Verify that your Qualified experiences are being attributed to your Salesforce campaign by going to Integrations→ Salesforce → Lead Mapping. Your Salesforce campaign should be listed here.
If you use Pardot and Salesforce, we strongly recommend using Pardot Connected Campaigns
Qualified Campaigns with Leads
Build a report that shows how many leads come from Qualified and influenced your campaign. (When you later create your Qualified dashboard, this will help you see a clear view of how many leads have come in via Qualified that are currently associated with a campaign.)
Create a new report in Salesforce and select “Campaigns with Leads and Converted Lead Information” as your report option. This will include current and recently converted leads.
From here, add a few filters to make sure you’re looking at your Qualified campaign specifically.
Finally, add a chart if you'd like to the report to see the visual representation of Leads and name your report "Qualified.com Campaigns with Leads."
We recommend the following settings:
Filters:
- Show me: All Campaigns
- Filter by: Campaign name contains Qualified.com
Groups (in this order):
- Campaign Name
- Lead Created by Date (We suggest additionally grouping this by calendar week or month)
Additional columns:
- Name
- Title
- Company
- Opportunity Name
- Opportunity Amount
- Owner
Qualified Influenced Opportunities
Once you have Campaign Attribution set up and working within your Salesforce account, you should start to see activity in your campaigns as leads come into your site and interact with your Qualified app. If you’ve followed our previous instructions, you’ll now have a Campaign called Qualified and you might even have child campaigns for each Qualified Experience that you’re running, but this isn’t a requirement.
.png)
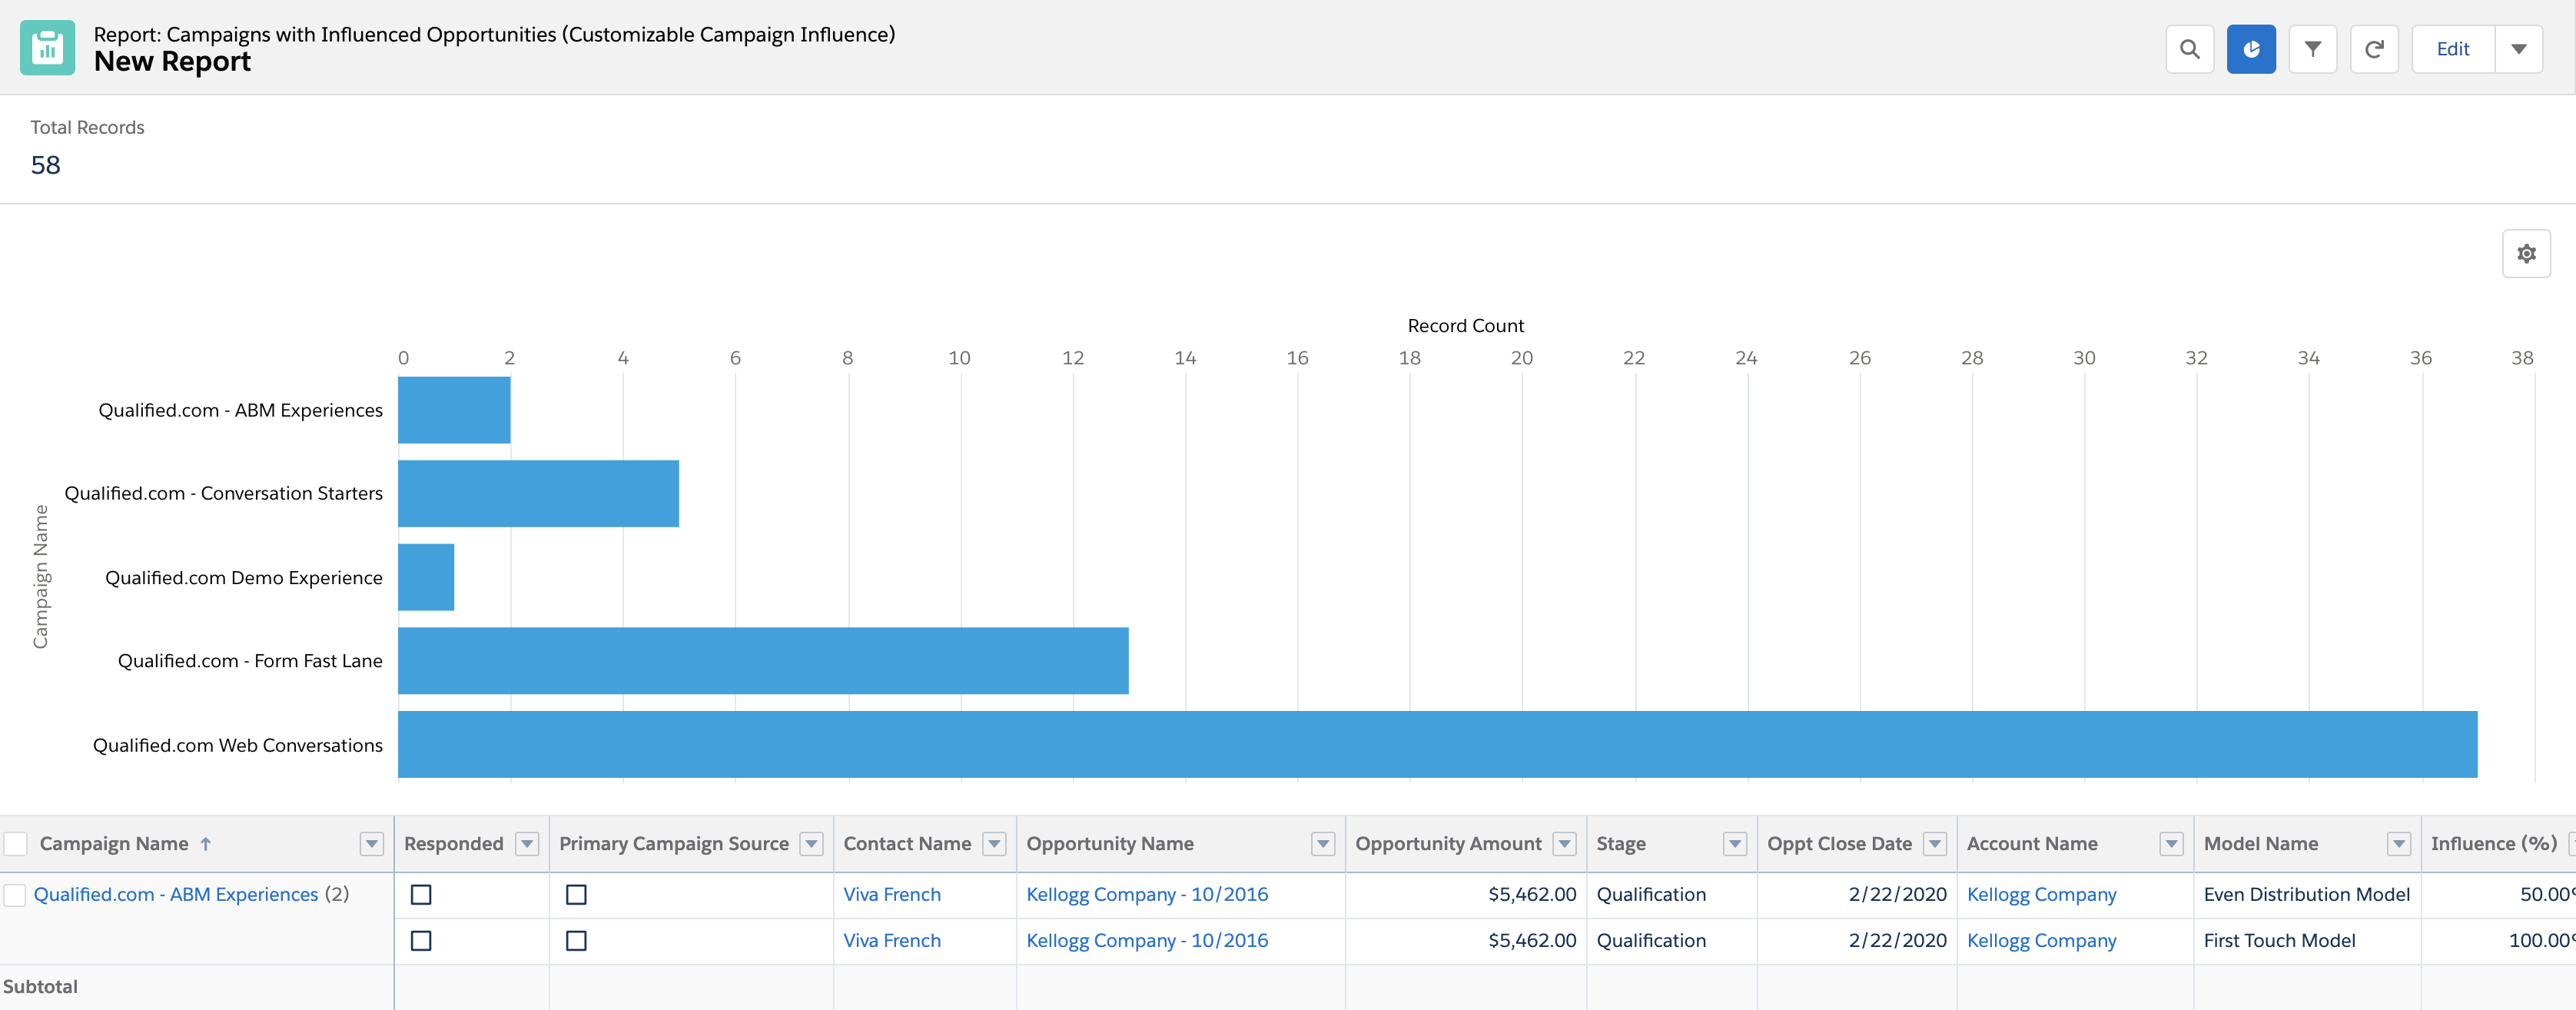
Begin by creating a new report and select to run a 'Campaign with Influenced Opportunities’ report from the list of standard reports that you’ll see appear.

The Campaigns with Influenced Opportunities report displays campaigns that have opportunities associated by multiple methods:
- A campaign is associated to a contact role on the opportunity. This means that the contact that's assigned to a contact role on an opportunity is a member of a campaign.
- Use the Add to Campaign button on the Campaign Influence related list on the Opportunity record (Campaign Influence 1.0 only)
- Enter a campaign in the Primary Campaign Source field on the opportunity record. (Any campaign saved in this field will be reported, even if it is later removed or replaced.)
Once the report is selected, you can configure the reports to see the opportunities that were influenced by your Qualified campaign.
From here, you’ll want to add a few filters to make sure you’re looking at your Qualified.com Campaign specifically.
We recommend the following settings:
Filters:
- Show me: All Campaigns
- Filter by: Campaign name contains Qualified.com
Group by (in this order):
- Campaign Name
- Lead Created by Date (We suggest additionally grouping this by calendar week or month)
Additional columns:
- Contact name
- Company
- Opportunity Name
- Opportunity Amount
- Stage
- Closed date
- Owner
Set your opportunity stage filter here if you’d like to only see opportunities that are in progress or completed.
Finally, run the report and make adjustments as needed like adding a bar chart, as shown below, to give you a full picture of the Qualified campaign influence on your opportunities and name your report "Qualified.com Influenced Opportunities."
Qualified Influenced ABM Opportunities
If you use account-based marketing (ABM), create a report that shows how Qualified conversations influenced your ABM opportunities.
From Salesforce, run a 'Campaign with Influenced Opportunities’ report from the list of standard reports.
The next step will depend on how you track ABM accounts within Salesforce. You may mark your accounts with a custom field that says "ABM or have tiers like 'Diamond' for their highest account. Create a filter for however you mark your ABM accounts.
Also, add a few filters to make sure you’re looking at your Qualified.com Campaign specifically.
We recommend the following settings:
Filters:
- Show me: All Campaigns
- Filter by: Campaign name contains Qualified.com
Group by (in this order):
- Campaign Name
- Lead Created by Date (We suggest additionally grouping this by calendar week or month)
Additional columns:
- Name
- Title
- Company
- Opportunity Name
- Opportunity Amount
- Account Name
- Owner
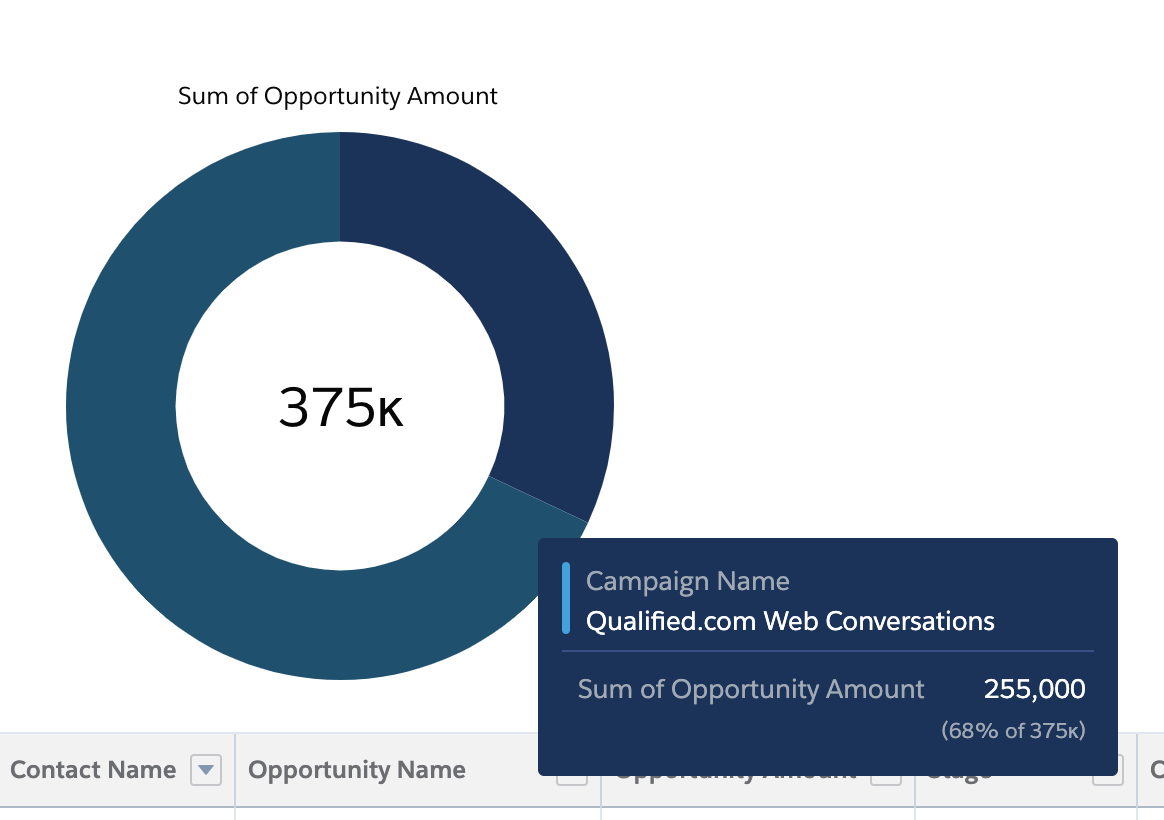
Once you've set your filters, find the total sum value of your opportunities. In one report, it will tell you the number of ABM opportunities and the total value of those opportunities that were influenced by Qualified.
Add a visual chart at the end, to help you see the value of your Qualified influenced ABM opportunities and accounts.
As the very last step, save your report and name it "Qualified.com Influenced ABM Opportunities."
<span id="dashboard"></span>
Creating a Campaign Influence Dashboard
If you've been following our articles, by now you’ve got your Campaign Attribution locked down, your Salesforce reports have been created, and you’re ready to start on your Salesforce dashboard about Qualified-influenced accounts.
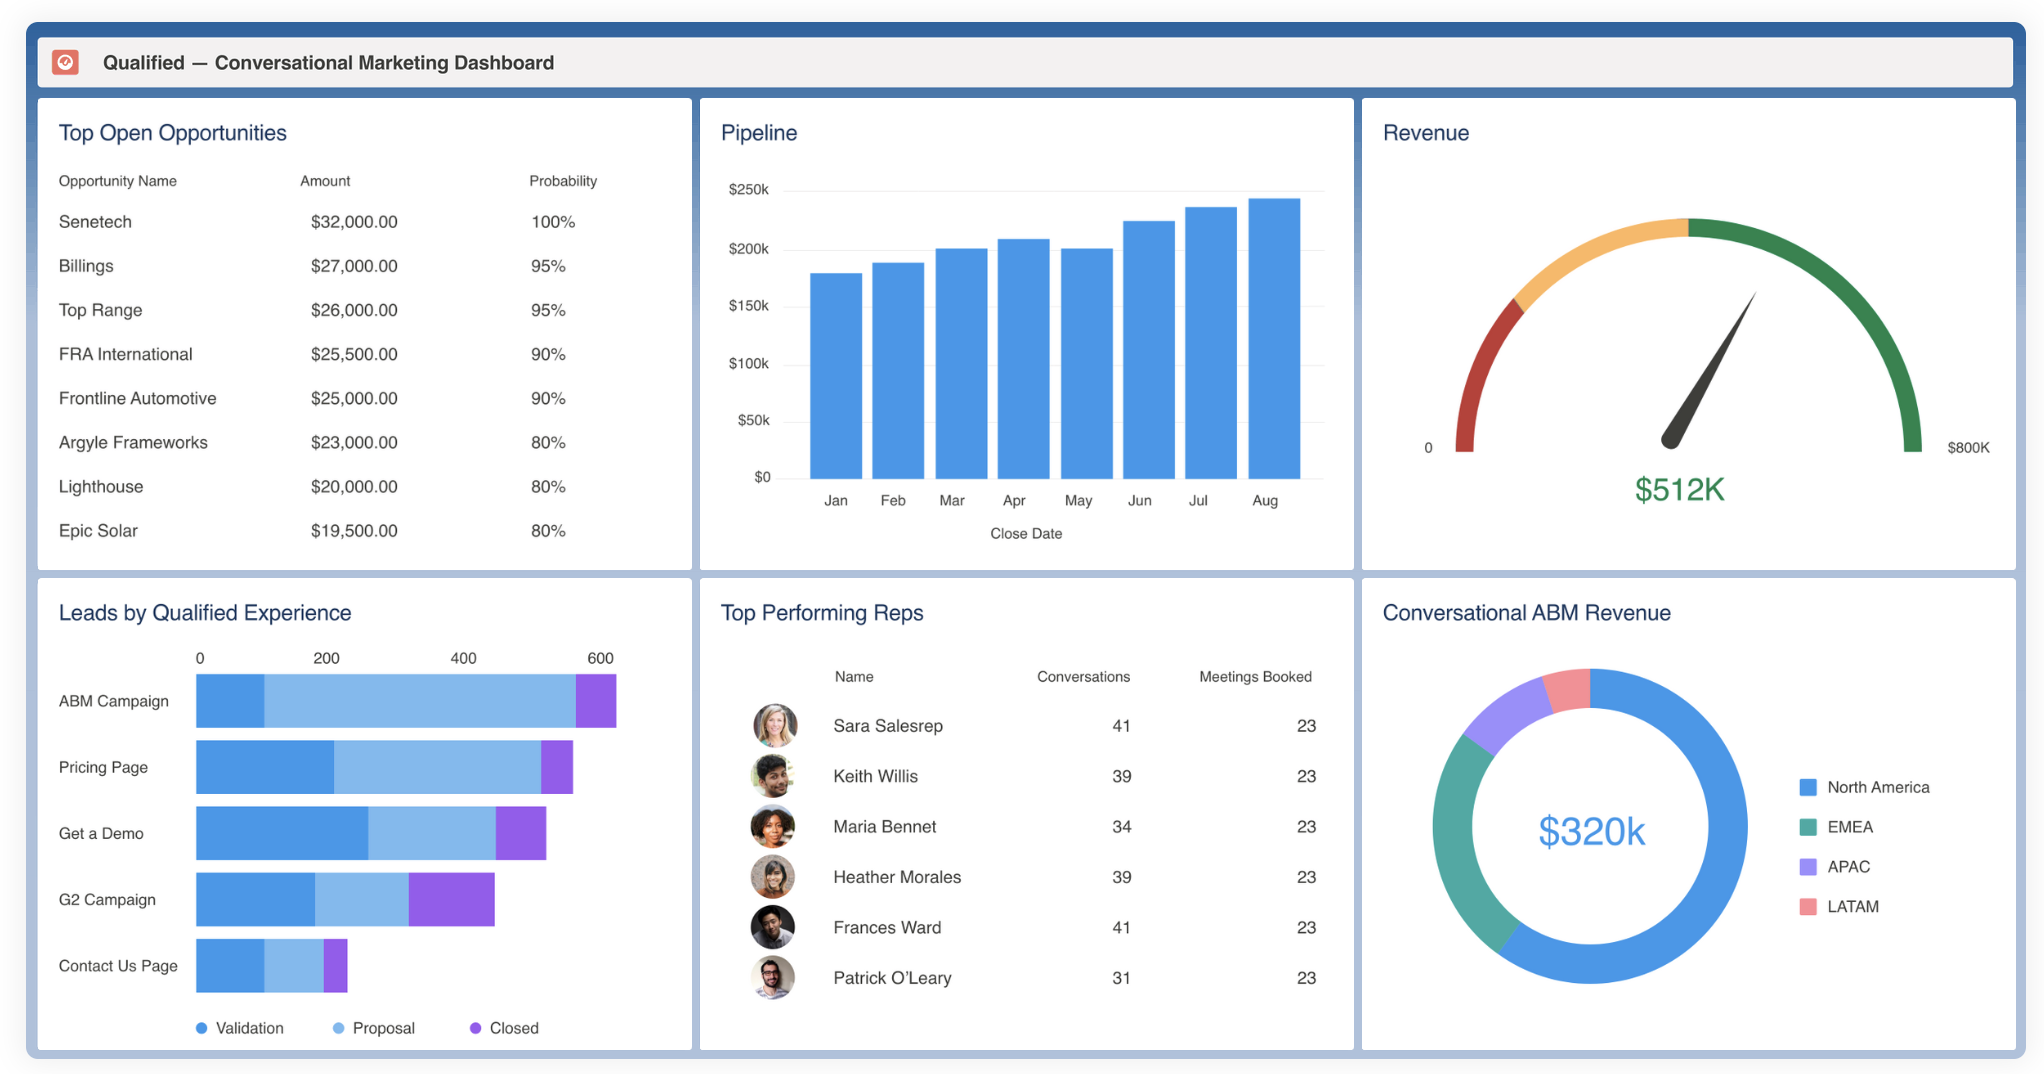
Salesforce dashboards are a visual display of your key metrics and trends. Creating a dashboard dedicated to your conversational marketing efforts helps your marketing team track ROI and can easily be shared with key stakeholders.
Dashboard components and Salesforce reports share a 1:1 relationship, meaning each dashboard component that you’ll create is tied directly to a report that you’ve created. Use your campaign influence reports to create components on a dashboard.
Getting Started
To get started, you’ll want to first create a brand new dashboard in Salesforce and name it something similar to "Qualified.com" or "Qualified Conversational Marketing Dashboard" so it's clear that you’re specifically targeting Qualified ROI.
Create Your ABM Opportunities
If you’re running ABM on your marketing side of things, this will be extremely important for you to add. First, create a "Qualified.com Influenced ABM Opportunities" report. You'll create dashboard tiles that pull from that report.
In this component, call out the dollar value of ABM Opportunities that have been influenced by Qualified. You can also add two other important dashboard components using the same report:
- Qualified-influenced ABM opportunities by number
- Qualified-influenced ABM opportunities by experience (if you are using Campaign Hierarchy)
Create Your Influenced Opportunity Components
Your first components will draw from your Influenced Qualified Opportunities. We’ll look at both the number of Opportunities influenced as well as the dollar amount of those opportunities.
Select to create a new component from your previously created Salesforce report “Qualified.com Influenced Opportunities.”
Once that’s selected, you’ll want to add two key components as shown in the video below:
- Total value of opportunities influenced
- Total number of opportunities influenced
Create your Campaign Leads Component
The last component you'll want to add to your dashboard is your campaign lead component. Create a new component and select your report created earlier titled "Qualified.com Campaigns with Leads."
This component will give you and your stakeholders a quick visualization of how many Leads have come in from Qualified.com and later on associated with your campaign.
Create Your Open & Closed Opportunity Components
Next, you can get a bit more granular if you’d like and add two components to visualize the information you’ve just added above:
- Qualified-influenced closed opportunities
- Qualified-influenced open opportunities
Keep in mind that you’ll need to create another report to filter for just closed opportunities if you have not yet done so. You’ll see in the video above that we’ve added both components to our dashboard, removing the stage and filtering by campaign name to clearly see which experience has given us more ROI.
Heading 1
Heading 2
Heading 3
Heading 4
Heading 5
Heading 6
Lorem ipsum dolor sit amet, consectetur adipiscing elit, sed do eiusmod tempor incididunt ut labore et dolore magna aliqua. Ut enim ad minim veniam, quis nostrud exercitation ullamco laboris nisi ut aliquip ex ea commodo consequat. Duis aute irure dolor in reprehenderit in voluptate velit esse cillum dolore eu fugiat nulla pariatur.
Lorem ipsum dolor sit amet, consectetur adipiscing elit, sed do eiusmod tempor incididunt ut labore et dolore magna aliqua. Ut enim ad minim veniam, quis nostrud exercitation ullamco laboris nisi ut aliquip ex ea commodo consequat. Duis aute irure dolor in reprehenderit in voluptate velit esse cillum dolore eu fugiat nulla pariatur.
Lorem ipsum dolor sit amet, consectetur adipiscing elit, sed do eiusmod tempor incididunt ut labore et dolore magna aliqua. Ut enim ad minim veniam, quis nostrud exercitation ullamco laboris nisi ut aliquip ex ea commodo consequat. Duis aute irure dolor in reprehenderit in voluptate velit esse cillum dolore eu fugiat nulla pariatur.

Block quote
Ordered list
- Item 1
- asdfasdf
- asdfasdf
- asdfasdf
- Item 2
- Item 3
Unordered list
- Item A
- Item B
- Item C
Bold text
Emphasis
Superscript
Subscript
|
|---|
|


.svg)


