
Campaign Attribution Reports & Dashboards
Salesforce campaign attribution is one of the best ways to assess the ROI of your marketing efforts and the channels you’re using to connect to leads, contacts, and prospects.
- Salesforce Campaign Basics
- How it Works: Campaign Attribution and Qualified
- Campaign Attribution Reports
- Campaign Attribution Dashboard
<span id="basics"></span>
Salesforce Campaign Basics
Before we dig into campaign attribution, you’ll want to become familiar with the basic concept of Salesforce campaigns.
Salesforce campaigns are an object within Salesforce that helps track marketing initiatives. For example, your outbound emails, marketing events, advertisements, and conversational marketing strategies are different types of campaigns.
Within your Salesforce campaigns, you'll have campaign members. Campaign members are those leads or contacts that you're trying to market to within that campaign. For example, the people in your email distribution list or the visitors on your website who have had a conversation with your chatbot or live chat.
There are different “Campaign Member Statuses” that you may assign to each campaign member (e.g. Sent or Responded), but we will not be referencing that value for Qualified’s recommended reporting.
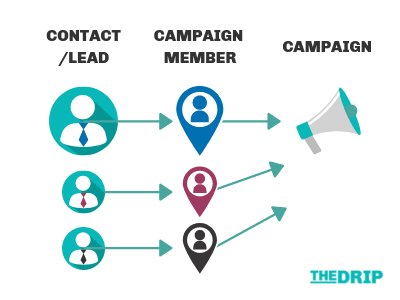
Now that you understand what a campaign is and how you have campaign members within those campaigns, let’s talk about campaign attribution specifically. Marketers use campaign attribution to measure campaign influence, such as how campaigns generated revenue by influencing prospects to buy. More specifically, campaign attribution happens when a campaign member interacts with one of your marketing campaigns.
For example, let’s say Jane Smith is on your marketing email list and you’re sending out an email campaign that features your newest product. Jane receives your email, clicks on the CTA inside the email and is now on your website. Jane Smith continues to browse your product page and finally clicks on your Qualified chatbot and interacts with your sales rep to ask a few more questions before she books a meeting to get a live demo later that week.
A meeting was booked, awesome! If you’re not using campaign attribution, you might not be able to see which campaign played a part in Jane’s decision to book a demo and purchase from you. Campaign attribution helps you answer these questions and continue to invest your marketing efforts wisely.
<span id="how-it-works"></span>
Campaign Attribution and Qualified: How It Works
Now that you understand how campaigns, campaign members, and campaign attribution work let’s take a closer look at how it all works specifically within Qualified.
As visitors come to your site and have conversations with your chatbot or with your sales reps, those visitors will be pushed into Salesforce or Pardot and associated with the campaign you've designated in your Salesforce Lead or Contact mappings.
A conversation in Qualified is defined as a simple back-and-forth interaction between a visitor and a chatbot or sales rep.
We’ll break down different scenarios below to show you what happens behind the scenes with your known and unknown visitors and campaign attribution.
Attribution Within Salesforce
New Leads (Unknown Visitors)
When a new lead enters your site and has a conversation within your Qualified chatbot or with a sales rep, we add campaign attribution as soon as the lead is created. A lead can be created two ways:
- The visitor hits a Salesforce push node in your experience.
- A sales rep manually creates the lead during or after a live chat with the visitor as shown below.
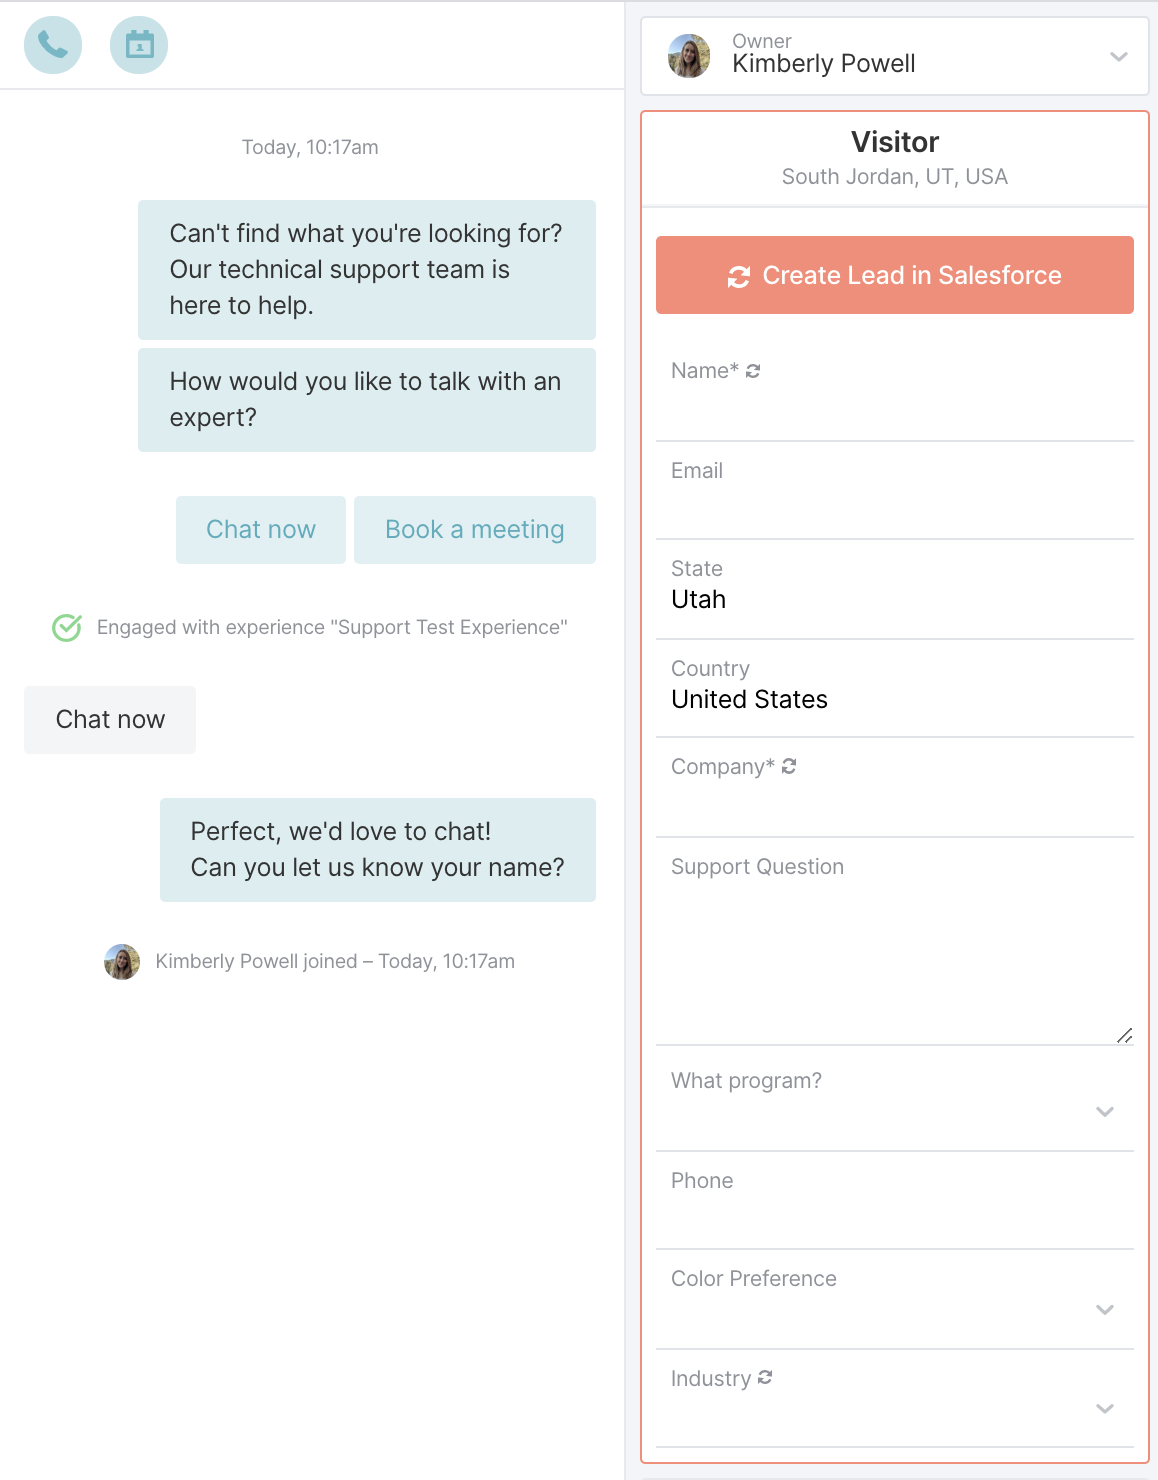
Campaign Attribution will be determined by the settings that you’ve set in your Qualified Lead mapping.
Existing Leads or Contacts (Known Visitors)
When a known visitor, an existing Salesforce lead or contact, comes to your site, Qualified will associate them to a campaign five minutes after the visitor leaves the site or one hour after the visitor goes idle. If the visitor doesn’t have a conversation, we won’t add any campaign attribution to that lead or Contact in Salesforce.
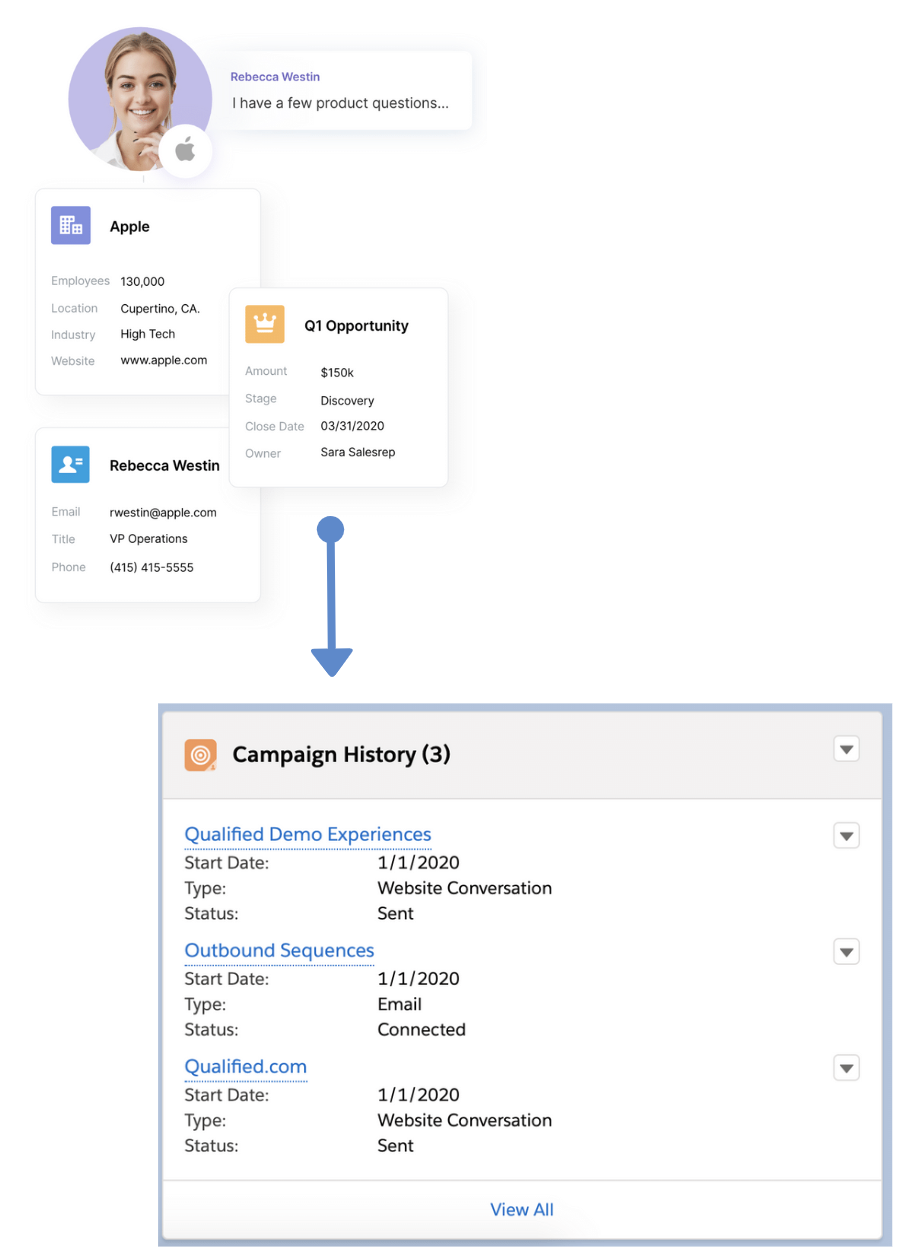
You’ll want to keep in mind that in order for campaign attribution to happen automatically for your known leads and contacts, you’ll need to set this up in your contact and lead mappings.
Attribution Within Pardot
New Prospect (Unknown Visitor)
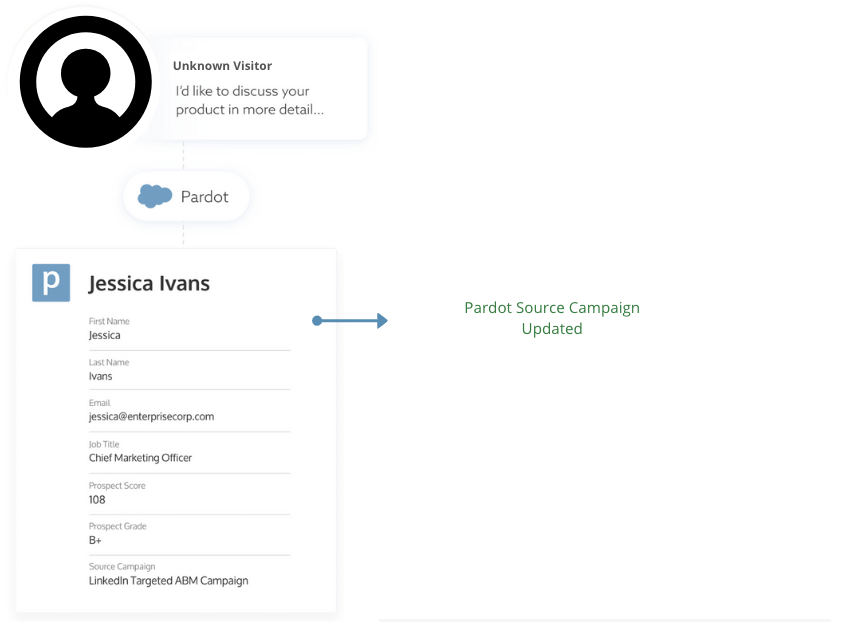
Now, let’s say someone who is not a prospect in Pardot comes to your site and has a conversation within your Qualified app. We’ll update your source campaign automatically in Pardot as soon as the prospect is created. A prospect can be created in two different ways:
- Via the push node in the experience when a visitor hits this automatically
- When a sales rep manually pushes a new visitor into Pardot
If you are using Connected Campaigns with Salesforce, you’ll see campaign attribution happen in Salesforce after the Pardot prospect syncs. Keep in mind that Salesforce leads can be associated with multiple campaigns while Pardot prospects can only be associated with one source campaign.
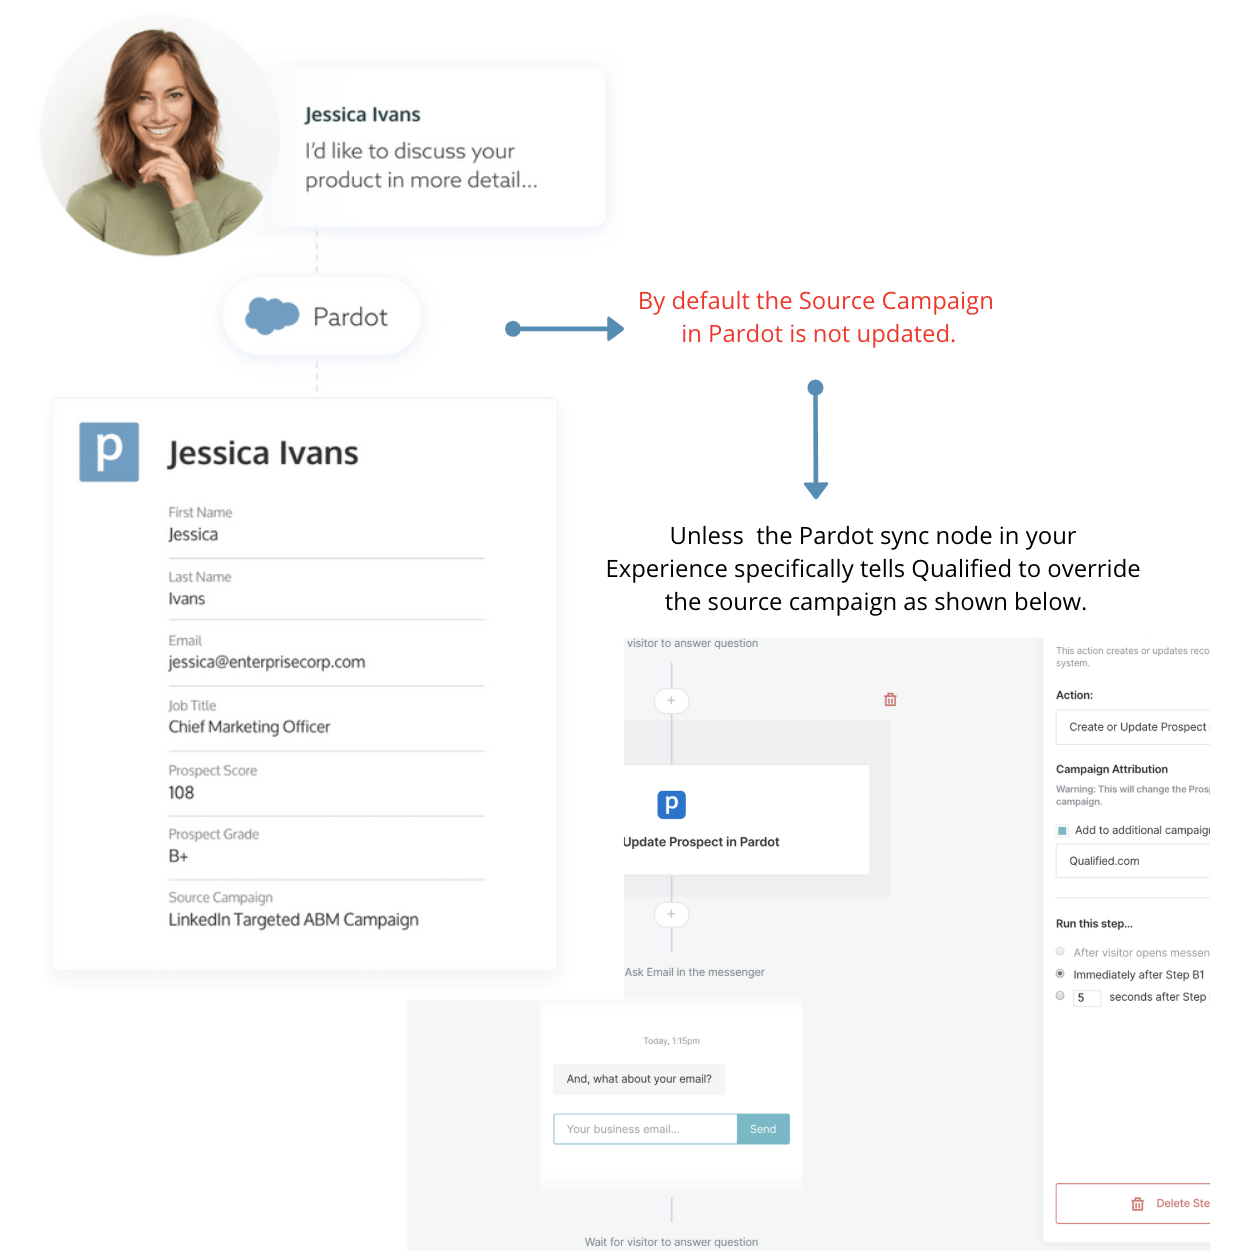
Known Prospect in Pardot
When a known Pardot prospect comes to your website and has a conversation with your Qualified chatbot or one of your sales reps, we won’t automatically override your Pardot source campaign.
We understand that most likely your known Prospects already have a source campaign attributed to them. If you’d like to override that source campaign at any time, you can do so just by setting this up in your Pardot sync push node in the Experience Builder.
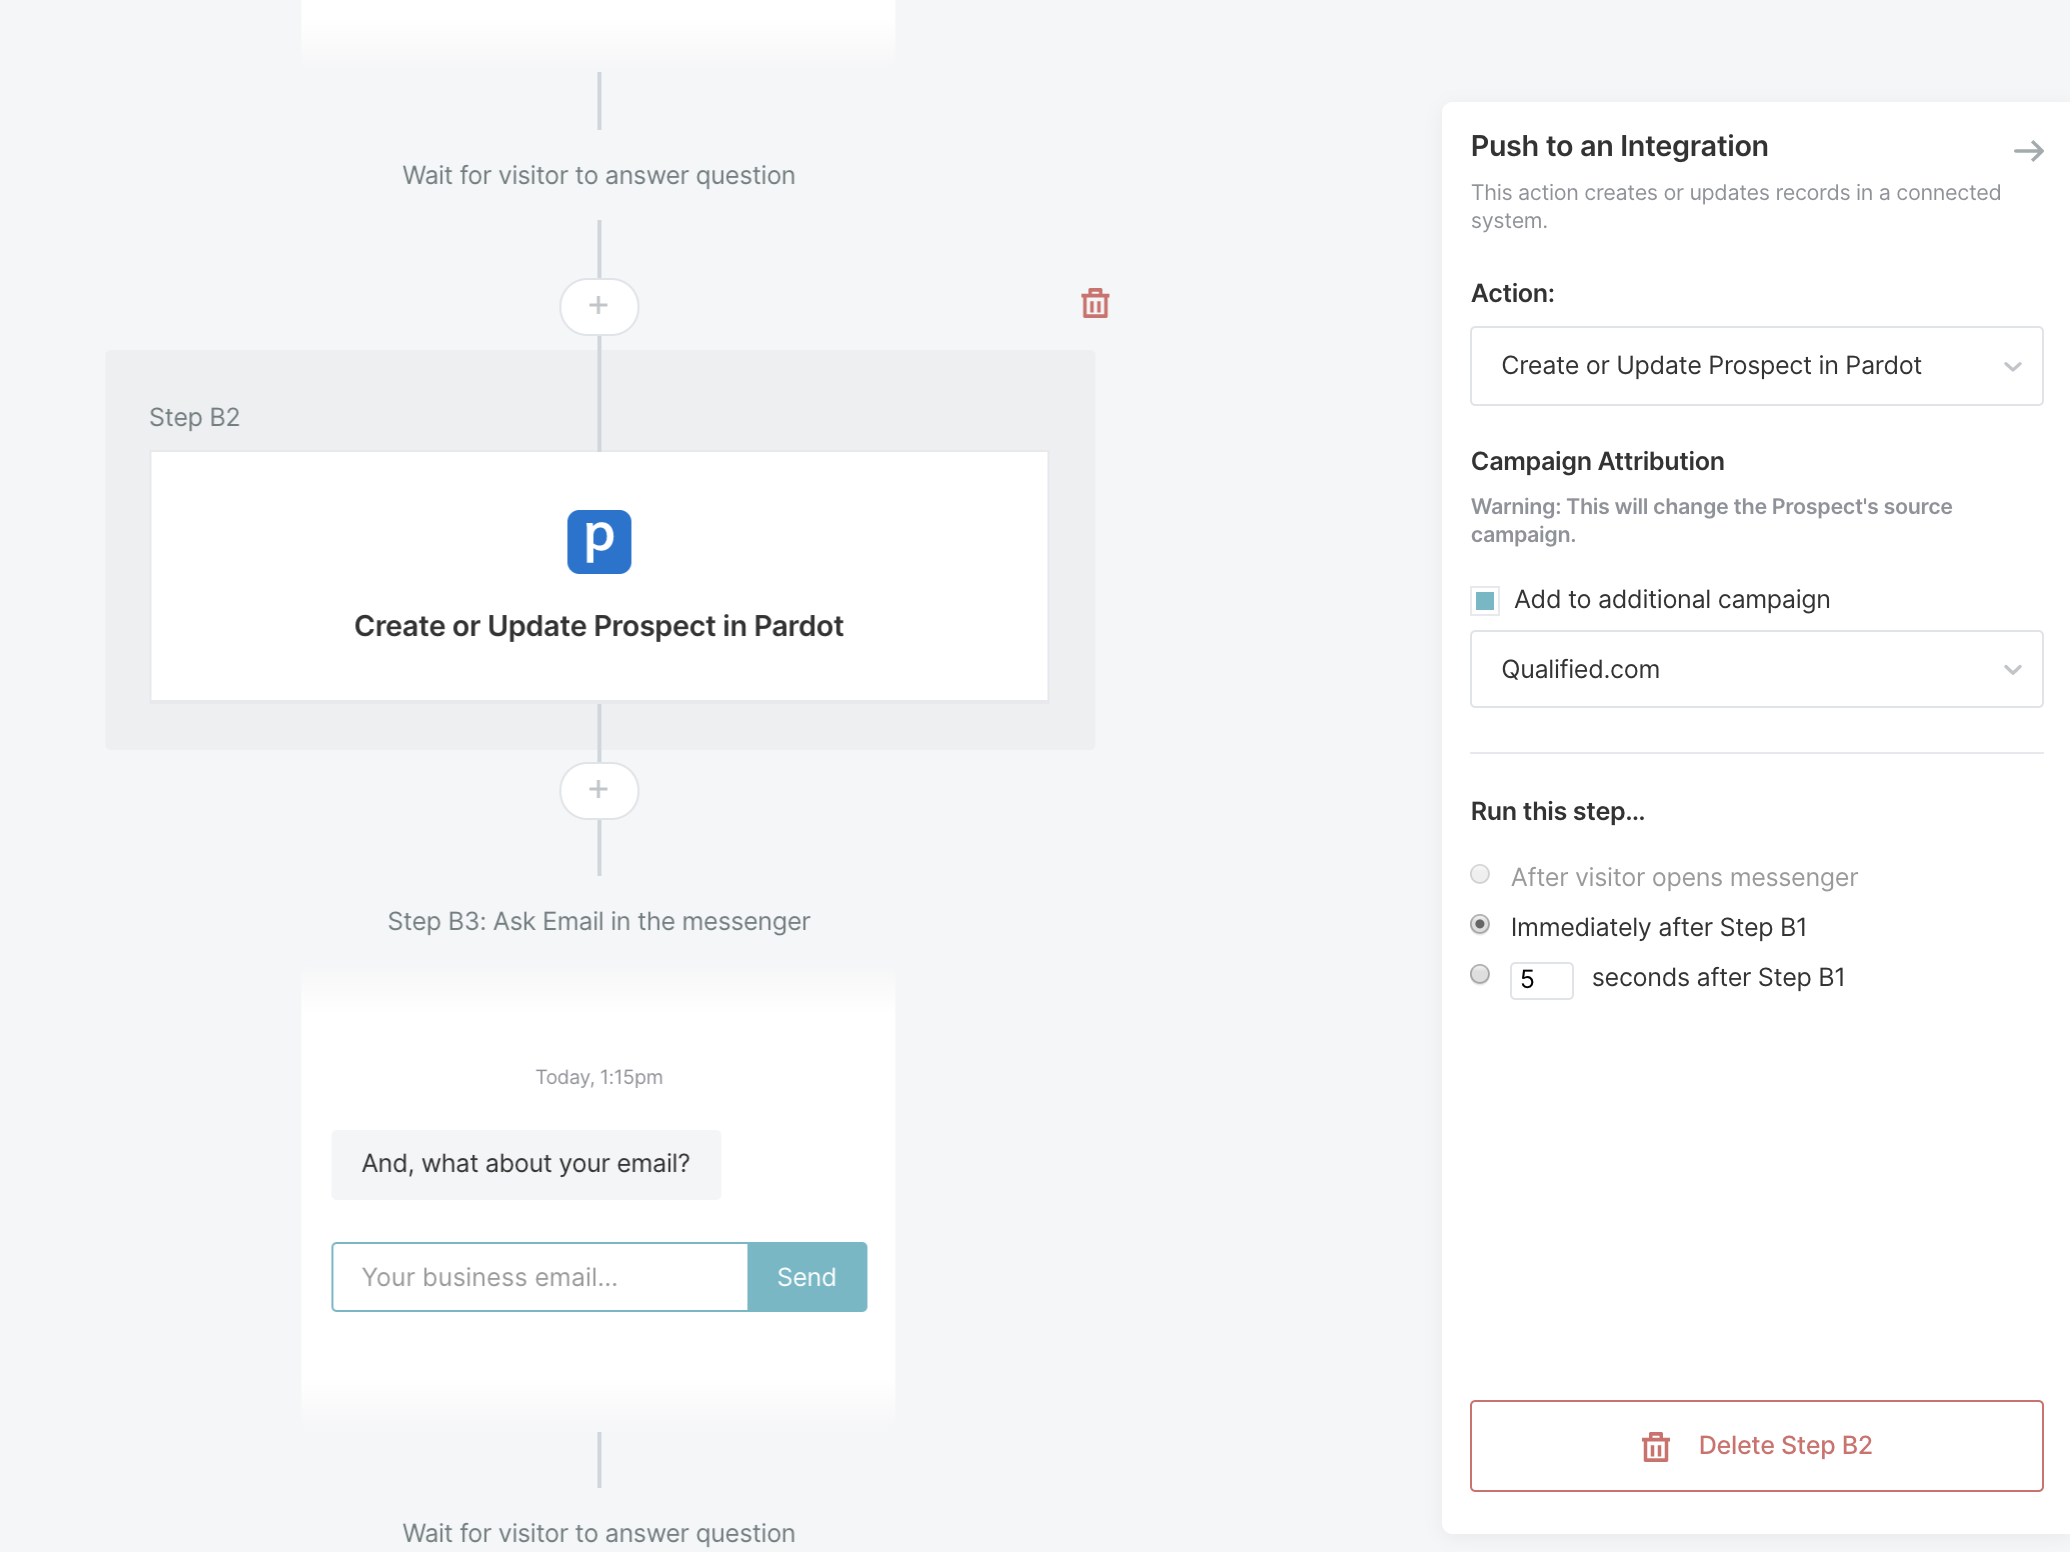
Remember Jane from earlier? Let’s assume she was a prospect in Pardot and clicked on a link in your email campaign, which led her to your site and interaction with your sales team using the Qualified app. Since Jane was already a Prospect, we won’t override her source campaign field. If she syncs to Salesforce as a lead, however, we’ll associate her with your Qualified campaign in Salesforce.
Connected Campaigns
If you are using Connected Campaigns with Pardot, you’ll notice that changes made to your Pardot source campaign will also be reflected in Salesforce.
Your source campaign will not be updated in Pardot after it has been set by Qualified or an outside source unless you specifically request this in your Pardot push node. However, we will continue to associate your Salesforce leads and contacts to campaigns. What this means is that your Pardot prospects will only have one source campaign but the lead in Salesforce could have multiple campaign associations.
<span id="reports"></span>
Campaign Attribution Reports
There are several reports you can create in Salesforce to help you see the value of your Qualified experiences and report on your Campaign Attribution. We’ll show you the top four reports that you’ll want to run in Salesforce and how to use them to understand the ROI on your experiences in Qualified.
- Reporting on all leads created by Qualified
- Reporting on all leads attributed to Qualified (leads that interacted with your chatbot or sales team in Qualified)
- Reporting on all contacts attributed to Qualified (contacts that interacted with your chatbot or sales team in Qualified)
- Reporting on all ABM accounts attributed to Qualified
Once you have campaign attribution set up within your Salesforce account, you should start to see activity in your campaigns as leads come into your site and interact with your Qualified app. If you’ve followed our previous instructions, you’ll now have a campaign called Qualified as well as your leads and contacts mapped from Qualified into this Salesforce campaign.
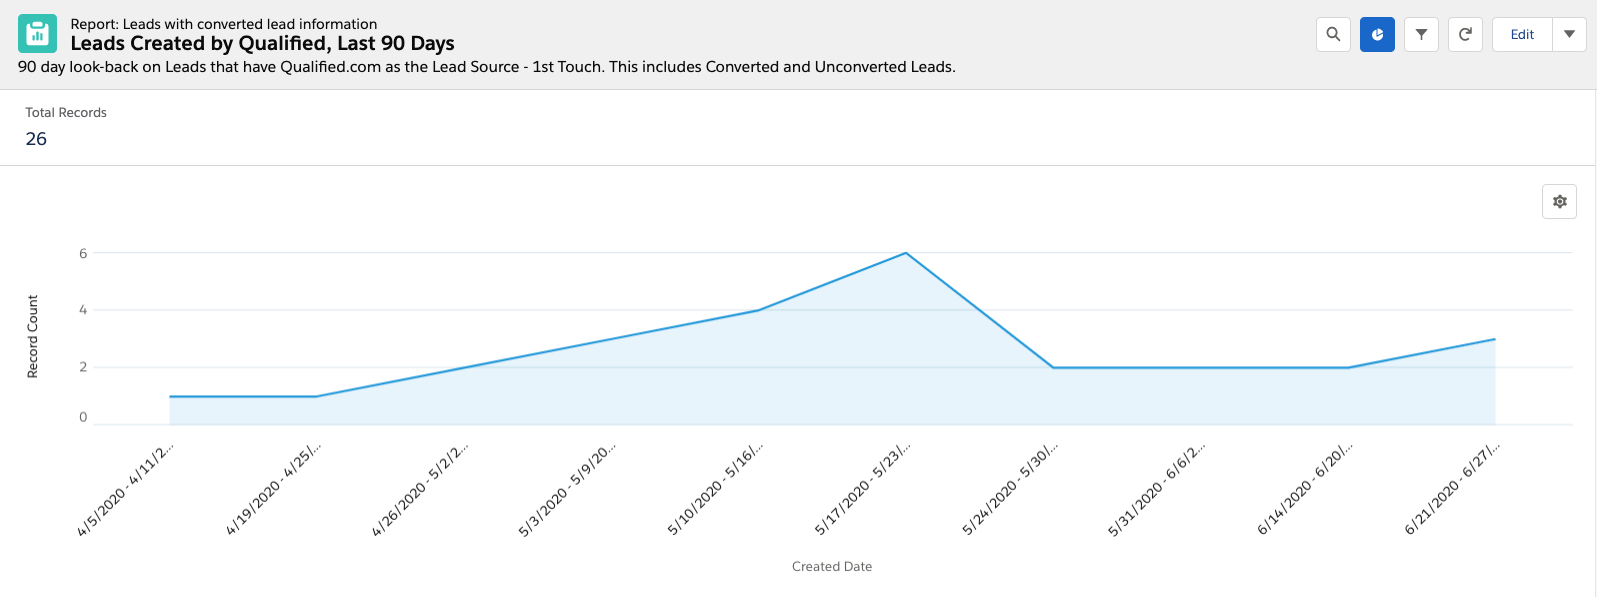
Report #1: All Leads Created by Qualified
The first report you’ll want to create is a report that will show you all leads created by Qualified. This means the lead was synced automatically when they hit the Salesforce push node in the experience or they were manually created by someone on your sales team.
To get started in Salesforce, you’ll want to first create a report by selecting the campaign object and the report “Leads with converted lead information.”
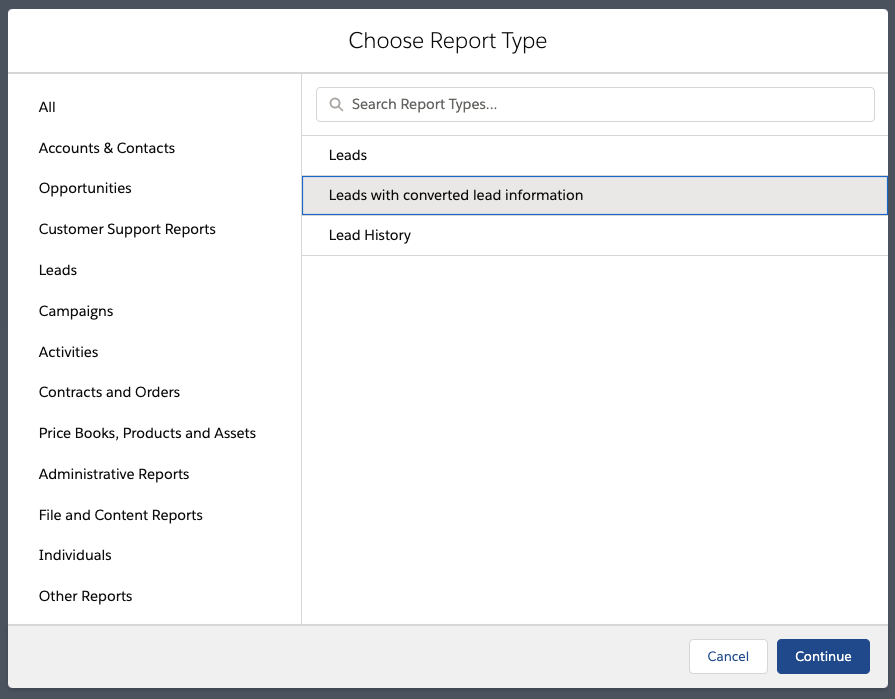
This report type will ensure that we see all of the leads created, regardless of converted status.
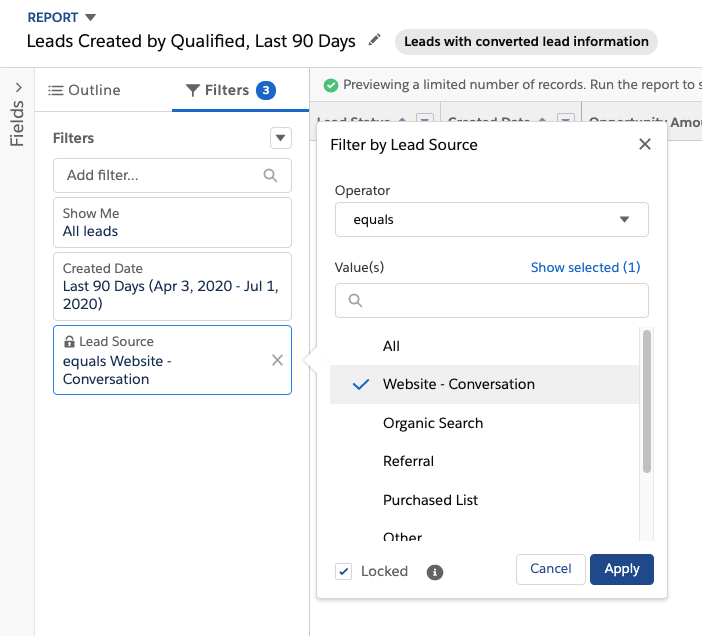
Next, you’ll want to make a few changes to your report filters so that you’ll be able to call out your Qualified campaign and see the leads specifically created from Qualified.
These are filters that we recommend setting but you're not limited to these filters or grouping. Depending on your business case, you might want to group differently or add more filters than what we show below.
Set your filters to:
- Show me: All leads
- Created Date: Last 90 days
- Lead Source: Website conversation or Qualified
Group by (in this order):
- Campaign name
- Lead created by date (We suggest additionally grouping this by calendar week or month.)
Additionally, we've added these columns to our reports here at Qualified which might be helpful to you as well:
- Name
- Title
- Company
- Rating
- Converted
- Owner
Finally, run the report to see all current Leads created by Qualified.com and save the report as “Leads created by Qualified”. Add a chart if you’d like, to help visualize the report.
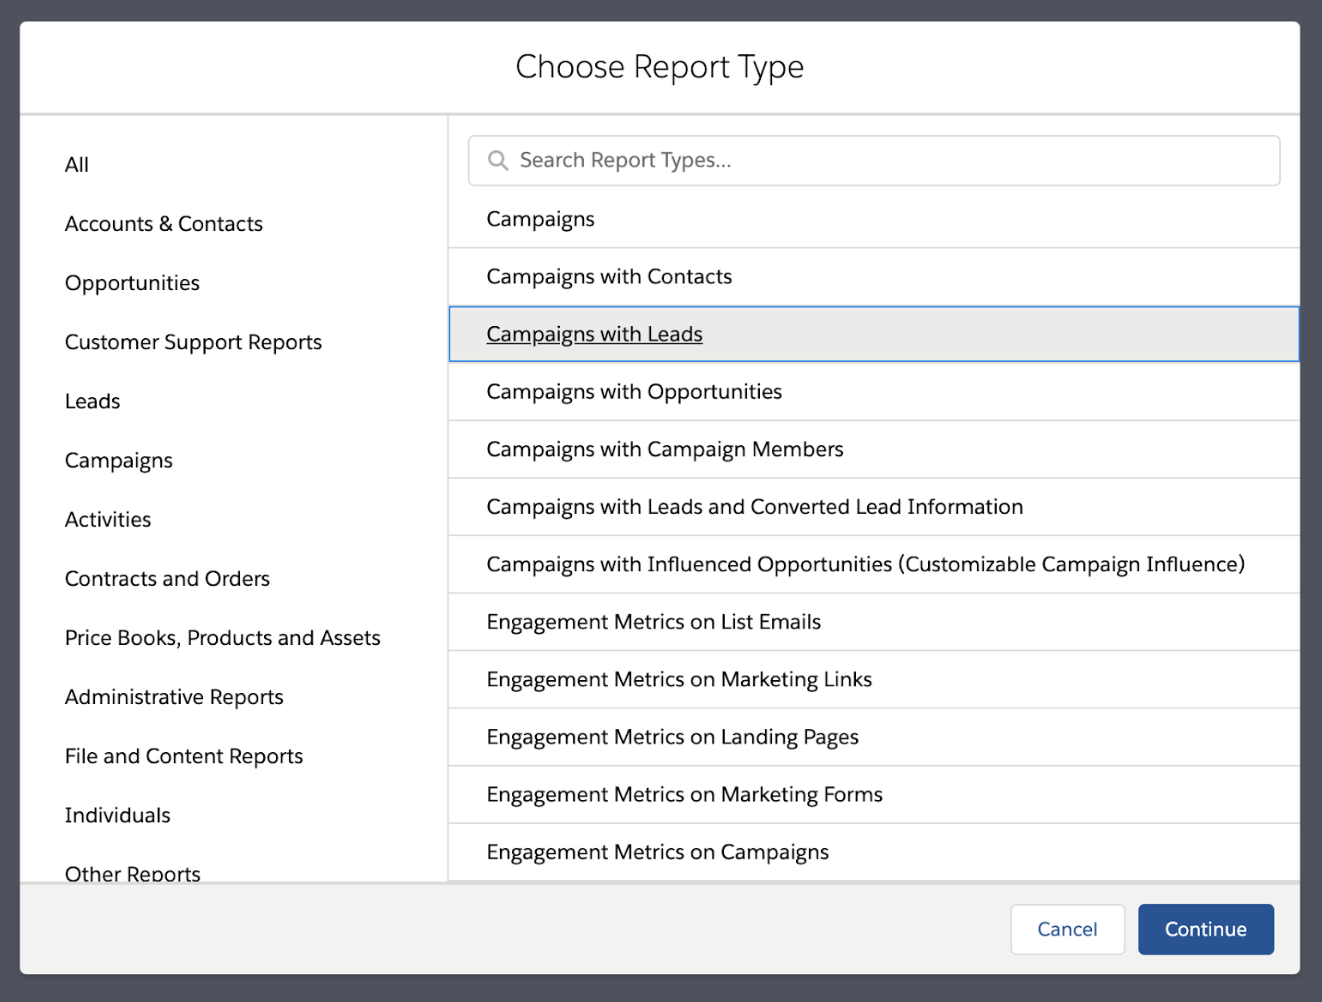
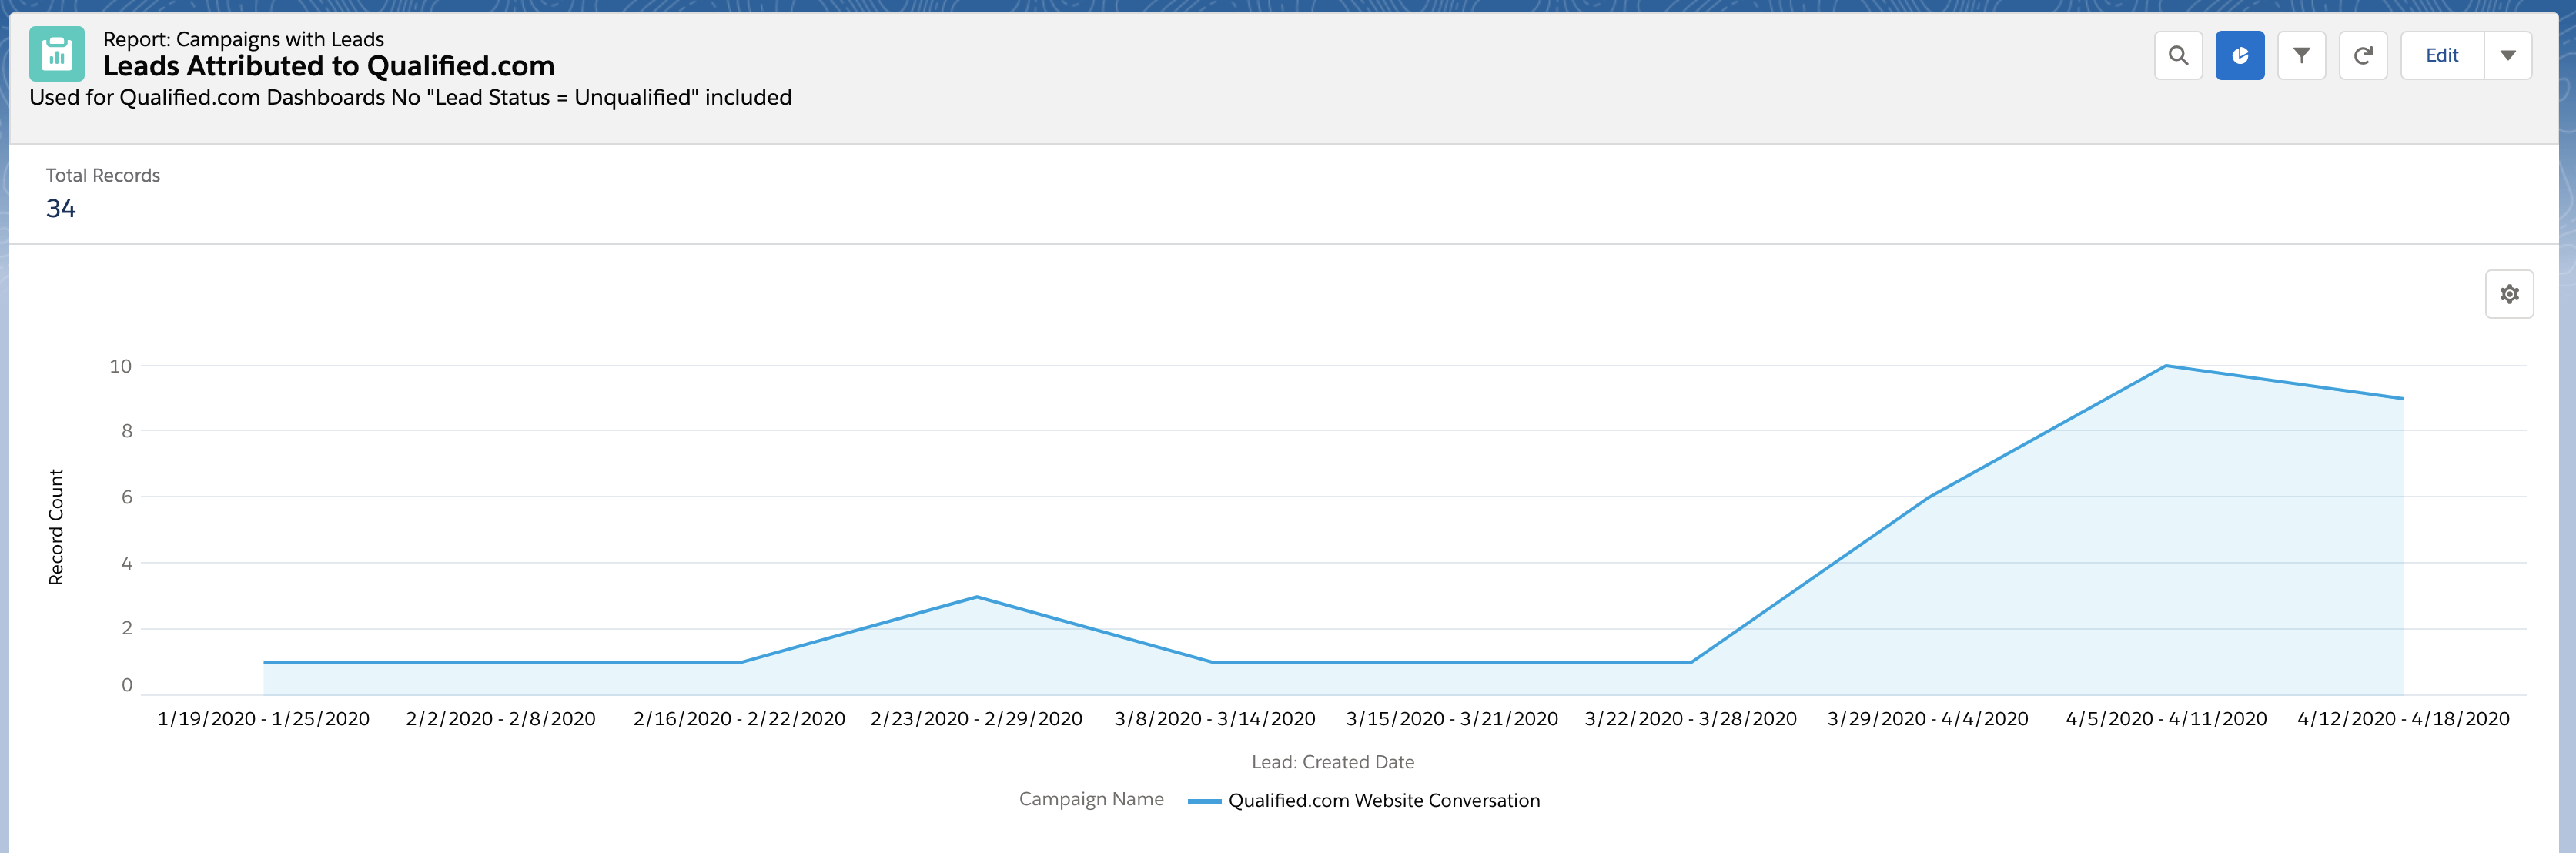
Report #2: All Leads Attributed to Qualified
The next report you’ll want to make sure to have on hand is how many leads were attributed to Qualified, meaning these leads interacted with your chatbot or had a live chat with someone on your team.
To get started, you’ll want to create a new report in Salesforce by selecting the report “Campaigns with Leads” once more.
Once you’re in your new report, you’ll need to set some filters to show only those leads that have had conversations within your Qualified app.
Set your filters to:
- Show me: All campaigns
- Filter by: Campaign name contains Qualified
Group by (in this order):
- Campaign name
- Lead created by date (We suggest additionally grouping this by calendar week or month.)
Additionally, we've added these columns to our reports here at Qualified which might be helpful to you as well:
- Name
- Title
- Company
- Rating
- Converted
- Owner
Finally, run the report to see all current leads attributed to Qualified and save your report as “Leads Attributed to Qualified.com.” Add a chart if you’d like, to help visualize the report.
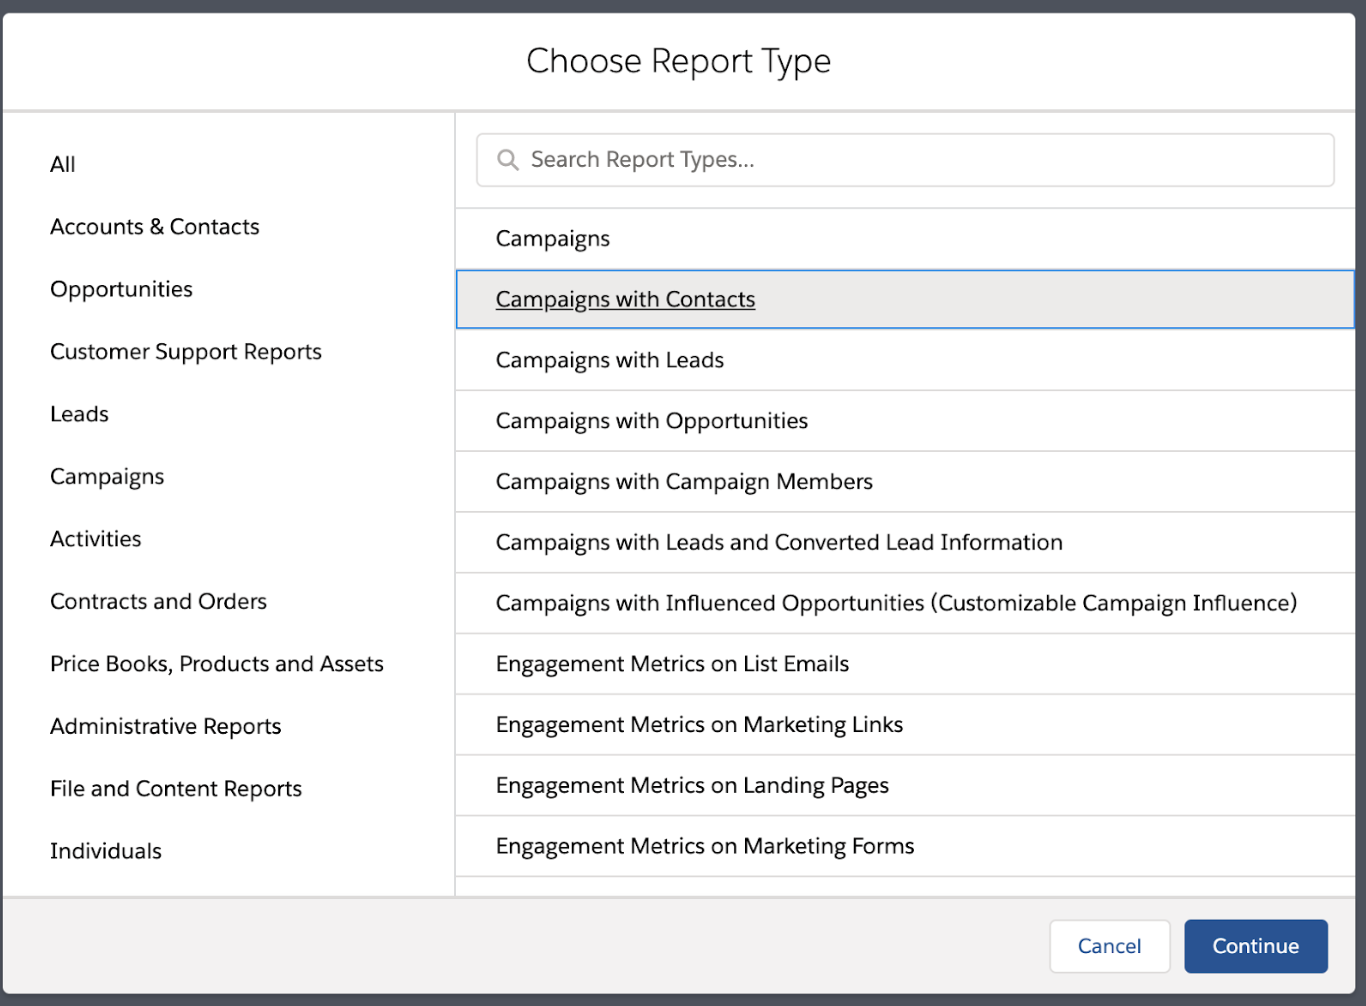
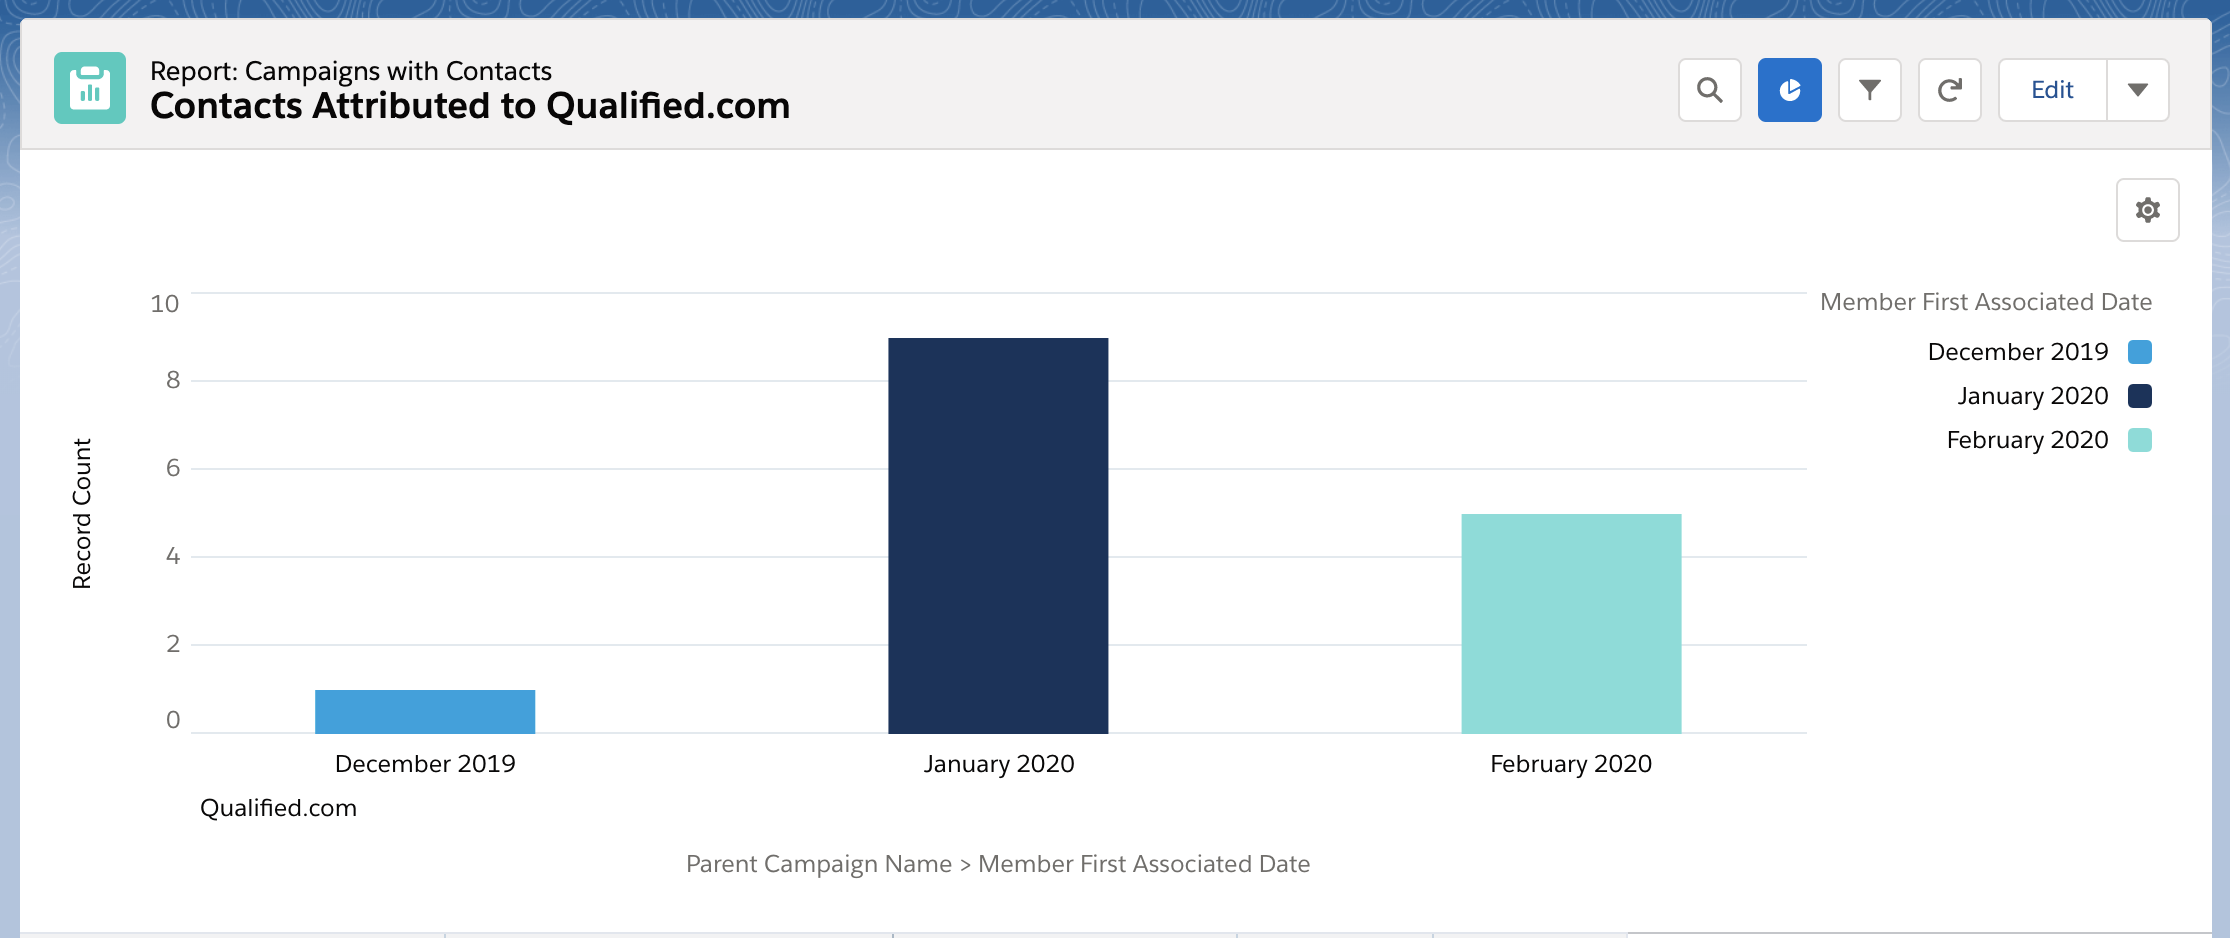
Report #3 All Contacts Attributed to Qualified
The next report you’ll want to make sure to create will show all existing contacts that have had conversations with your chatbot or sales reps within Qualified.
To run this report, you’ll want to start by creating a new report in Salesforce by selecting Report > Campaigns with Contacts, as shown below.
Once you’ve selected this report, you’ll want to configure the report before running:
Set your filters to:
- Show me: All campaigns
- Filter by: Campaign name contains Qualified
Group by (in this order):
- Campaign name
- Member first associated date (We suggest additionally grouping this by calendar week or month.)
Additionally, we've added these columns to our reports here at Qualified which might be helpful to you as well:
- Name
- Title
- Company
- Rating
- Converted
- Owner
Finally, run the report to see all contacts that are attributed to Qualified and save your report as “Contacts Attributed to Qualified.” Add a chart to visualize your findings.
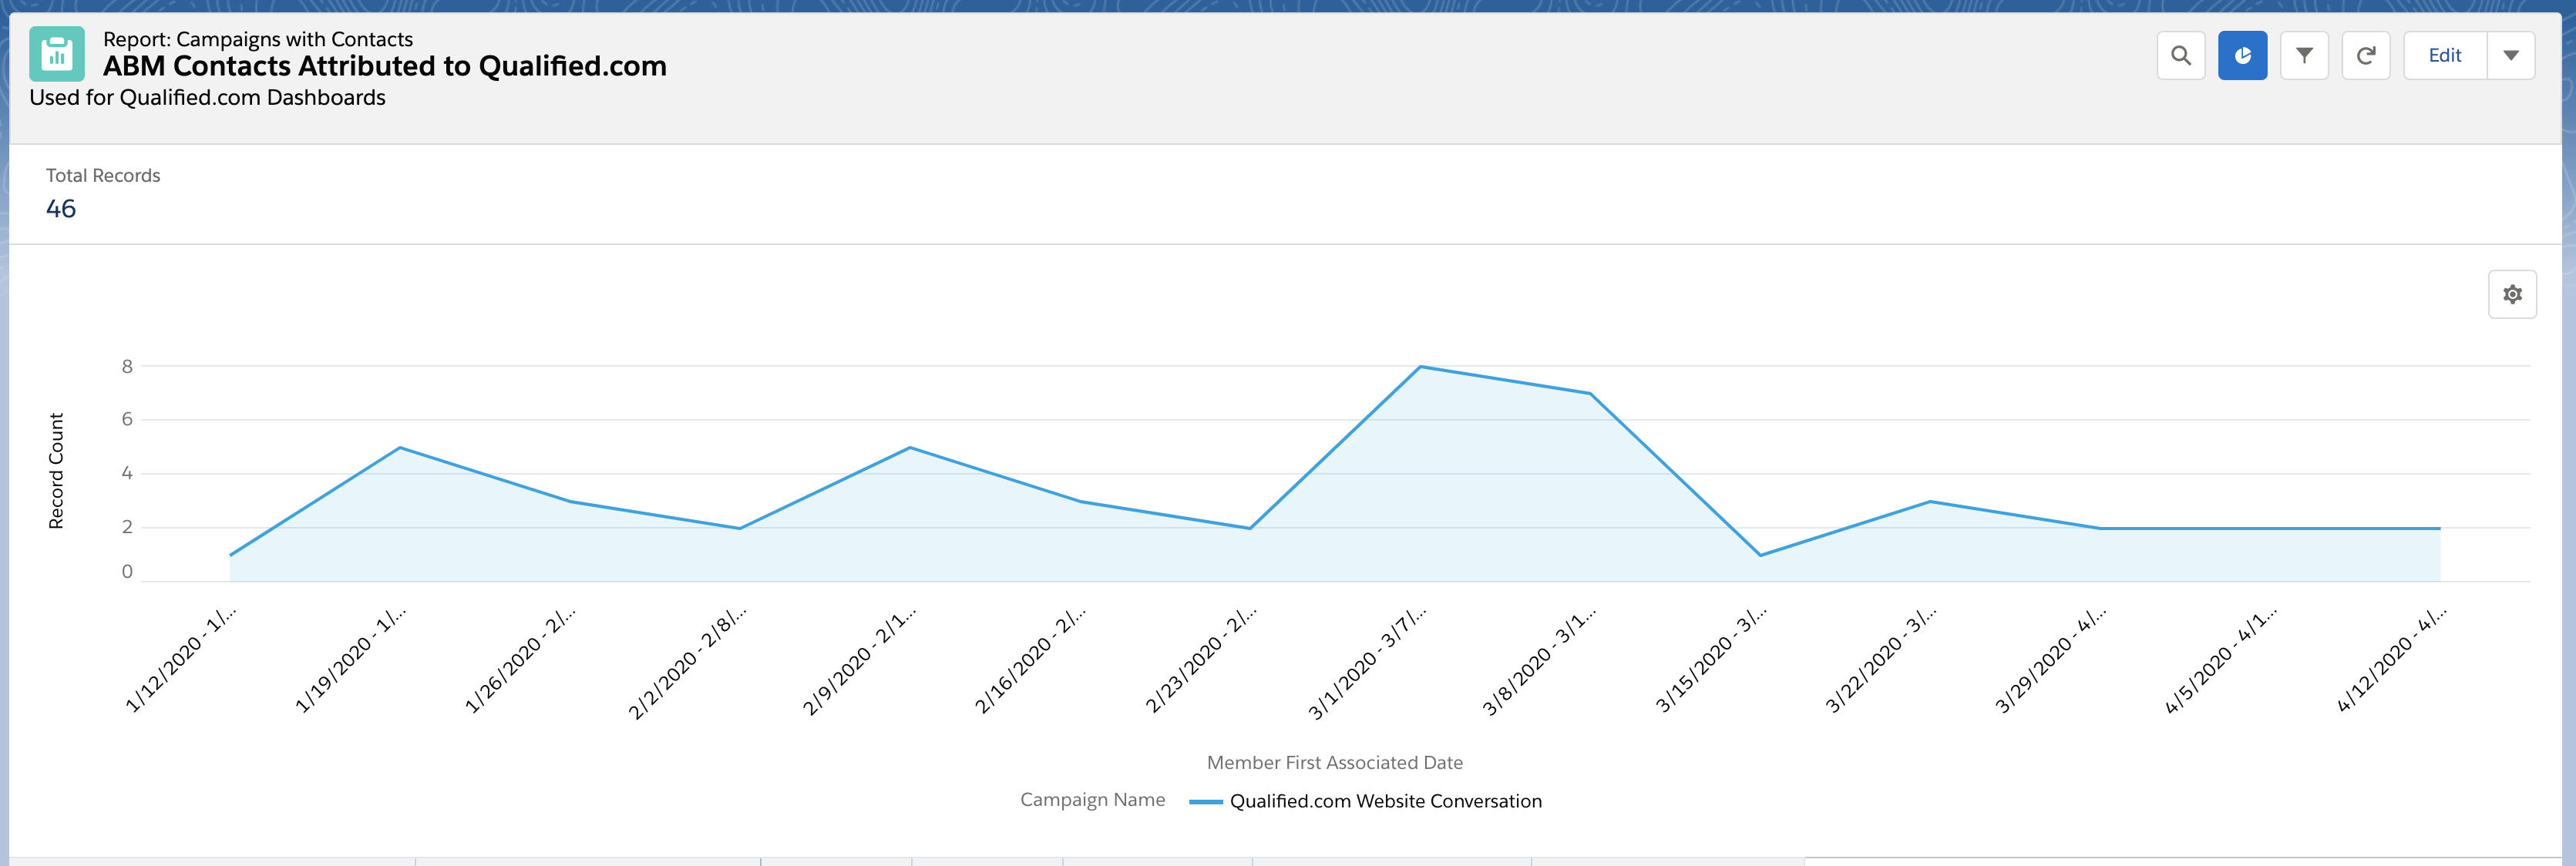
Report #4 ABM Contacts Attributed to Qualified
Account-based marketing or ABM is a business marketing strategy that concentrates resources on a set of target accounts within a market. It uses personalized campaigns designed to engage each account, basing the marketing message on the specific attributes and needs of the account.
You can see then how using Qualified with ABM can be such a powerful tool for marketers. If you’re currently using ABM with your Qualified experiences, seeing the ROI can be as easy as creating a simple Salesforce report.
To get started, you’ll want to create a new report by selecting to run a "Campaign with Contacts."
Next, you’re going to set your filters to suss out who those contacts are that are part of your ABM model. Most likely you’ll have a field on the contact record that designates either the ABM tier or simply if the contact is marked as ABM. Set your report filter to show these contacts, as shown below.
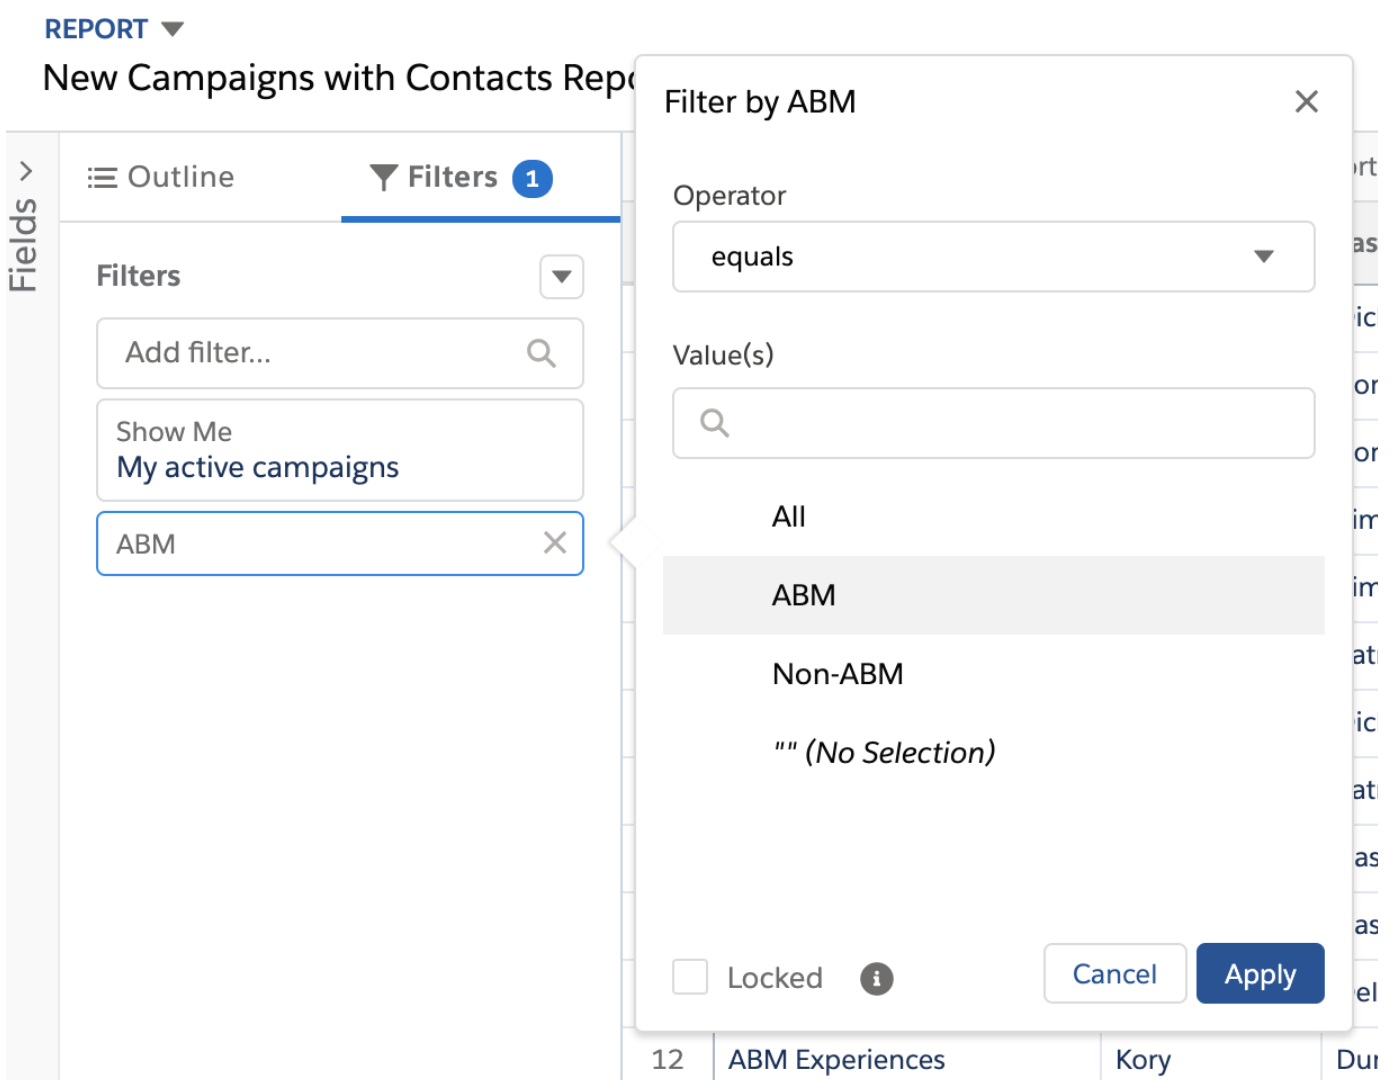
This will ensure the report shows on your Contacts that are either part of a certain ABM tier or part of your ABM model (depending on your setup in Salesforce).
Finally, finish setting up your filters by setting them to:
Set your filters to:
- Show me: All campaigns
- Filter by: Campaign name contains Qualified
Group by (in this order):
- Campaign name
- Member first associated by date (We suggest additionally grouping this by calendar week or month,)
Additionally, we've added these columns to our reports here at Qualified which might be helpful to you as well:
- Name
- Title
- Company
- Rating
- Converted
- Owner
Run the report and add a chart if you’d like to visualize your report results. Save your report as “ABM Contacts Attributed to Qualified."
<span id="dashboard"></span>
Campaign Attribution Dashboard
Now that you know what campaign attribution is, how it works in Qualified, and how to set it up your next step will be to set up your campaign attribution dashboards. Salesforce dashboards help you easily identify trends in your conversational marketing efforts as well as visualize the impact those efforts are having on your overall bottom line.
As you probably know, dashboard components and reports share a 1:1 relationship, meaning each dashboard component that you’ll create is tied directly to a report that you’ve created. We’ll walk you through how to create your Qualified dashboard in Salesforce and some of the key Dashboard components you’ll want to include from our top Salesforce reports.
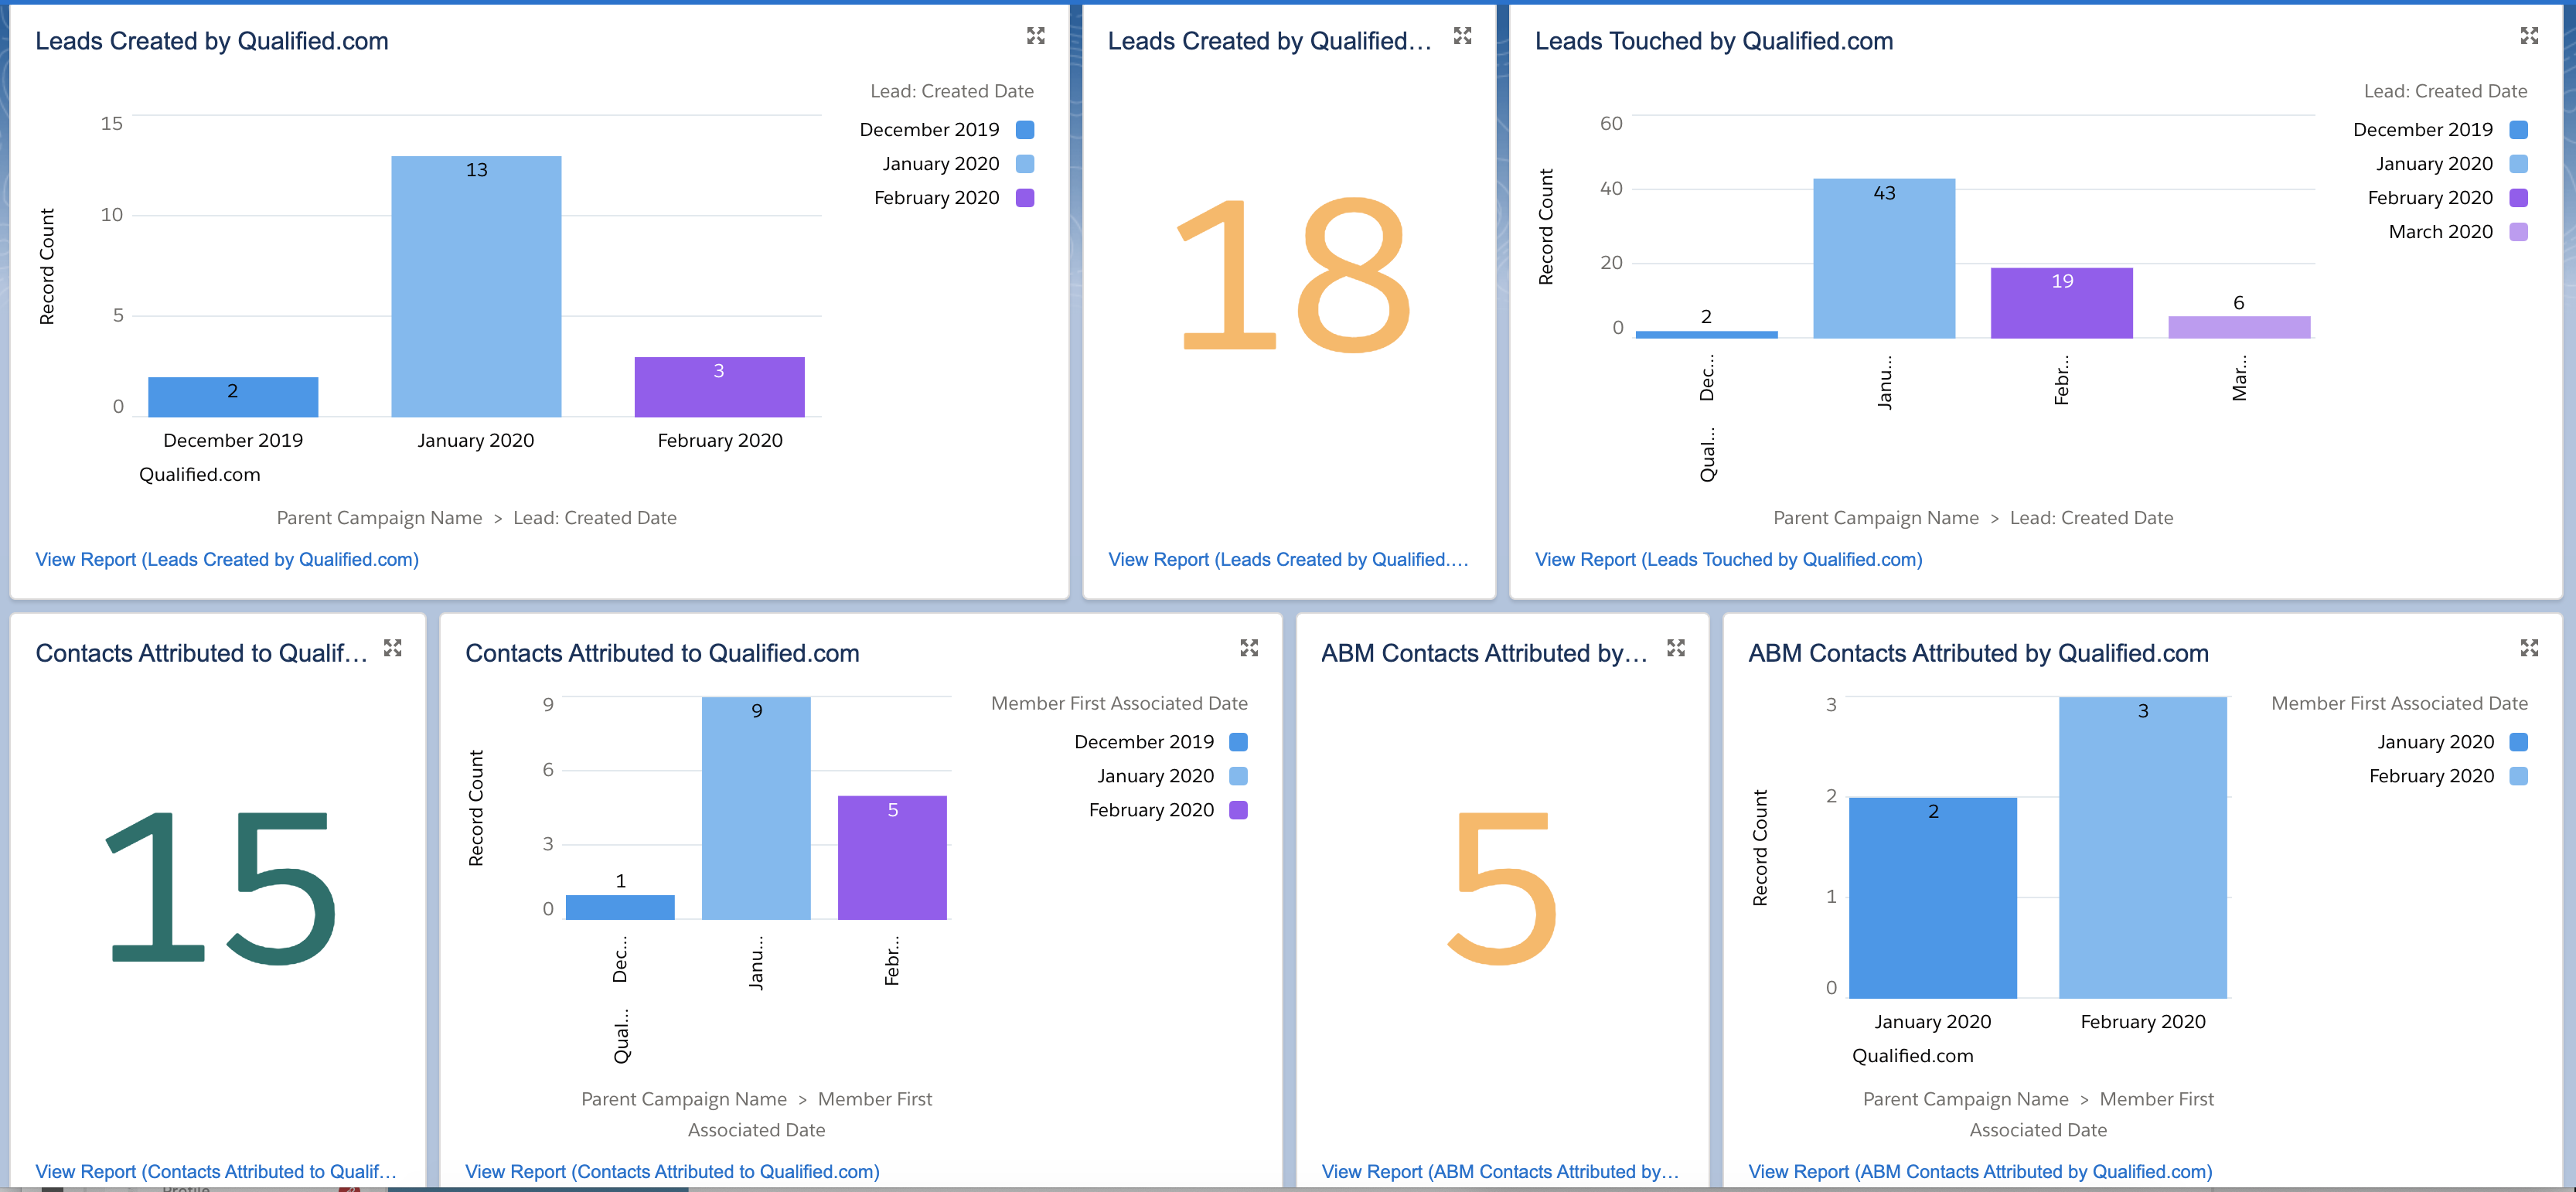
To get started, you’ll want to first create a brand new dashboard in Salesforce and name it Qualified.com Campaign Attribution or similar so that others will know that you’re specifically targeting Qualified's ROI.
Component #1: Leads Created by Qualified.com
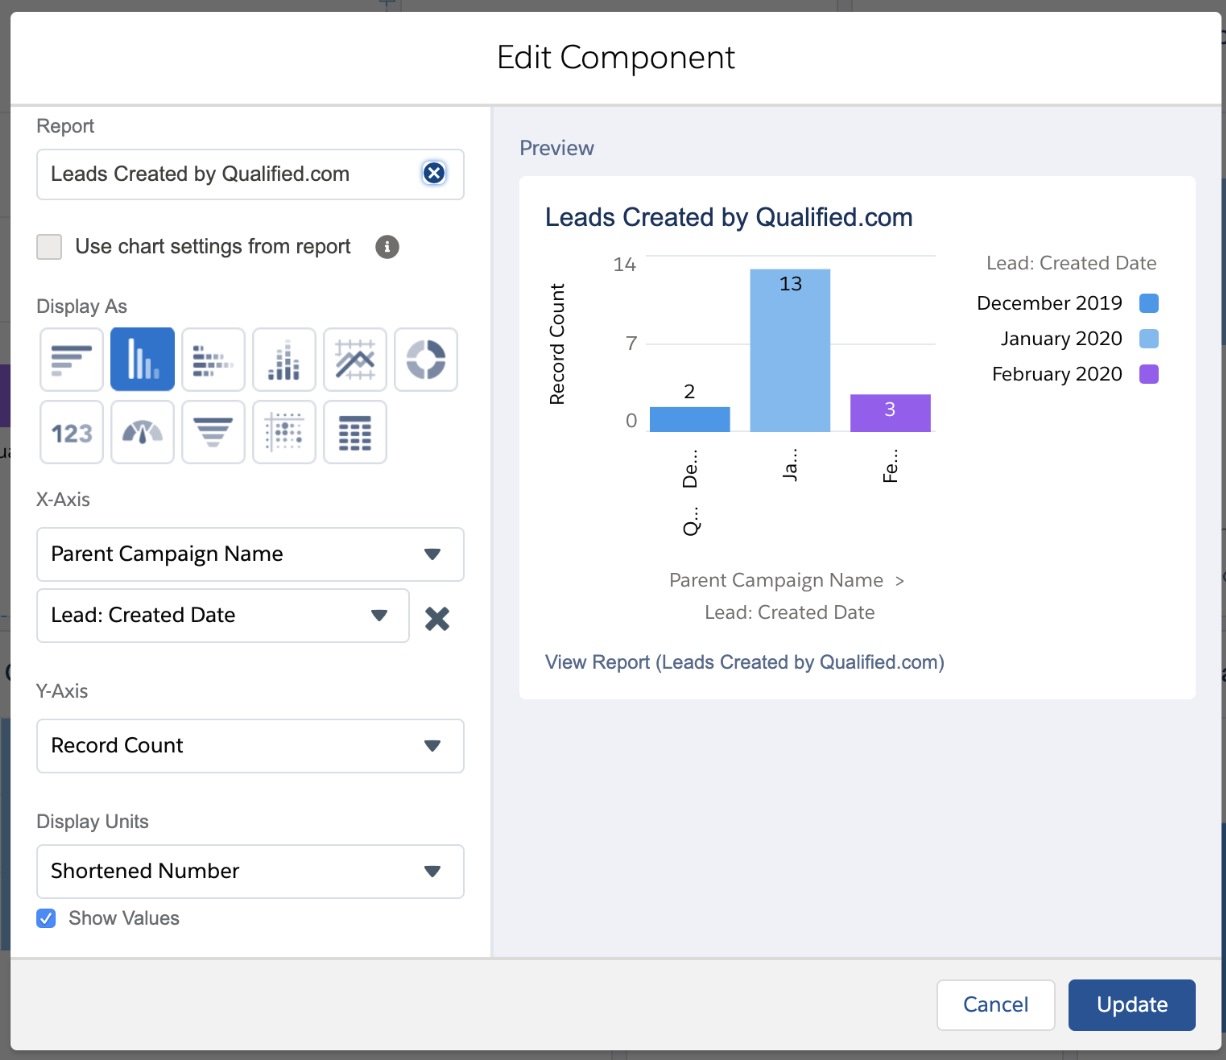
The first component you’ll want to create is based off the report we created earlier: Leads Created by Qualified.
To get started, select to create a new component in your dashboard. This component will help visualize how many Leads were actually created directly by chat bots or via your sales team using Qualified.
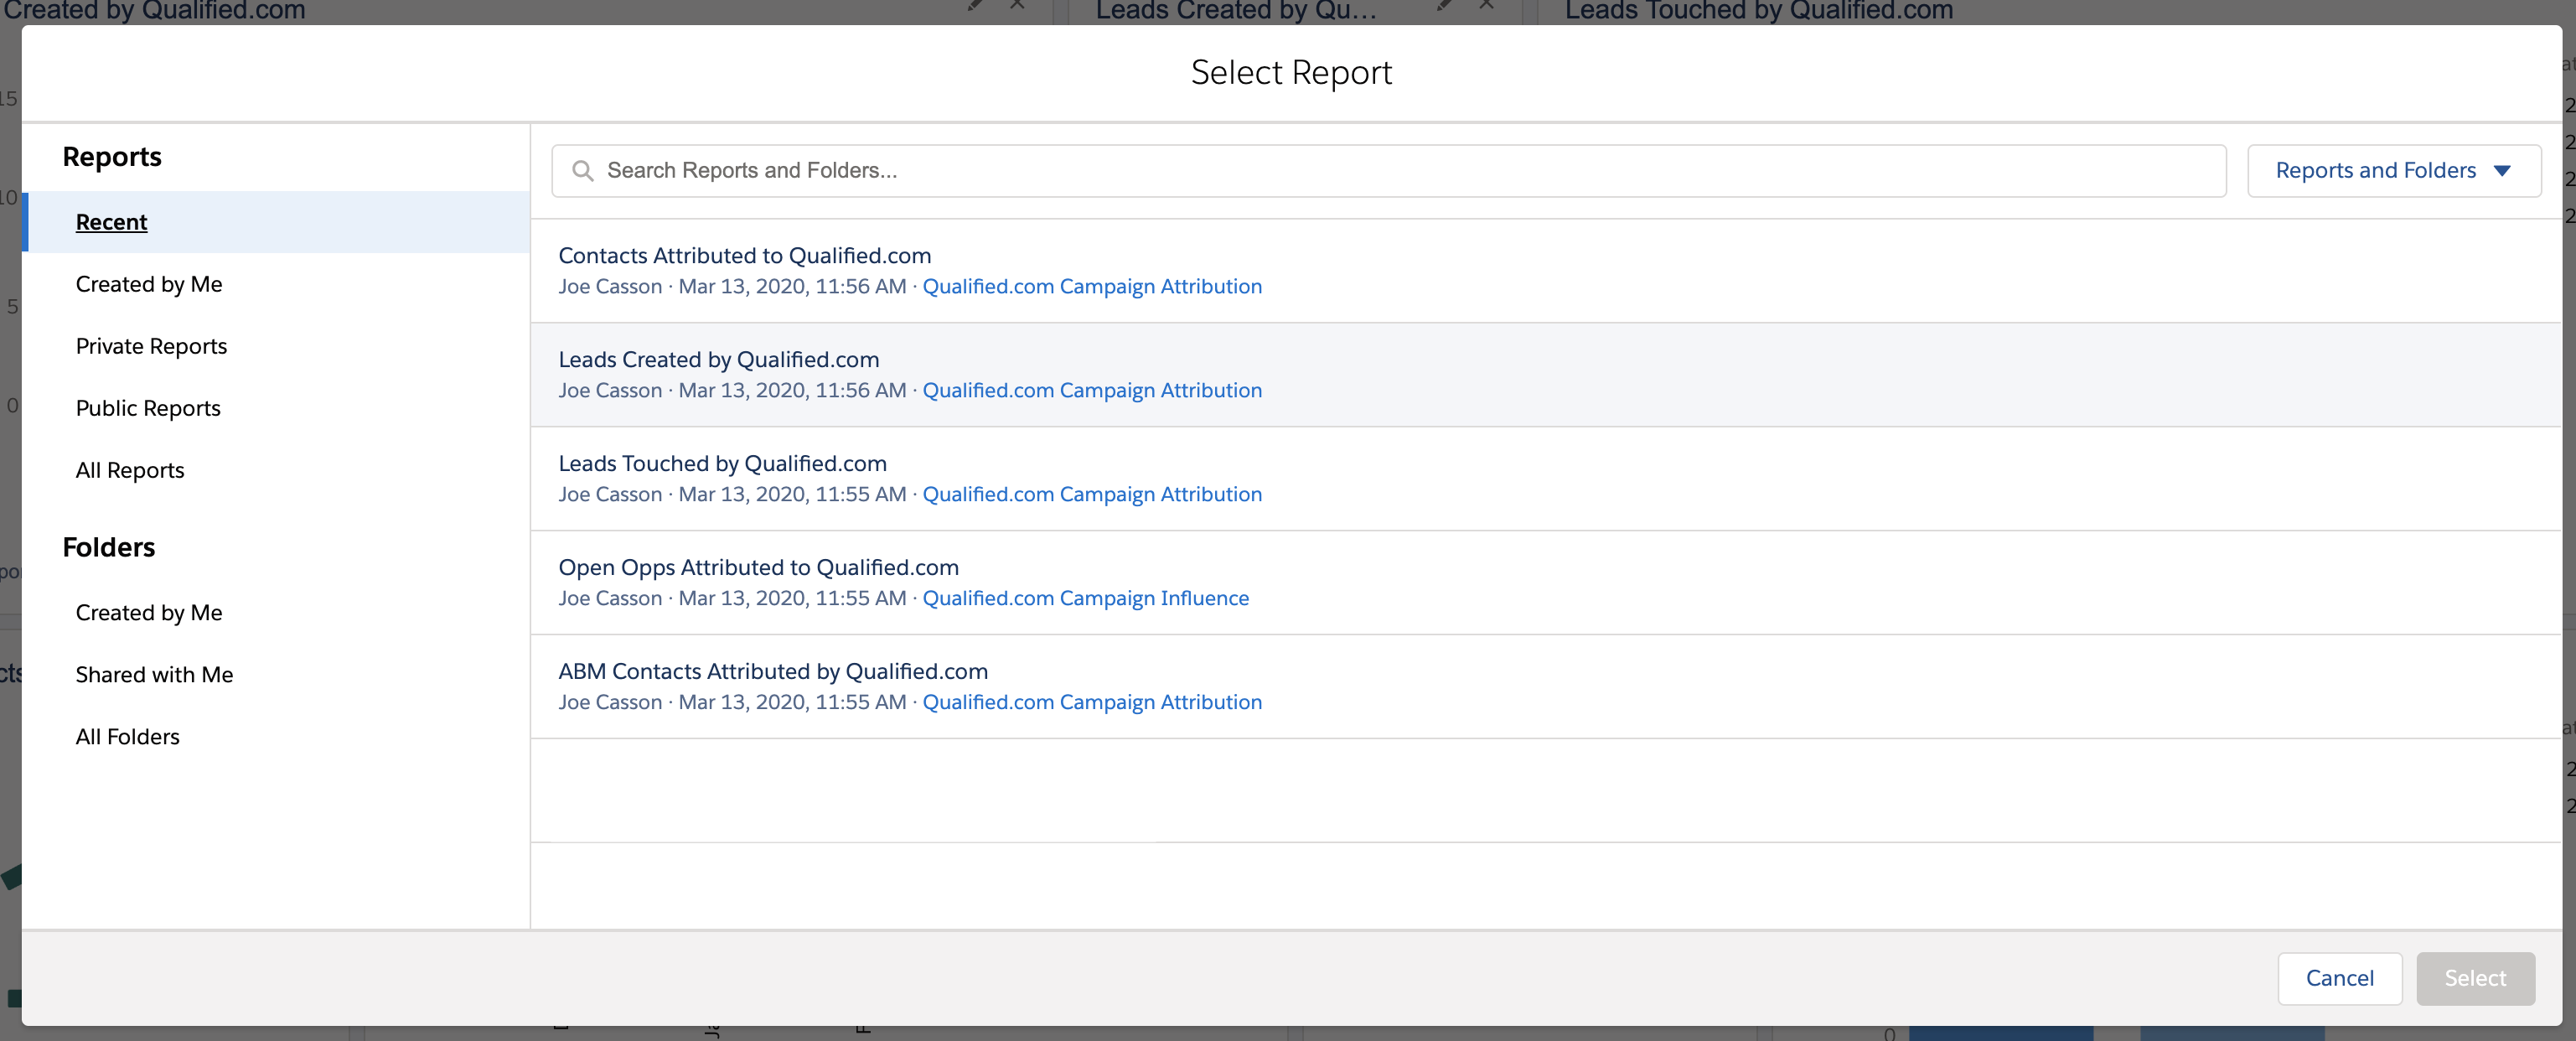
Next, select your report to create the component on your dashboard.
Change your component settings to the following:
- Display As: Bar Chart
- X-Axis: Campaign Name
Lead Created Date - Y-Axis: Record Count
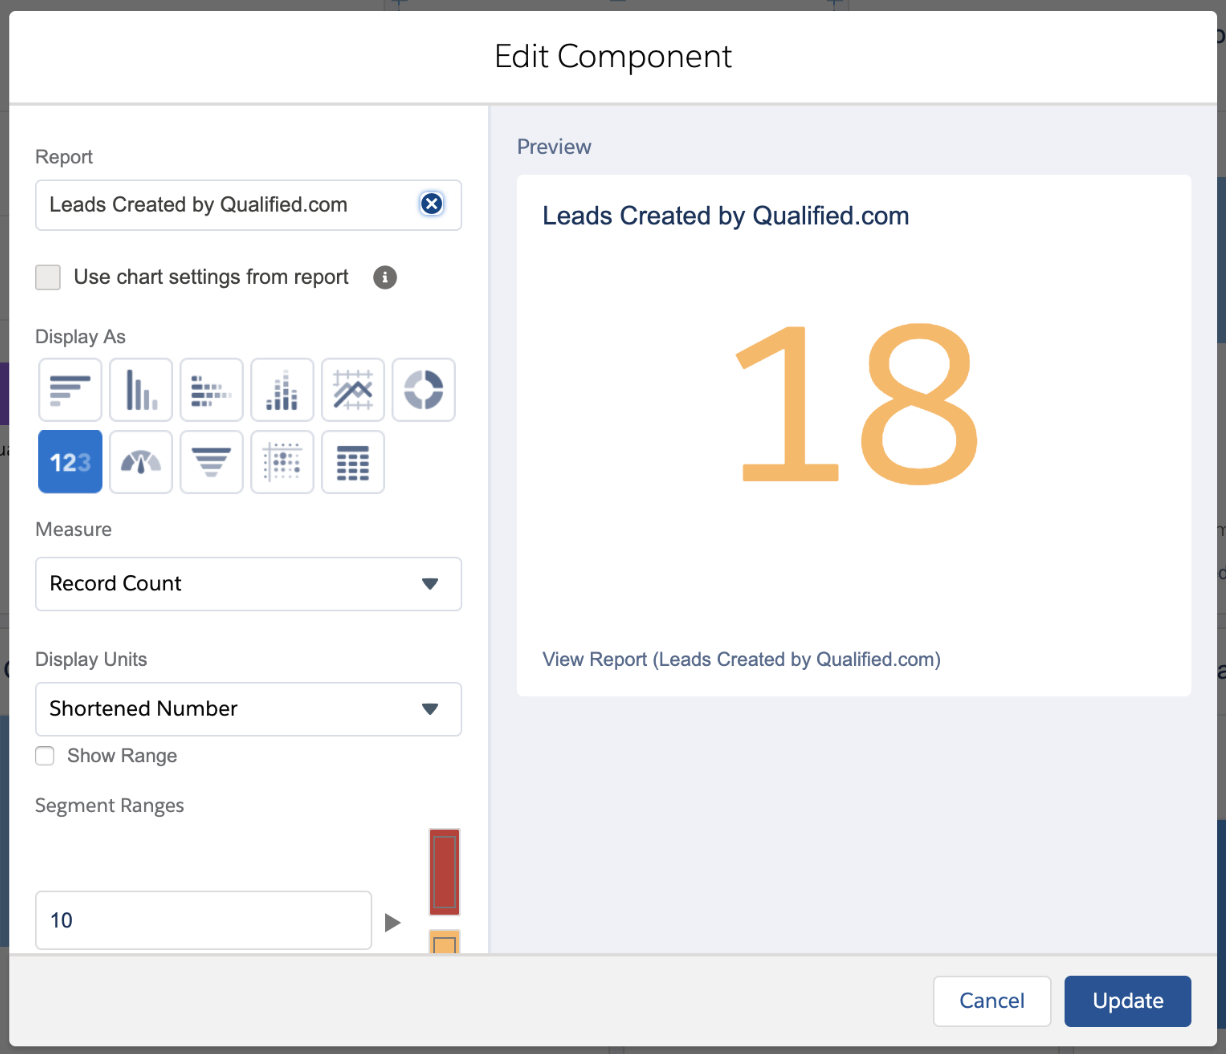
You can also choose to create a second component here based on the same report by creating a new component and selecting the display to be a full number as shown below.
Component #2: Leads Attributed to Qualified.com
The next component you’ll want to create will show you how many leads interacted with your chatbot or had a live chat with someone on your team.
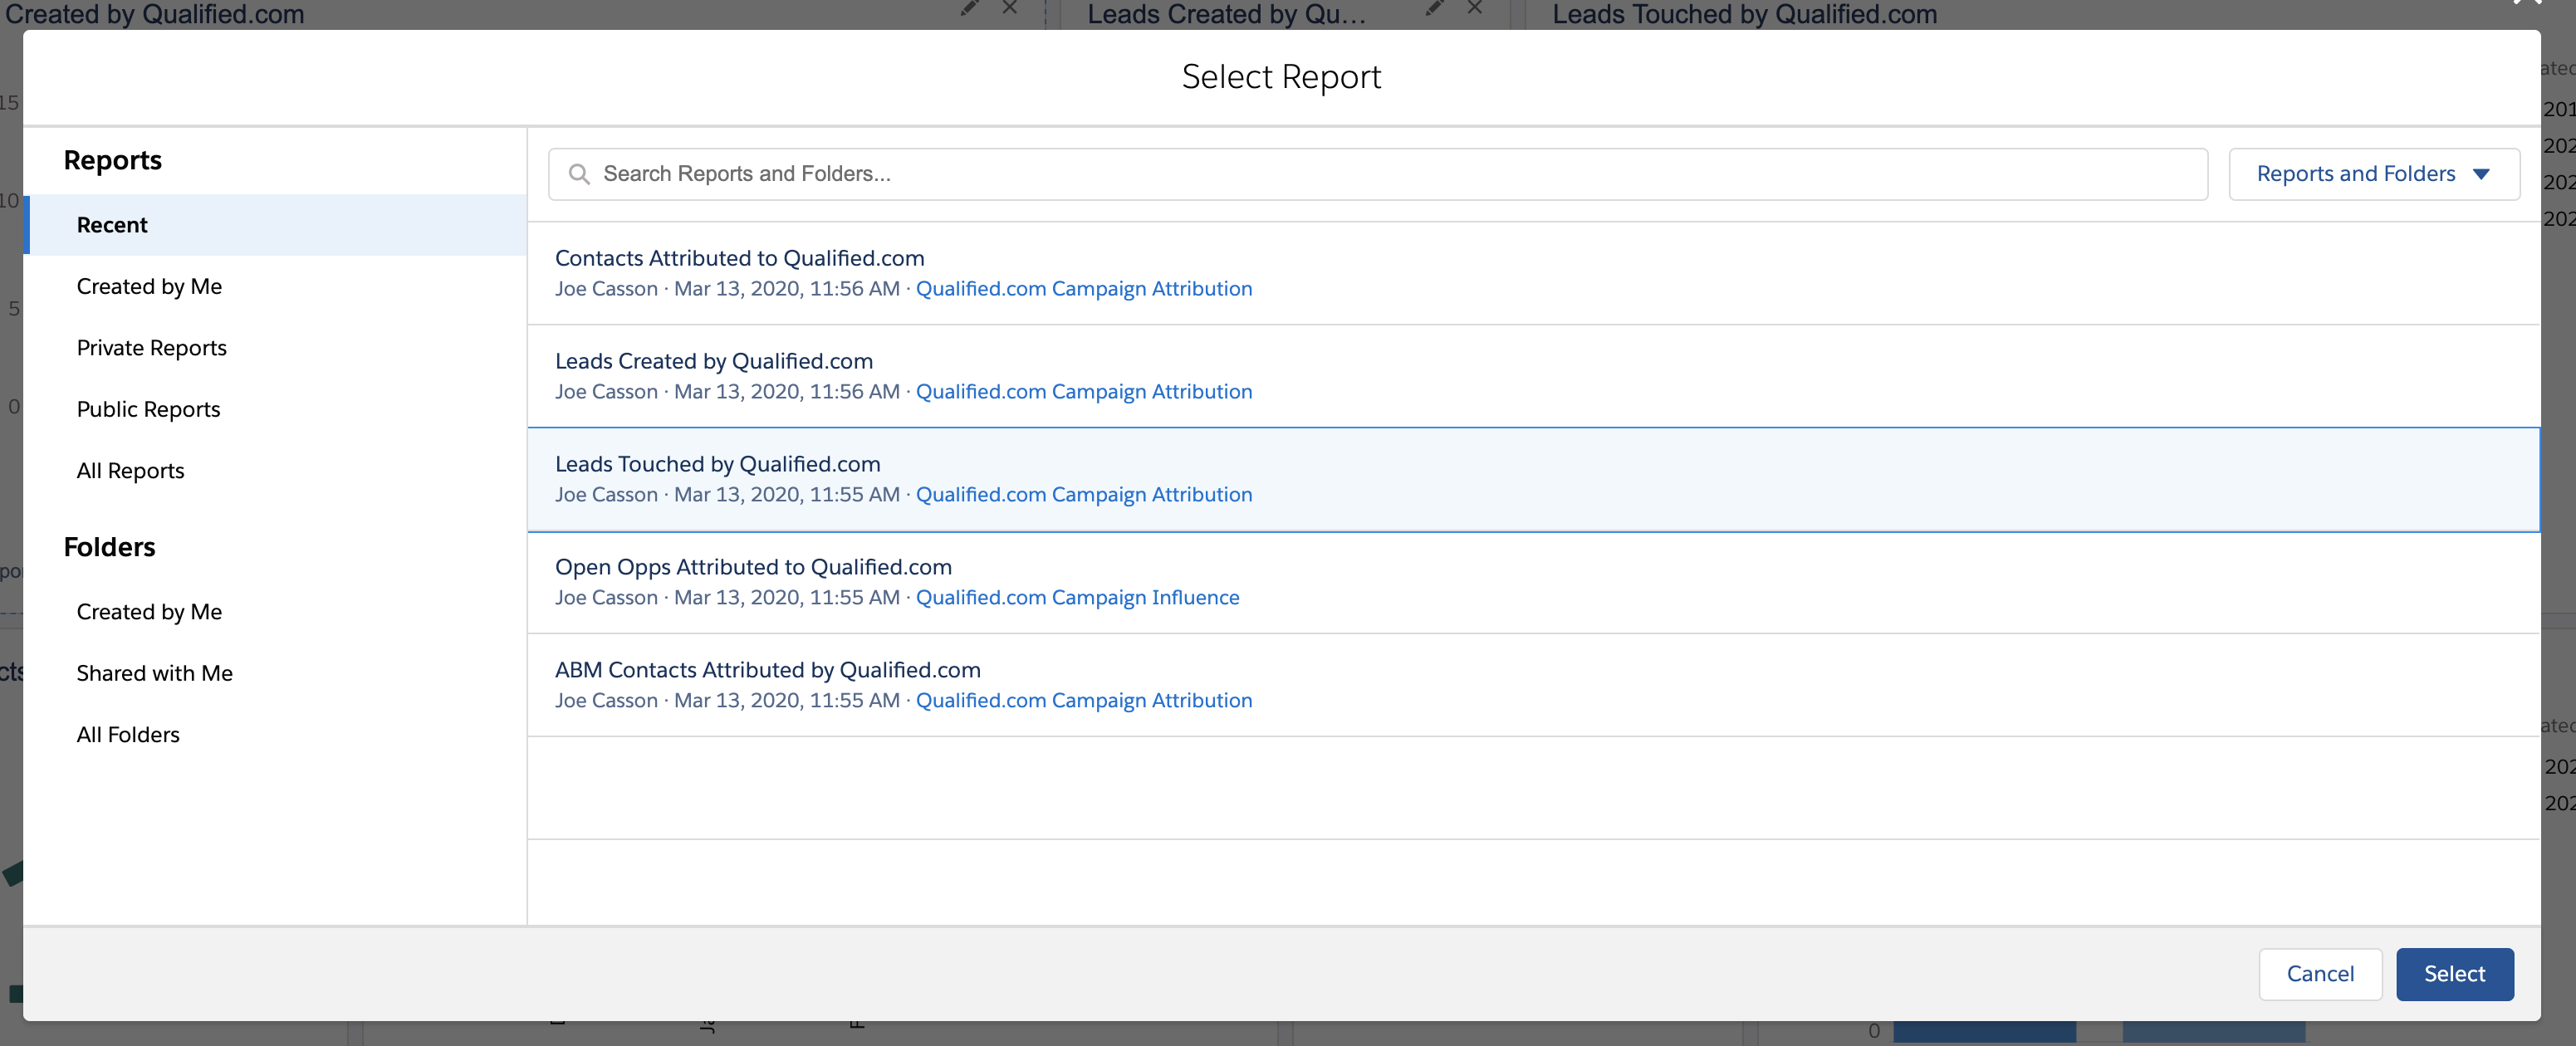
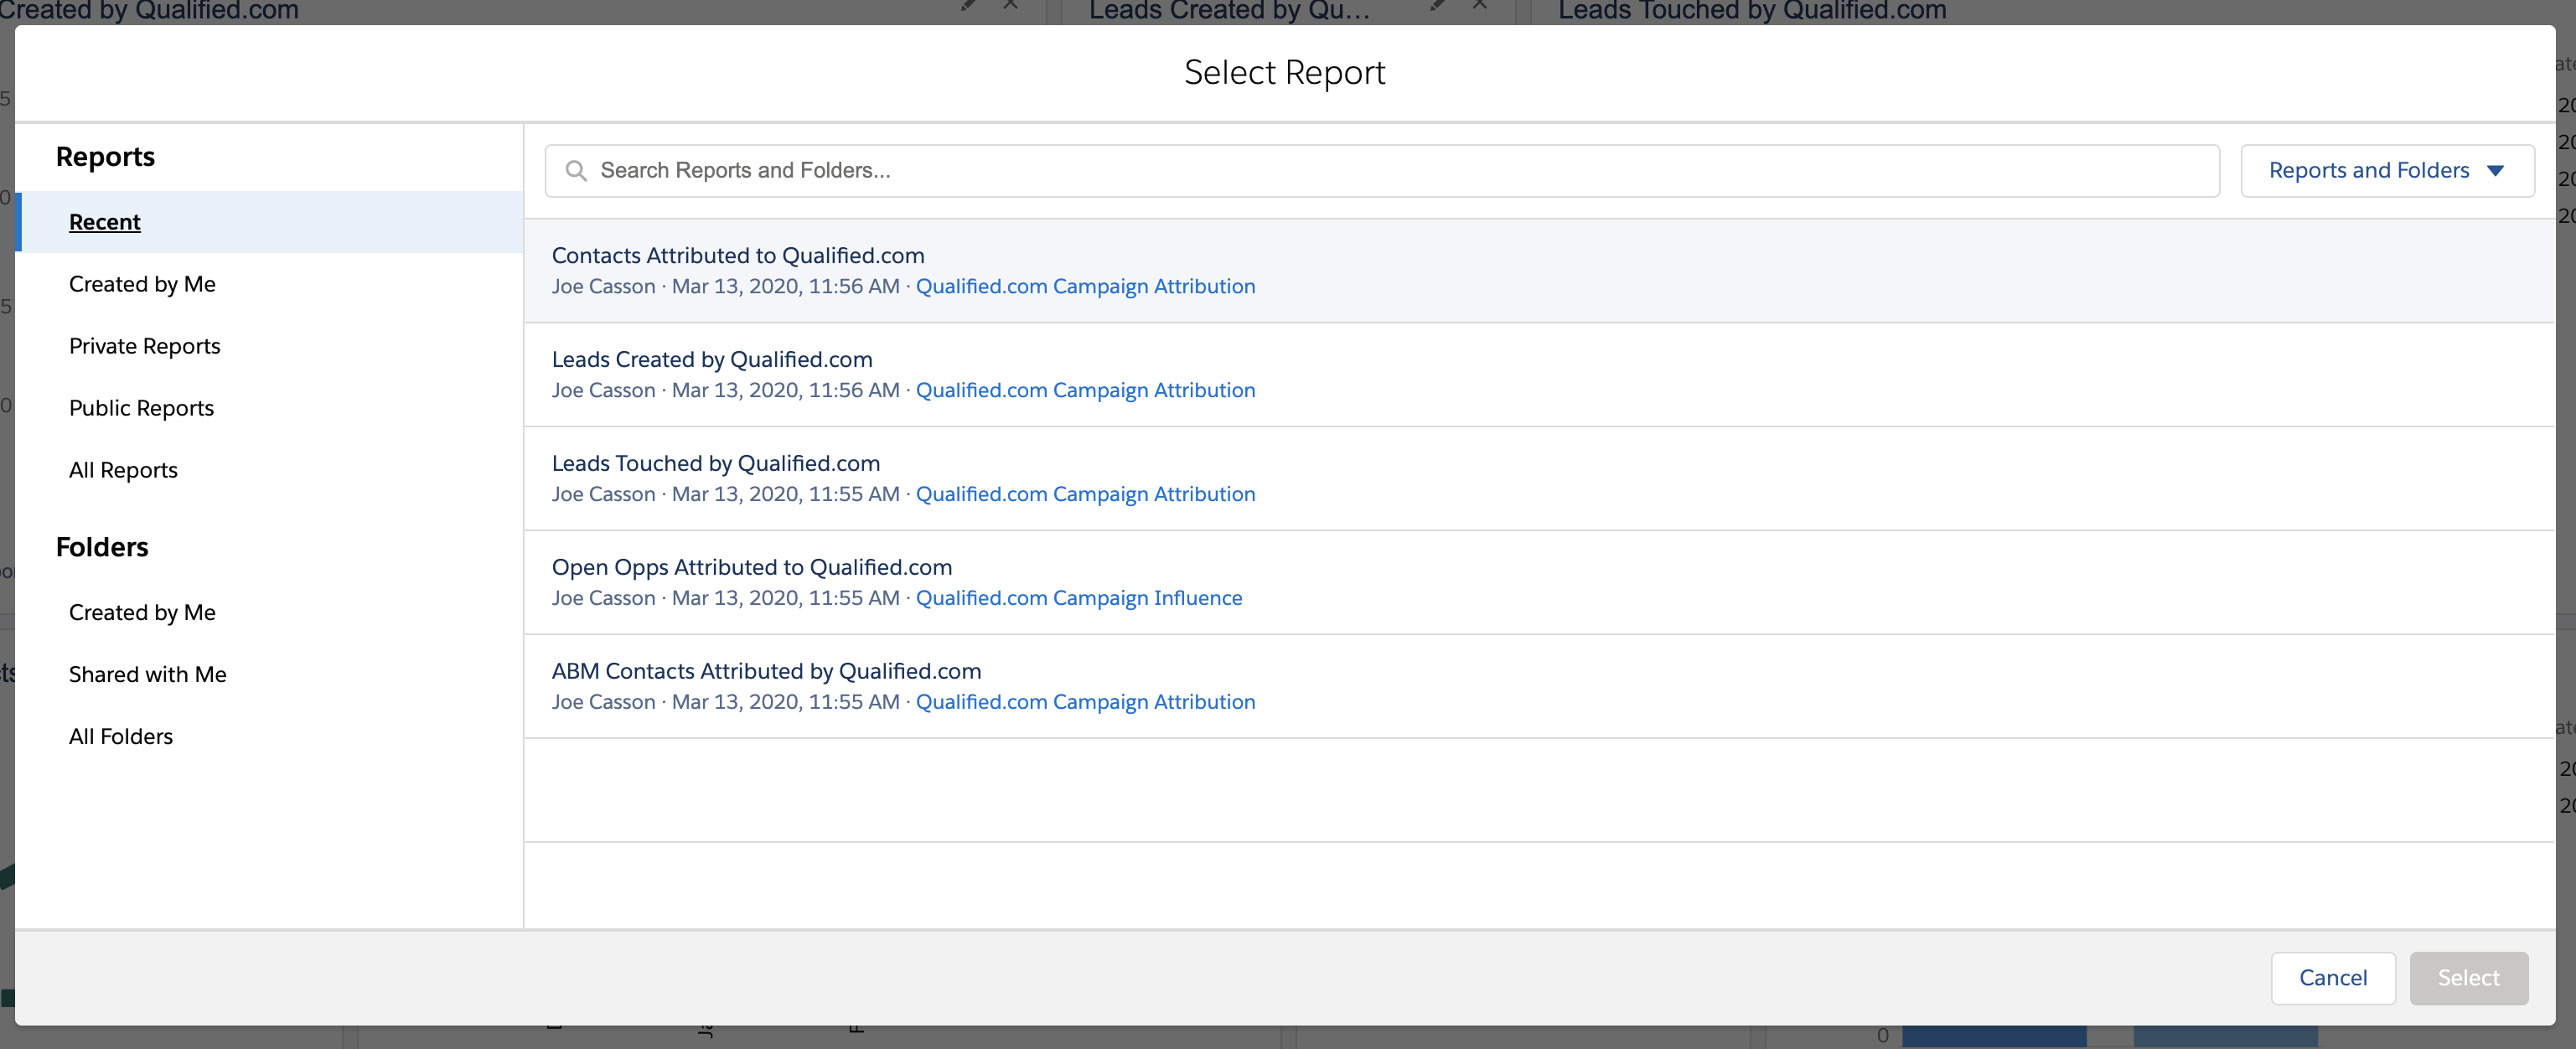
To get started, select to create a new component in your dashboard. Next, select the report we created earlier titled ‘Leads Attributed to Qualified.com’ as shown below to created your component.
Change your component settings to the following:
- Display As: Bar Chart
- X-Axis: Campaign Name
Lead Created Date - Y-Axis: Record Count
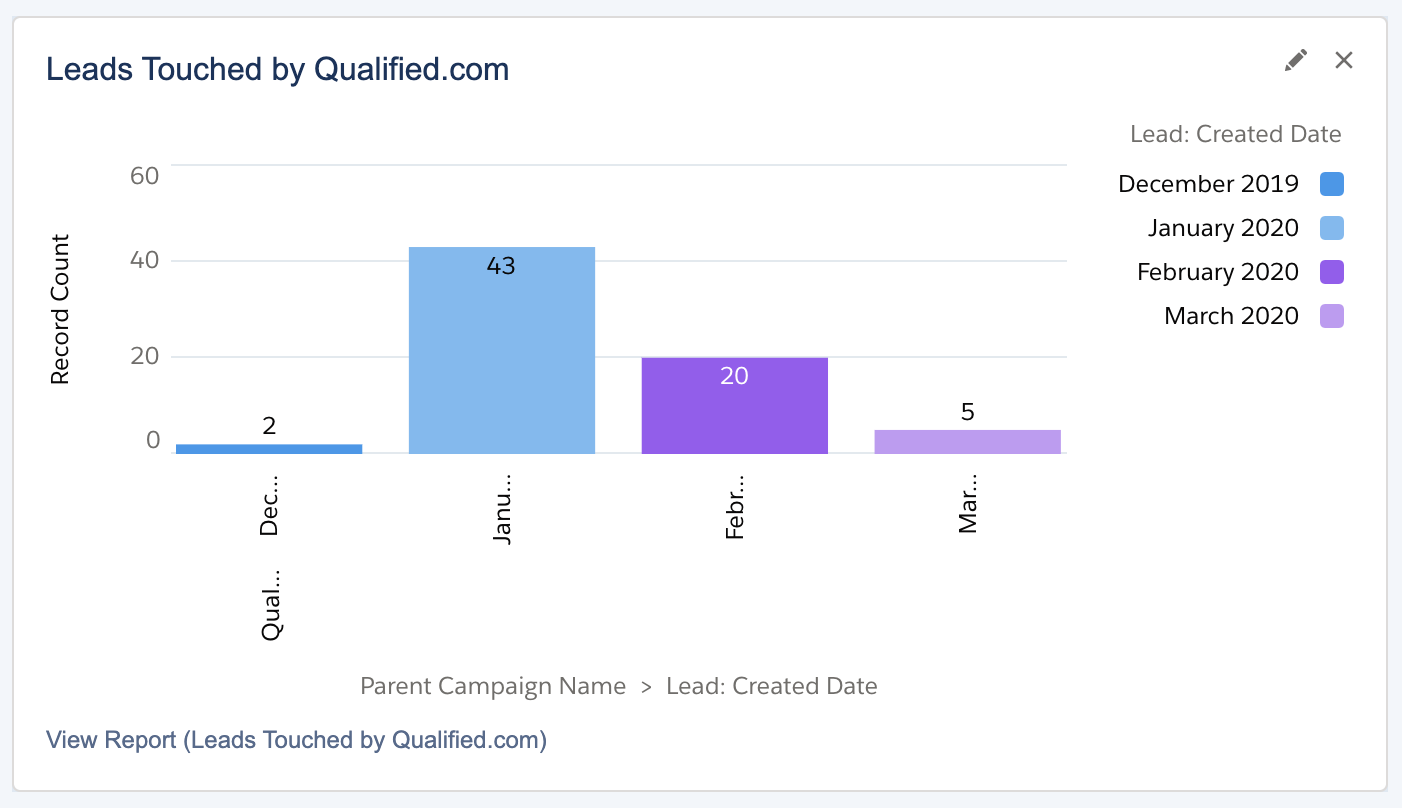
Just as with the component above, you can also add a second component using the same report using a round number to show all leads touched by Qualified.
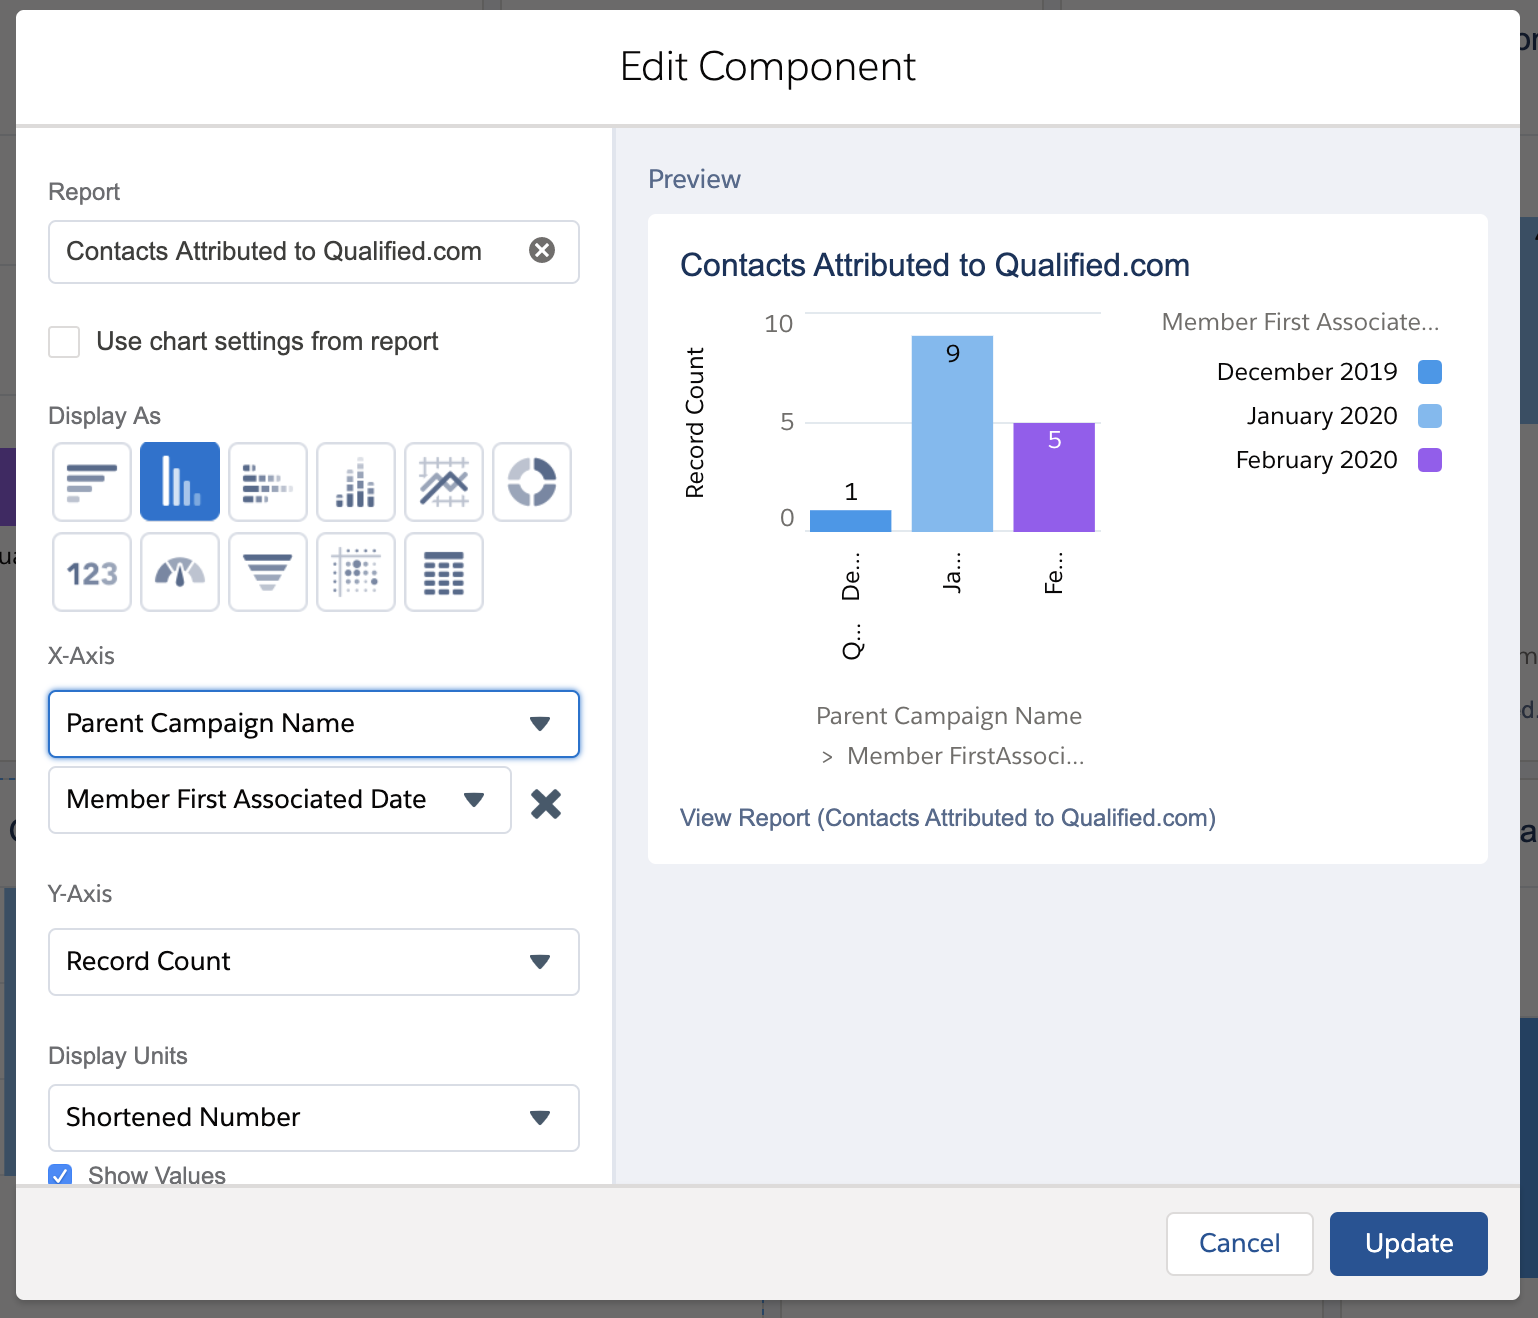
Component #3: Contacts Attributed to Qualified.com
The next component you’ll want to make sure to have on your dashboard is specifically tied to your existing contacts in Salesforce and which ones have had conversations within the Qualified app.
To get started, you’ll want to select to create a new component on your dashboard and select your report “Contacts Attributed to Qualified.com” to create the component as shown below.
Change your component settings to the following:
- Display As: Bar Chart
- X-Axis: Campaign Name
Member First Associated Date - Y-Axis: Record Count
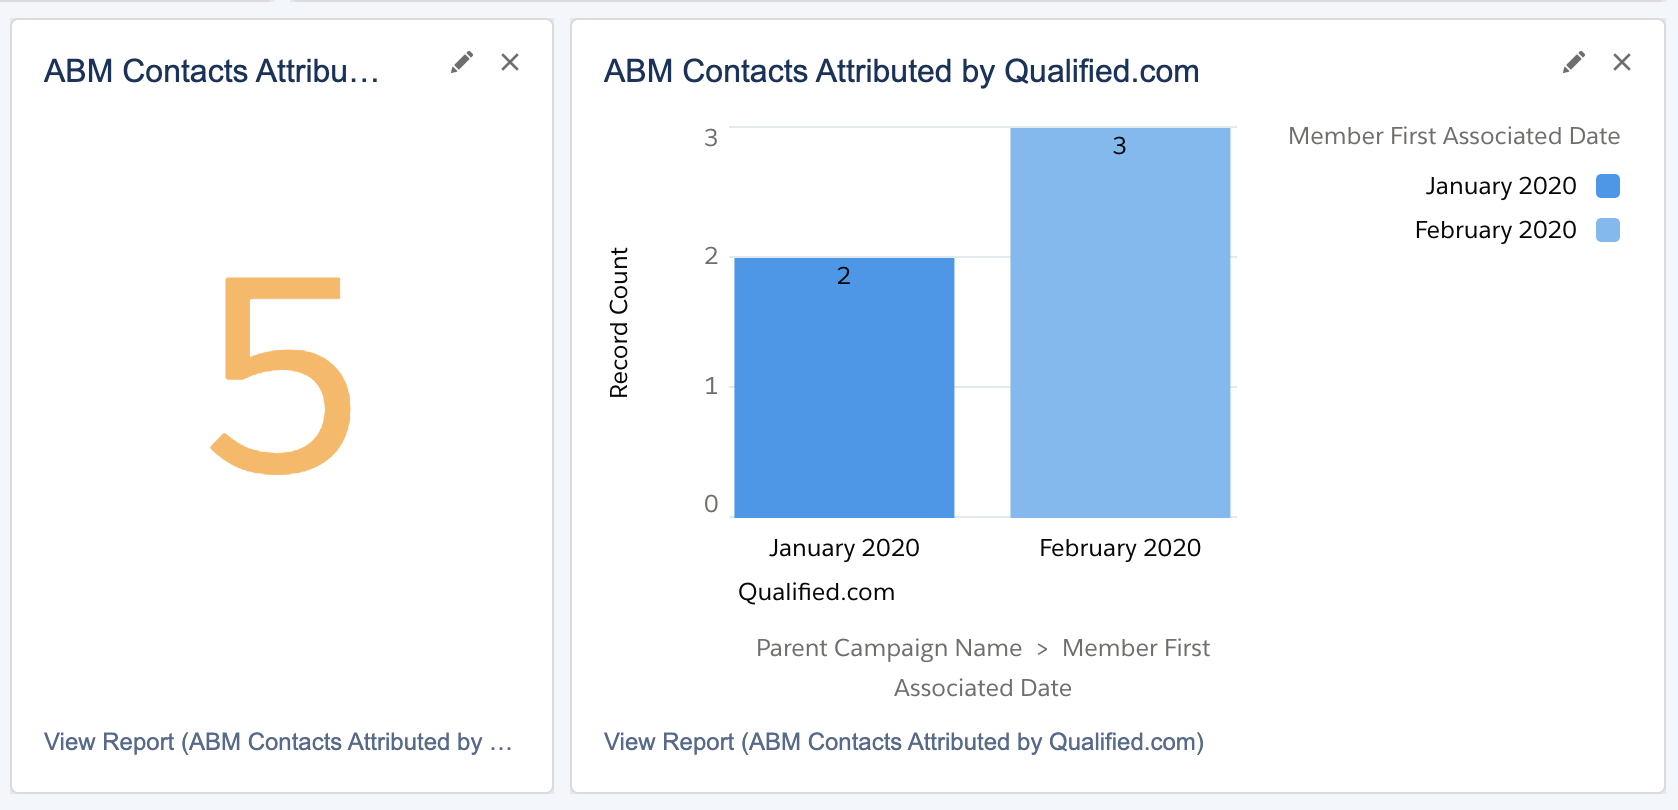
Component #4: ABM Contacts Attributed to Qualified.com
The final component you’ll want to make sure to create in your dashboard will be for your contacts that are part of your ABM model. In this component, we’ll show how many ABM contacts have had conversations with Qualified.
To get started, add a new component to your dashboard and select the report you created earlier titled, “ABM Contacts in Qualified.com”
Change your component settings to the following:
- Display As: Bar Chart
- X-Axis: Campaign Name
Member First Associated Date - Y-Axis: Record Count
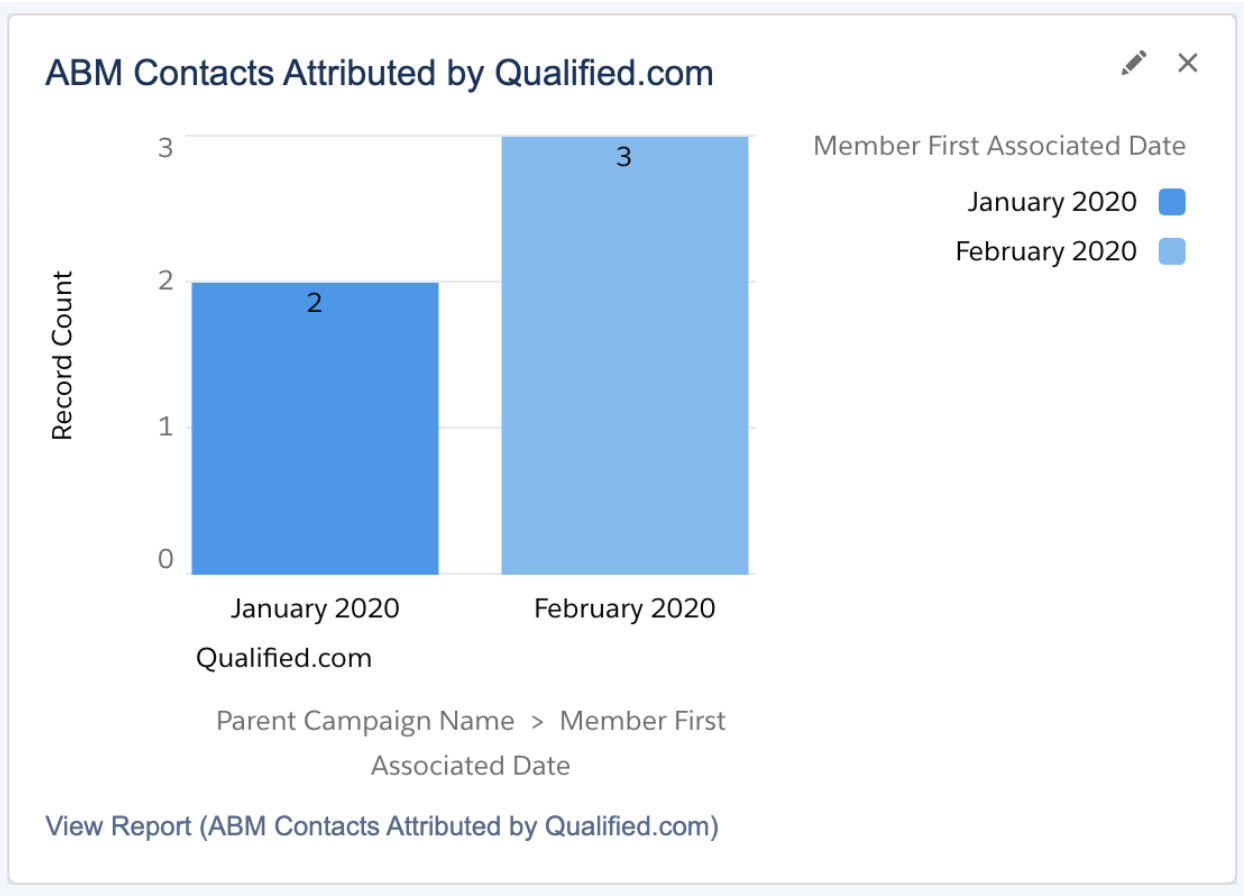
Just as with the component above, you can also add a second component using the same report using a round number to show all ABM Contacts touched by Qualified.com.
Heading 1
Heading 2
Heading 3
Heading 4
Heading 5
Heading 6
Lorem ipsum dolor sit amet, consectetur adipiscing elit, sed do eiusmod tempor incididunt ut labore et dolore magna aliqua. Ut enim ad minim veniam, quis nostrud exercitation ullamco laboris nisi ut aliquip ex ea commodo consequat. Duis aute irure dolor in reprehenderit in voluptate velit esse cillum dolore eu fugiat nulla pariatur.
Lorem ipsum dolor sit amet, consectetur adipiscing elit, sed do eiusmod tempor incididunt ut labore et dolore magna aliqua. Ut enim ad minim veniam, quis nostrud exercitation ullamco laboris nisi ut aliquip ex ea commodo consequat. Duis aute irure dolor in reprehenderit in voluptate velit esse cillum dolore eu fugiat nulla pariatur.
Lorem ipsum dolor sit amet, consectetur adipiscing elit, sed do eiusmod tempor incididunt ut labore et dolore magna aliqua. Ut enim ad minim veniam, quis nostrud exercitation ullamco laboris nisi ut aliquip ex ea commodo consequat. Duis aute irure dolor in reprehenderit in voluptate velit esse cillum dolore eu fugiat nulla pariatur.

Block quote
Ordered list
- Item 1
- asdfasdf
- asdfasdf
- asdfasdf
- Item 2
- Item 3
Unordered list
- Item A
- Item B
- Item C
Bold text
Emphasis
Superscript
Subscript
|
|---|
|


.svg)


