
Creating and Optimizing AI Offers
Qualified Offers allows you to offer customized content to your visitors while they’re on your website, serving top-of-funnel content to target audiences.
<span id="new-offer"></span>
Creating a New Offer
To create a new offer as a Qualified Admin:
1. Go to Settings → Website → Offers.
2. Click the + Create new offer button.
3. Configure the Audience and Design.
4. Click Save.
5. If you create multiple offers, make sure to drag and drop the offers to place them in priority order with the most targeted Offer at the top of the list, and the least Targeted offer at the bottom.
6. When ready, toggle the offer to “Active” to make it visible to visitors on your website.
Audience
Configuring the Audience for an offer consists of two parts: Segment and Display Conditions.
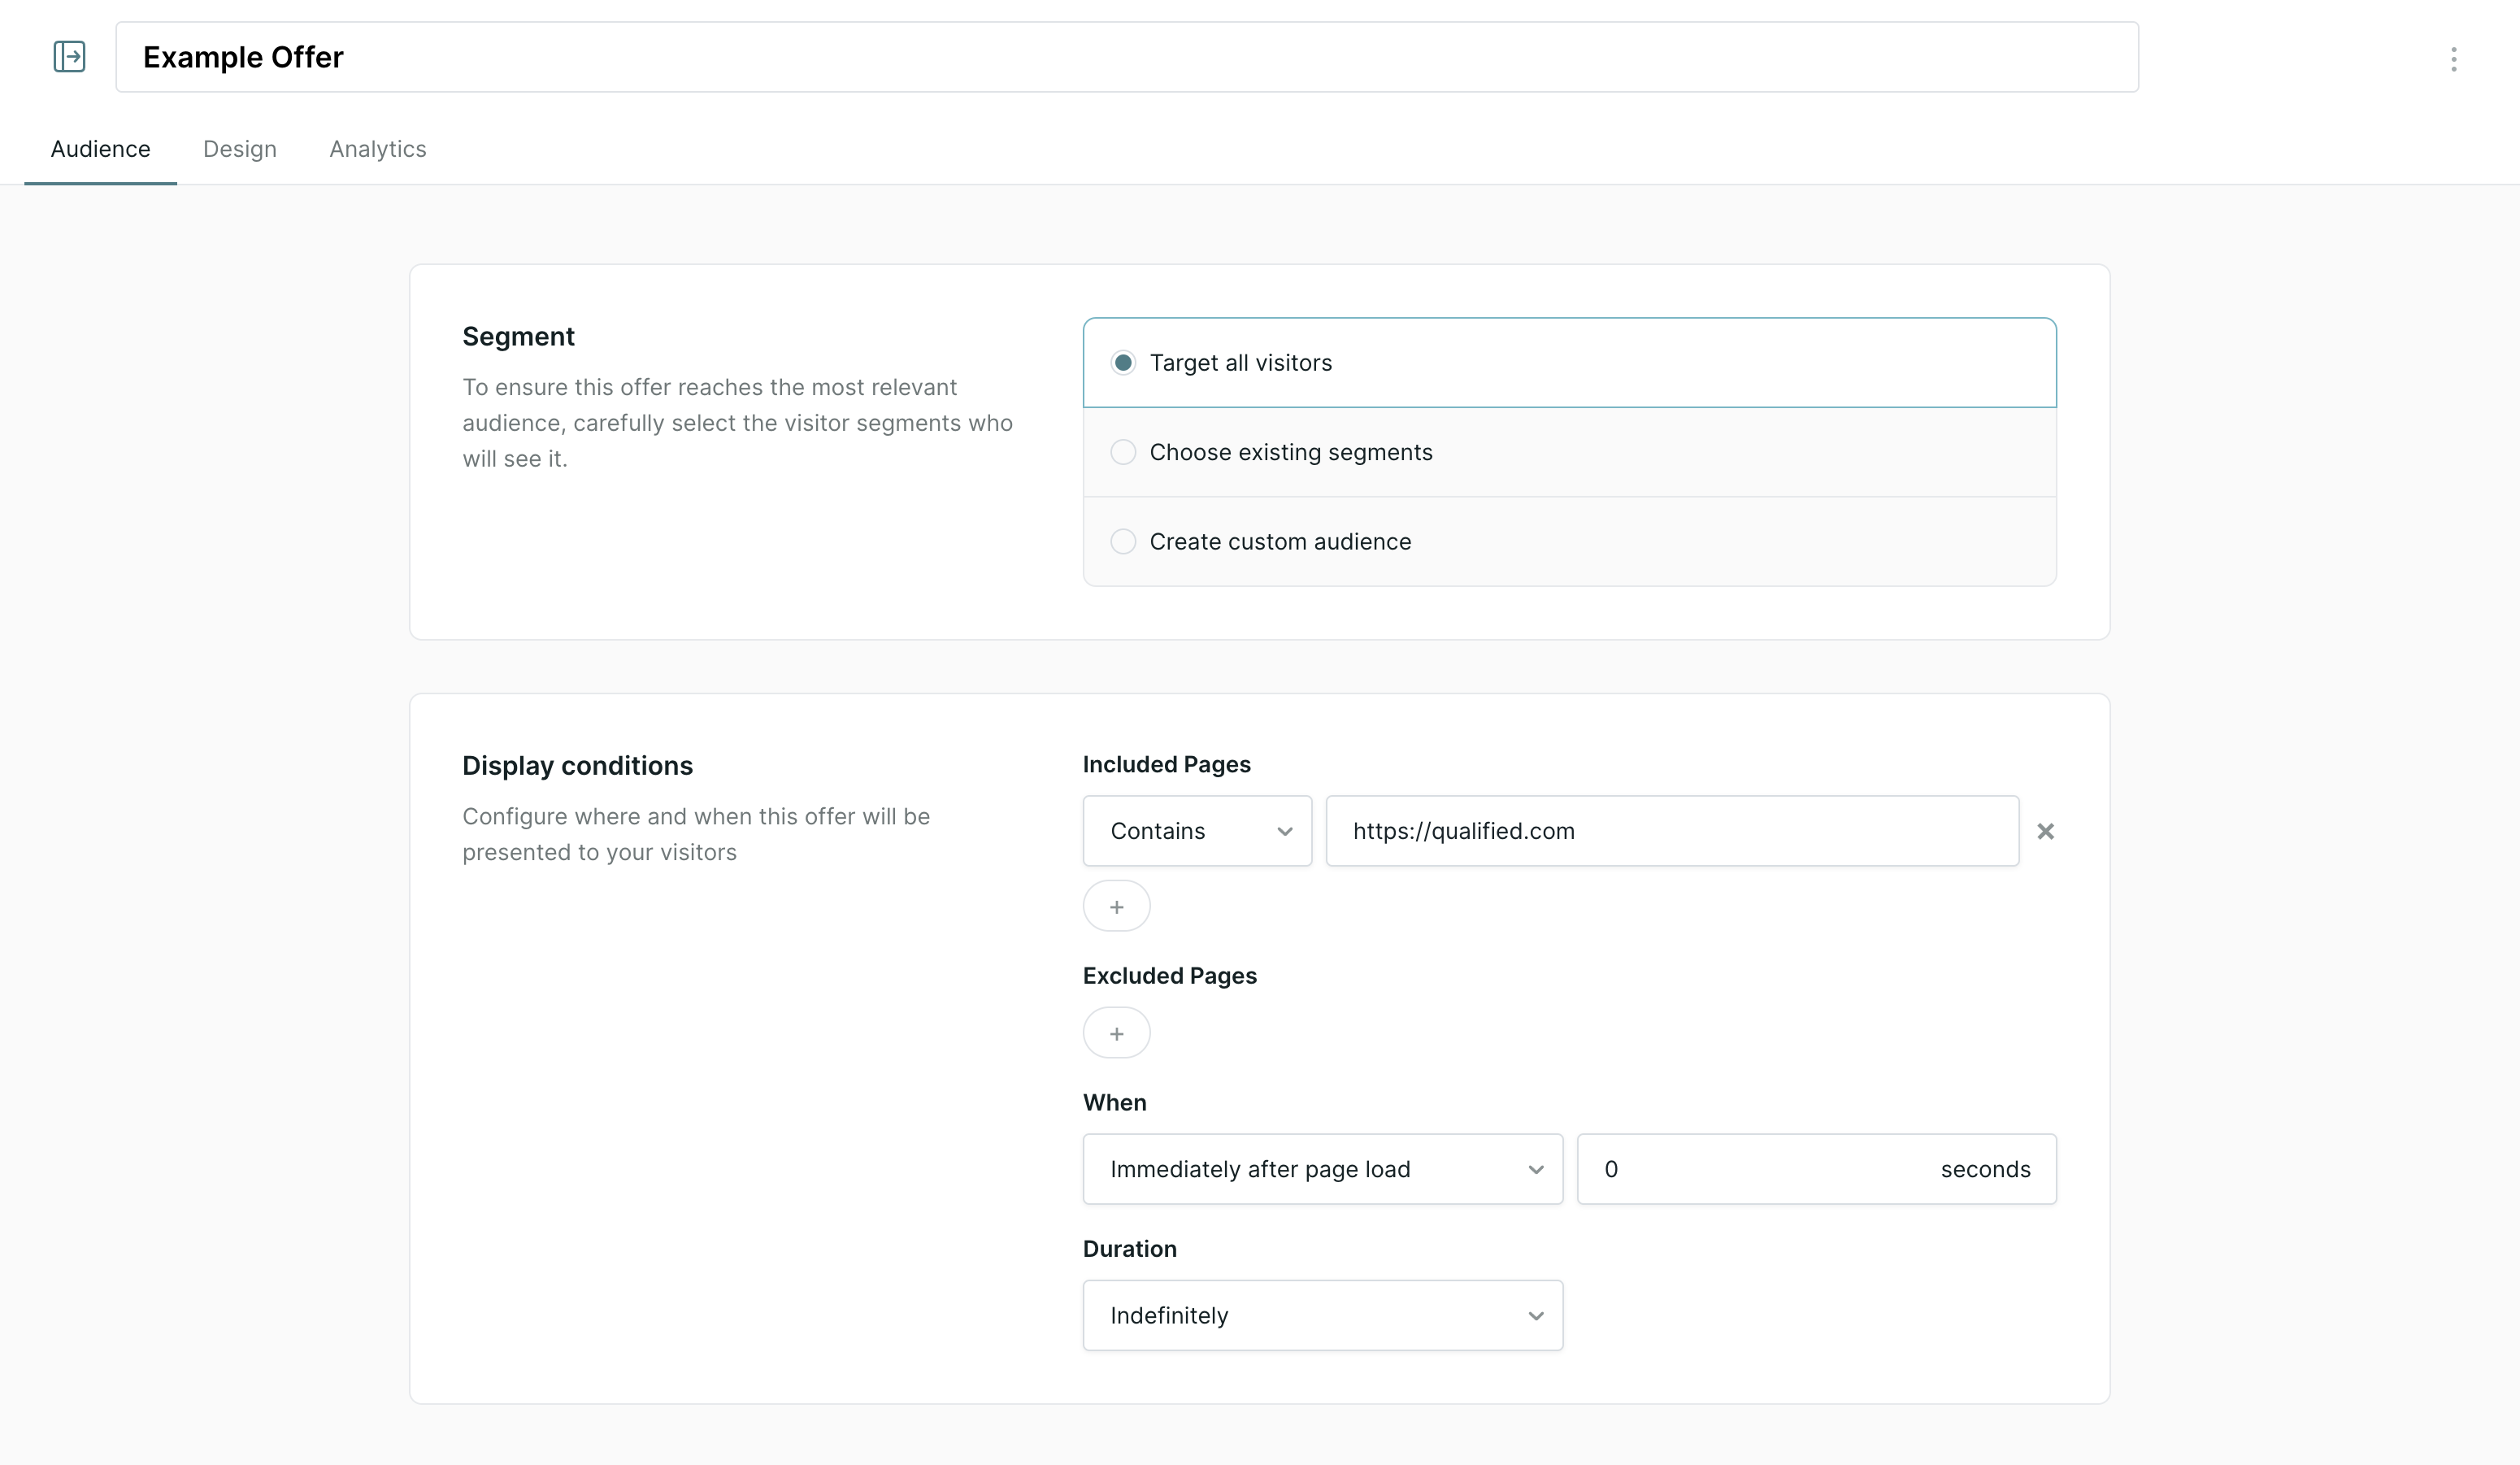
Segment
The Segment section allows you to select the audience that should see the Offer. You have the following options available:
- Target all visitors - will be displayed to all visitors matching the display conditions below
- Choose existing segments - will be displayed to visitors matching the select segment(s) and the display conditions below.
- Learn how to configure visitor segments here.
- Create custom audience - will be displayed to visitors matching the custom audience criteria and the display conditions below.
Display conditions
Configure where and when this offer will be presented to visitors identified in the Segment section.
1. Add Included Pages and/or Excluded Pages
2. Determine When to display the offer:
- Immediately after page load
- When user shows exit intent
3. Add the Duration for the offer by choosing one of the following:
- Date Range, then select the date range of when the offer will be active
- Indefinitely
4. Click Save, and you're ready to start designing the offer.
Design
Now it’s time for the fun part - designing the Offer! When you click the Design tab, you should see the page you added to the Display conditions loaded in Qualified, along with a preview of the Offer.
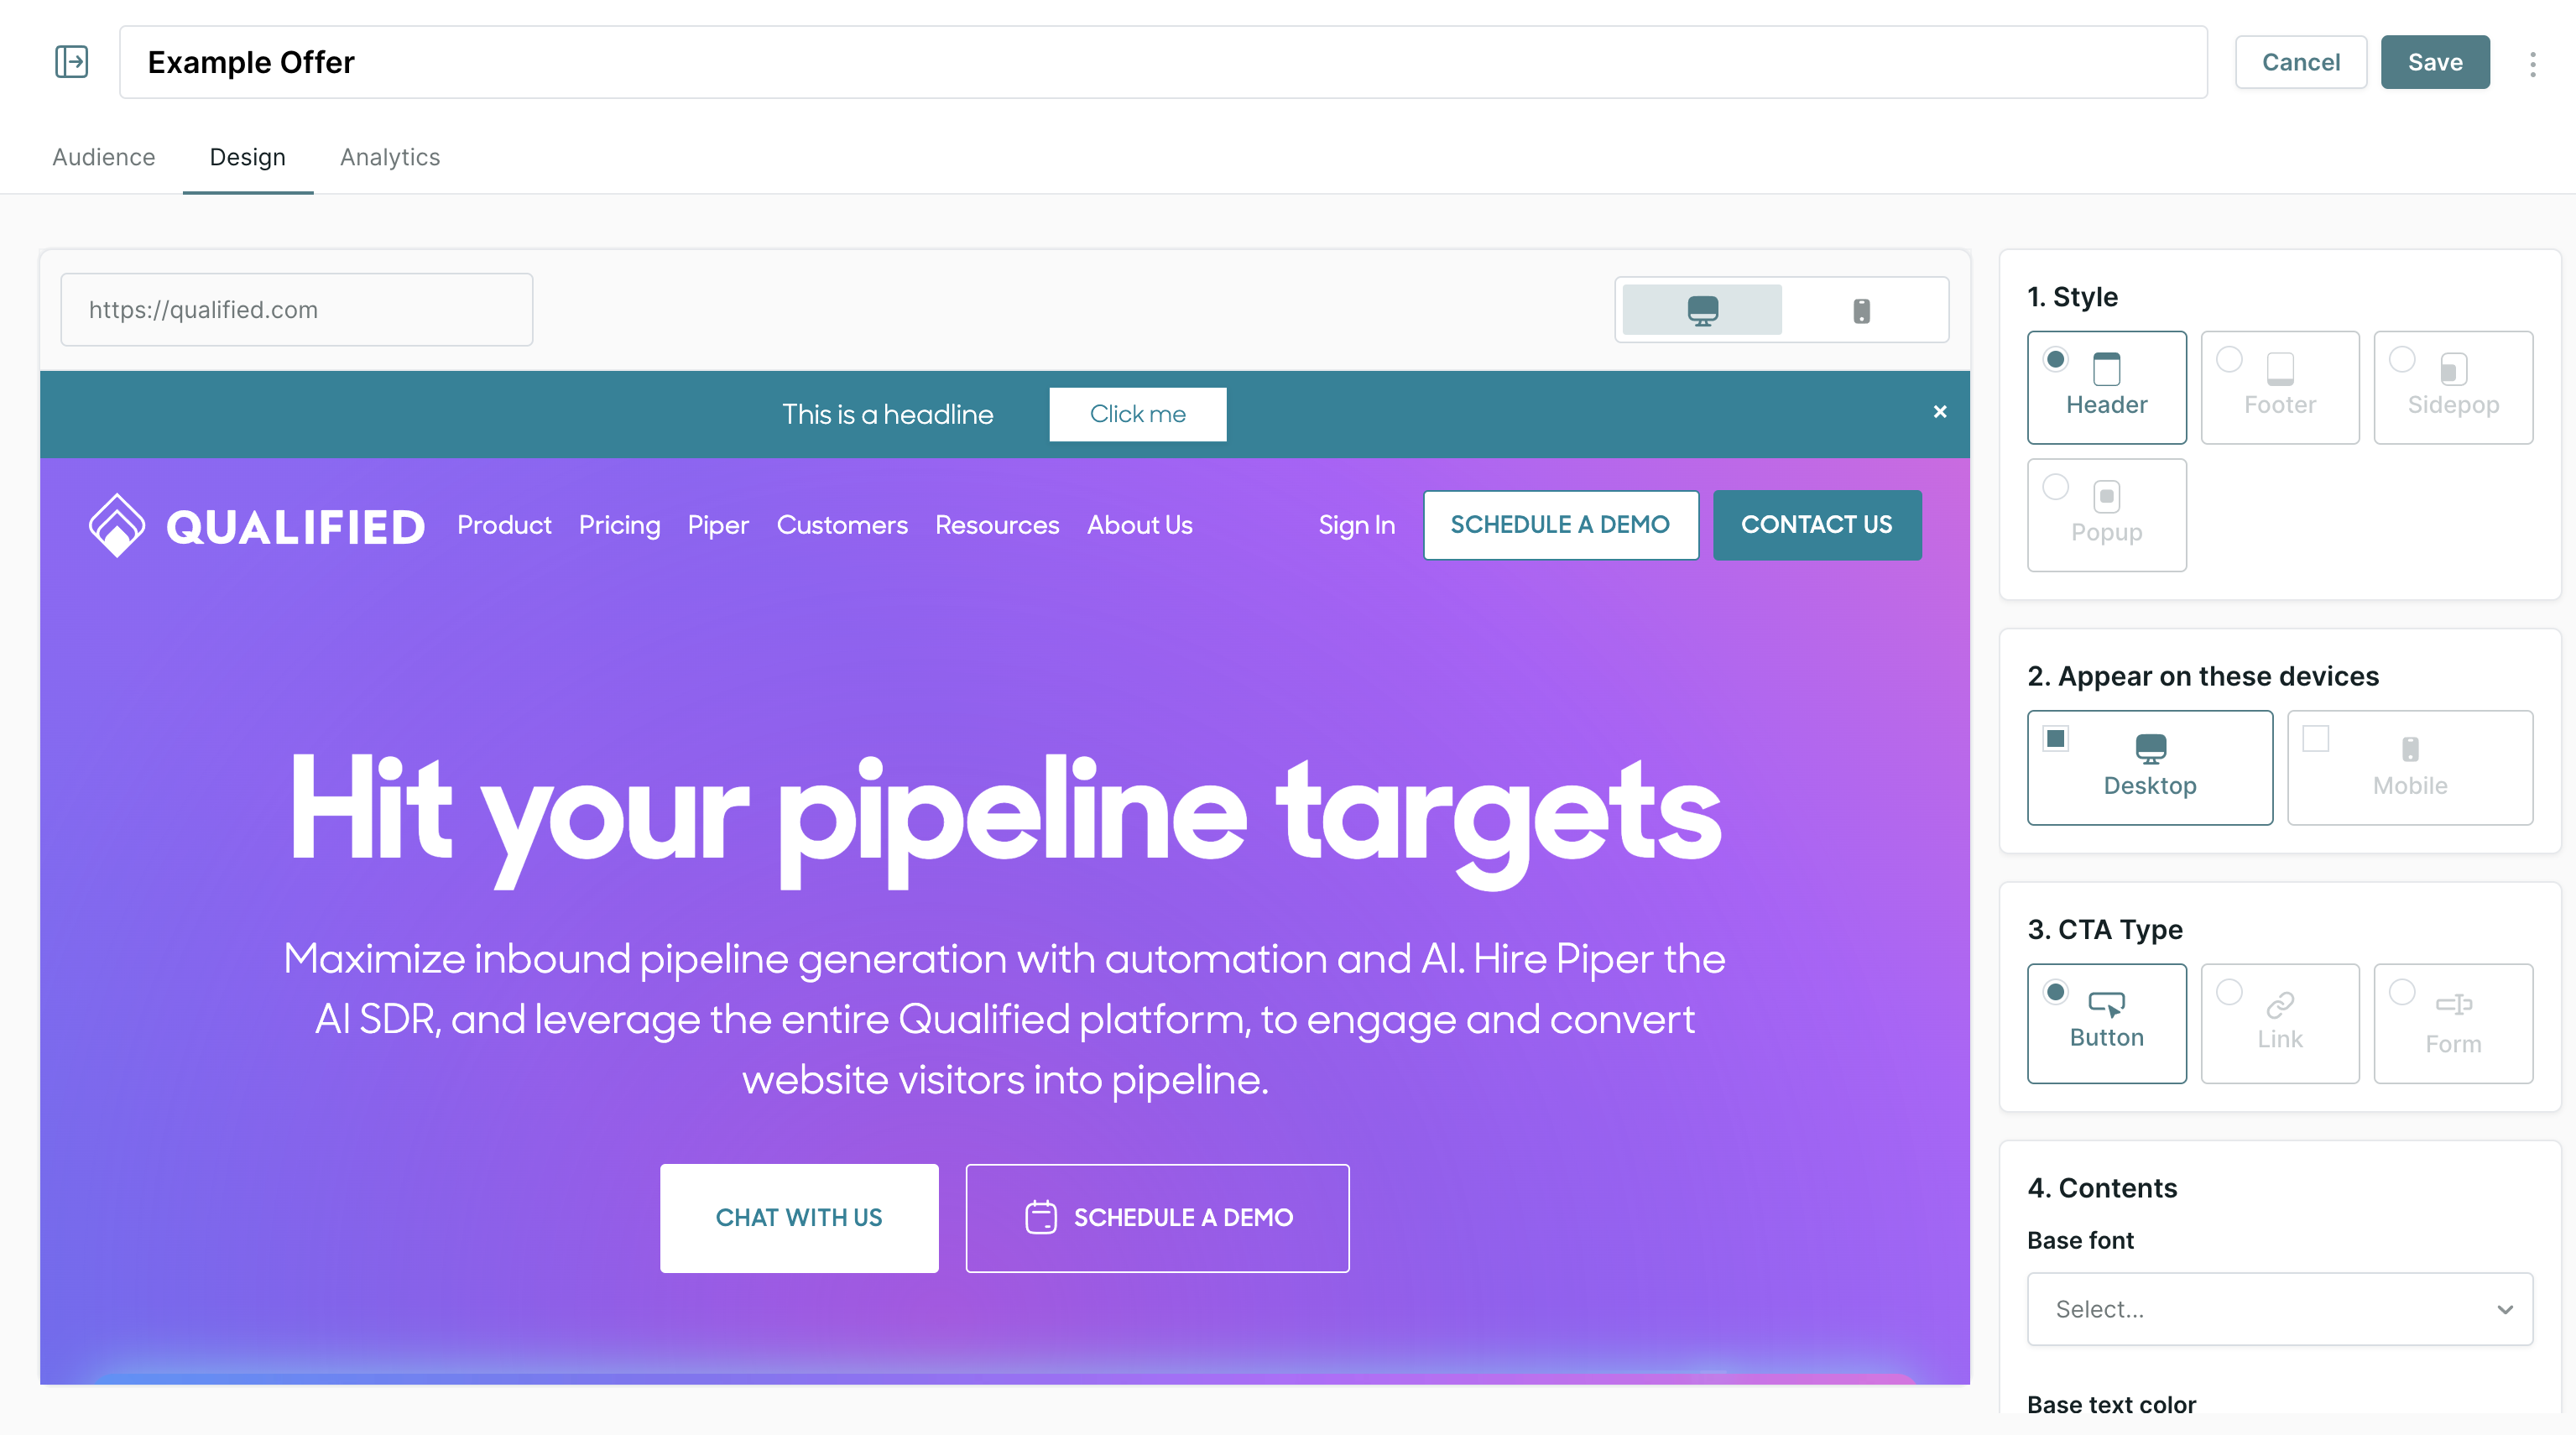
Follow the steps outlined below (and in-app) to customize the design of the offer:
1. Choose the Style of the offer:
- Header
- Footer
- Sidepop
- Popup
2. Under Appear on these devices choose which devices you would like to display the offer on.
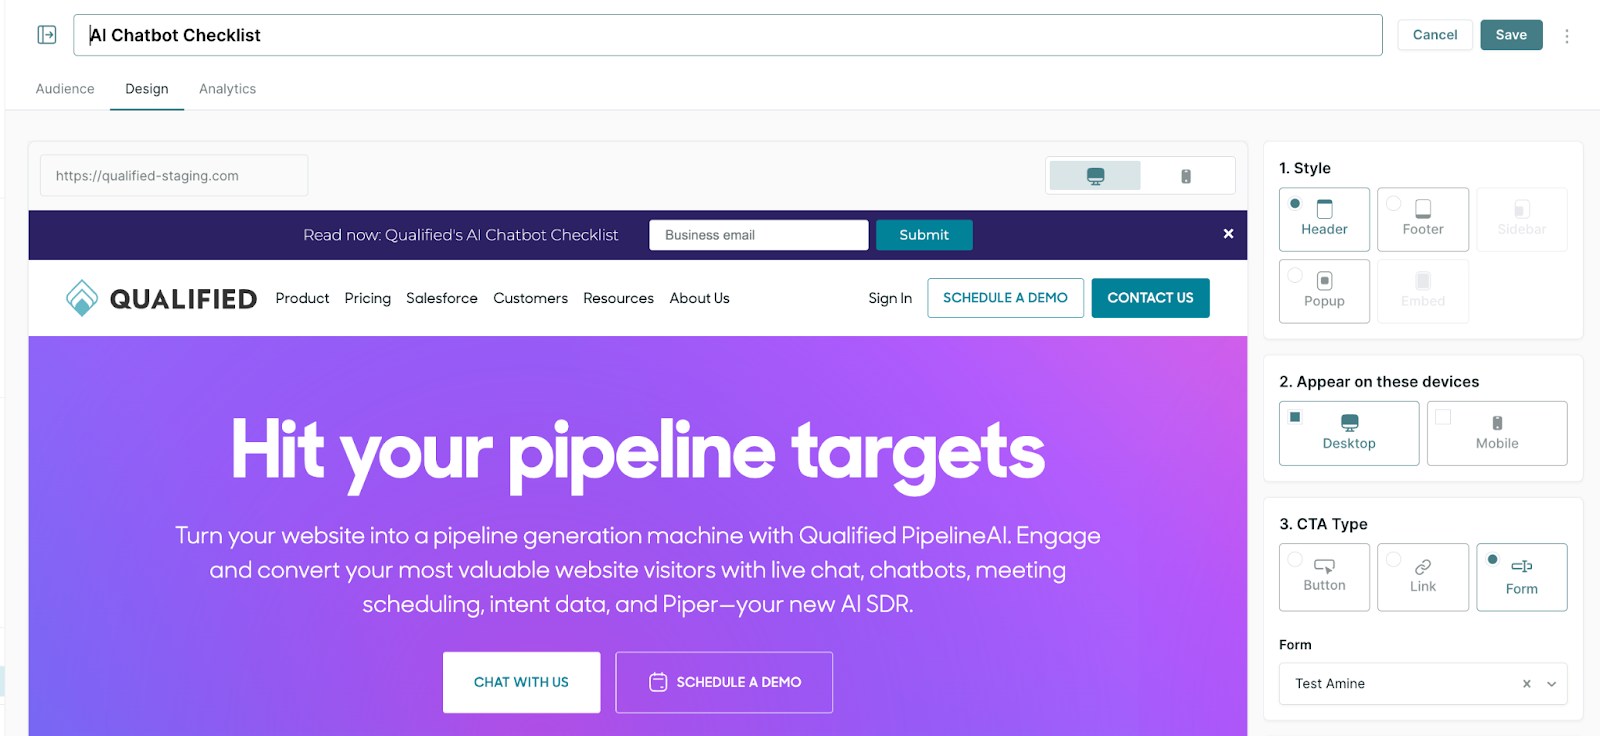
3. Choose the CTA Type:
- Button
- Link
- Form
4. Add Contents, including:
- Base font - we will automatically pull in the fonts on your website to use for the offer.
- Base text color - choose the color of the main text of the offer
- Headline
- Body (Sidepop and Popup styles only)
- Button/Link Text
- Button/Link URL (Button and Link CTA types only)
- Open link in new tab
Headline, Body, and Button/Link Text can be personalized using known information about your visitors. Please note that personalization must include fallback text.
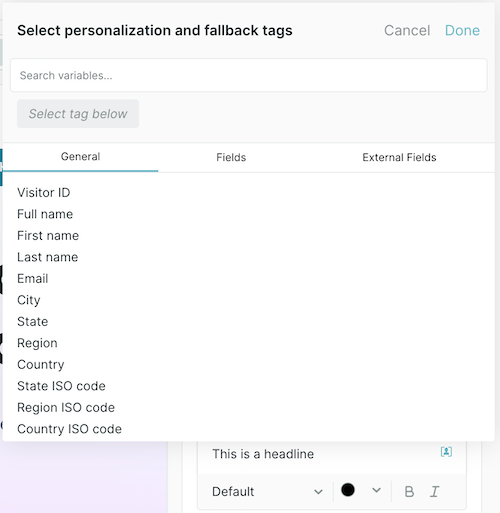
Highlight the text entered in the Headline, Body, and Button/Link Text to further customize the text font, color, style, and weight.
For offers, please note the following character count limits:
- Header (Header/Footer Style): 80 Characters
- Header (Popup/Sidepop Style): 140 Characters
- Body (Popup/Sidepop Style): 540 Characters
5. Customize the Design:
- Background Color - choose the background color of the offer
- Button - copy the design of an existing button from the website preview, or design your own using colors for the background, border, and adjust the button corners using the slider.
- Image - upload an image to support your offer. This image can be placed to the left or right of your offer text, or at the top of a popup or sidepop offer. Crop your image and use the preview to finalize your design!
When adding an image to a Popup and Sidepop Offer, we recommend sizing your image to 1000px x 1000 px. For Header and Footer offers, we recommend icons, logos, and PNGs/SVGs with clear backgrounds, with a height of 52px.
6. Customize the Interaction settings:
- Entrance: Choose from the available options. Click the reload icon on the right to preview the Entrance type.
- Dismissal options:
- “Dismissable” - give visitors the ability to dismiss the Offer, or uncheck to keep the offer persistent.
- “Remember visitor engagement / dismiss” - If the visitor engages with the offer, or dismisses it, we won’t show it to them again.
7. Click Save
To customize the privacy disclosure for Qualified Offers, utilize the Meeting & Forms theme setting.
<span id="cta-types"></span>
CTA Types
Qualified Offers include three CTA types: Button, Link, and Form
Button and Link
Button and Link CTA types function the same way, the difference is how the CTA is displayed within the Offer. When configuring a Button or Link CTA type, a destination URL is required.
PRO TIP! Does the button or link URL have a form? Include UTM parameters in the button/link URL to track attribution when they fill out the form.
Form
The Form CTA type allows you to collect information about the visitor within the Offer.
Before finalizing the Design of your Offer using the Form CTA Type, you’ll need to setup a Form Experience. Follow the steps below:
1. Go to Settings → Experiences → Forms and click + Create form experience.
2. Make sure the Smart Form Experience is set to “Qualified form”, then continue to configure your Experience. Some common steps include:
- Qualification fields, including things like Email, Company Name, and Job Title.
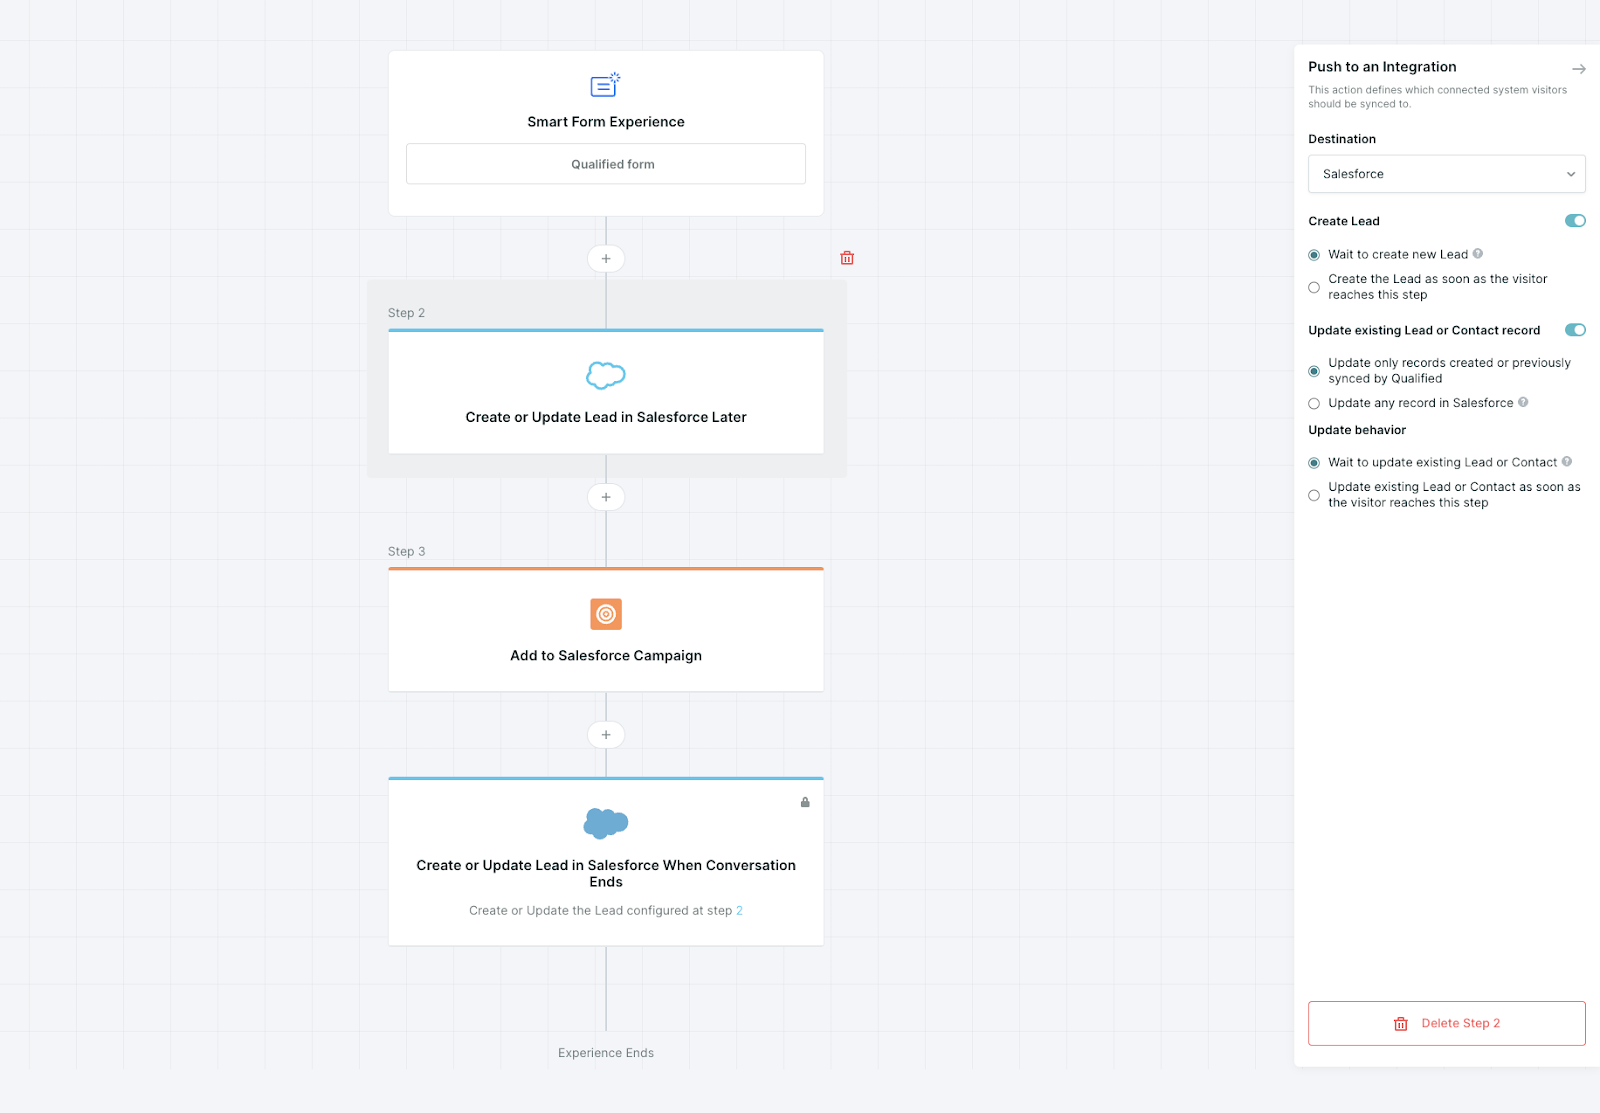
- Pushing data to Salesforce or a MAP.
- Adding a visitor to a Salesforce campaign or Marketo Program
- Slack/Teams/Email alerts
- Navigating the visitor to a new page.
Note: Qualified will first ask for the visitor's email, then follow up with any questions that can't be answered via enrichment.
3. Once complete, save the form experience.
4. Use the “Active” toggle to enable the experience.
5. Navigate to Website → Offers, and create a new offer or edit an existing offer.
6. Under the Design tab, select "Form" as your CTA type.
7. Then, select the form experience from the dropdown.
Note: Only enabled forms will be displayed within this dropdown.
<span id="analytics"></span>
Offer Analytics
Offer Analytics are available within the Offer configuration, under the Analytics tab.
By default, we’ll track:
- Impressions
- Clickthroughs
- Dismisses
We’ll also track Qualified-related Conversions for clickthroughs:
- All conversions - total number of conversions
- Bot conversations - visitor clicked through the Offer and had a bot conversation during the same session.
- Rep conversations - visitor clicked through the Offer and had a rep conversation during the same session.
- Meetings booked - visitor clicked through the Offer and booked a meeting via Qualified during the same session.
- Form fills - visitor clicked through the Offer and filled out a form that’s configured and active in a Form experience.
Heading 1
Heading 2
Heading 3
Heading 4
Heading 5
Heading 6
Lorem ipsum dolor sit amet, consectetur adipiscing elit, sed do eiusmod tempor incididunt ut labore et dolore magna aliqua. Ut enim ad minim veniam, quis nostrud exercitation ullamco laboris nisi ut aliquip ex ea commodo consequat. Duis aute irure dolor in reprehenderit in voluptate velit esse cillum dolore eu fugiat nulla pariatur.
Lorem ipsum dolor sit amet, consectetur adipiscing elit, sed do eiusmod tempor incididunt ut labore et dolore magna aliqua. Ut enim ad minim veniam, quis nostrud exercitation ullamco laboris nisi ut aliquip ex ea commodo consequat. Duis aute irure dolor in reprehenderit in voluptate velit esse cillum dolore eu fugiat nulla pariatur.
Lorem ipsum dolor sit amet, consectetur adipiscing elit, sed do eiusmod tempor incididunt ut labore et dolore magna aliqua. Ut enim ad minim veniam, quis nostrud exercitation ullamco laboris nisi ut aliquip ex ea commodo consequat. Duis aute irure dolor in reprehenderit in voluptate velit esse cillum dolore eu fugiat nulla pariatur.

Block quote
Ordered list
- Item 1
- asdfasdf
- asdfasdf
- asdfasdf
- Item 2
- Item 3
Unordered list
- Item A
- Item B
- Item C
Bold text
Emphasis
Superscript
Subscript
|
|---|
|


.svg)


