
<span id="top"></span>
Creating AI Email Campaigns
Setting up an Email Campaign enables Piper to engage leads, follow up automatically, and book meetings. This guide walks you through every step of creating and customizing your campaign, from configuring triggers and selecting a sender to personalizing messages and optimizing follow-ups.
- Create an Email Campaign
- Configure Campaign Enrollment
- Select the Email Sender
- Choose the Unsubscribe Footer
- Configure the Book a Meeting Goal
- Set the Campaign Duration
- Customize the Exit Criteria and Engagement Window
- Save Your Campaign
- Add Campaign Instructions
- Preview Emails with the Email Simulator
<span id="create-email-campaign"></span>
Step 1: Create an Email Campaign
Before creating a new email campaign, make sure to complete the steps outlined in the following help articles: Email Sender Setup and Email Unsubscribe Management. Otherwise, you will not be able to Save the email campaign.
- As an Admin, go to Settings → AI → Email Campaigns.
- Click + Create a Campaign.
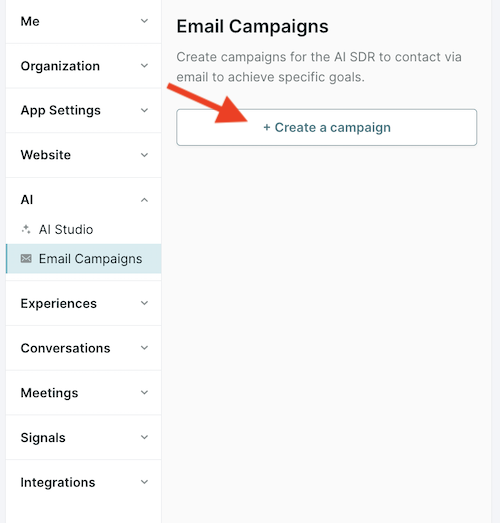
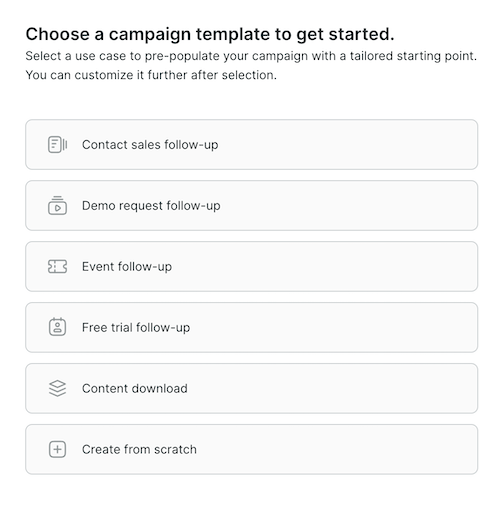
- Select a campaign type from the available options.
- Add a unique Name for your campaign at the top, but do not save yet.
You must complete Steps 2 - 8 outlined below before you can successfully Save your campaign.
<span id="campaign-enrollment"></span>
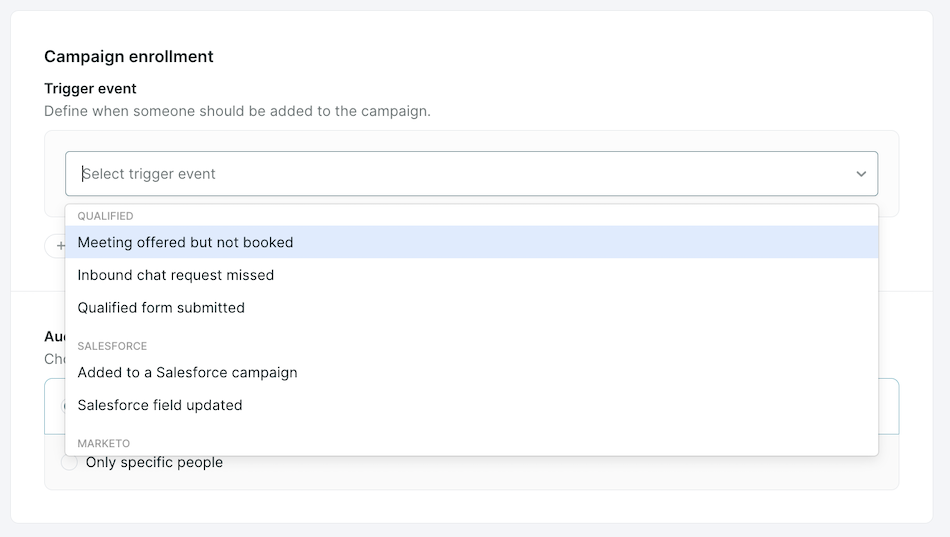
Step 2: Configure Campaign Enrollment
- Trigger Event: Define the event(s) that will enroll leads into the email campaign. At this time, Piper supports the following triggers:
- Meeting Offered Not Booked: Triggered when a meeting is offered but not booked via Qualified after the visitor’s session ends.
- This trigger can be further refined based on meeting type, meeting source, or the rep who offered the meeting.
- Meeting Canceled: Triggers if a prospect uses the "reschedule or cancel" link sent out with Qualified meeting invites.
- Meeting No-Show: Triggers if a meeting type is set to report no-shows and the prospect does not attend the meeting.
- Inbound Chat Request Missed: Triggers if an inbound chat is missed, no rep enters the conversation, and no meeting is booked after the session has ended.
- Qualified Form Submitted: Triggers when a Qualified form is submitted.
- Added to Salesforce Campaign: Records added to a specific campaign with a specific campaign member status can trigger email outreach.
- Qualified will check Salesforce every 15 min for new SFDC campaign members who match the mapped status.
- Salesforce Field Update: Triggers if the mapped field is updated on the Lead or Contact to match the criteria indicated here.
- Qualified will check Salesforce every 15 min for field updates that modify the SystemModStamp field on the Lead or Contact record.
- MAP Form Submitted: Triggers when a Marketo, Hubspot, or Pardot form is submitted.
- Meeting Offered Not Booked: Triggered when a meeting is offered but not booked via Qualified after the visitor’s session ends.
By default, Qualified syncs with Salesforce every 15 minutes to check for field and Campaign updates. To customize this cadence, click here.
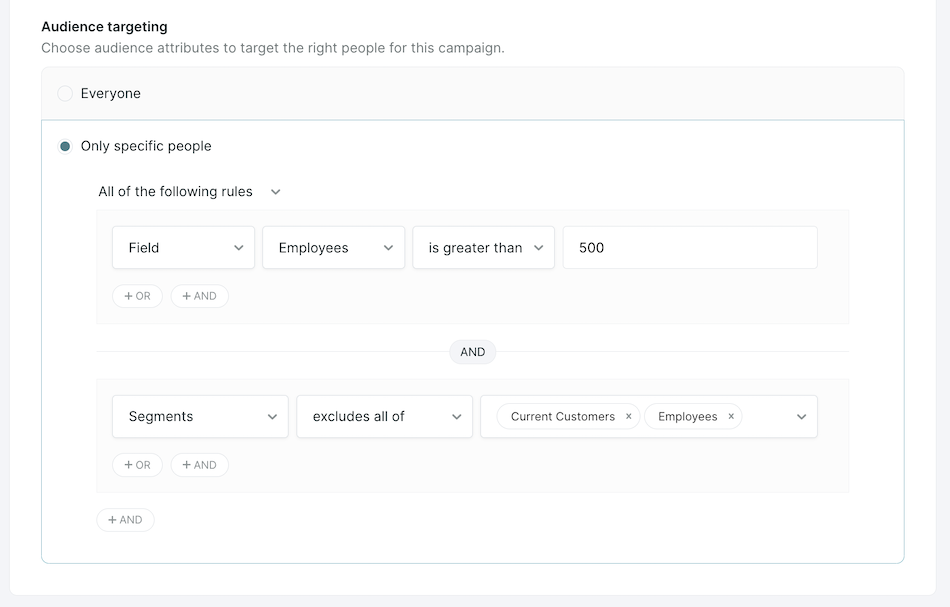
- Audience targeting: Choose whether to target “Everyone” who triggers the campaign enrollment event, or “Only specific people” to target a specific audience by setting criteria such as:
- Exclude employees or current customers.
- Filter by fields indicating qualification, e.g., CRM type, number of employees, or lead status.
- Segment visitors who qualify but are not engaged in existing Outreach/Salesloft sequences.
<span id="select-email-sender"></span>
Step 3: Select the Email Sender
Send from your AI SDR Agent
If your AI SDR Agent has a connected email account, select this option to have all emails come from your AI SDR Agent. Note that the AI SDR Agent will not handle replies to this inbox at this time.
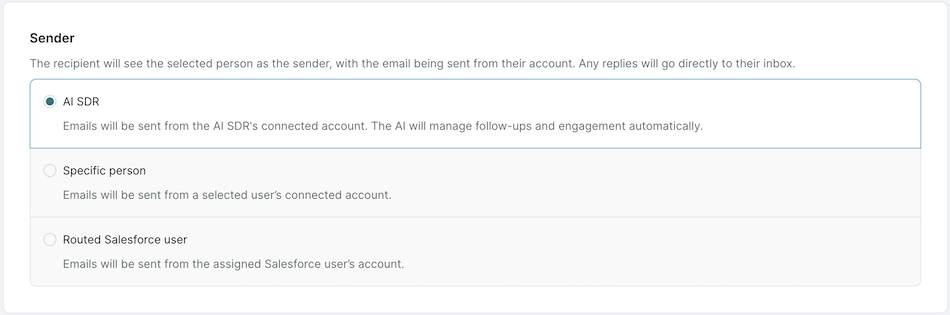
For more information about connecting your AI SDR Agent's email address, see here.
Send from an Specific user
Select the email Sender from the dropdown list. Emails will appear as coming from this user, and any replies will go to their inbox to manage.
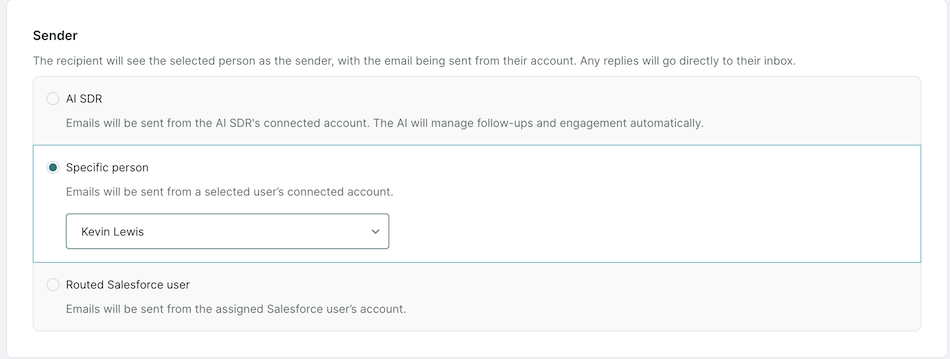
The sender must have their Google or Microsoft account connected to be selectable in the dropdown list. If you are not able to select the desired Sender, make sure they complete the steps here: Email Sender User Setup
Send based on a Routed Salesforce User
Select the relevant fields on the Lead and/or Contact objects in Salesforce to identify users to send emails. Qualified will wait up to 3 hours for record creation and assignment in order to send an email.

As above, the identified user must have a Google or Microsoft account connected for Qualified to send emails on their behalf. If Salesforce routing yields a user that does not have an email address connected to Qualified, no email will be sent.
<span id="unsubscribe-footer"></span>
Step 4: Choose the Unsubscribe Footer
If you have one AI Profile, select the Unsubscribe Footer from the dropdown to use for this email campaign.
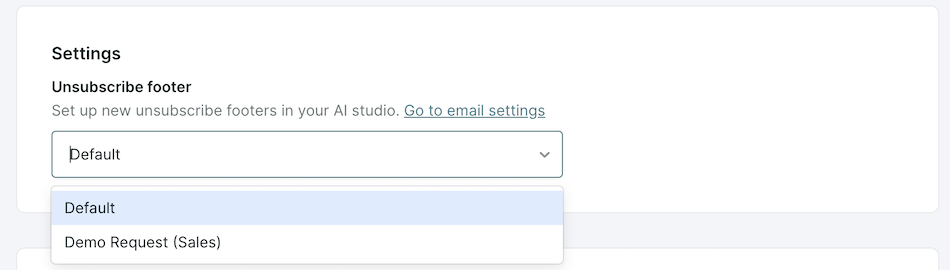
If you have multiple AI Profiles, you’ll need to:
- Select the AI Profile that will be used for this campaign
- This will determine which Unsubscribe footers are available to select below and which promoted content will be used in the emails.
- Next, select the Unsubscribe Footer from the dropdown to use for this email campaign.

If you have not configured your unsubscribe footer yet, check out our help article on Email Unsubscribe Management.
If you want to add UTM parameters to links that Piper sends via email (including meeting links, promotions, and more), use the URL Parameters text box to add these parameters.

Parameters will not be shown in the simulator or emails tab to prevent false attribution. Parameters will appear appended to the unsubscribe link, but will not be attributed as a click-through or count towards session reporting.
<span id="configure-goal"></span>
Step 5: Configure the Book a Meeting Goal
Under Goal, select the Meeting type that should be used for the Book a Meeting Goal.
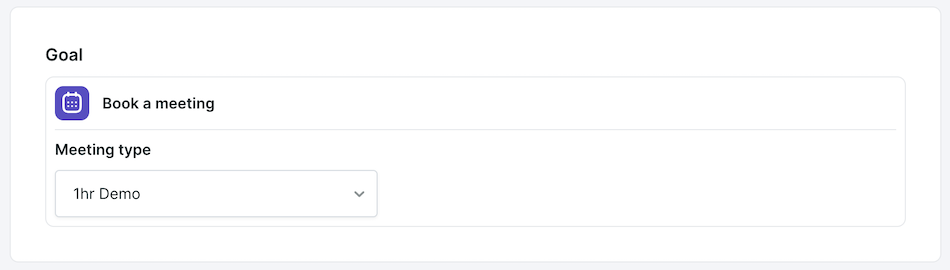
At this time, AI Email only supports the Goal of booking a meeting via Qualified.
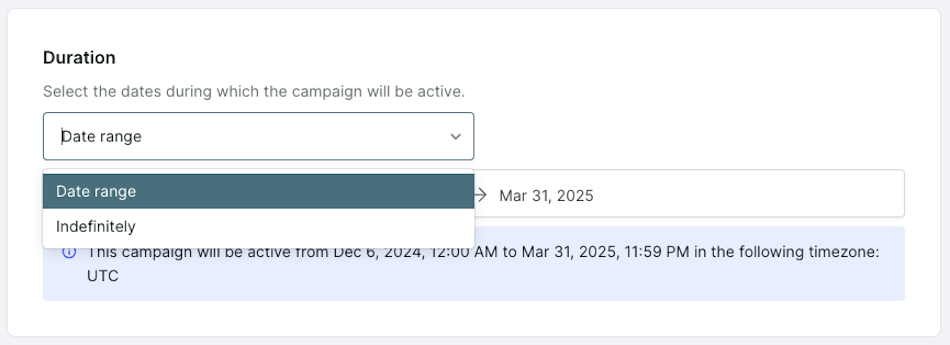
<span id="campaign-duration"></span>
Step 6: Set the Campaign Duration
Choose the Duration of how long the campaign should be active to be a specific date range, or indefinitely
<span id="exit-criteria-engagement-window"></span>
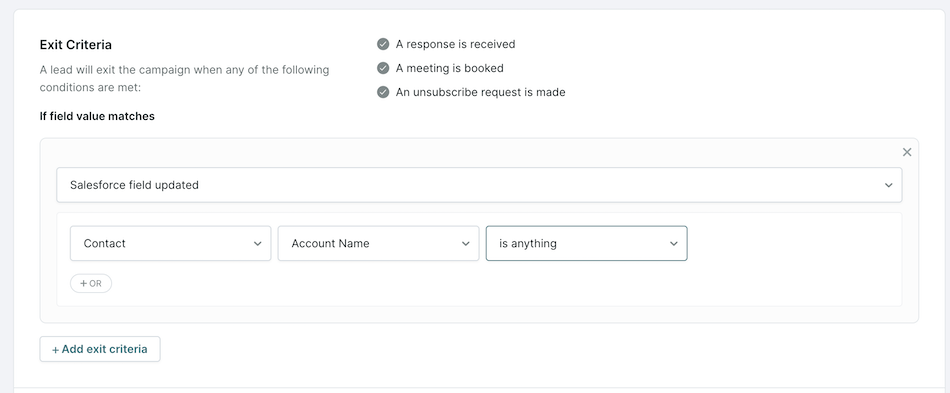
Step 7: Exit Criteria and Engagement Window
Exit Criteria
A recipient will always be removed from the email campaign if any of the following actions occur:
- A Response is Received: If the recipient replies to the email, they are immediately removed from the campaign.
- If the reply is an out-of-office (OOO) message, the recipient remains in the campaign.
- A Meeting is Booked: If a meeting is successfully scheduled via Qualified—whether through email, a button, a form, chat, or a direct/routed meeting link—the recipient is removed from the campaign.
- An Unsubscribe Request is Made: If the recipient clicks the unsubscribe link, they will no longer receive emails from the campaign.
Admins can also build custom exit criteria based on changes to the Salesforce Lead and Contact record. To do so:
- Within your email campaign setup, scroll to the Exit Criteria section.
- Press the + Add Exit Criteria button.
- Select the field change(s) on the Lead and/or Contact record that should trigger campaign exit.
- Repeat steps 2-3 as needed for additional custom criteria.
PRO TIP: Want to track campaign exits outside of Qualified? Configure workflows in Qualified to log exits in Salesforce or Marketo. Learn more about automating Workflows for AI Email Campaigns here.
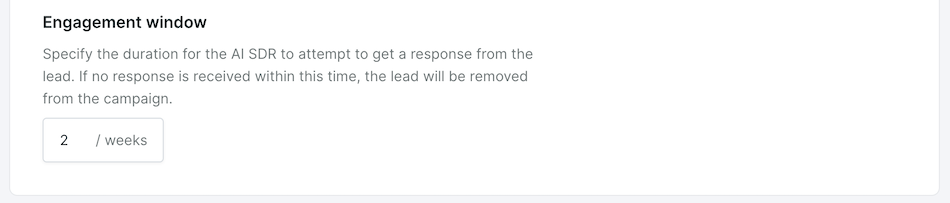
Engagement Window
The Engagement Window defines the maximum amount of time a recipient remains in a Piper Email campaign if they do not respond, book a meeting, or unsubscribe.
- By default, the engagement window is set to 2 weeks.
- If no action is taken within this period, the recipient will automatically exit the campaign.
This timeframe ensures that campaigns remain relevant and do not persist indefinitely without engagement.
<span id="save-campaign"></span>
Step 8: Save Your Campaign
- If you haven’t done so already, add a Name for your email campaign at top.
- Then, click Save.

The Email Campaign will remain OFF when you save it.
<span id="additional-campaign-instructions"></span>
Step 9: Add Campaign Instructions
Once you’ve configured your campaign settings, you can add Campaign Instructions in the Email Simulator. These instructions help refine how Piper generates email content, ensuring emails align with the campaign’s purpose and audience.
This step allows you to:
- Define the Purpose and Background of the campaign.
- Set Persistence to control email frequency.
- Specify Personalization Fields to enhance engagement.
- Provide Email Samples to shape messaging structure.
How to Add Additional Campaign Instructions
- Click the Simulator tab at the top of your email campaign.
- On the right hand side, you’ll see the Campaign Instructions menu.
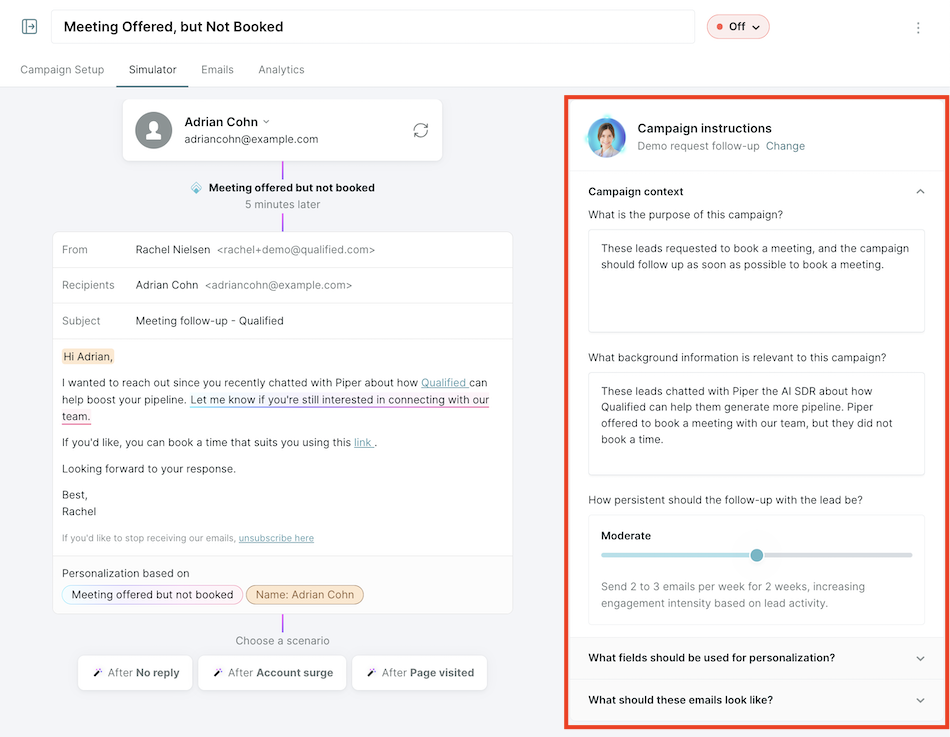
- Under “Campaign context,” define the Purpose of the Campaign
- Review the default text, which is pre-filled based on the campaign type selected.
- Edit or expand on the purpose to clarify:
- The primary goal of the campaign.
- The type of recipients being targeted.
- Key messaging Piper should include.
- Click Save to apply changes.
- Below that, add Background Information
- Enter any additional context that Piper should consider when generating email content, such as:
- The reason for the campaign.
- Specific challenges, offers, or product details.
- Insights on the target audience’s needs.
- Click Save to apply changes.
- Enter any additional context that Piper should consider when generating email content, such as:
- Scroll down to Persistence
- Choose a setting:
- Low: 1 email per week
- Moderate: 2-3 emails per week
- High: 1 email per day
- Click Save to confirm your selection.
- Choose a setting:
Email send limits are enforced per organization. If you need to send more than 1,000 emails per day, contact your Qualified Success Architect.
- Configure Personalization Fields
- Locate the Personalization Fields section below Email Persistence.
- Select the lead fields Piper should use, such as:
- First Name (e.g., “Hi [First Name]”)
- Company Name (e.g., “I see you’re with [Company]”)
- If a field has a value, Piper will include it. If it's blank, the personalization will be skipped.
- Click Save to apply changes.
- Provide Email Samples to guide Piper’s messaging style for each stage of the campaign.
- Find the Email Samples section below Personalization Fields.
- Add text for the following email types:
- First Touch: The initial email sent to campaign members.
- Nudge: Follow-up emails sent if no response is received.
- Break Up: The final email sent before a recipient is removed from the campaign.
- Click Save to confirm your samples.
While email samples can help shape Piper’s messaging, the Purpose and Background Information fields have the most influence on AI-generated content.
<span id="email-simulator"></span>
Step 10: Preview Emails with the Email Simulator
Before launching your campaign, use the Email Simulator to preview how Piper will generate email content based on your campaign settings. The simulator allows you to:
- Test email personalization with real lead data.
- See how different campaign instructions impact email copy.
- View sample follow-up emails based on recipient engagement.
This step ensures your emails align with your campaign goals before they are sent to leads.
How to Preview Emails in the Email Simulator
- Under the Simulator tap, you’ll see the email preview section in the center
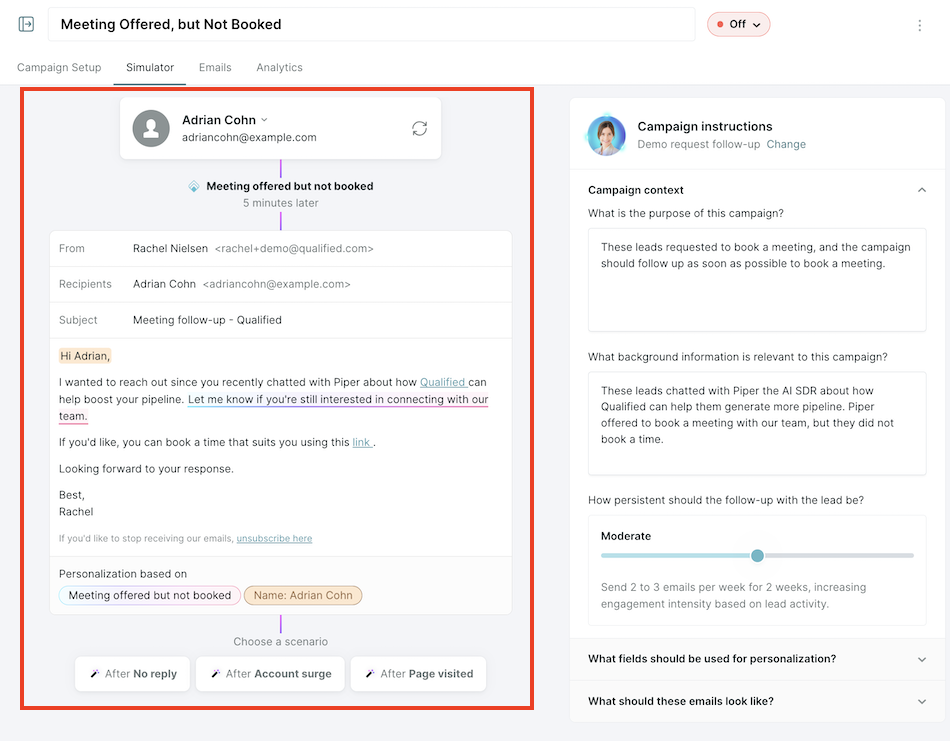
- Select a Lead to Preview Emails
- Use the lead dropdown menu to simulate the initial email sent.
- Only leads that meet the trigger criteria will be available for selection.
- Any personalization fields (e.g., First Name, Company Name) will be highlighted within the email preview.
Understanding What Impacts Email Content and Timing
While the simulator provides several options to preview follow-up emails, it’s important to know what actually affects email copy and send timing.
Factors That Influence Email Copy
The following elements will directly impact the email content Piper generates:
- Campaign Trigger – The event that enrolls the lead in the campaign.
- Campaign Content – Most heavily weighted. Provide detailed campaign instructions to shape the messaging.
- Promoted Content – Pre-selected links that Piper can reference in the email.
- Personalization Fields – Dynamic elements like First Name and Company Name.
- Sample Email Templates – While these offer structure, Piper relies more on campaign instructions to generate email copy.
Factors That Influence Follow-Up Send Timing
- Web Visit – If a lead visits the website, the next follow-up email will be sent.
Factors That Do Not Impact Email Copy or Send Timing
- Account Surge – While visible in the simulator, this does not currently affect email content or follow-up scheduling.
Back to Top | Continue to Workflows for AI Email Campaigns →
Heading 1
Heading 2
Heading 3
Heading 4
Heading 5
Heading 6
Lorem ipsum dolor sit amet, consectetur adipiscing elit, sed do eiusmod tempor incididunt ut labore et dolore magna aliqua. Ut enim ad minim veniam, quis nostrud exercitation ullamco laboris nisi ut aliquip ex ea commodo consequat. Duis aute irure dolor in reprehenderit in voluptate velit esse cillum dolore eu fugiat nulla pariatur.
Lorem ipsum dolor sit amet, consectetur adipiscing elit, sed do eiusmod tempor incididunt ut labore et dolore magna aliqua. Ut enim ad minim veniam, quis nostrud exercitation ullamco laboris nisi ut aliquip ex ea commodo consequat. Duis aute irure dolor in reprehenderit in voluptate velit esse cillum dolore eu fugiat nulla pariatur.
Lorem ipsum dolor sit amet, consectetur adipiscing elit, sed do eiusmod tempor incididunt ut labore et dolore magna aliqua. Ut enim ad minim veniam, quis nostrud exercitation ullamco laboris nisi ut aliquip ex ea commodo consequat. Duis aute irure dolor in reprehenderit in voluptate velit esse cillum dolore eu fugiat nulla pariatur.

Block quote
Ordered list
- Item 1
- asdfasdf
- asdfasdf
- asdfasdf
- Item 2
- Item 3
Unordered list
- Item A
- Item B
- Item C
Bold text
Emphasis
Superscript
Subscript
|
|---|
|


.svg)


