
AppExchange Chat: Data Mapping
In this article, you'll learn how to map AppExchange Chat data into Salesforce. Once you’ve configured data mapping, AppExchange Chat conversations and chatbot interactions can create leads, contacts, and events in your Salesforce org.
Here’s what we’ll cover:
- Data Mapping Basics
- Map Data to Common and Required Fields
- Mapping Data to More Complicated Data Types
- Mapping Checkbox Data
- Mapping Hidden Field Data
- Salesforce Campaign Setup and Mapping
- Verify Lead Source Configuration
<span id="data-mapping-basics"></span>
Data Mapping Basics
When prospects participate in conversations or chatbot experiences, AppExchange Chat captures information that can be used to create leads, contacts, and other Salesforce records.
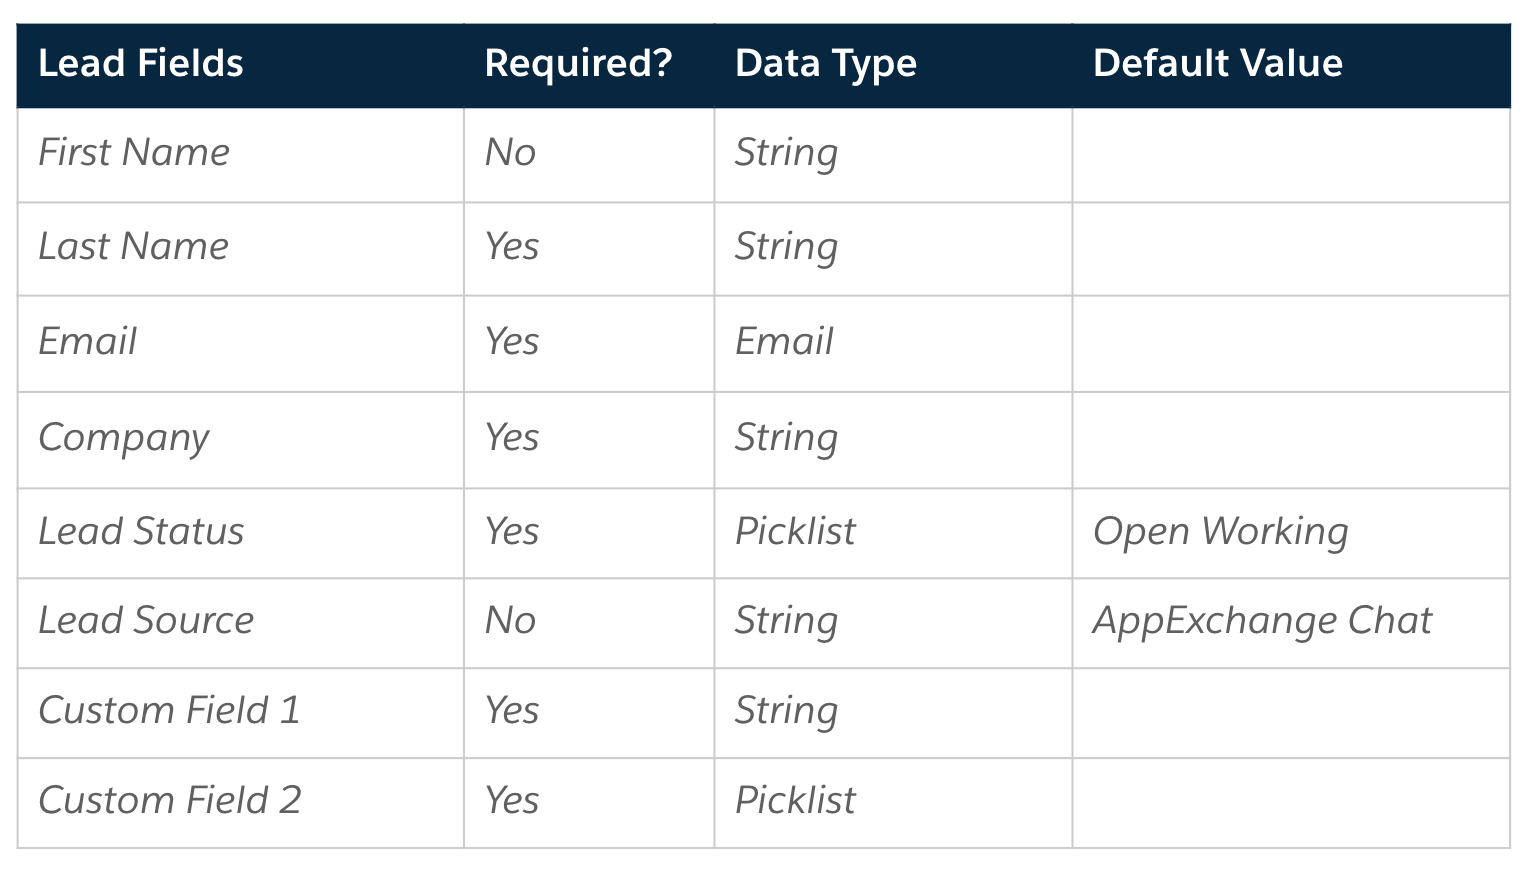
The process of transforming that information into records is called data mapping, and it starts by identifying standard and custom fields on key Salesforce objects. Use the following table to determine which lead fields you'd like to map to. Then repeat the process for contacts.
<span id="map-data-fields"></span>
Map Data to Common and Required Fields
After you identify the lead and contact fields you want to map, you can start data mapping. At a minimum, you should map data from common and required fields for leads and contacts.
- In your Qualified Admin account, go to Settings → Salesforce → Lead Mapping.
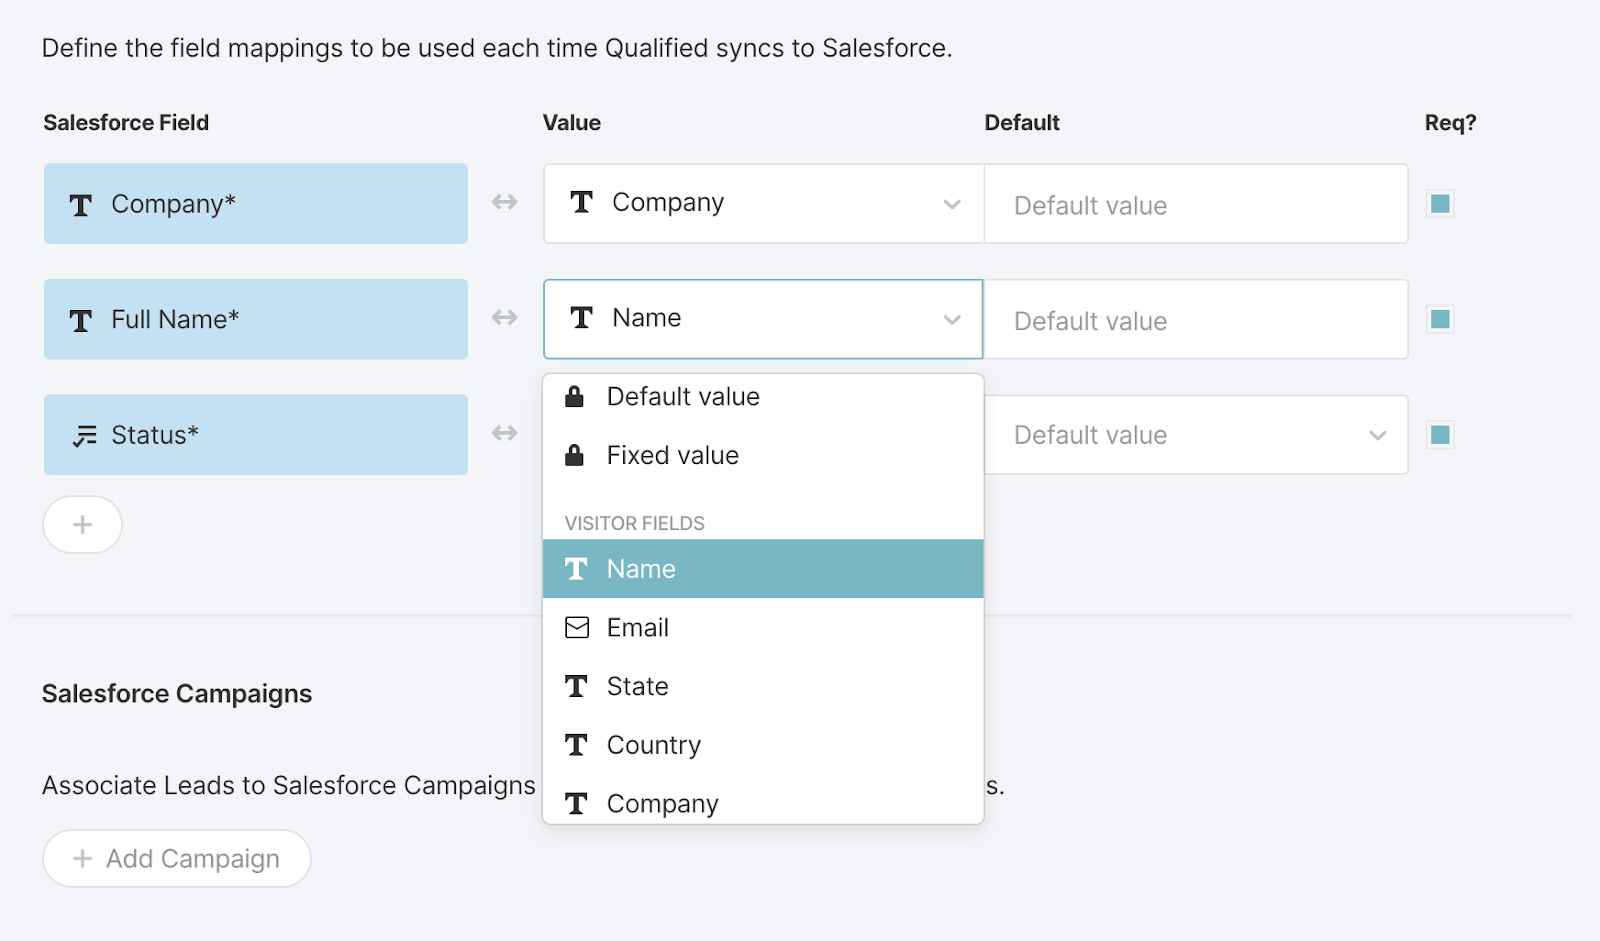
- Add the lead fields that you identified for mapping in the column on the left, and match them to existing Qualified fields or create new fields in the center column.
- Click “Save”.
- Then, go to Settings → Salesforce → Contact Mapping.
- Add the contact fields that you identified for mapping in the column on the left, and match them to existing Qualified fields.
- Click “Save”.
If you don't see the visitor field that you'd like to match up with your Salesforce field, you can create it on the fly by selecting "Create Field" in the drop-down menu. We’ll automatically create the visitor field for you and match it up with your Salesforce field for mapping purposes.
IMPORTANT! There are some Salesforce field data types that Qualified cannot map into at this time: Lookup Fields, Multi-Select Picklists, and Formula Fields.
<span id="map-data-complicated"></span>
Mapping Data to More Complicated Data Types
After you map common and required fields, you can consider mapping more complicated data types. Mapping standard fields such as name, company, and email is a great start. It's likely your business has at least a few additional fields specific to your business needs that you'll also want to map. First, let’s talk about data types.
What's a data type? Here, data type is the type, or “flavor”, of data that a Salesforce field accepts as valid. For example,Company is a text field, meaning it accepts a string of characters. Similarly, Email is an email field, which accepts only valid email addresses
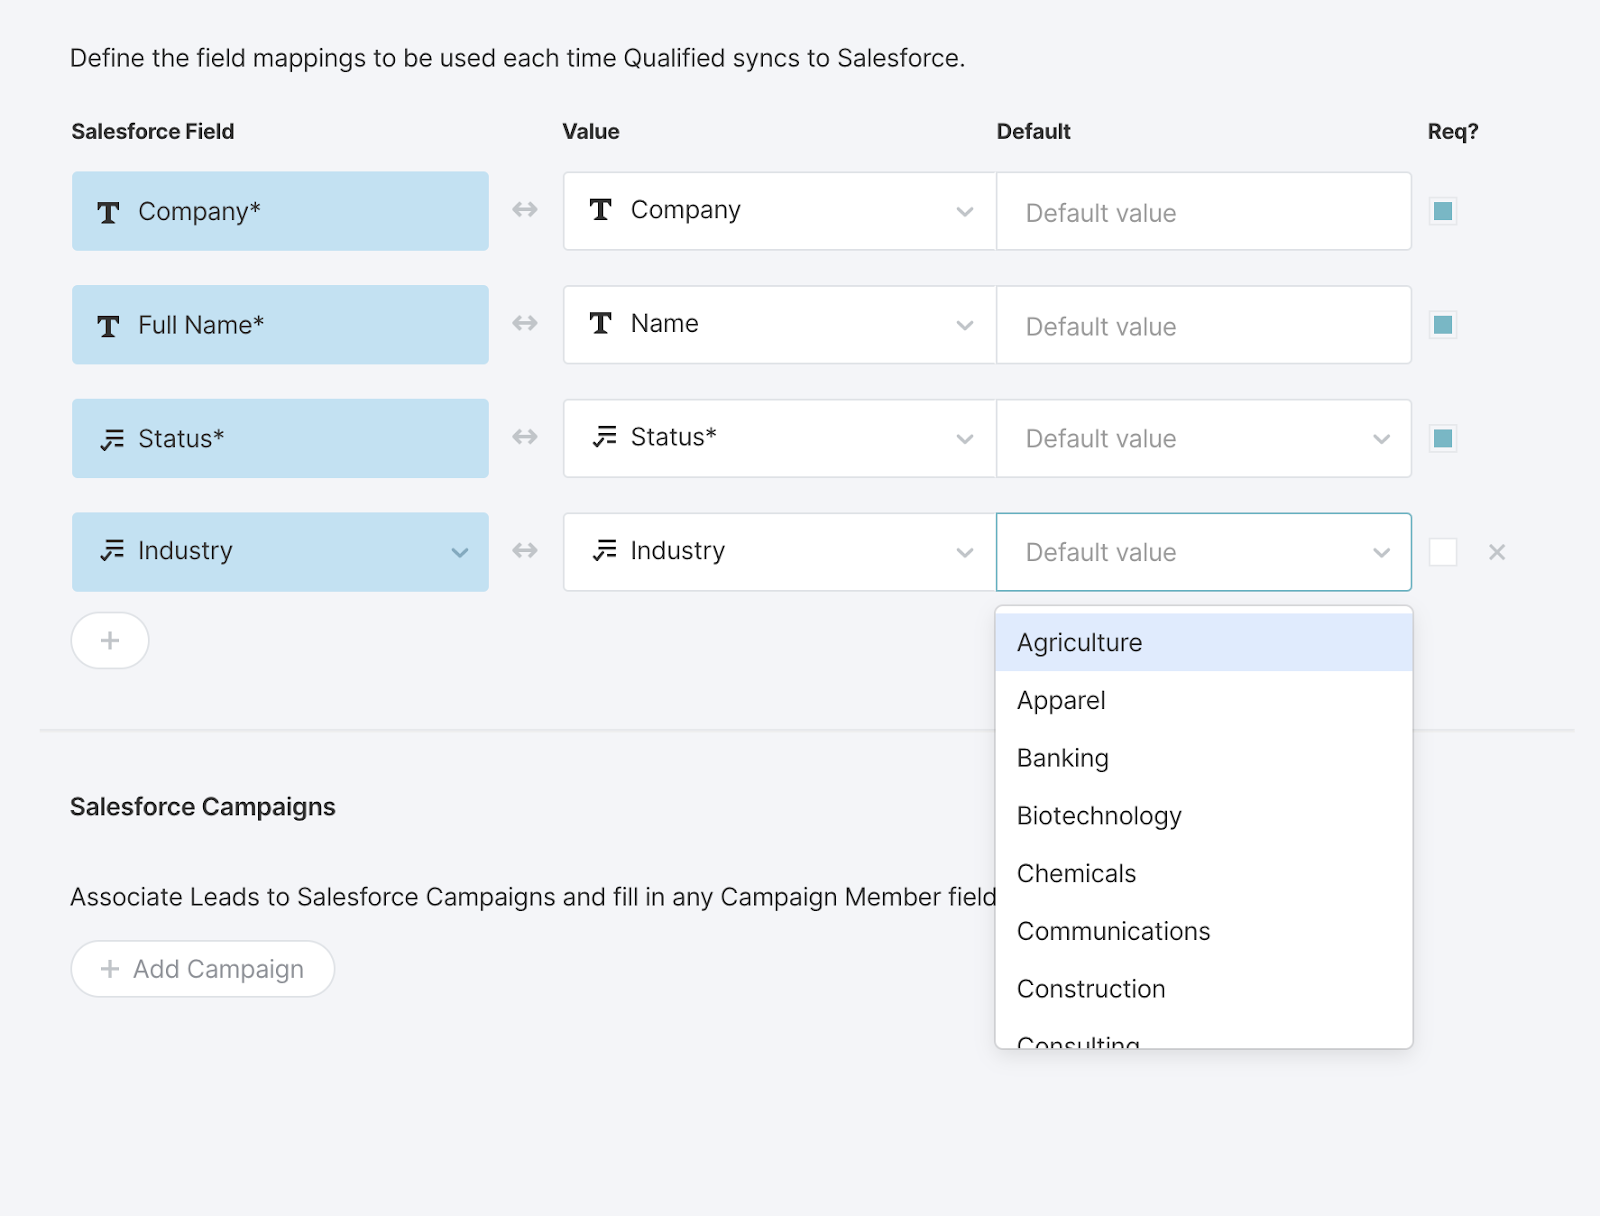
Next, let's look at an example of a common, more complex data type: picklists. In Salesforce, fields like Company Size or Industry commonly have default values set by a Salesforce admin. If you want to map AppExchange Chat data into these fields, it's a good idea to allow only the values set by your Salesforce admin. That way, when you select the field in Salesforce, the mapping automatically pulls in these values. Here’s an example.
<span id="map-checkbox"></span>
Map Checkbox Data
Checkboxes are another important and commonly used Salesforce field type. Mapping AppExchange Chat data to a checkbox can be a bit more complex than other fields, as it is always either true (checked) or false (unchecked) and frequently triggers workflows within Salesforce orgs.
Before you map a checkbox, note the two options available for data mapping: default value or fixed value. A default value allows you to map a value to a field only if the field is already empty. Because checkbox fields in Salesforce are never empty (that is, they are always true or false), we suggest avoiding this mapping option in most cases. In contrast, a fixed value allows you to override whatever is in the checkbox field with a predetermined value. In this example, the fixed value is true.
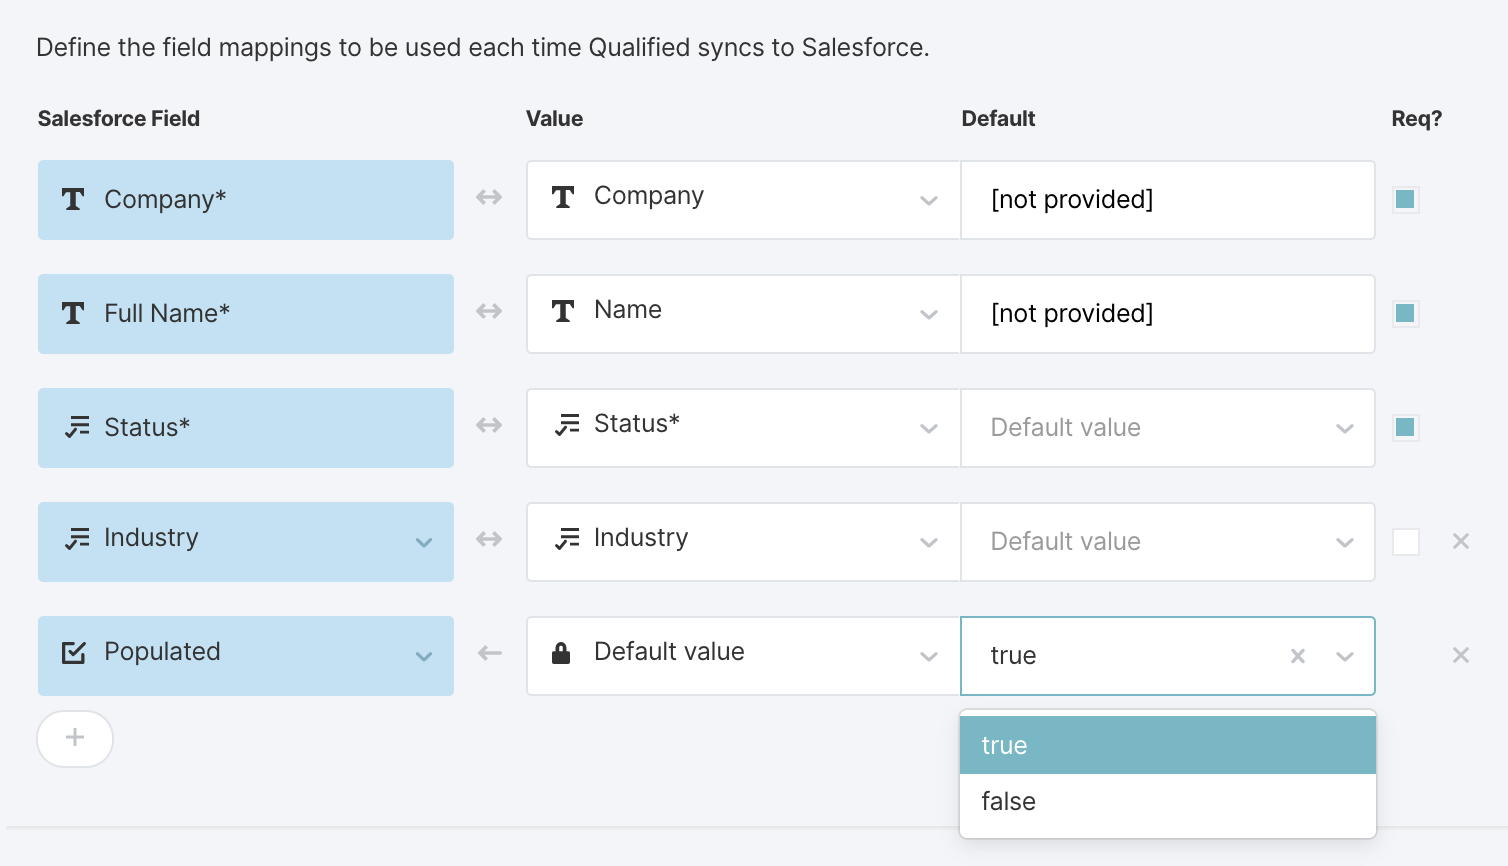
To mark a checkbox as true, you must select true as your fixed value. This will ensure each time a lead or contact is created or updated in Salesforce that box is marked as true.
<span id="map-hidden"></span>
Map Hidden Field Data
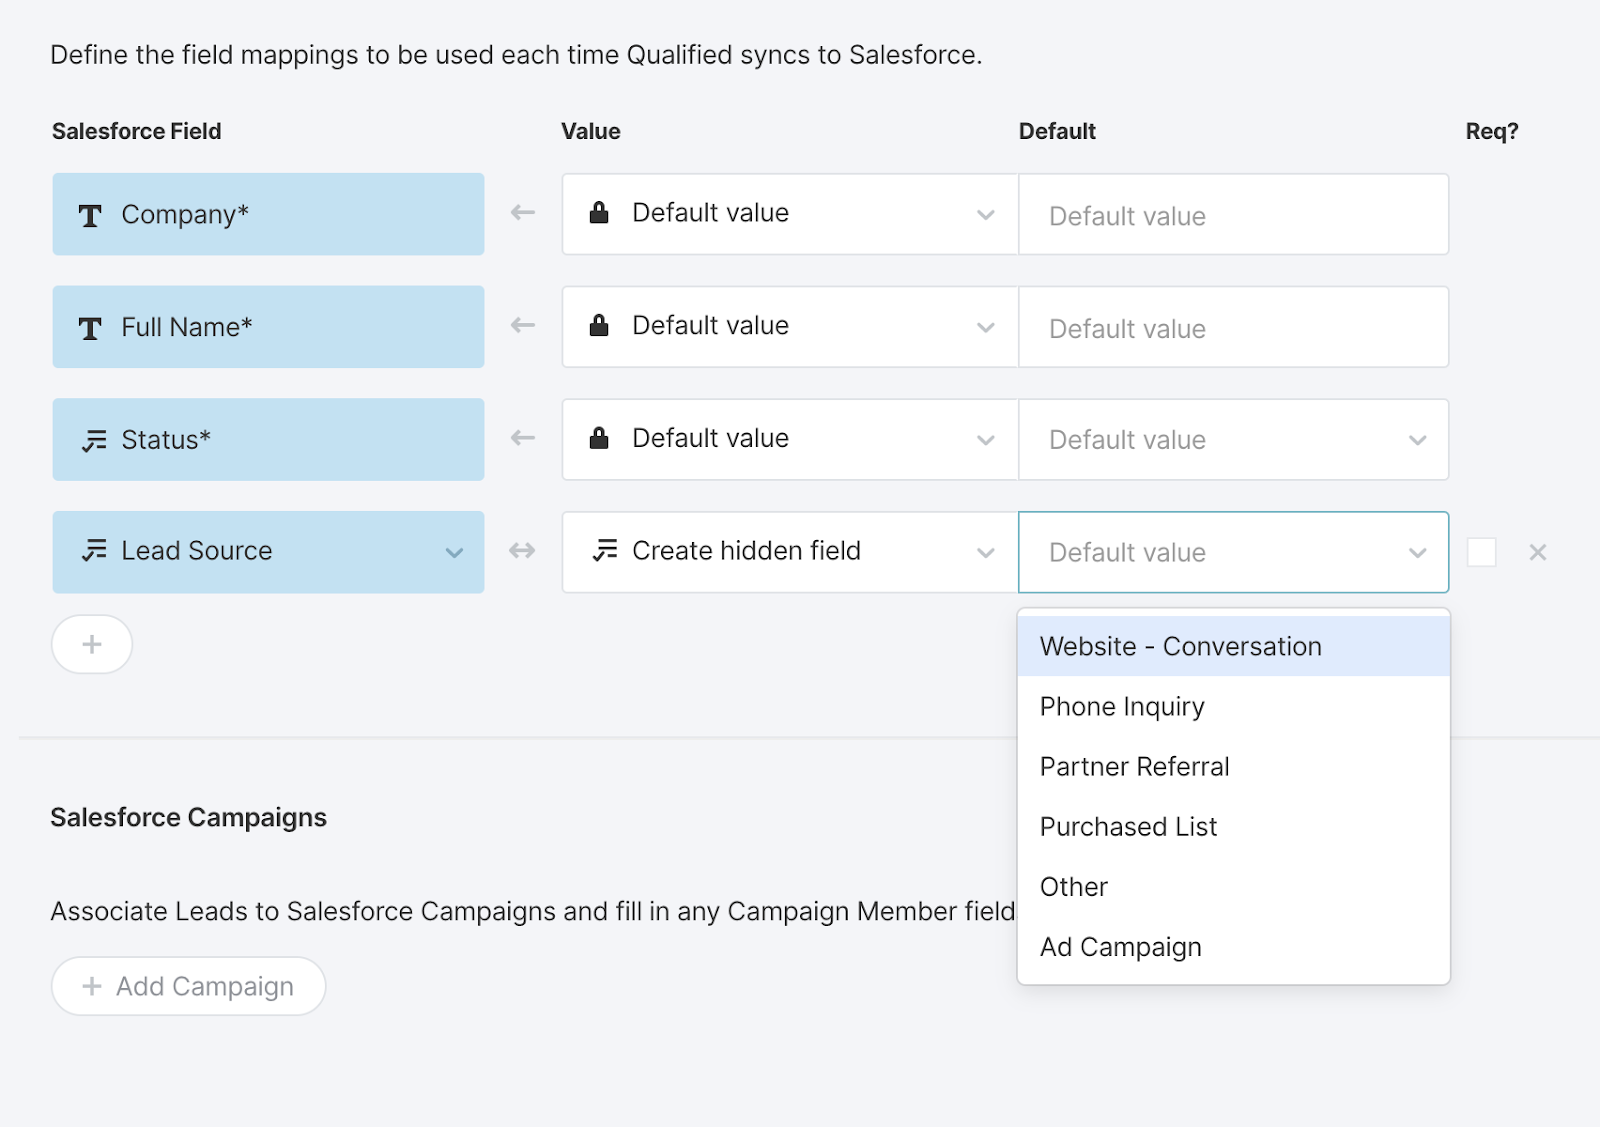
Another common practice is to hardcode some field values when leads are created in Salesforce. For example, this approach is favored when you want the system to set field values according to your defined rules, instead of sales reps setting the values manually.
For leads, this typically occurs with the Lead Source field. In AppExchange Chat, setting a hardcoded ("hidden") value for Lead Source lets you see that a lead originated from a live conversation or chatbot interaction. This information is often useful for reporting by marketing managers and sales managers.
<span id="sfdc-campaign"></span>
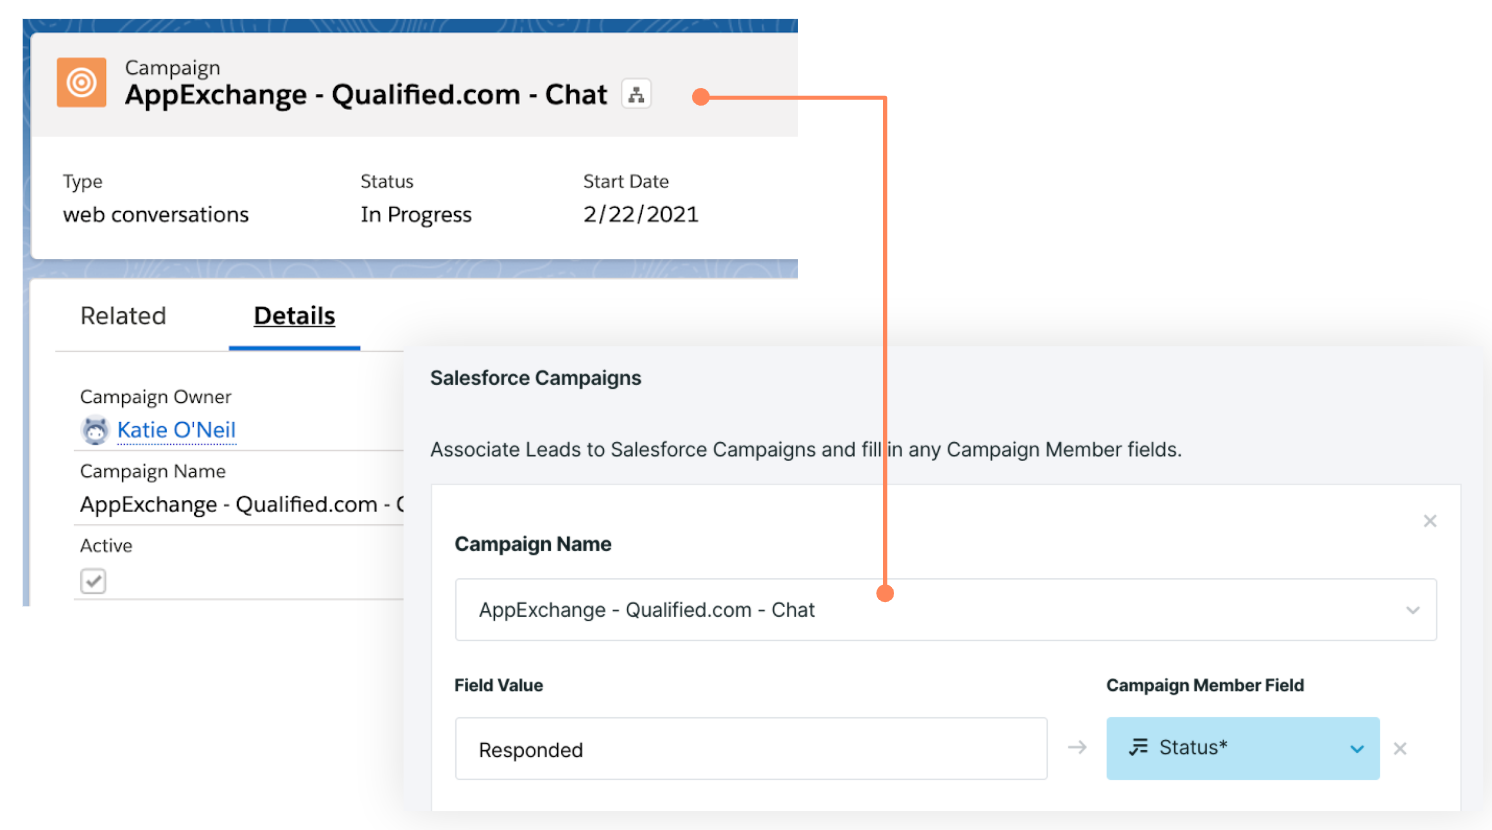
Create a Salesforce Campaign for AppExchange Chat
To help you track the leads and other data that originates from AppExchange Chat, we suggest creating a campaign in Salesforce. You can name the campaign anything you like, but we recommend including "AppExchange Chat" so it’s clear where the lead came from. Follow these steps to create a campaign in Salesforce.
- Log in to your Salesforce org.
- Click the App Launcher, and then click Marketing.
- Click Campaigns.
- Click New.
- Assign the following field values. You can leave the other field blank.some text
- Active: Checked
- Type: Web Conversations
- Status: In Progress
- Start Date: Today’s date, or leave blank.
- Click Save.

<span id="sfdc-campaign"></span>
Configure Campaign Attribution in the Qualified Dashboard
After you configure a campaign for AppExchange Chat in Salesforce, add the campaign to the Qualified dashboard.
- In your Qualified Admin account, go to Settings → Salesforce → Lead Mapping.
- Under Salesforce Campaigns, click “Add Campaign”.
- Select the campaign that you created for AppExchange Chat.
- Click “Save”.
Next, repeat the process for contacts.
- Go to Settings → Salesforce → Contact Mapping.
- Under Salesforce Campaigns, click “Add Campaign”.
- Select the campaign that you created for AppExchange Chat.
- Click “Save”.
Once this is set, we'll now know which Salesforce Campaigns to associate your leads or contacts to by default.
To associate AppExchange Chat prospects with a Pardot Source Campaign, use the Pardot Prospect mapping area.
<span id="verify-lead-source"></span>
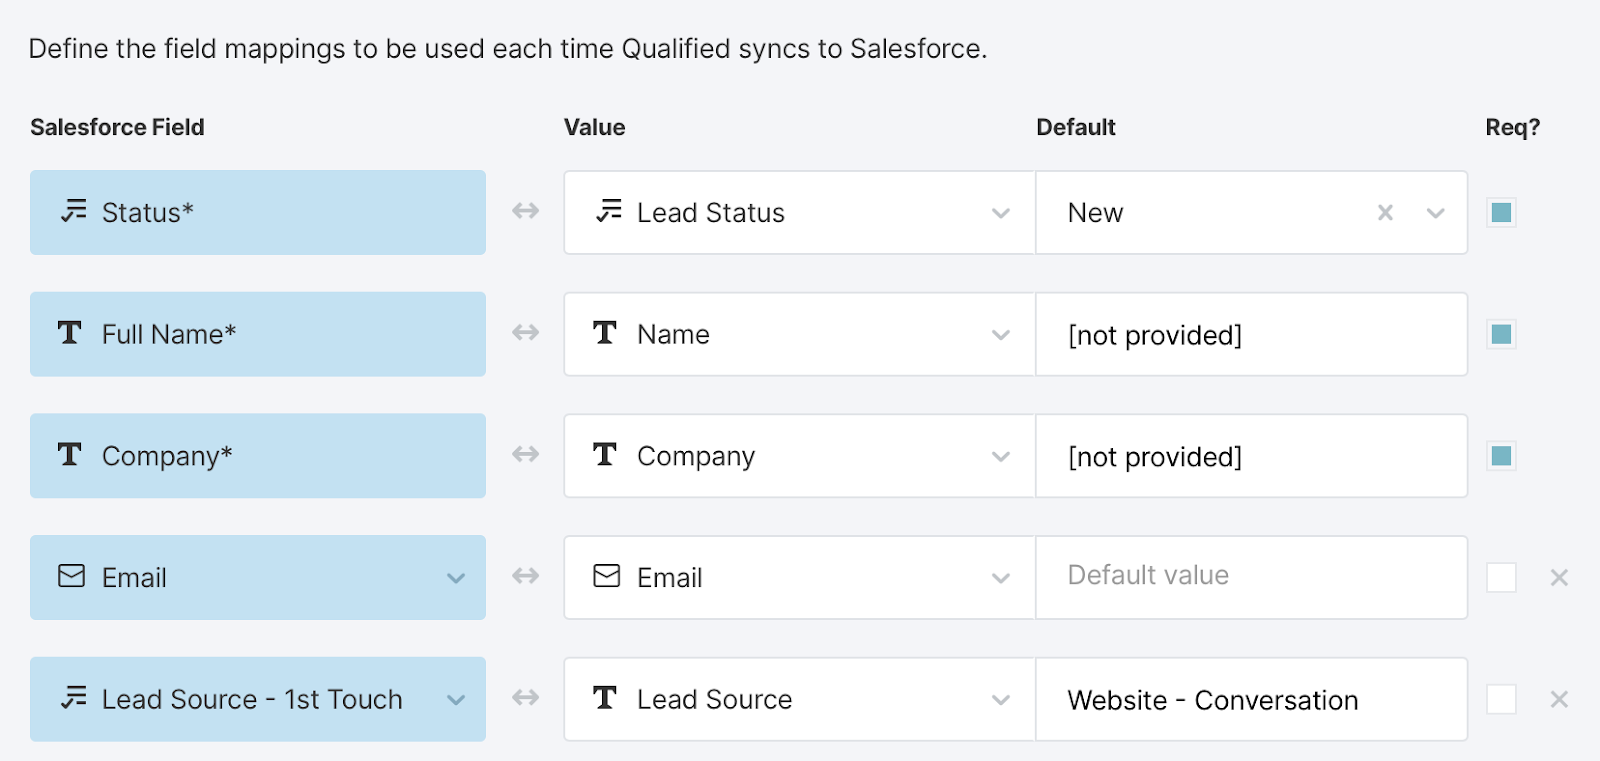
Verify Lead Source Configuration
Accurate lead source values help you understand where your leads are coming from. Before you finish setting up campaign attribution, verify that the Lead Source field in Salesforce is populated correctly when AppExchange Chat creates a lead.
- In your Qualified Admin account, go to Settings → Salesforce → Lead Mapping.
- Find the Lead Source field. If you don’t see the field, add it by clicking the plus icon and browsing to Lead Source.
- Verify that the default value is set to Website - Conversation. If not, set the value.
Heading 1
Heading 2
Heading 3
Heading 4
Heading 5
Heading 6
Lorem ipsum dolor sit amet, consectetur adipiscing elit, sed do eiusmod tempor incididunt ut labore et dolore magna aliqua. Ut enim ad minim veniam, quis nostrud exercitation ullamco laboris nisi ut aliquip ex ea commodo consequat. Duis aute irure dolor in reprehenderit in voluptate velit esse cillum dolore eu fugiat nulla pariatur.
Lorem ipsum dolor sit amet, consectetur adipiscing elit, sed do eiusmod tempor incididunt ut labore et dolore magna aliqua. Ut enim ad minim veniam, quis nostrud exercitation ullamco laboris nisi ut aliquip ex ea commodo consequat. Duis aute irure dolor in reprehenderit in voluptate velit esse cillum dolore eu fugiat nulla pariatur.
Lorem ipsum dolor sit amet, consectetur adipiscing elit, sed do eiusmod tempor incididunt ut labore et dolore magna aliqua. Ut enim ad minim veniam, quis nostrud exercitation ullamco laboris nisi ut aliquip ex ea commodo consequat. Duis aute irure dolor in reprehenderit in voluptate velit esse cillum dolore eu fugiat nulla pariatur.

Block quote
Ordered list
- Item 1
- asdfasdf
- asdfasdf
- asdfasdf
- Item 2
- Item 3
Unordered list
- Item A
- Item B
- Item C
Bold text
Emphasis
Superscript
Subscript
|
|---|
|


.svg)


